The first step is to import your own data into the DTI Track module. We developped a
specific file format to handle in an easy way DT-MRI sequences. This format is called a
``DTI Study'' (extension .dts), and stores in a human readable way all information
regarding your data: number of images, images, gradient sequence, parameters used for the
processing, saved tensor and fiber files, etc. You only need to import your data once,
and then you will be able to reuse it without going through the importation process
again.
![]() To import your DTI dataset, click on the ``new .dts'' icon and a wizard will
popup to guide you through the process.
To import your DTI dataset, click on the ``new .dts'' icon and a wizard will
popup to guide you through the process.


|
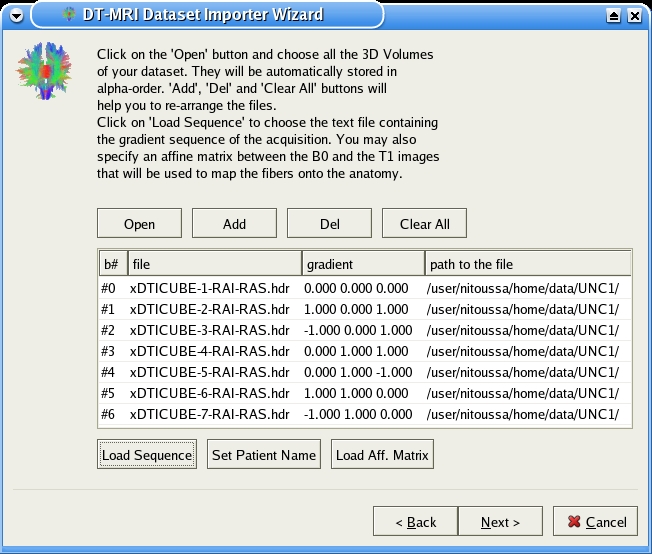
Click Next to proceed to the import screen (Fig. 3.2, right).
Click on the ``Open'' button to load the DTI sequence (Fig. 3.2, right). Select all
volume images that compose your dataset. The images will be sorted in alpha order
afterwards. Then click on the ``Load Sequence'' button to load the gradients used for the
acquisition. There has to be the same number of gradients as the number of volume images.
Note that the gradient sequence must match the list of images
after being sorted: the first image corresponds to the first gradient in the text list,
etc (see appendix for details on the gradient list file). Also note
that you have to put a B0 image at the top. The software can only support one B0 image for
the moment. Please do not import several B0 images. You can also give additional
information to your study. For instance you can set the name of the patient, or specify a
registration matrix between the DWI and any other image to map the reconstructed fibers
onto this new image (such as the T1 image). For more details on the registration matrix
see appendix.


|
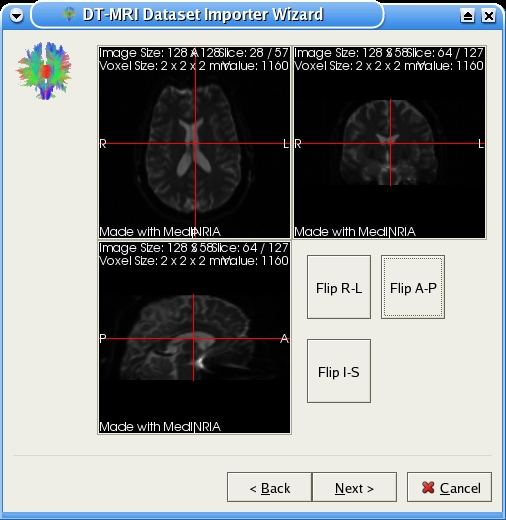
On the next screen you will be able to change orientation of your DWI regarding radiologic
conventions (see Fig. 3.3). Click on Flip R-L,
Flip A-P, or Flip I-S to flip the volume respectively around the Right-Left axis, the
Anterior-Posterior axis or the Inferior-Superior axis. Once the radiologic convention are
obtained, click next to validate your choice.
The last screen of this import wizard shows you a summary of the DTI-study. Please check
if the information is correct. ``Axes Flipped'' show the axes flipped in order to match
radiologic conventions, respectively the Righ-Left axis, the Anterior-Posterior axis, and
Inferiro-Superior axis (1 means that the axis has been flipped). You can now save the
DTI-study with the ``save'' button. This file has to be stored in the same folder where
the DWI are (it will be done automatically). You can now click finish. Your DTI-study has
been succesfully created.
![]() At any time you can save any change of parameters or DTI results (tensors, fibers and fiber
bundles) into the DTI-study file by clicking ``save .dts'' button. You will be able to
retrieve all your information directly by openning the DTI-study.
At any time you can save any change of parameters or DTI results (tensors, fibers and fiber
bundles) into the DTI-study file by clicking ``save .dts'' button. You will be able to
retrieve all your information directly by openning the DTI-study.
If you want to move the DTI-study file (extension .dts) to another folder, make sure you also move tensors
(sudyname_tensors.inr.gz), fibers (studyname_fibers.fib), bundles ( *.fib) and all the DWI
with it, otherwise you will not be able to open the study correctly.