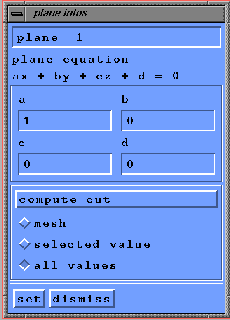
In the ``current plane'' frame, push the ``add'' button. The name of the new defined plane appears as ``plane 1''. You can now set the toggle ``infos'' on, a new window titled ``plane infos'' appears (figure 1.28). With this window, you can change the name of the plane, its equation, set a toggle which indicates if you want only to computes the mesh (``mesh''), to interpolate the current variable (``selected value'') at the mesh nodes, or to interpolate all the variables (``all values''). Now press the ``set'' button, and ``compute cut''. The new computed plane cut can be visualized with the ``planes'' toggle on.
You can add as many planes as you want, and delete previously defined planes. If your application need to compute several plane intersections for a good visualization, it is recommended to use ``the extended description langage'', as in the previous example, to define them.