This page contains the description of the following commands
\qbezier,
\qopname,
\qprime,
\quad,
\qquad,
and environments
quotation,
quote.
The \qbezier command takes three arguments which are points
(it is valid only inside a picture environment, and a point is given by a list
of two real numbers, separated by a comma, with parentheses around). The
result is a quadratic Bezier curve that goes from the first to the last
point, and the second point is a control point. The XML translation is
a <bezier> element, an empty element that has
the coordinates of the points (multiplied by the unitlength) as attributes.
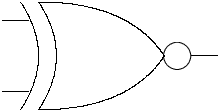
This is an example from the latex companion, page 281.
\setlength\unitlength{10pt}
\begin{picture}(12,10)(-2,0)
%\linethickness{0.4pt}
\qbezier(2,6)(7,6)(9,3)
\qbezier(2,0)(7,0)(9,3)
\qbezier(2,6)(4,3)(2,0)
\qbezier(1,6)(3,3)(1,0)
\put(9.75,3.00){\circle{1.50}}
\put(10.5,3.00){\line(1,0){1.50}}
\put(0,5){\line(1,0){1.5}}
\put(0,1){\line(1,0){1.50}}
\end{picture}
<picture xpos='-20' ypos='0' width='120' height='100'>
<bezier a1='20' a2='60' b1='70' b2='60' c1='90' c2='30'/>
<bezier a1='20' a2='0' b1='70' b2='0' c1='90' c2='30'/>
<bezier a1='20' a2='60' b1='40' b2='30' c1='20' c2='0'/>
<bezier a1='10' a2='60' b1='30' b2='30' c1='10' c2='0'/>
<put xpos='97.5' ypos='30'><circle size='15'/></put>
<put xpos='105' ypos='30'><line xdir='1' ydir='0' width='15'/></put>
<put xpos='0' ypos='50'><line xdir='1' ydir='0' width='15'/></put>
<put xpos='0' ypos='10'><line xdir='1' ydir='0' width='15'/></put>
</picture>
Preview
The command takes also an optional argument, that is the number of points. Here is the second example
\setlength\unitlength{1pt}
\begin{picture}(120,100)(-5,0)
%\linethickness{.5pt}
 \qbezier [50](0,0)(0,100)(100,0)
 \qbezier     (0,0)(30,80)(100,0)
 \qbezier[150](0,0)(60,60)(100,0)
 \qbezier[200](0,0)(90,40)(100,0)
 \qbezier     (0,0)(120,20)(100,0)
% mark the end points
 \put(0,0){\circle*{3}}
 \put(100,0){\circle*{3}}
% mark the control points
 \multiput(0,100)(30,-20){5}{\circle{2}}
\end{picture}
and the translation
<picture xpos='-5' ypos='0' width='120' height='100'>
<bezier a1='0' a2='0' b1='0' b2='100' c1='100' c2='0' repeat='50'/>
<bezier a1='0' a2='0' b1='30' b2='80' c1='100' c2='0'/>
<bezier a1='0' a2='0' b1='60' b2='60' c1='100' c2='0' repeat='150'/>
<bezier a1='0' a2='0' b1='90' b2='40' c1='100' c2='0' repeat='200'/>
<bezier a1='0' a2='0' b1='120' b2='20' c1='100' c2='0'/>
<put xpos='0' ypos='0'><circle full='true' size='3'/></put>
<put xpos='100' ypos='0'><circle full='true' size='3'/></put>
<multiput xpos='0' ypos='100' repeat='5' dx='30' dy='-20'><circle size='2'/></multiput>
</picture>
Preview 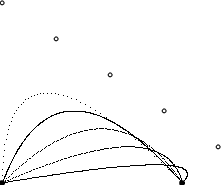
Yet another picture. This is from the book of Lamport, page 220. The only difference is that we used \multiput*. Without the star, the argument is evaluated once, but in this case, the counter has to be incremented by Tralics.
\newcounter{cms}
\setlength{\unitlength}{1mm}
\begin{picture}(50,39)
\put(0,7){\makebox(0,0)[bl]{cm}}
\multiput*(10,7)(10,0){5}{\addtocounter{cms}{1}\makebox(0,0)[b]{\arabic{cms}}}
\put(15,20){\circle{6}}
\put(30,20){\circle{6}}
\put(15,20){\circle*{2}}
\put(30,20){\circle*{2}}
\put(10,24){\framebox(25,8){car}}
\put(10,32){\vector(-2,1){10}}
\multiput(1,0)(1,0){49}{\line(0,1){2.5}}
\multiput(5,0)(10,0){5}{\line(0,1){3.5}}
\thicklines
\put(0,0){\line(1,0){50}}
\multiput(0,0)(10,0){6}{\line(0,1){5}}
\end{picture}
<picture width='142.26303' height='110.96516'>
<pic-put xpos='0' ypos='19.91682'>
       <pic-framebox width='0' height='0' position='bl'>cm</pic-framebox></pic-put>
<pic-put xpos='28.4526' ypos='19.91682'>
       <pic-framebox width='0' height='0' position='b'>1</pic-framebox></pic-put>
<pic-put xpos='56.90521' ypos='19.91682'>
       <pic-framebox width='0' height='0' position='b'>2</pic-framebox></pic-put>
<pic-put xpos='85.35782' ypos='19.91682'>
       <pic-framebox width='0' height='0' position='b'>3</pic-framebox></pic-put>
<pic-put xpos='113.81042' ypos='19.91682'>
       <pic-framebox width='0' height='0' position='b'>4</pic-framebox></pic-put>
<pic-put xpos='142.26303' ypos='19.91682'>
       <pic-framebox width='0' height='0' position='b'>5</pic-framebox></pic-put>

<pic-put xpos='42.67891' ypos='56.90521'><pic-circle size='17.07156'/></pic-put>
<pic-put xpos='85.35782' ypos='56.90521'><pic-circle size='17.07156'/></pic-put>
<pic-put xpos='42.67891' ypos='56.90521'><pic-circle full='true' size='5.69052'/></pic-put>
<pic-put xpos='85.35782' ypos='56.90521'><pic-circle full='true' size='5.69052'/></pic-put>
<pic-put xpos='28.4526' ypos='68.28625'>
       <pic-framebox width='71.13152' height='22.76208' framed='true'>car</pic-framebox></pic-put>
<pic-put xpos='28.4526' ypos='91.04834'><pic-vector xdir='-2' ydir='1' width='28.4526'/></pic-put>
<pic-multiput xpos='2.84526' ypos='0' repeat='49' dx='2.84526' dy='0'>
      <pic-line xdir='0' ydir='1' width='7.11314'/></pic-multiput>
<pic-multiput xpos='14.2263' ypos='0' repeat='5' dx='28.4526' dy='0'>
      <pic-line xdir='0' ydir='1' width='9.9584'/></pic-multiput>
<pic-thicklines/><pic-put xpos='0' ypos='0'><pic-line xdir='1' ydir='0' width='142.26303'/></pic-put>
<pic-multiput xpos='0' ypos='0' repeat='6' dx='28.4526' dy='0'>
      <pic-line xdir='0' ydir='1' width='14.2263'/></pic-multiput>
</picture>
Preview 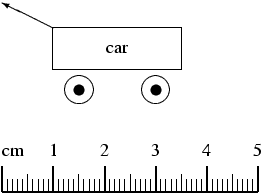
Another example.
\setlength\unitlength{1.5pt}
\begin{picture}(220,30)(0,0)
\put(0,0){\makebox(30,10){aaa}}
\put(40,0){\framebox(30,10)[lb]{bbb}}
\put(80,0){\dashbox{1}(30,10)[bl]{ccc}}
\put(120,0){\dashbox{2}(30,10)[rt]{ddd}}
\put(160,0){\dashbox{5}(30,10)[b]{eee}}
\put(192,1){\frame{W}}
\put(15,20){\oval(30,10)}
\put(55,20){\oval(30,10)[t]}
\put(95,20){\oval(30,10)}
\put(135,20){\oval(30,10)[bl]}
\put(175,20){\oval(30,10)[r]}
\end{picture}
Translation
<picture xpos='0' ypos='0' width='330' height='45'>
<pic-put xpos='0' ypos='0'>
    <pic-framebox width='45' height='15'>aaa</pic-framebox></pic-put>
<pic-put xpos='60' ypos='0'>
    <pic-framebox width='45' height='15' position='lb' framed='true'>bbb</pic-framebox></pic-put>
<pic-put xpos='120' ypos='0'>
    <pic-dashbox dashdim='1.5' width='45' height='15' position='bl'>ccc</pic-dashbox></pic-put>
<pic-put xpos='180' ypos='0'>
    <pic-dashbox dashdim='3' width='45' height='15' position='rt'>ddd</pic-dashbox></pic-put>
<pic-put xpos='240' ypos='0'>
    <pic-dashbox dashdim='7.5' width='45' height='15' position='b'>eee</pic-dashbox></pic-put>
<pic-put xpos='288' ypos='1.5'><pic-frame>W</pic-frame></pic-put>
<pic-put xpos='22.5' ypos='30'><pic-oval xpos='45' ypos='15'/></pic-put>
<pic-put xpos='82.5' ypos='30'><pic-oval xpos='45' ypos='15' specs='t'/></pic-put>
<pic-put xpos='142.5' ypos='30'><pic-oval xpos='45' ypos='15' /></pic-put>
<pic-put xpos='202.5' ypos='30'><pic-oval xpos='45' ypos='15' specs='bl'/></pic-put>
<pic-put xpos='262.5' ypos='30'><pic-oval xpos='45' ypos='15' specs='r'/></pic-put>
</picture>
Preview 
The \qopname command takes three arguments, A, B, C. If the second argument is o, translation is the same as \operatorname{C} otherwise it is the same as \operatornamewithlimits{C}. This is an operator named C; depending on B, it has limits, or has no limits. The first argument is ignored. Example
\[
\qopname {}o{foo}_x \qopname {}{l}{foo}_x
\operatorname{bar}_x \operatorname*{bar}_x
\operatornamewithlimits{gee}_x\]
Translation
<formula type='display'>
  <math mode='display' xmlns='http://www.w3.org/1998/Math/MathML'>
   <mrow>
     <msub><mo form='prefix'>foo</mo> <mi>x</mi> </msub>
     <munder><mo form='prefix'>foo</mo> <mi>x</mi> </munder>
     <msub><mo form='prefix'>bar</mo> <mi>x</mi> </msub>
     <munder><mo form='prefix'>bar</mo> <mi>x</mi> </munder>
     <munder><mo form='prefix'>gee</mo> <mi>x</mi> </munder>
   </mrow>
  </math>
</formula>
The \qprime command is valid only in math mode. It generates a quadruple prime symbol: <mi>⁗</mi> (Unicode U+2057, ⁗).
The \qquad command is valid in math mode and text mode. In math mode, it generates a space of width two em, <mspace width='2.em'/>. Outside math mode, it generates or   .
Here are some commands valid in math and non-math mode.
\def\cmd{a\dots b\ldots c\quad d\qquad e\space f\$g\%h\&i\!j\,k\{%
l\}m\i n\sharp o\natural p\flat q\_}
\cmd\\ $\cmd$
This is the XML translation.
<p>
a...b...c d e f$g%h&ij k{l}mın♯o♮p♭q_</p>
<p noindent='true'><formula type='inline'>
<math xmlns='http://www.w3.org/1998/Math/MathML'><mrow><mi>a</mi>
<mo>⋯</mo><mi>b</mi><mo>...</mo><mi>c</mi><mspace width='1.em'/>
<mi>d</mi><mspace width='2.em'/><mi>e</mi><mi>f</mi><mi>$</mi><mi>g</mi>
<mo>%</mo><mi>h</mi><mo>&</mo><mi>i</mi><mspace width='-0.166667em'/>
<mi>j</mi><mspace width='0.166667em'/><mi>k</mi><mo>{</mo><mi>l</mi><mo>}</mo>
<mi>m</mi><mo>ı</mo><mi>n</mi><mo>♯</mo><mi>o</mi><mo>♮</mo>
<mi>p</mi><mo>♭</mo><mi>q</mi><mo>_</mo></mrow></math></formula>
</p>
This is the preview. The translation of \quad is really different in math mode and outside it.

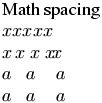
We show here the values of thin-space, med-space and thick-space (\,, \>, \;) as well as neg-thin-space (\!). The TeX values are 3, 4 and 5 mu respectively, where a mu is 1/18 em. The value used by Tralics is the 6-digit approximation given in the MathML Recommendation.
Math spacing\\
$xxxxx$\\
$x\,x\>x\;x\!x$\\
$a\,\,\,\,\,a\>\>\>\>\>a$\\
$a\;\;\;a\;\;\;\;a$\\
The preview shows that there is little difference between thick and thin
space, this explains why MathML ranges from very-very-thick to
very-very-thin.
 (see also here).
The \quad command is valid in math mode and text mode.
In math mode, it generates a space of width one em,
<mspace width='1.em'/>. Outside math mode,
it generates or  
 See description of the
\qquad command.
See description of the
\qquad command.
If you say \begin{quotation}text\end{quotation}
then your text will be in quotation mode.
For more information,
see description of the command
\centering.
If you say \begin{quote}text\end{quote}
then your text will be in quote mode.
For more information, see description of the command
\centering.
By default, there is no difference between quote and
quotation.
back to home page
© INRIA 2003-2005, 2006
Last modified $Date: 2015/12/01 17:24:43 $