

Next: Visualize Isolines and Colour
Up: Plane cut
Previous: How to make a
Contents
Index
- Push the ``Choose plane'' button, the
possibility to make the object moving is invalidated. Push another time to make
the object moving. (You note that when ``Choose Plane'' is not
validated all the buttons concerning this module are insentitive.
- First choose the plane direction by setting ``XY'', ``YZ'' or
``ZX'' on.
- The default plane is ``XY''.
- Now you have three choices to modify the plane position:
- Press the left mouse button on the boundary in the drawing area.
the plane will pass this point. You can note that the push buttons near the
scales indicates the point coordinates.
- Move the cursor of the ``z'' scale, because you have chosen a plane
according to ``XY''. Note that the
Z-button value follows the movements of the
scale.
- You can also specify the plane equation, by pushing on the Z-button
and giving a new value to the equation: ``z = cste'', (see figure
1.33).
Figure 1.33:
Choosing a z_cste plane equation.
 |
- If you want to save this plane equation, set the toggle ``extension''
on, a new window appears, (see figure
1.34).
Figure 1.34:
Setting, Saving, or Restoring a plane equation.
 |
- You can also define the cut plane by an axis and a rotation:
- First selsect on a point on the boundary in the drawing area with the left mouse button.
- Press the ``Rotation Axis'' button .
- Then click on a second point on the boundary.
You have set the rotation axis with the two points you've just chosen.
- Move the cursor in the ``Rot'' scale
to define the rotation angle around the rotation axis.
- You can also set the angle value by pushing the Rot-button near the
scale.
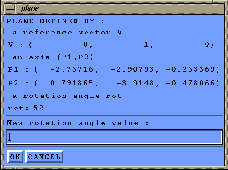
The plane is defined by two 2 points P1, P2 and a rotation around this axis,
(see figure 1.35). You can save this plane, and restore it as
described before.
Figure 1.35:
Choosing a new rotation angle value.
 |
Note: Another use of the scale cursors (either than moving the
cursor) is to keep the mouse cursor in the scale window near the scale
cursor and to push
rapidly with left button. This is a more precise way to move a scale cursor.
Now you have chosen a cut plane and you're going to visualize
Isolines and Colour contours in this plane.


Next: Visualize Isolines and Colour
Up: Plane cut
Previous: How to make a
Contents
Index
Robert Fournier
2002-09-13
 ,
,  ,
,  or
or  of the plane
equation
 in the editable windows where you can read them
and validate them by pushing the ``set'' button.


