
A TUTORIAL
Introduction
What we want to show in this tutorial is that writing an KetuK description to define an editor is as simple as writing an XSLT description to produce HTML. For this, we take a simple XML format for sales orders and introduce an XSLT description that produces HTML. The first step consists in modifying the description so that a Bean Markup Document is produced instead of an HTML one. Once we have this new description, we simply need to slightly modify the part that we want to edit to get an interactive editor.
Step by Step: Xml, Html, Javabeans, Editing, More Editing
XML
We present here the complete DTD of our XML format for sales orders. Knowing the DTD of a format is particulary important to understand the different rules of the XSLT description.
Our sales order is composed of two components, the products that are available and the list of the different orders.
<!ELEMENT sales ( products, order* )>
<!ELEMENT products ( product+ )>
The products are listed. Each product has an ID, a type, a name and a price
<!ELEMENT product EMPTY>
<!ATTLIST product id ID #REQUIRED
                  type CDATA #REQUIRED
                  name CDATA #REQUIRED
                  price CDATA #REQUIRED>
An order is composed of a customer and all the products he/she has ordered:
<!ELEMENT order ( cust,prods )>
The cust tag collects all the information about the customer (name,email,...)
<!ELEMENT cust (name, email, phone, billing, shipping?, creditcard)>
<!ELEMENT name ( #PCDATA )>
<!ELEMENT email ( #PCDATA )>
<!ELEMENT phone ( #PCDATA )>
<!ELEMENT billing  (street, city, state, zip, country )>
<!ELEMENT shipping (street, city, state, zip, country )>
<!ELEMENT creditcard EMPTY>
<!ATTLIST creditcard type CDATA #REQUIRED
                      number CDATA #REQUIRED
                        date CDATA #REQUIRED>
<!ELEMENT street ( #PCDATA )>
<!ELEMENT city ( #PCDATA )>
<!ELEMENT state ( #PCDATA )>
<!ELEMENT zip ( #PCDATA )>
<!ELEMENT country ( #PCDATA )>
Finally the products are refered by their ID, the quantity needed and their color.
<!ELEMENT prods (prod+)>
<!ELEMENT prod EMPTY>
<!ATTLIST prod idref IDREF #REQUIRED
               qty   CDATA #REQUIRED
               color CDATA #REQUIRED>
All through the tutorial we are going to use the same example. It is composed of 10 product descriptions and a single order.
<sales>
  <products>
    <product id="p1" type="bottled ink" name="Aurora" price="7"/>
    <product id="p2" type="bottled ink" name="Cartier" price="14"/>
    <product id="p3" type="bottled ink" name="Cross" price="5.5"/>
    <product id="p4" type="bottled ink" name="Mont Blanc" price="8.25"/>
    <product id="p5" type="bottled ink" name="Namiki" price="9"/>
    <product id="p6" type="bottled ink" name="Omas" price="13.5"/>
    <product id="p7" type="bottled ink" name="Parker" price="8.75"/>
    <product id="p8" type="bottled ink" name="Pelikan" price="10.75"/>
    <product id="p9" type="bottled ink" name="Visconti" price="12"/>
    <product id="p10" type="bottled ink" name="Waterman" price="6"/>
  </products>
  <order>
    <cust>
      <name>Claude Pasquier</name>
      <email>claude.pasquier@sophia.inria.fr</email>
      <phone>+33 4 92 38 71 64</phone>
      <billing>
        <street>2004 route des lucioles - BP 93</street>
        <city>Sophia Antipolis</city>
        <state>N/A</state>
        <zip>06902</zip>
        <country>France</country>
      </billing>
      <creditcard type="Visa" number="56055788544" date="10/01"/>
    </cust>
    <prods>
      <prod idref="p4" qty="7" color="black"/>
      <prod idref="p8" qty="2" color="blue"/>
      <prod idref="p8" qty="2" color="black"/>
    </prods>
  </order>
</sales>
HTML
The XSLT description we are going to present generates order summaries. As the format is rather small, only six rules are needed. The first one that matches the root of the XML document generates the skeleton of the HTML document and skips the products description.
<xsl:template match="/">
    <html>
      <head>
        <title>Order summary</title>
      </head>
      <body bgcolor="white">
        <h1>Order Summary</h1>
        <xsl:apply-templates select="sales/order"/>
      </body>
    </html>
  </xsl:template>
To process the order we first process the customer then the products that are ordered.
  <xsl:template match="order">
    <xsl:apply-templates select="cust"/>
    <xsl:apply-templates select="prods"/>
  </xsl:template>
For the customer we display the different components. As the shipping information are optional, there is a test for this component.
  <xsl:template match="cust">
    <p> client: <xsl:value-of select="name"/>  </p>
    <p>  email: <xsl:value-of select="email"/> </p>
    <p>  phone: <xsl:value-of select="phone"/> </p>
    <h3>Billing Information</h3>
    <xsl:apply-templates select="billing"/>
    <xsl:if test="shipping">
      <h3>Shipping information</h3>
      <xsl:apply-templates select="shipping"/>
    </xsl:if>
    <h3>Credit Card Information</h3>
    <p>card type: <xsl:value-of select="creditcard/@type"/></p>
    <p>card number: <xsl:value-of select="creditcard/@number"/></p>
    <p>expiration date: <xsl:value-of select="creditcard/@date"/></p>
  </xsl:template>
Billing and shipping are handled by a single rule. With this rule and
the previous one, all the information concerning the customer have
been displayed.
  <xsl:template match="billing|shipping">
    <p>street: <xsl:value-of select="street"/></p>
    <p>city: <xsl:value-of select="city"/></p>
    <p>state: <xsl:value-of select="state"/></p>
    <p>zip: <xsl:value-of select="zip"/></p>
    <p>country: <xsl:value-of select="country"/></p>
  </xsl:template>
For the products, we use a more elaborate presentation using a table. The name of the ink, its color, the quantity, the price, and the total (price*quantity) composed the different columns.
  <xsl:template match="prods">
    <h3>Order details</h3>
    <table border="1">
      <tr>
        <td>Ink name</td>
        <td>color</td>
        <td>quantity</td>
        <td>price</td>
        <td>total</td>
      </tr>
      <xsl:apply-templates select="prod"/>
    </table>
  </xsl:template>
To display the information about each product we make use of the expressivness of the XSLT language. Remember that in the order products are refered by their ID. So it is necessary first to find the product that is refered. For this we use the variable product.
  <xsl:template match="prod">
    <xsl:variable name="product"
    select="/sales/products/product[@id=current()/@idref]"/>
    <tr>
      <td><xsl:value-of select="$product/@name"/>        </td>
      <td><xsl:value-of select="@color"/>                </td>
      <td><xsl:value-of select="@qty"/>                  </td>
      <td><xsl:value-of select="$product/@price"/>       </td>
      <td><xsl:value-of select="@qty * $product/@price"/></td>
    </tr>
  </xsl:template>
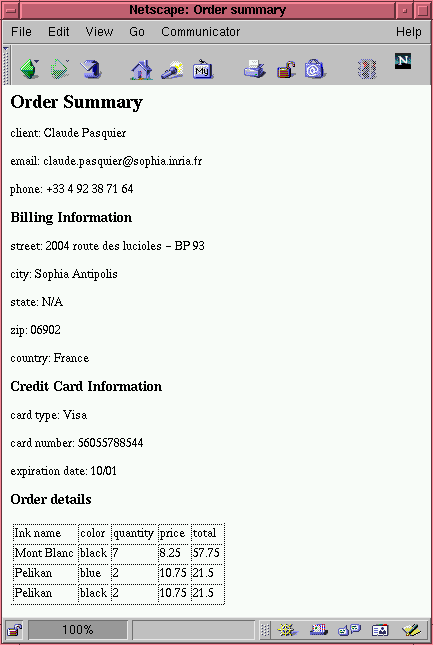
The complete XSLT script is in the file gen-html.xsl. Running it on our example, we get:
JAVABEANS
The next step is to mimic what has been done to get HTML but this time generating a Bean Markup Document defining the Java Beans to create. All the beans we are going to use come from the initial library of KetuK. This is not at all mandatory, KetuK is extensible and could use any external beans. In order to translate the top rule, we use the VBox bean. It is a specialization of Swing's JPanel component and simply layouts its children vertically. It gives us an approximation of the body used in the html description. Then we use the Label bean to get an equivalent of the <h> tags. It is a specialization of Swing's JLabel component which has a style property. With these two beans, the top rule can be rewritten as:
<xsl:template match="/">
  <bean class="fr.inria.ketuk.widgets.VBox">
    <bean class="fr.inria.ketuk.widgets.html.Label" action="add">
     <args><string>Order Summary</string></args>
     <property name="style" value="h1"/>
    </bean>
    <xsl:apply-templates select="sales/order"/>
  </bean>
</xsl:template>
Note that beans are explicitly added by the action property set to add. Arguments needed to create the bean are given in the <args> tag. The properties can be set by the <property> tag.
The second rule is left unchanged since it was not generating some HTML directly.
  <xsl:template match="order">
    <xsl:apply-templates select="cust"/>
    <xsl:apply-templates select="prods"/>
  </xsl:template>
The third is as simple as the first one. The only new bean we are using is the JLabel bean. It is used to display strings.
<xsl:template match="cust">
  <bean class="javax.swing.JLabel" action="add">
    <args><string>client: <xsl:value-of select="name"/></string></args>
  </bean>
  <bean class="javax.swing.JLabel" action="add">
    <args><string>email: <xsl:value-of select="email"/></string></args>
  </bean>
  <bean class="javax.swing.JLabel" action="add">
    <args><string>phone: <xsl:value-of select="phone"/></string></args>
  </bean>
  <bean class="fr.inria.ketuk.widgets.html.Label" action="add">
    <args><string>Billing Information</string></args>
    <property name="style" value="h3"/>
  </bean>
  <xsl:apply-templates select="billing"/>
  <xsl:if test="shipping">
    <bean class="fr.inria.ketuk.widgets.html.Label" action="add">
      <args><string>Shipping Information</string></args>
      <property name="style" value="h3"/>
    </bean>
    <xsl:apply-templates select="shipping"/>
  </xsl:if>
  <bean class="fr.inria.ketuk.widgets.html.Label" action="add">
    <args><string>Credit Card Information</string></args>
    <property name="style" value="h3"/>
  </bean>
  <bean class="javax.swing.JLabel" action="add">
    <args>
      <string>
        card type: <xsl:value-of select="creditcard/@type"/>
      </string>
    </args>
  </bean>
  <bean class="javax.swing.JLabel" action="add">
    <args>
      <string>
        card number: <xsl:value-of select="creditcard/@number"/>
      </string>
    </args>
  </bean>
  <bean class="javax.swing.JLabel" action="add">
    <args>
      <string>
        expiration date: <xsl:value-of select="creditcard/@date"/>
      </string>
    </args>
  </bean>
</xsl:template>
The billing and shipping rule has nothing new. We simply use JLabel .
<xsl:template match="billing|shipping">
  <bean class="javax.swing.JLabel" action="add">
    <args>
      <string>street: <xsl:value-of select="street"/></string>
    </args>
  </bean>
  <bean class="javax.swing.JLabel" action="add">
    <args>
      <string>city: <xsl:value-of select="city"/></string>
    </args>
  </bean>
  <bean class="javax.swing.JLabel" action="add">
    <args>
      <string>state: <xsl:value-of select="state"/></string>
    </args>
  </bean>
  <bean class="javax.swing.JLabel" action="add">
    <args>
      <string>zip: <xsl:value-of select="zip"/></string>
    </args>
  </bean>
  <bean class="javax.swing.JLabel" action="add">
    <args>
      <string>country: <xsl:value-of select="country"/></string>
      </args>
  </bean>
</xsl:template>
Translating the rule for products is also direct since in the KetuK library there are beans that correspond to the tags for tables: Table,TR, TD.
<xsl:template match="prods">
  <bean class="fr.inria.ketuk.widgets.html.Label" action="add">
    <args><string>Order Details</string></args>
    <property name="style" value="h3"/>
  </bean>
  <bean class="fr.inria.ketuk.widgets.html.Table" action="add">
    <property name="borderw" value="1" />
    <bean class="fr.inria.ketuk.widgets.html.TR" action="add">
      <bean class="fr.inria.ketuk.widgets.html.TD" action="add">
        <bean class="javax.swing.JLabel" action="add">
          <args><string>Ink name</string></args>
        </bean>
      </bean>
      <bean class="fr.inria.ketuk.widgets.html.TD" action="add">
        <bean class="javax.swing.JLabel" action="add">
          <args><string>Color</string></args>
        </bean>
      </bean>
      <bean class="fr.inria.ketuk.widgets.html.TD" action="add">
        <bean class="javax.swing.JLabel" action="add">
          <args><string>Quantity</string></args>
        </bean>
      </bean>
      <bean class="fr.inria.ketuk.widgets.html.TD" action="add">
        <bean class="javax.swing.JLabel" action="add">
          <args><string>Price</string></args>
        </bean>
      </bean>
      <bean class="fr.inria.ketuk.widgets.html.TD" action="add">
        <bean class="javax.swing.JLabel" action="add">
          <args><string>Total</string></args>
        </bean>
      </bean>
    </bean>
    <xsl:apply-templates select="prod"/>
  </bean>
</xsl:template>
Note that we explicitly set the border width of the table to one unit.
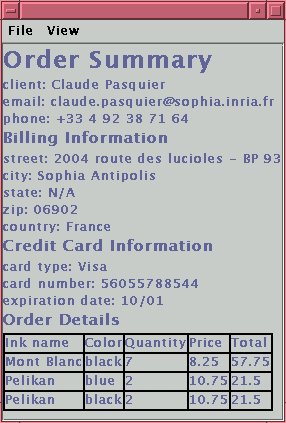
The complete description is given in the file gen-beans1.xsl. Running it on our example,
% java fr.inria.ketuk.BeansEdit sales.xml gen-beans1.xsl
we get
Editing
To turn our presentation into an editable one, we just need to put interactive beans at the places we want to be able to edit following some convention. The beans we are going to use are provided by the standard Swing library: JPanel, JTextField and JComboBox. If we take the bean description of the client information:
  <bean class="javax.swing.JLabel" action="add">
    <args><string>client: <xsl:value-of select="name"/></string></args>
we split the label into two: a label and a text field put together in a panel.
  <bean class="javax.swing.JPanel" action="add">
    <bean class="javax.swing.JLabel" action="add">
      <args><string>client:</string></args>
    </bean>
    <bean class="javax.swing.JTextField" action="add">
      <args> <string><xsl:value-of select="name"/></string> </args>
    </bean>
  </bean>
This is unfortunately not enough to enable editing. KetuK needs to have explicitly given the property of the beans that could be modified. In the case of the JLabel, the text to be modified corresponds to the property text. Also, the event on which the modification has to be trigerred has to be explicitly given by the listener property. Here we decide to do it when the text is valided, so on an action event.
  <bean class="javax.swing.JPanel" action="add">
    <bean class="javax.swing.JLabel" action="add">
      <args><string>client:</string></args>
    </bean>
    <bean class="javax.swing.JTextField" action="add">
      <property name="text">
        <string><xsl:value-of select="name"/></string>
      </property>
    <listener name="action"/>
    </bean>
  </bean>
Alternatively it is possible to use the JComboBox component instead of the JTextField to propose multiple choices. If we take the card type in the Credit Card information:
  <bean class="javax.swing.JLabel" action="add">
    <args><string>card type: <xsl:value-of select="creditcard/@type"/></string></args>
  </bean>
we simply group a JLabel and a JComboBox inside a JPanel:
  <bean class="javax.swing.JPanel" action="add">
    <bean class="javax.swing.JLabel" action="add">
      <args><string>card type:</string></args>
    </bean>
    <bean class="javax.swing.JComboBox" action="add">
      <args>
        <array>
          <string value="Visa"/>
          <string value="Mastercard"/>
          <string value="American Express"/>
        </array>
      </args>
      <property name="selectedItem">
        <string><xsl:value-of select="creditcard/@type"/></string>
      </property>
      <listener name="action"/>
    </bean>
  </bean>
Doing a similar transformation for each rule of the description gen-beans1.xsl, we get a new description gen-beans2.xsl. Applying it to our example
% java fr.inria.ketuk.BeansEdit sales.xml gen-beans2.xsl
we get:>
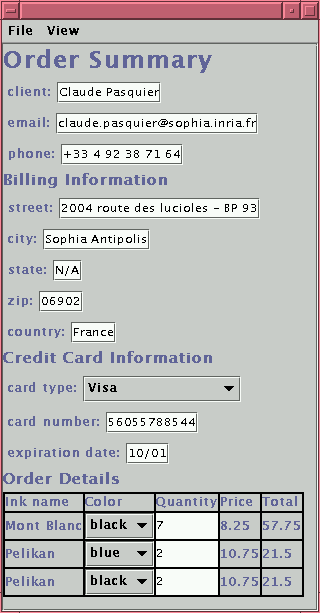
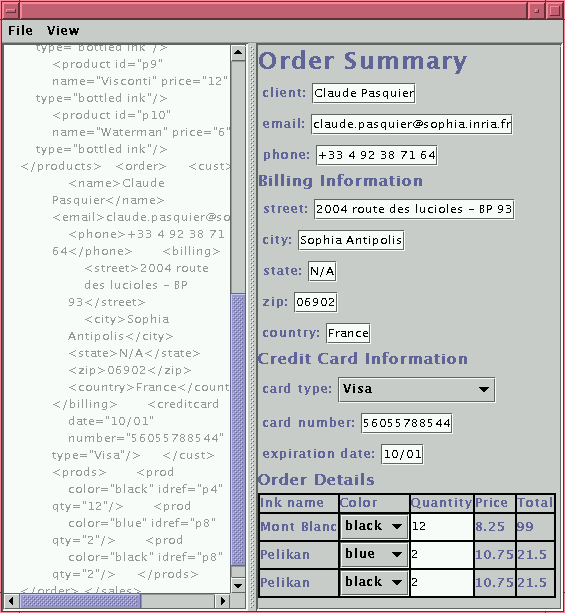
Any modification on this presentation will be automatically applied to the initial XML document. We can see it by selecting the item Document Source in the View pulldown. Note if KetuK propagates modification it also insures that what is presented is coherent with the document. For example if we change the quantity of Mont Blanc from 7 to 12, it also recomputes the new total (99) as expected.
More Editing
In the previous section, we voluntary disable the possibility to change the ink name in the order. To understand why editing ink names is not so simple, remember that in the orders, products are refered by their ids. We made use of the expressivity of XSLT to retrieve automatically the name from the id. When editing, what is needed is the inverse operation: from the name to retrieve the id. Deriving automatically inverse operations is difficult if not impossible. A way to overcome this problem is to delegate the connection between ids and names to a specialized bean: the SalesComboBox bean. It derives from JComboBox and contains an array of keys which in our case are the product ids. The property SelectedId holds the current id. The Java code of this new bean is the following:
package fr.inria.ketuk.demos.sales;

import javax.swing.JComboBox;

public class SalesComboBox extends JComboBox {

  private String[] keys;

  public SalesComboBox(String[] keys, Object[] items) {
    super(items);
    this.keys = keys;
  }

  public void setSelectedId(String key) {
    for (int i = 0 ; i < keys.length ; i++) {
      if (keys[i].equals(key)) {
        setSelectedIndex(i);
        return;
      }
    }
  }

  public String getSelectedId() {
    return keys[getSelectedIndex()];
  }
}
Using this new bean we can rewrite the part of the table concerning the ink name
<bean class="javax.swing.JLabel" action="add">
  <args><string><xsl:value-of select="$product/@name"/></string></args>
</bean>
To create a SalesComboBox, we have to give its two initial arrays. For this, we create a first loop to generate the array of all possible ids and a second one to generate the array of all possible names, then we set the property selectedId to the required id.
<bean class="fr.inria.ketuk.demos.sales.SalesComboBox" action="add">
  <args>
    <array>
      <xsl:for-each select="/sales/products/product">
        <string><xsl:value-of select="@id"/></string>
      </xsl:for-each>
    </array>
    <array>
      <xsl:for-each select="/sales/products/product">
        <string><xsl:value-of select="@name"/></string>
      </xsl:for-each>
    </array>
        </args>
  <property name="selectedId">
    <string><xsl:value-of select="@idref"/></string>
  </property>
  <listener name="action"/>
</bean>
Doing this modification, we get the corresponding gen-beans3.xsl. Running it to our favorite example
% java fr.inria.ketuk.BeansEdit sales.xml gen-beans2.xslwe have now an editable ink name:
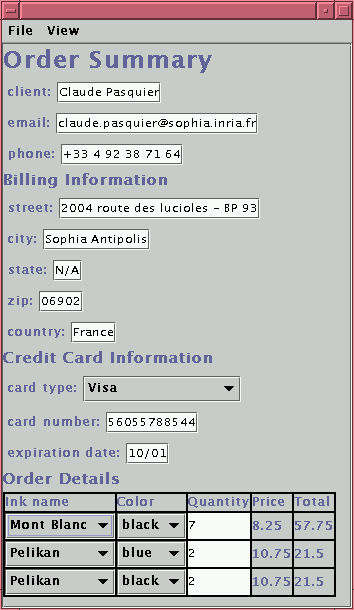
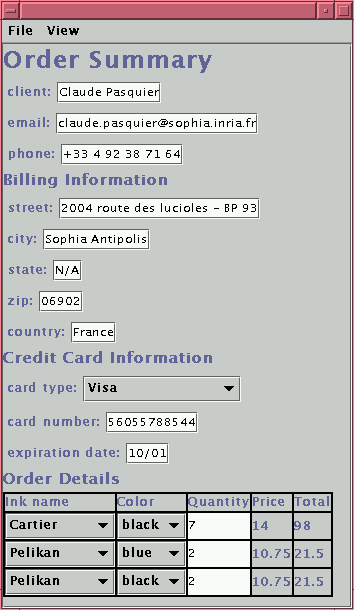
The ink name can be modified and the source, the price and the total are changed accordingly.

Created by Claude Pasquier