


Next: Results
Up: Real-time Collision Detection for
Previous: Static Collision Detection
Taking the motion of the tool into account
The simple solution presented in the previous section
tests the collision between a static position of the tool and the organ
at a given time step.
This suffers from the classical flaws of time discretization:
if the user hands move quickly, the tool may deeply penetrate inside the organ
before being repulsed. It may even
cross a thin part of the organ without any collision being detected.
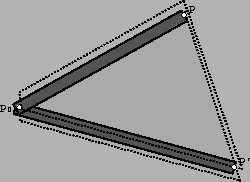
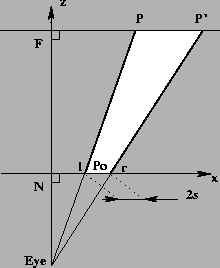
Figure 3:
Tool movement between two simulation steps.
 |
In order to avoid these classical problems, we present an extension which
takes into account the volume covered by the tool during a time step
(we still neglect the dynamic deformations of the organ during this time
period). In our model, the tool goes through the patient's abdominal wall
at the fixed point
P0, and is able to slide through this point, so
its length varies over time.
We assume that the active extremity of the tool follows a straight line
trajectory from
P to
P'.
The area covered by the axis of the tool is thus the triangle
P0,P,P' (see Figure 3).
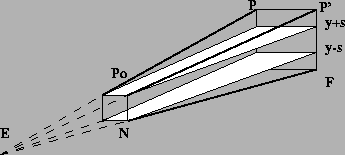
Since the tool may be seen as a cylinder of radius s, the volume covered
by the tool during the time-interval is obtained by enlarging and thickening
the triangle by the distance s. It is thus an hexahedron, as shown in
Figure 4.
As in the previous section, our aim is to model this volume
using OpenGLcameras and clipping planes.
Figure 4:
Volume covered by the tool during a time interval.
 |
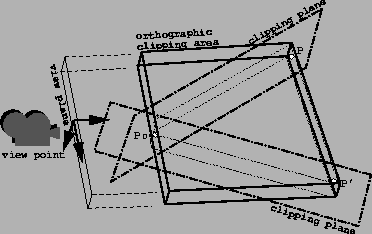
The simplest way to do this consists in using an orthographic projection,
which parallelepipedic viewing volume corresponds to the bounding box of
the hexahedron (see Figure 5): bottom and top, near and far
correspond to the hexahedron; two extra clipping planes are used to model
the sides
P0P and
P0P'.
Figure 5:
Naive approach using an orthographic camera.
 |
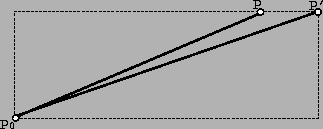
However, this naive construction has some flaws.
For instance, the orthographic viewing volume
will be excessively large when
PP' is far from orthogonal to
P0P
(see Figure 6).
The consequence is that a lot of faces will be accepted during the
clipping with the frustum, and rejected later during clipping with
the user-defined clipping-planes. This increases the cost, since
the latter is more computationally intensive
than clipping with the canonical viewing volume.
Figure 6:
Configuration where the viewing volume is much too
large before the addition of the two extra clipping planes.
 |
Thus, we construct the test-volume using OpenGLin a more complex way,
in order to use intermediary volumes that are as small as possible.
Our construction is based on a perspective viewing volume whose cone
follows the segments
P0P and
P0P', as shown in Figure 7.
This is done by setting the camera axes to
PP' for the x axis,
 for the y axis, and
 for the z axis.
Figure 7:
(x,z) plane of the perspective camera
 |
As previously, the triangle is enlarged on each side by the tool section
s. We set the
(top,bottom) interval in the near clipping plane to 2s.
Since the camera is a perspective camera, we have to add two extra
clipping planes in order to limit the vertical extent of the volume
to 2s everywhere (see Figure 8).
Figure 8:
Reducing the viewing volume with clip planes
 |
To set the camera to this configuration, the eye position E must be
computed from the points
P0, P, P'.
Let
u be:
We use it to set the left and right limits of the viewing volume in the near
and far clipping planes:
P0l = P0 - s u
P0r = P0 + s u
Pl = P - s u
P'r = P' + s u
From Thales theorem we get:
This yields:
Thus we set the OpenGLperspective camera parameters to:
R= L + 2s
T= +s
B= -s
We finally add the two extra clipping planes y=-s and y=s depicted in
Figure 8.
This leads to the following pseudo-code, where fixed is
P0,
oldPos is
P, and newPos is
P':
   glMatrixMode (GL_PROJECTION);
   glLoadIdentity ();
   u = (newPos - oldPos)
      /norm(newPos-oldPos);
   P0l = fixed - s*u; P0r = fixed + s*u;
   Pl = oldPos - s*u; Pr = newPos + s*u;
   E = P0l;
   E -= norm(P0l - P0r)
      /(norm(Pl - Pr) - 2*s) * (Pl - P0l);
   L = dot(P0l-E, u);  R =  L+2*s;
   B = -s; T = s;
   near = norm (P0l-E - L*u);
   far = norm (Pl-E - dot(Pl-E,u)*u);

   // define the projection
   glFrustum(L, R, B, T, near, far);
   glMatrixMode (GL_MODELVIEW);
   glLoadIdentity ();

   // clipping planes have to be placed in
   // MODELVIEW matrix, but we define them
   // if camera referential, so define them
   // BEFORE gluLookAt()
   GLdouble plan1[4] = {0,1,0,s};
   GLdouble plan2[4] = {0,-1,0,s};
   glClipPlane(GL_CLIP_PLANE0, plan1);
   glClipPlane(GL_CLIP_PLANE1, plan2);
   up = cross(E-Pr, E-Pl);
   F = (Pl - dot(Pl-E, u)*u);

   // move the camera to set eye at E
   // and looking at F, with up set up[]
   gluLookAt(E[0], E[1], E[2],
      F[0], F[1], F[2],
      up[0], up[1], up[2]);

   // activate the clipping planes
   glEnable(GL_CLIP_PLANE0);
   glEnable(GL_CLIP_PLANE1);

   // redraw the scene with some glNames
   // pushed
   redraw(NULL);
   glDisable(GL_CLIP_PLANE0);
   glDisable(GL_CLIP_PLANE1);
Next: Results
Up: Real-time Collision Detection for
Previous: Static Collision Detection
Jean-Christophe Lombardo
1999-05-17