
|
|
|
|
This is a single-page compendium of all the pages found
in the HTML original version. It provides an easier way to
print than stepping through the individual pages.
|
 |
This page is very large and pulls in many images.
This page has dysfunctional links.
|
|
|
|
|
|
|
|
|
Tutorial
|
|
|
An easy to print
version of this document is available. of this document is available.
|
|
|
 Table of Contents. Table of Contents.
- Getting Started
- Working with Resources
- More Constructs
- More Visualization Mode
- Working with Scrollbars
- Working with Selections
- Updating the Boxes
- Event Handling
- Input/Output Operations
|
|
|
Getting Started : The Hello World Applet
|
|
|
Step by Step
Import the main figue package.
Import the box package.
Import the path package.
Create the usual java applet.
|
public class MyApplet extends java.applet.Applet { |
Keep a reference to an AWT facade.
|
private AWTFacade _facade; |
Initialize the AWT facade.
|
public final void init() {
  ...
_facade = new AWTFacade(); |
Add the facade's AWT component to the layout.
|
add(_facade.getAwtComponent()); |
Build an atom.
|
final GlyphInterface theMessage = Atom.newAtom("Hello World"); |
Create a modification path.
|
PathInterface thePath = new Path(); |
Add the atom to the path.
|
thePath.addOperation(new InsertGlyph(theMessage,0)); |
Apply the path to the facade.
|
_facade.buildInit(thePath);
_facade.buildComplete(); |
Free all resources when done.
|
public final void destroy() {
  _facade.disposeWhenInactive();
  _facade = null;
  ...
super.destroy(); |
|
|
|
Example
|
|
|
Related Classes
and Methods
|
|
|
|
Getting Started : The Hello World Application
|
|
|
Step by Step
Import the main figue package.
Import the box package.
Import the path package.
Create the usual java application.
|
public class MyApplication extends java.awt.Frame { |
Keep a reference to an AWT facade.
|
private AWTFacade _facade; |
Initialize the AWT facade.
|
_facade = new AWTFacade(); |
Add the facade's AWT component to the layout.
|
add(BorderLayout.CENTER,_facade.getAwtComponent()) |
Build an atom.
|
GlyphInterface theMessage = Atom.newAtom("Hello World"); |
Create a modification path.
|
PathInterface thePath = new Path(); |
Add the atom to the path.
|
thePath.addOperation(new InsertGlyph(theMessage,0)); |
Apply the path to the facade.
|
_facade.buildInit(thePath);
_facade.buildComplete(); |
Free all resources when done.
|
Button theButton = new Button("Close");
...
theButton.addActionListener(new ActionListener() {
   public void actionPerformed(ActionEvent anEvent) {
                    _facade.disposeWhenInactive();
_facade = null; |
|
|
|
Example
|
|
|
Related Classes
and Methods
|
|
|
|
Getting Started : Creating a Line
|
|
|
Step by Step
Import the usual figue packages.
|
import figue.*;
import figue.box.*;
import figue.path.*; |
Create a line with the expected interword.
|
final GlyphInterface theLine = new Horizontal(20); |
Push some atoms in the line.
|
theLine.addChild(Atom.newAtom("It's"));
theLine.addChild(Atom.newAtom('a'));
theLine.addChild(Atom.newAtom("wonderful"));
theLine.addChild(Atom.newAtom("life"));
theLine.addChild(Atom.newAtom("!!")); |
Apply the modification to the facade.
|
PathInterface thePath = new Path();
thePath.addOperation(new InsertGlyph(theLine,0));
_facade.buildInit(thePath);
_facade.buildComplete(); |
|
|
|
Example
|
|
|
Related Classes
and Methods
|
|
|
|
Getting Started : Creating a Column
|
|
|
Step by Step
Import the usual figue packages.
|
import figue.*;
import figue.box.*;
import figue.path.*; |
Create a column with the expected interline and indentation.
|
final GlyphInterface theColumn = new Vertical(10,5); |
Push some atoms in the column.
|
theColumn.addChild(Atom.newAtom("It's"));
theColumn.addChild(Atom.newAtom('a'));
theColumn.addChild(Atom.newAtom("wonderful"));
theColumn.addChild(Atom.newAtom("life"));
theColumn.addChild(Atom.newAtom("!!")); |
Apply the modification to the facade.
|
PathInterface thePath = new Path();
thePath.addOperation(new InsertGlyph(theColumn,0));
_facade.buildInit(thePath);
_facade.buildComplete(); |
|
|
|
Example
|
|
|
Related Classes
and Methods
|
|
|
|
Working with Resources : Font, Color and Background
|
|
|
Step by Step
Import the usual figue packages.
|
import figue.*;
import figue.box.*;
import figue.path.*; |
Import the resource package.
Keep a reference to a font.
|
private FontInterface _bigFont; |
Keep a reference to a color.
|
private ColorInterface _red; |
Create and keep a reference to an anonymous font.
|
_italicFont = _facade.doGetFont(null,
                                FontFamily.TIMES_ROMAN,
                                FontStyle.BOLD_ITALIC,
                                24,
false); |
Define a named font.
|
_facade.doGetFont("big font",
                  FontFamily.COURIER,
                  FontStyle.BOLD,
                  46,
false); |
Do the same for colors.
|
_facade.doGetColor("red",BasicColor.RED);
_yellow = _facade.doGetColor("yellow",BasicColor.YELLOW);
_blue = _facade.doGetColor(null,0,0,255);; |
Modify the inherited graphical context.
|
final GlyphInterface theFirstContext
         = new ChangeGraphicalContextAnonymous(
                         _italicFont,
                         _blue,
                         null);
final GlyphInterface theLine = new Horizontal(10);
theFirstContext.addChild(theLine); |
Modify the inherited graphical context another time.
|
theLine.addChild(Atom.newAtom("It's"));
theLine.addChild(Atom.newAtom('a'));
final GlyphInterface theSecondContext
         = new ChangeGraphicalContextAnonymous(
                     _facade.getFont("big font"),
                     _facade.getColor("red"),
                     _yellow);
theLine.addChild(theSecondContext);
theSecondContext.addChild(Atom.newAtom("wonderful"));
theLine.addChild(Atom.newAtom("world")); |
Deal with wrong resource allocation.
|
catch ( WrongResourceException anException ) { |
|
|
|
Example

|
|
|
Related Classes
and Methods
|
|
|
|
Working with Resources : Defered Resources
|
|
|
Step by Step
Import the usual figue packages.
|
import figue.*;
import figue.box.*;
import figue.path.*; |
Import the resource package.
Use names instead of concrete resources.
|
final GlyphInterface theFirstContext
           = new ChangeGraphicalContextAnonymous("italic",
                                                 "blue",
                                                 null);
final GlyphInterface theLine = new Horizontal(10);
theFirstContext.addChild(theLine);
theLine.addChild(Atom.newAtom("It's"));
theLine.addChild(Atom.newAtom('a')); |
Define the named resources before applying the modification.
|
final GlyphInterface theBox = buildBox();
initResources();
PathInterface thePath = new Path();
thePath.addOperation(new InsertGlyph(theBox,0));
_facade.buildInit(thePath);
_facade.buildComplete();
...
private final void initResources() {
  try {
    _facade.doGetFont("italic",FontFamily.TIMES_ROMAN,
                      FontStyle.BOLD_ITALIC,24,false);
    _facade.doGetFont("big font",FontFamily.COURIER,
                      FontStyle.BOLD,46,false);
_facade.doGetColor("red",BasicColor.RED); |
|
|
|
Example
|
|
|
Related Classes
and Methods
|
|
|
|
Working with Resources : Styles
|
|
|
Step by Step
Import the usual figue packages.
|
import figue.*;
import figue.box.*;
import figue.path.*; |
Import the resource package.
Define a style.
|
_facade.doGetStyle("style",
                   _facade.getFont("italic"),
		   _facade.getColor("green"),
	           null);
_facade.doGetStyle("style hot",
	           _facade.getFont("big font"),
	           _facade.getColor("red"),
_facade.getColor("yellow")); |
Use the style name instead of concrete resources.
|
final GlyphInterface theFirstContext
             = new ChangeGraphicalContextNamed("style");
final GlyphInterface theLine = new Horizontal(10);
theFirstContext.addChild(theLine);
theLine.addChild(Atom.newAtom("It's"));
theLine.addChild(Atom.newAtom('a'));
final GlyphInterface theSecondContext
             = new ChangeGraphicalContextNamed("style hot");
theLine.addChild(theSecondContext);
theSecondContext.addChild(Atom.newAtom("wonderful"));
theLine.addChild(Atom.newAtom("world")); |
|
|
|
Example
|
|
|
Related Classes
and Methods
|
|
|
|
Working with Resources : Customization of Initial Font, Color and Background
|
|
|
Step by Step
Import the usual figue packages.
|
import figue.*;
import figue.box.*;
import figue.path.*; |
Import the resource package.
Define an initializer.
|
private final FacadeInitializer getParameters() {
FacadeInitializer theParameters = new FacadeInitializer(); |
Add to the initializer the name of initial resources.
|
theParameters.setInitialColor("My color");
theParameters.setInitialBackground("My background");
theParameters.setInitialFont("My font");
return theParameters; |
Pass the initializer to the facade on creation.
|
_facade = new AWTFacade(getParameters()); |
Create the relevant named resources.
|
private final void initResources() {
  try {
    _facade.doGetFont("My font",FontFamily.TIMES_ROMAN,
                      FontStyle.BOLD_ITALIC,24,false);
    _facade.doGetColor("My background",BasicColor.RED);
_facade.doGetColor("My color",BasicColor.YELLOW); |
|
|
|
Example
|
|
|
Related Classes
and Methods
|
|
|
|
Working with Resources : Customization of Default Resources
|
|
|
Step by Step
Import the usual figue packages.
|
import figue.*;
import figue.box.*;
import figue.path.*; |
Import the resource package.
Create the relevant resources for the reserved names.
|
private final void initResources() {
  try {
    _facade.doGetFont(Constants.DEFAULT_FONT,
                      FontFamily.TIMES_ROMAN,
                      FontStyle.BOLD,26,false);
    _facade.doGetColor(Constants.DEFAULT_COLOR,
                       BasicColor.GREEN);
    _facade.doGetColor(Constants.DEFAULT_BACKGROUND,
BasicColor.YELLOW); |
|
|
|
Example
|
|
|
Related Classes
and Methods
|
|
|
|
Working with Resources : Symbol Font
|
|
|
Specifying the Symbol Font
- Microsoft's SDK
- Browse the font directory
- Program Manager
- Main
- Control Panel
- Fonts
- If the true type "Symbol"
is available you have nothing to do
- If the true type "Symbol"
is unavailable or if you want to use
another font for symbols memorize the
name of another true type relevant font
(a rather stupid exemple would be "WingDings").
- Sun's JDK
|
|
|
Step by Step
Create and keep a reference to a symbol font.
|
private final void initResources() {
  try {
    _greekFont = _facade.doGetFont(null,
                                   FontFamily.SYMBOL,
                                   FontStyle.BOLD,
24,false); |
Modify the inherited graphical context with ths font.
|
final GlyphInterface theFirstContext
   = new ChangeGraphicalContextAnonymous(_greekFont,
                                         _blue,
null); |
|
|
|
Example
|
|
|
Related Classes
and Methods
|
|
|
|
Working with Resources : Portable Font
|
|
|
Credits and Acknowledgements
The portable fonts used in Figue's Symbol class rely on the
anti-aliased fonts for Java, courtesy of
Bernard Suffrin, Worcester College.
|
|
|
Step by Step
Import the usual figue packages.
|
import figue.*;
import figue.box.*;
import figue.path.*; |
Import the resource package.
Define an initializer.
|
FacadeInitializer theParameters = new FacadeInitializer(); |
Add to the initializer the location of the portable font library.
|
final URL theCodeBaseUrl = getCodeBase();
theParameters.setPortableFontLibrary(
   new URL(theCodeBaseUrl,
theCodeBaseUrl + "")); |
Pass the initializer to the facade on creation.
|
_facade = new AWTFacade(theParameters); |
Create and keep a reference to a portable font.
|
_portableFont = _facade.doGetPortableFont(null,
                                          "laurass12",
                                          600,
1.5); |
Build a symbol.
|
theLine.addChild(new Symbol(theBuffer.toString(),
_portableFont)); |
|
|
|
Example
|
|
|
Related Classes
and Methods
|
|
|
|
More Constructs : Formatting with Paragraphs
|
|
|
Step by Step
Create a paragraph with the expected interword, interline and indentation.
|
final GlyphInterface theParagraph = new Paragraph(5,50,5); |
Push some atoms in the paragraph.
|
theParagraph.addChild(Atom.newAtom("It's"));
theParagraph.addChild(Atom.newAtom('a'));
theParagraph.addChild(Atom.newAtom("wonderful"));
theParagraph.addChild(Atom.newAtom("world")); |
Apply the modification to the facade.
|
PathInterface thePath = new Path();
thePath.addOperation(new InsertGlyph(theParagraph,0));
_facade.buildInit(thePath);
_facade.buildComplete(); |
|
|
|
Example
|
|
|
Related Classes
and Methods
|
|
|
|
More Constructs : Setting the Available Space
|
|
|
Step by Step
Define an initializer.
|
private final FacadeInitializer getParameters() {
FacadeInitializer theParameters = new FacadeInitializer(); |
Set the initial available space.
|
theParameters.setFormattingWidth(INITIAL_SPACE);
return theParameters; |
Pass the initializer to the facade on creation.
|
_facade = new AWTFacade(getParameters()); |
If needed reset the value after.
|
_facade.setFormattingWidth(_margin); |
|
|
|
Example
|
|
|
Related Classes
and Methods
|
|
|
|
More Constructs : Decorated Key Words
|
|
|
Step by Step
Define the relevant styles.
|
_facade.doGetStyle("style hot",
		   _facade.getFont("big font"),
		   _facade.getColor("red"),
_facade.getColor("yellow")); |
Associate the style to the atom.
|
theParagraph.addChild(Atom.newAtom("Wonderful",
"style hot")); |
|
|
|
Example
|
|
|
Related Classes
and Methods
|
|
|
|
More Constructs : Measures and Units
|
|
|
Step by Step
Use an explicit measure instead of a simple integer.
|
theLine = new Horizontal(new Measure(INTERWORD,
                         UnitInterface.PIXEL));

theLine = new Horizontal(new Measure(INTERWORD,
UnitInterface.BLANK_TENTH)); |
|
|
|
Example
|
|
|
Related Classes
and Methods
|
|
|
|
More Constructs : Adjusting the Space Around a Box
|
|
|
Step by Step
Create an inset with the expected margins.
|
final GlyphInterface theInsets = new Insets(BEFORE,
                                            AFTER,
                                            LEFT,
RIGHT); |
Push another glyph in it.
|
final GlyphInterface theContext
   = new ChangeGraphicalContextAnonymous("italic","
                                         green",
                                         "yellow");
theInsets.addChild(theContext);
final GlyphInterface theOtherLine = new Horizontal(5);
theContext.addChild(theOtherLine);
theOtherLine.addChild(Atom.newAtom("It's"));
theOtherLine.addChild(Atom.newAtom("a"));
theOtherLine.addChild(Atom.newAtom("Wonderful"));
theOtherLine.addChild(Atom.newAtom("Life")); |
|
|
|
Example
|
|
|
Related Classes
and Methods
|
|
|
|
More Constructs : Integration of Lightweight Components
|
|
|
Step by Step
Create an usual java lightweight component and implement
LightweightInterface.
|
class MyLightweight extends java.awt.Component
implements LightweightInterface { |
Keep track of the Figue parent.
|
public MyLightweight() {
 ...
 _parent = null;
 ...
}

  private LightweightComponentAdapter _parent;

public void setParent(LightweightComponentAdapter aGlyph) {
   _parent = aGlyph;
} |
Delegate the invalidate task to Figue.
|
public void invalidate() {
  if ( _parent != null ) {
     _parent.invalidate();
  }
} |
Delegate the repaint task to Figue.
|
public void repaint() {
  if ( _parent != null ) {
     _parent.refresh();
  }
} |
Use the current awt font and color as usual.
|
public void update(Graphics g) {
   ...
   g.setColor(getForeground());
   g.fillArc(0, 0, s, s, 0, 360);
g.drawArc(0, 0, s, s, 0, 360); |
Use the current awt font metric as usual.
|
public java.awt.Dimension getPreferredSize() {
  Font f = getFont();
if(f != null) { |
Return the expected alignment as usual.
|
public float getAlignmentX() {
   ...
}
public float getAlignmentY() { |
Insert the lightweight component in an adapter.
|
LightweightInterface theLightweight = new MyLightweight();
theLine.addChild(
   new LightweightComponentAdapter(theLightweight));
theLine.addChild(Atom.newAtom(aText)); |
|
|
|
Example
|
|
|
Related Classes
and Methods
|
|
|
|
More Constructs : Hyperlinks
|
|
|
Step by Step
Import the usual figue packages.
|
import figue.*;
import figue.box.*;
import figue.path.*;
import figue.resource.* |
Import the event package.
Define an hyperlink history.
|
_history = new HyperlinkHistoryInterface() {
   public final void clear() {
     _followedLinks.clear();
   }
   public final boolean isVisited(Hyperlink aLink) {
     return _followedLinks.containsKey(
                (String)(aLink.getInfo()));
   }
   public final void setVisited(Hyperlink aLink) {
    _followedLinks.put((String)(aLink.getInfo()),this);
   }
   private Hashtable _followedLinks = new Hashtable();
}; |
Add a listener to the facade.
|
_facade.addHyperlinkListener(new HyperlinkListenerInterface() {
   public void linkEntered(HyperlinkEvent anEvent) {
     ...
   }
   public final void linkClicked(HyperlinkEvent anEvent) {
     ...
   }
   public final void linkExited(HyperlinkEvent anEvent) {
     ...
   }
}); |
Check the events and update the history.
|
public final void linkClicked(HyperlinkEvent anEvent) {
  try {
    final String theString
      = (String)(anEvent.getHyperlink().getInfo());
    final URL theUrl;
    if ( theString.equals(POSTER) ) {
       theUrl = new URL("http://www.....");
    }
    else {
      ...
    }
    if ( theUrl!= null ) {
       anEvent.getHyperlink().setVisited();
getAppletContext().showDocument(theUrl); |
Create a link with some information chunk.
|
theLink = new Hyperlink(URL,_history); |
Push some atoms in the link.
|
theLink.addChild(Atom.newAtom("its"));
theLink.addChild(Atom.newAtom('a'));
theLink.addChild(Atom.newAtom("wonderful"));
theLink.addChild(Atom.newAtom("life"));
theParagraph.addChild(theLink); |
|
|
|
Example
|
|
|
Related Classes
and Methods
|
|
|
|
More Visualization Mode : PostScript
|
|
|
Step by Step
Import the usual figue packages.
|
import figue.*;
import figue.box.*;
import figue.path.*;
import figue.resource.* |
Import the event package.
Keep a reference to a Postscript facade
|
private PSFacade _facade;
|
Initialize the postscript facade with an AWT PrintJob.
|
_facade = new PSFacade(Toolkit.getDefaultToolkit()
.getPrintJob(_dummyFrame,"",null)); |
Initialize the resources and build the boxes.
|
initResources(_facade);
buildBox(_facade); |
Eventually add a print listener.
|
_facade.addPrintListener(new PrintListenerInterface() {
    public void printInitiate(PrintEvent anEvent) {
      getAppletContext().showStatus("Start printing");
   }
   public void printAdvance(PrintEvent anEvent) {
      getAppletContext().showStatus(
         "Printing page " +
         anEvent.getPageNumber() + " " +
         anEvent.getPercentDone() + "%");
      }
   public void printDone(PrintEvent anEvent) {
      getAppletContext().showStatus("Printing done");
   }
}); |
Print.
Free the resources when done.
|
_facade.disposeWhenInactive(); |
|
|
|
Example
|
|
|
Related Classes
and Methods
|
|
|
|
More Visualization Mode : ASCII
|
|
|
Step by Step
Keep a reference to an ASCII facade.
|
private ASCIIFacade _facade; |
Initialize the ASCII facade.
|
_facade = new ASCIIFacade(); |
Initialize the resources and build the boxes.
|
initResources(_facade);
buildBox(_facade); |
Write on an output stream.
|
final StringWriter theOutputStream = new StringWriter();
_facade.executeWhenInactive(new CommandInterface() {
    public final boolean execute() {
         _facade.update(theOutputStream);
         _textArea.append(theOutputStream.toString());
	 return true;
     }
     public final String getName() {
         return "Done";
     }
}); |
Free the resources when done.
|
_facade.disposeWhenInactive(); |
|
|
|
Example
|
|
|
Related Classes
and Methods
|
|
|
|
More Visualization Mode : SWING
|
|
|
Step by Step
Keep a reference to a SWING facade.
|
private SWINGFacade _facade; |
Initialize the SWING facade.
|
_facade = new SWINGFacade(); |
Add the facade's AWT component to the layout.
|
getContentPane().add(_facade.getAwtComponent()); |
Initialize the resources and build the boxes.
|
initResources(_facade);
buildBox(_facade); |
Free the resources when done.
|
_facade.disposeWhenInactive(); |
|
|
|
Example
|
|
|
Related Classes
and Methods
|
|
|
|
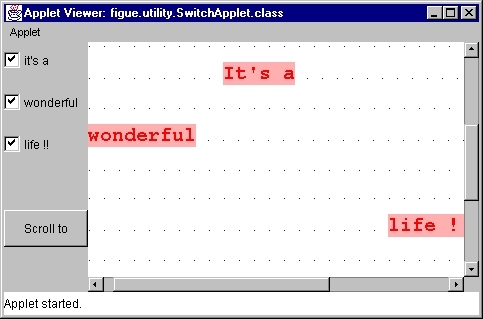
Working with Scrollbars : Scroller Customization
|
|
|
Step by Step
Define an initializer.
|
private final FacadeInitializer getParameters() {
FacadeInitializer theParameters = new FacadeInitializer(); |
Add the choosen scrollbar policy to the initializer.
|
theParameters.setHorizontalScrollbarPolicy(
                    ScrollbarPolicy.ALWAYS);

theParameters.setHorizontalScrollbarPolicy(
                     ScrollbarPolicy.NEVER);

theParameters.setHorizontalScrollbarPolicy(
ScrollbarPolicy.AS_NEEDED); |
Pass the initializer to the facade on creation.
|
_facade = new AWTFacade(getParameters()); |
If needed do the same for the vertical scrollbar.
|
theParameters.setVerticaltalScrollbarPolicy(
ScrollbarPolicy.ALWAYS); |
|
|
|
Example
|
|
|
Related Classes
and Methods
|
|
|
|
Working with Scrollbars : Autoscroll
|
|
|
Step by Step
Define an initializer.
|
private final FacadeInitializer getParameters() {
FacadeInitializer theParameters = new FacadeInitializer(); |
Add the choosen scrollbar policy to the initializer.
|
theParameters.setAutoScrollPolicy(
                    AutoScrollPolicy.WITHIN_FRAME);

theParameters.setAutoScrollPolicy(
AutoScrollPolicy.NONE); |
If needed, set the autoscroll margin.
|
theParameters.setAutoScrollMargin(250) |
If needed, set the autoscroll delay.
|
theParameters.setAutoScrollDelay(250) |
If needed, set the autoscroll rate.
|
theParameters.setAutoScrollRate(100) |
Pass the initializer to the facade on creation.
|
_facade = new AWTFacade(getParameters()); |
|
|
|
Example
|
|
|
Related Classes
and Methods
|
|
|
|
Working with Scrollbars : Scrolling to an Area
|
|
|
Step by Step
Define an initializer.
|
private final FacadeInitializer getParameters() {
FacadeInitializer theParameters = new FacadeInitializer(); |
Add the choosen "scroll to" policy to the initializer.
|
theParameters.setInsureVisiblePolicy(
new InsureVisiblePolicy(20,0,0,0)); |
Pass the initializer to the facade on creation.
|
_facade = new AWTFacade(getParameters()); |
Create a path and mark all relevant area
|
PathInterface thePath = new Path();
PathInterface theNextPath = new Path(0);
thePath.addChild(theNextPath);
if ( _selectionFlag1 ) {
    PathInterface theFinalPath = new Path(NOISE * 10);
    theNextPath.addChild(theFinalPath);
theFinalPath.addOperation(MarkGlyph.INSTANCE); |
Apply the path to the facade
|
_facade.insureVisible(thePath); |
|
|
|
Example
|
|
|
Related Classes
and Methods
|
|
|
|
Working with Selections : Simple Selection
|
|
|
Step by Step
Import the usual figue packages.
|
import figue.*;
import figue.box.*;
import figue.path.*;
import figue.resource.* |
Import the selection package.
|
import figue.selection.*; |
Define a selection
|
try {
  _facade.doGetSelection("current selection",
			 Priority.MEDIUM,
			 null,
"green"); |
Deal with wrong selection allocation.
|
catch ( WrongSelectionException anException ) { |
Create a modification path.
|
PathInterface thePath = new Path();
PathInterface theNextPath = new Path(0);
thePath.addChild(theNextPath);
PathInterface theFinalPath = new Path(2);
theNextPath.addChild(theFinalPath); |
Add the selection to the path.
|
theFinalPath.addOperation(
    new ExtendSelection(
_facade.getSelection("current selection")); |
Or remove it.
|
theFinalPath.addOperation(
    new ShrinkSelection(
_facade.getSelection("current selection")); |
Apply the path to the facade.
|
_facade.updateSelectionAndRedisplay(thePath); |
|
|
|
Example
|
|
|
Related Classes
and Methods
|
|
|
|
Working with Selections : Selection Multiple
|
|
|
Step by Step
Import the usual figue packages.
|
import figue.*;
import figue.box.*;
import figue.path.*;
import figue.resource.* |
Import the selection package.
|
import figue.selection.*; |
Define a selection.
|
try {
   _facade.doGetSelection("current selection",
			  Priority.MEDIUM,
			  null,
"green"); |
Create a modification path.
|
PathInterface thePath = new Path();
PathInterface theNextPath = new Path(0);
thePath.addChild(theNextPath);
PathInterface theFinalPath = new Path(_counter++ * 2); |
Add the selection to the path.
|
theFinalPath.addOperation(
new ExtendSelection(theSelection)); |
Apply the path to the facade.
|
_facade.updateSelectionAndRedisplay(thePath); |
|
|
|
Example
|
|
|
Related Classes
and Methods
|
|
|
|
Working with Selections : Multiples Selections
|
|
|
Step by Step
Import the usual figue packages.
|
import figue.*;
import figue.box.*;
import figue.path.*;
import figue.resource.* |
Import the selection package.
|
import figue.selection.*; |
Define selections with various priority.
|
_facade.doGetSelection("selection 1",
		       Priority.HIGH,
		       "green",
		       null);
_facade.doGetSelection("selection 2",
		       Priority.MEDIUM,
		       "cyan",
		       null);
_facade.doGetSelection("selection 3",
		       Priority.LOW,
		       null,
"pink"); |
|
|
|
Example
|
|
|
Related Classes
and Methods
|
|
|
|
Working with Selections : Hightlighters
|
|
|
Step by Step
Import the usual figue packages.
|
import figue.*;
import figue.box.*;
import figue.path.*;
import figue.resource.* |
Import the selection package.
|
import figue.selection.*; |
Associate the relevant highlighter to the selection.
|
_facade.doGetSelection("selection 1",
		       Priority.HIGH,
		       null,
		       "green");
_facade.doGetSelection("selection 2",
		       Priority.MEDIUM,
		       null,
		       "cyan")
     .setHighlighter(BarHighlighter.INSTANCE);
_facade.doGetSelection("selection 3",
		       Priority.LOW,
		       null,
		       "pink")
.setHighlighter(CornerHighlighter.INSTANCE); |
|
|
|
Example
|
|
|
Related Classes
and Methods
|
|
|
|
Updating the Boxes : Heavy Modification
|
|
|
Step by Step
xxx
xxx
|
|
|
Example
|
|
|
Related Classes
and Methods
|
|
|
|
Updating the Boxes : Interactive Update
|
|
|
Step by Step
xxx
xxx
|
|
|
Example
|
|
|
Related Classes
and Methods
|
|
|
|
Updating the Boxes : Incremental Building
|
|
|
Step by Step
xxx
xxx
|
|
|
Example
|
|
|
Related Classes
and Methods
|
|
|
|
Event Handling : Receiving Pointing Events
|
|
|
Step by Step
Import the usual figue packages.
|
import figue.*;
import figue.box.*;
import figue.path.*;
import figue.resource.*;
import figue.selection.*; |
Import the event package.
Add a custom pointing listener to an interactive facade.
|
_facade.addPointingListener(new PointingListenerInterface() {
    public final void mouseEntered(PointingEvent anEvent) {
      ...
    }
    public final void mouseExited(PointingEvent anEvent) {
      ...
    }
    public final void mousePressed(PointingEvent anEvent) {
      ...
    }
    public final void mouseReleased(PointingEvent anEvent) {
      ...
    }
    public final void mouseClicked(PointingEvent anEvent) {
      ...
    }
} |
React to the events.
|
public final void mouseClicked(PointingEvent anEvent) {
    if ( anEvent.getPath() != null ) {
	hightlightBox(anEvent.getPath());
    }
} |
|
|
|
Example
|
|
|
Related Classes
and Methods
|
|
|
|
Event Handling : Receiving Pointing Motion Events
|
|
|
Step by Step
Import the usual figue packages.
|
import figue.*;
import figue.box.*;
import figue.path.*;
import figue.resource.*;
import figue.selection.*; |
Import the event package.
Add a custom pointing motion listener to an interactive facade.
|
_facade.addPointingMotionListener(
   new PointingMotionListenerInterface() {
       public final void moving(PointingEvent anEvent) {
          ...
       }
       public final void startDragging(PointingEvent anEvent) {
          ...
       }
       public final void dragging(PointingEvent anEvent) {
          ...
       }
       public final void stopDragging(PointingEvent anEvent) {
          ...
       }
}); |
React to the events.
|
public final void dragging(PointingEvent anEvent) {
   if ( anEvent.getPath() != null ) {
	hightlightBox(anEvent.getPath());
   }
} |
|
|
|
Example
|
|
|
Related Classes
and Methods
|
|
|
|
Event Handling : Receiving Keyboard Events
|
|
|
Step by Step
Import the usual figue packages.
|
import figue.*;
import figue.box.*;
import figue.path.*;
import figue.resource.*;
import figue.selection.*; |
Import the event package.
Add a custom key listener to an interactive facade.
|
_facade.addKeyListener (new KeyListenerInterface() {
   public final void keyTyped(KeyEvent anEvent) {
     ...
   }
   public final void keyPressed(KeyEvent anEvent) {
     ...
   }
   public final void keyReleased(KeyEvent anEvent) {
     ...
   }
}); |
Check and react to the events.
|
public final void keyPressed(KeyEvent anEvent) {
   switch ( anEvent.getKeyCode() ) {
   case KeyEvent.VK_A:
   ...
   case KeyEvent.VK_Y: {
       insertChar(anEvent.getKeyChar());
       break;
} |
You can also specialize the default key listener (the one that
manages page up/down, home/end, left/right, up/down).
|
class NumberListener extends DefaultKeyListener {
   public NumberListener(InteractiveFacade aFacade) {
     super(aFacade);
   }
   public final void keyPressed(KeyEvent anEvent) {
     switch ( anEvent.getKeyCode() ) {
        case KeyEvent.VK_0:
        ...
	case KeyEvent.VK_NUMPAD9: {
	   insertChar(anEvent.getKeyChar());
           break;
        }
        default: {
	   super.keyPressed(anEvent);
	}
...
}
_facade.addKeyListener(new NumberListener(_facade)); |
Specify a policy for the focus management.
|
_facade.addPointingListener(new PointingListenerInterface() {
    public final void mouseEntered(PointingEvent anEvent) {
       _facade.requestFocus();
    }
... |
|
|
|
Example
|
|
|
Related Classes
and Methods
|
|
|
|
Input/Output Operations : Saving to an XML Stream
|
|
|
Step by Step
Open an output stream.
|
StringWriter theOutputStream = new StringWriter(); |
Write the objet state on the stream.
|
_facade.writeAsXML(theOutputStream); |
|
|
|
Example
|
|
|
Related Classes
and Methods
|
|
|
|
Input/Output Operations : Loading from an XML Stream
|
|
|
Step by Step
Open an input stream.
|
private final String _input =
   "<?XML version=\"1.0\"?><Facade><Resources> ...";
StringBufferInputStream theInput
= new StringBufferInputStream(_input); |
Create a new facade from the stream.
|
_facade = new AWTFacade(theParameters,theInput); |
Initialize the facade.
|
_facade.buildInit(null);
_facade.buildComplete() |
|
|
|
Example
|
|
|
Related Classes
and Methods
|
|
|
|
Input/Output Operations : Editing an XML Stream
|
|
|
Step by Step
[PENDING : Specify the DTD]
|
|
|
Example

|
|
|
|
Input/Output Operations : Java Serialization
|
|
|
Step by Step
xxx
|
|
|
Example

|
|
|
Related Classes
and Methods
|
|
|
|
|