We describe here the implementation of the arrays in Tralics. One has to distinguish between table which is an environment in which you can put some objects (in general tables) with a caption; like the figure environment, this generates a floating object. On the other hand, the array and tabular environments can be used to create table: the first one is designed for math only, the second for non-math material.
Content : the tabular environment; the preamble; math shift characters in a preamble, new column types , an example , booktabs extension.
You can say \begin{tabular} followed by pos, cols, tabular material and \end{tabular} or: \begin{tabular*} followed by size, pos, cols, tabular material and \end{tabular*}.
In both cases, the result is a <table> element, with attribute rend='inline'. In the second case, size has to be a dimension, for instance {.3pt}, whose effect is to add the attribute pair width='0.3pt' to the table. The pos argument should be one of [t], [b], [c], or omitted. (No error is signaled otherwise; in particular, macros are neither expanded not evaluated). If not omitted, the element has a vpos attribute whose value is t, b or c. The translation of tabular material fills the element with some <row> elements, each of which contains some <cell> elements. Each cell has a position in the row; its translation depends on the position and the cols specification. Example
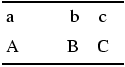
\begin{tabular*}{10pc}[b]{lrc}
\hline
a&b&c\\[2pt]
\multicolumn{1}{l}{A}&B&C\\\hline
\end{tabular*}
The translation is the following.
<table vpos='b' width='120.0pt' rend='inline'>
 <row  spaceafter='2.0pt' top-border='true'>
  <cell halign='left'>a</cell>
  <cell halign='right'>b</cell>
  <cell halign='center'>c</cell>
 </row>
 <row bottom-border='true'>
  <cell halign='left' cols='1'>A</cell>
  <cell halign='right'>B</cell>
  <cell halign='center'>C</cell>
 </row>
</table>
Preview
Not all names are hard-coded. If the configuration file contains the following lines,
  att_vpos = "Vpos"
  att_halign = "Halign"
  att_cols = "Cols"
  att_table_width = "Width"
  xml_table_name = "Table"
  xml_row_name = "Row"
  att_row_spaceafter = "Spaceafter"
  xml_cell_name = "Cell"
  att_cell_left =  "Left"
  att_cell_right =  "Right"
  att_cell_center =  "Center"
  att_cell_leftborder = "Leftborder"
  att_cell_rightborder = "Rightborder"
  att_cell_topborder = "Topborder"
  att_cell_bottomborder = "Bottomborder"
  att_rend = "Rend"
then the translation is the following.
<Table Vpos='b' Width='120.0pt' Rend='inline'>
 <Row Spaceafter='2.0pt' Topborder='true'>
  <Cell Halign='Left'>a</Cell>
  <Cell Halign='Right'>b</Cell>
  <Cell Halign='Center'>c</Cell>
 </Row>
 <Row Bottomborder='true'>
  <Cell Halign='Left' Cols='1'>A</Cell>
  <Cell Halign='Right'>B</Cell>
  <Cell Halign='Center'>C</Cell>
 </Row>
</Table>
The preamble of the array is the quantity marked cols in the description above. This is a specification for columns. It specifies how the columns should be formatted. In standard LaTeX, you cannot use more columns than specified; in Tralics, this is not relevant.
As the previous example shows, there are three standard column types: c, l and r, (centered, left-aligned, right-aligned). The effect is to add an attribute pair of the form halign='center'. If a row contains more cells than in the specification, these extra cells have no halign attribute. You can also say p{dim}. This should typeset the column in a \parbox[t]{dim}. This feature is not implemented: the argument is ignored, and p is replaced by c.
The array.sty package adds two options: m and b. The b option is like the p option, but bottom-aligned. The m option should be used only in math mode (i.e. for the array environment, and not tabular). In Tralics, there is no difference between b, m and p.
There is an @{text} option. It inserts text in every row, where text is processed in math mode in the array environment and in LR mode in the tabular and tabular* environments. Such an expression suppresses the space that LaTeX normally inserts between columns. For instance, an array specification like {l@{\hspace{1cm}}l} says that the two columns of text should be separated by exactly one centimeter. A specification like {@{}c@{}} says that no additional space should be added neither of the left not the right of the column. An \extracolsep{wd} command can be used inside such an expression. It causes an extra space to appear to the left of all subsequent columns. Note that \extracolsep expands to \tabskip; this TeX primitive is not implemented in Tralics. In fact, Tralics ignores an @ and its argument.
You can use a | for specifying a vertical rule. However, in Tralics you cannot use double or triple rules. Sorry. There is also a !{...} option that is not implemented.
Every specification (l, r, c, b, p, m) can be preceded by a
>{xx} declaration
and followed by a <{yy} declaration, where xx and yy are
arbitrary (see comments below), respectively called the u-part
and v-part of the template.
In case of multiple declarations, the last will be executed first.
Said otherwise, >{3}>{b}c<{a}<{z}
is the same as >{b3}c<{za}.
The effect is to insert b3 before the cell in the current
position, and za after the cell. Note that the cell is
finished when a token is sensed that indicates either a new cell, a new row
or the end of the array. Technically, this means a &,
a \\, or an \end (the end of the
environment) after full
expansion.
A special marker is pushed back after the v-part. This is
\endtemplate in the case of a cell,
and \cr in the
case of \\. You should not use \cr or
\crcr outside an array defined by \halign (this is
not yet implemented). You must be careful that the v-part
does not contain something that reads the special end marker.
For instance \def\x#1{}\halign{#\x&#\cr 1&2\cr} is an error.
Finally, *{N}{text} can be used instead of N occurrences of text.
Note. At the end of Chapter 22 of the TeXbook, Knuth gives an example of a table where the preamble is \centerline{#}. Such a construction cannot be done in Tralics, since >{\centerline?}c<{?} would transform into \centerline?#? and question marks cannot be replaced by braces; you could try >{\expandafter\centerline?} and replace the question mark by something that expands to an open brace but contains as many open braces as closing ones, for instance \expandafter{\iffalse}\fi. This fails as Tralics finds some invalid command; it also fails without the \expandafter, (the closing \fi is not found). Finally, this fails also: >{\centerline\bgroup}c<{\egroup}.
Knuth says that an entry of the form a}b{c is legitimate, with respect to this template. This cannot be the case in Tralics, but it would be valid for a template like >{\bgroup\bf}c<{\egroup}. This justifies that a table has to be terminated by \cr or \crcr. In the case of Tralics, this is not needed.
Inserting the v-part of the template at the right moment is not a trivial task, and before November 2015, Tralics failed to do it in math mode. The following example now compiles.
\newenvironment{tab}{Table \begin{tabular}{>{\before} c<{\after}c}}{\end{tabular}}
\def\before{Before}\def\after{After}%
\begin{tab}x\end{tab}%
\def\before{$\bgroup}\def\after{\egroup$}%
\tracingall
\begin{tab}c&math before amp brace \end{tab}
\begin{tab}x\end{tab}
\newenvironment{xtab}{\begin{tabular}{>{\before} cc}}{\after\end{tabular}}
\begin{xtab}ww\end{xtab}
We give here part of the trace for the second array. When the line
marked Hack1
is sensed, the situation is the following. The
save stack holds: the document environment,
the tab environment,
the tabular environment, a cell group,
a math group, and a brace group (watch
for stack: level).
The XML stack holds
the document, the table, a row, a cell (watch
for Push
and Pop); note that the current paragraph was
ended, and another one will be started after the array.
Tralics sees an
ampersand character whose meaning is: finish the current cell and
start a new one. This is not possible, since a closing brace is
expected. The hack is the following: if Tralics is scanning a
math formula and sees & or \\, if the
save stack
holds a cell below the math (ignoring brace groups), if the top of the XML stack
holds a cell, with a non-empty v-part, then
the v-part is inserted, and the & or \\
is marked to be read again.
If the first two conditions hold
but not the last (no v-part to insert) an error is signaled
and parsing of the math formula stops.
In this example the conditions are
fulfilled and \after is inserted. Expanding this yields
the closing brace and the closing dollar. On line Hack2
, you
can see all tokens (after full expansion) that were read as part of
the math formula; there is an &, but it is not part of the
formula. It is read again (as alignment tab character
) and
evaluates to \endtemplate. This finishes the cell and
starts a new one. Note:
we have simplified the remaining of the trace by showing only the
modifications to the save stack and XML stack.
[6] \begin{tab}c&math before amp brace \end{tab}
{\begin}
{\begin tab}
+stack: level + 2 for environment entered on line 6
\tab ->Table \begin {tabular}{>{\before } c<{\after }c}
Character sequence: Table .
{\begin}
{Text:Table }
{\begin tabular}
+stack: level + 3 for environment entered on line 6
{\tabular}
{Pop 1: document_v p_v}
{Push tabular 1}
% Array preamble parsing omitted
{Push row 2}
{Push cell 3}
+stack: level + 4 for cell entered on line 6
{template u-part \before }
\before ->$\bgroup
{math shift character}
+stack: level + 5 for math entered on line 6
+stack: level + 6 for brace entered on line 6
{template v-part \after }  % Hack1
\after ->\egroup $
+stack: level - 6 for brace from line 6
+stack: level - 5 for math from line 6
Math: $\bgroup c&\egroup$  % Hack2
{Inline formula ...} % details omitted
{alignment tab character}
{\endtemplate}
{Pop 3: document_v tabular_v row_a cell_a}
+stack: level - 4 for cell from line 6
{Push cell 3}
% more lines omitted
+stack: level + 4 for cell entered on line 6
{Pop 3: document_v tabular_v row_a cell_a}
+stack: level - 4 for cell from line 6
{Pop 2: document_v tabular_v row_a}
{Pop 1: document_v tabular_v}
{Push p 1}
+stack: level - 3 for environment from line 6
+stack: level - 2 for environment from line 6
The next example is similar to the previous one. When the line
marked Hack3
is seen we are in exactly the same situation as
described above but instead of an ampersand character we have \end.
The same algorithm is applied. However no error is signaled if there
is no v-part on the stack (this is needed in order to make
the last example work). After the formula has been
translated, Tralics sees the \end command, and
interprets it; it expands to \end {tabular}. At this
moment (marked Hack4
), the v-part of the template is
inserted (as at was already inserted, nothing happens here), as well
as the \cr token. Its effect is to pop the XML stack
as well as the save stack: this finishes the current cell. The XML
stack is popped again (there is nothing to pop on the save stack):
this finishes the current row. Then \end {tabular} is
evaluated again. This pops the XML stack and finishes the
array. After that, the save stack is popped twice: once for
each \end command.
[7] \begin{tab}x\end{tab}
% Some lines omitted (same as above)
{Push row 2}
{Push cell 3}
+stack: level + 4 for cell entered on line 7
+stack: level + 5 for math entered on line 7
+stack: level + 6 for brace entered on line 7
{template v-part \after } % Hack3
\after ->\egroup $
+stack: level - 6 for brace from line 7
+stack: level - 5 for math from line 7
Math: $\bgroup x\end\egroup$
{Inline formula ...} % details omitted
{\end}
{\end tab}
\endtab ->\end {tabular}
{\end}
{\end tabular}  % Hack4
{\cr}
{Pop 3: document_v tabular_v row_a cell_a}
+stack: level - 4 for cell from line 7
{Pop 2: document_v tabular_v row_a}
{\end}
{\end tabular}
{\endtabular}
{Pop 1: document_v tabular_v}
{Push p 1}
{\endenv}
+stack: restoring \par=\par.
+stack: ending environment tabular; resuming tab.
+stack: level - 3 for environment from line 7
{\endenv}
+stack: ending environment tab; resuming document.
+stack: level - 2 for environment from line 7
You can say things like these
\newcolumntype{C}{>{$}c<{$}}
\newcolumntype{L}{>{$}l<{$}}
\newcolumntype{R}{>{$}r<{$}}
\newcolumntype{d}[1]{>{\rightdots{#1}}r<{\endrightdots}}
\newcolumntype{X}{CLR}

\begin{tabular}{*{3}{|c|}d{23}X}
\end{tabular}
In this case, the transcript file will contains
array preamble at start: |c||c||c|d{23}X
array preamble after X: |c||c||c|d{23}CLR
array preamble after d: |c||c||c|>{\rightdots {23}}r<{\endrightdots }CLR
array preamble after C: |c||c||c|>{\rightdots {23}}r<{\endrightdots }>{$}c<{$}LR
array preamble after L: |c||c||c|>{\rightdots {23}}r<{\endrightdots }>{$}c<{$}>{$}l<{$}R
array preamble after R: |c||c||c|>{\rightdots {23}}r<{\endrightdots }>{$}c<{$}>{$}l<{$}>{$}r<{$}
array preamble parse: | c | | c 1| | c 2| >3>{} r <<{} >4>{} c <<{} >5>{} l <<{} >6>{} r <<{} 7
The first line is printed after evaluation of the * arguments.
After that, the preamble contains, at toplevel (outside braces) two characters d and X that are defined to be new column types. These are evaluated one after the other (the order is irrelevant, here alphabetic order is used so that X is expanded first). Since the expansion was non trivial, a second try is made. Note that only a finite numbers of tries are executed. In case of recursion, strange things can happen. Note how you can use commands with arguments (here d takes one argument, it is 23).
The last line of the transcript indicates parsing of standard options. In the case of p{...}, you will see a p first, followed by a p{}. Whenever a new cell is started, a number is printed. Hence c 1 indicates that cell 0 was finished, cell 1 started, and cell is is centered; >5>{} means that cell 5 was started because of the > sign. The final number just says that the seventh cell information were stored. [Note: these numbers are not printed anymore in the current version].
We consider here the following new column types. As you can see, one of them is the character + , another is the character _ . The fact that these characters have special catcodes is irrelevant (they cannot be of catcode 1 and 2, because this would interfere with brace matching, and they cannot be of catcode 10, because space characters should be ignored in the preamble).
\newcolumntype{L} {>{\large\bfseries 2}l <{y}|}
\newcolumntype{+} {>{B}l <{D}|}
\newcolumntype{_}{rlc<{x}}
\newcolumntype{x}{>{b}c<{a}}
Consider the four following tables
\begin{tabular*}{5cm}[b]{*{4}{_c|}}
a1&a2&a3&a4  & b1&b2&b3&b4 & c1&c2&c3&c4& d1&d2&d3&d4\\
Wa1&Wa2&Wa3&Wa4  & Wb1&Wb2&Wb3&Wb4 & Wc1&Wc2&Wc3&Wc4& Wd1&Wd2&Wd3&Wd4\\
\end{tabular*}

\begin{tabular}{|ll|rr|cc|}
\hline a&b&c&d&e&f\\
aaa&bbb&ccc&ddd&eee&fff\\
\hline
A&\multicolumn{3}{+}{C}&E&F\\
\multicolumn{2}{|l}{ab}&c&d&e&f\\
\cline{1-3}\cline{6-6}
aaa&bbb&ccc&ddd  &eee&fff\\\hline
\end{tabular}

\begin{tabular} {| >{\large 1}c <{x}| L > {\large\itshape 3}c <{z}|}
\hline A&B&C\\\hline 100&10 &1\\\hline
\end{tabular}


\begin{tabular} {| >{\large 1}c <{x}| L > {\large\itshape 3}x <{z}|}
\hline A&B&C\\\hline 100&10 &1
\end{tabular}
Preview is below. Currently, each table is as wide as the current page. This is a bad thing, it should be arranged in a future version.
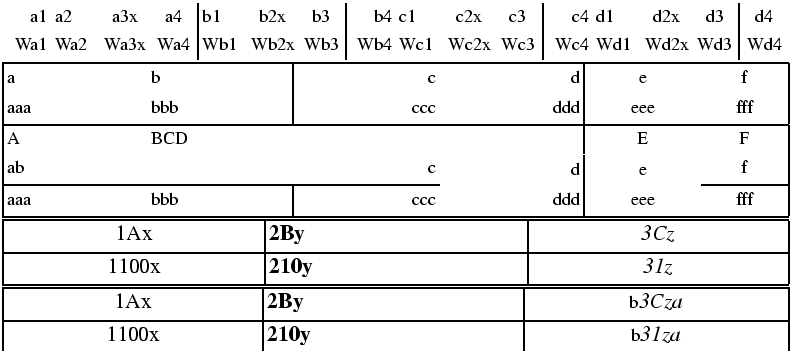
This is the XML translation of the first table. Note how the first two arguments {5cm}[b] are translated. Note also the preamble: *{4}{_c|}. This means a sequence, repeated for times, of a right-aligned cell, a left-aligned cell, a centered cell and a cell with a vertical rule after it. The table is terminated by a \\, this one is not necessary.
<table vpos='b' width='142.26378pt' rend='inline'>
<row><cell halign='right'>a1</cell>
<cell halign='left'>a2</cell>
<cell halign='center'>a3x</cell>
<cell halign='center' right-border='true'>a4</cell>
<cell halign='left'>b1</cell>
<cell halign='center'>b2x</cell>
<cell halign='center' right-border='true'>b3</cell>
<cell halign='right'>b4</cell>
<cell halign='left'>c1</cell>
<cell halign='center'>c2x</cell>
<cell halign='center' right-border='true'>c3</cell>
<cell halign='right'>c4</cell>
<cell halign='left'>d1</cell>
<cell halign='center'>d2x</cell>
<cell halign='center' right-border='true'>d3</cell>
<cell>d4</cell>
</row><row><cell halign='right'>Wa1</cell>
<cell halign='left'>Wa2</cell>
<cell halign='center'>Wa3x</cell>
<cell halign='center' right-border='true'>Wa4</cell>
<cell halign='left'>Wb1</cell>
<cell halign='center'>Wb2x</cell>
<cell halign='center' right-border='true'>Wb3</cell>
<cell halign='right'>Wb4</cell>
<cell halign='left'>Wc1</cell>
<cell halign='center'>Wc2x</cell>
<cell halign='center' right-border='true'>Wc3</cell>
<cell halign='right'>Wc4</cell>
<cell halign='left'>Wd1</cell>
<cell halign='center'>Wd2x</cell>
<cell halign='center' right-border='true'>Wd3</cell>
<cell>Wd4</cell>
</row></table>
This is the translation of the third table. The preamble of the table is something like |c|l|c|, indicating a centered row, a left-aligned row and a centered row. There are four vertical rules, the first two ones are attached to the first cell, and after that, there is a rule on the right of each cell. The specification of the second cell is L, and, after expansion, >{\large\bfseries 2}l <{y}, so that a B is replaced by \large\bfseries 2By. Remember that each cell is translated in a group, so that the scope of the \large\bfseries is limited to a single cell.
In the example we can see that \hline produces an horizontal rule by adding an attribute to the row that precedes it (the \hline at the start of the table induces a second rule for the first row).
<table rend='inline'>
 <row bottom-border='true' top-border='true'>
  <cell left-border='true' halign='center' right-border='true'><hi rend='large1'>1Ax</hi></cell>
  <cell halign='left' right-border='true'><hi rend='large1'></hi><hi rend='large1'><hi rend='bold'>2By</hi></hi></cell>
  <cell halign='center' right-border='true'><hi rend='large1'></hi><hi rend='large1'><hi rend='it'>3Cz</hi></hi></cell>
 </row>
 <row bottom-border='true'>
  <cell left-border='true' halign='center' right-border='true'><hi rend='large1'>1100x</hi></cell>
  <cell halign='left' right-border='true'><hi rend='large1'></hi><hi rend='large1'><hi rend='bold'>210y</hi></hi></cell>
  <cell halign='center' right-border='true'><hi rend='large1'></hi><hi rend='large1'><hi rend='it'>31z</hi></hi></cell>
</row></table>
This is the fourth table. It is like the table above, without the final \\\hline. As you can see, the end of a cell is obtained when the next character is either & (and the cell is followed by another cell), or a \\ command (and this means the end of a complete row), or, as in this case, a \\end command. In this case, we have to insert the <{} material, and the \end token.
The specifications of the last column are >{\large\itshape 3}x <{z}|. If we replace x by its value, we get >{\large\itshape 3}>{b}c<{a}<{z}| and this is the same as >{b\large\itshape 3}c<{za}|. This strange behavior is explained in the array.sty documentation.
<table rend='inline'>
 <row bottom-border='true' top-border='true'>
  <cell left-border='true' halign='center' right-border='true'><hi rend='large1'>1Ax</hi></cell>
  <cell halign='left' right-border='true'><hi rend='large1'></hi><hi rend='large1'><hi rend='bold'>2By</hi></hi></cell>
  <cell halign='center' right-border='true'>b<hi rend='large1'></hi><hi rend='large1'><hi rend='it'>3Cza</hi></hi></cell>
 </row>
 <row>
  <cell left-border='true' halign='center' right-border='true'><hi rend='large1'>1100x</hi></cell>
  <cell halign='left' right-border='true'><hi rend='large1'></hi><hi rend='large1'><hi rend='bold'>210y</hi></hi></cell>
  <cell halign='center' right-border='true'>b<hi rend='large1'></hi><hi rend='large1'><hi rend='it'>31za</hi></hi></cell>
 </row>
</table>
This is now the second table. Its preamble is|ll|rr|cc|, this means two left-align columns, two right-aligned columns, and two centered columns, with four vertical rules. The table contains three \hline, hence three horizontal rules.
The table contains \multicolumn{2}{|l}{ab} at the start of row 4. This means that a cell spans two columns. The preamble |ll| is replaced by |l, this means an interruption of the second vertical rule. The quantity ab is translated (inside a group), an put in this cell.
The table contains \multicolumn{3}{+}{C} in row 3. We have something that spans three rows, thus removing l|rr| from the preamble, replacing it by +. This is handled like a normal preamble (but for one column only), and here is >{B}l <{D}|. In fact, since the cell contains C, it is as if you said \multicolumn{3}{l|}{BCD}. Normally, the vertical rule implied by the bar should span the whole table. The hole is strange.
The table contains also a \cline{1-3}\cline{6-6} instead of a \hline. This indicates a horizontal rule that spans columns 1, 2, 3 and 6 (hence column 4 and 5 are omitted). In the translation, a bottom-border attribute is used for each cell, instead of a unique attribute for the row. Note that, in the example, there is a cell that spans columns 1 and 2, so that only three cells are marked.
<table rend='inline'>
 <row top-border='true'>
  <cell left-border='true' halign='left'>a</cell>
  <cell halign='left' right-border='true'>b</cell>
  <cell halign='right'>c</cell>
  <cell halign='right' right-border='true'>d</cell>
  <cell halign='center'>e</cell>
  <cell halign='center' right-border='true'>f</cell>
 </row>
 <row bottom-border='true'>
  <cell left-border='true' halign='left'>aaa</cell>
  <cell halign='left' right-border='true'>bbb</cell>
  <cell halign='right'>ccc</cell>
  <cell halign='right' right-border='true'>ddd</cell>
  <cell halign='center'>eee</cell>
  <cell halign='center' right-border='true'>fff</cell>
 </row>
 <row>
  <cell left-border='true' halign='left'>A</cell>
  <cell halign='left' right-border='true' cols='3'>BCD</cell>
  <cell halign='center'>E</cell>
  <cell halign='center' right-border='true'>F</cell>
 </row>
 <row>
  <cell bottom-border='true' left-border='true' halign='left' cols='2'>ab</cell>
  <cell bottom-border='true' halign='right'>c</cell>
  <cell halign='right' right-border='true'>d</cell>
  <cell halign='center'>e</cell>
  <cell bottom-border='true' halign='center' right-border='true'>f</cell>
 </row>
 <row bottom-border='true'>
  <cell left-border='true' halign='left'>aaa</cell>
  <cell halign='left' right-border='true'>bbb</cell>
  <cell halign='right'>ccc</cell>
  <cell halign='right' right-border='true'>ddd</cell>
  <cell halign='center'>eee</cell>
  <cell halign='center' right-border='true'>fff</cell>
 </row>
</table>
The implementation of \cline is the following; assume that the arguments are A and B. If the command is placed after a row contains cells c1, c2, etc, if there are integers i and j, such that the total span of rows less than i is A-1 and the total span of rows with index between i and j is B-A+1 then a bottom-border='true' attribute is added to these cells. If the total span c of the row is at most A-1, then Tralics inserts an empty cell whose span is A-1-c (unless this quantity is zero), then an empty cell with span B-A+1 and a bottom-border='true' attribute. If this fails, the current row is ignored if it contains an empty cell, followed by a possible newline marker; a new row is added, and the previous rule is applied, with c=0. The span attribute has the form cols='3', it is omitted when the value is one. In the example that follows, the effect of the \\ command between the two \cline is to start a new row, and a left aligned cell with a vertical rule on the left. Such a cell is considered empty, thus removed; as a consequence this \\ has no effect at all.
\begin{tabular}{|ll|rr|cc|}
A&\multicolumn{3}{l}{BCD}&E&F\cline{1-3}\\\cline{6-6}
A&\multicolumn{3}{l}{BCD}&E&F\\\cline{1-3}\\\cline{6-6}
z&t\\ \cline{3-3}
\end{tabular}
<table rend='inline'>
  <row>
    <cell halign='left' left-border='true'>A</cell>
    <cell halign='left' cols='3'>BCD</cell>
    <cell halign='center'>E</cell>
    <cell right-border='true' halign='center'>F</cell>
  </row>
  <row>
    <cell bottom-border='true' cols='3'/>
    <cell cols='2'/>
    <cell bottom-border='true'/>
  </row>
  <row>
    <cell halign='left' left-border='true'>A</cell>
    <cell halign='left' cols='3'>BCD</cell>
    <cell halign='center'>E</cell>
    <cell right-border='true' halign='center'>F</cell>
  </row>
  <row>
    <cell bottom-border='true' cols='3'/>
  </row>
  <row>
    <cell halign='left' left-border='true'/>
    <cell cols='4'/>
    <cell bottom-border='true'/>
  </row>
  <row>
    <cell halign='left' left-border='true'>z</cell>
    <cell right-border='true' halign='left'>t</cell>
    <cell bottom-border='true'/>
  </row>
</table>
This package introduces some commands that control the width of horizontal rules in tables. Here is an example from the documentation
\begin{tabular}{@{}llr@{}} \toprule
\multicolumn{2}{c}{Item}\\ \cmidrule(r){1-2}
Animal& Description & Price (\$) \\ \midrule
Gnat & per gram & 13.63 \\
        & each & 0.01\\
Gnu  & stuffed& 92.50 \\
Emu & stuffed & 33.33\\
Armadillo& frozen &8.99 \\ \bottomrule
\end{tabular}
The following three commands \toprule, \midrule and \bottomrule are assumed to be the first rule, an inner rule, or the last rule of the table. There effect is to add to the table some vertical space, a rule, and some other vertical space. The spaces are \aboverulesep and \belowrulesep, except that above the first rule there is \abovetopsep, and below the last rule there is \belowbottomsep. The thickness of a normal rule is \lightrulewidth, but the first and last rules have thickness \heavyrulewidth. The three commands take an optional parameter, the thickness of the rule. The command \specialrule take three arguments: width, space above, and space below. Below is the XML translation; you can see that the default space above the first rule and below the last rule are zero, such zero values are not indicated.
The package provides also \cmidrule. This command takes an optional argument (a width; default is \cmidrulewidth), a trim argument and a column specification. The column specification is an interval, 1-2, in the example above; it says that a rule spanning columns 1 to 2 should be used. The trim argument explains how this rule has to be trimmed on the left, or right, this argument is ignored by Tralics. We use the same algorithm as for \cline. In the case of \cmidrule[3pt](){1-3}\cmidrule[2pt](){3-4}, cell number 3 has a width of 2pt. You can use the command \morecmidrules in order to avoid this. This is implemented as \\.
<table rend='inline'>
  <row top_rule_space_below='2.76247pt' border-top-width='0.80002pt' top-border='true'>
    <cell bottom_rule_space_below='2.76247pt'
     bottom_rule_space_above='1.69997pt' border-bottom-width='0.29999pt'
    bottom-border='true' halign='right' cols='2'>Item
    </cell>
  </row>
  <row bottom_rule_space_below='2.76247pt'
    bottom_rule_space_above='1.69997pt'  border-bottom-width='0.50003pt'
    bottom-border='true'>
    <cell halign='left'>Animal</cell>
    <cell halign='left'>Description</cell>
    <cell>Price ($)</cell>
  </row>
  <row>
    <cell halign='left'>Gnat</cell>
    <cell halign='left'>per gram</cell>
    <cell>13.63</cell>
  </row>
  <row>
    <cell halign='left'/>
    <cell halign='left'>each</cell>
    <cell>0.01</cell>
  </row>
  <row>
    <cell halign='left'>Gnu</cell>
    <cell halign='left'>stuffed</cell>
    <cell>92.50</cell>
  </row>
  <row>
    <cell halign='left'>Emu</cell>
    <cell halign='left'>stuffed</cell>
    <cell>33.33</cell>
  </row>
  <row bottom_rule_space_above='1.69997pt'
    border-bottom-width='0.80002pt' bottom-border='true'>
    <cell halign='left'>Armadillo</cell>
   <cell halign='left'>frozen</cell>
   <cell>8.99</cell>
  </row>
</table>
An example that shows how \morecmidrules works.
\setlength\aboverulesep{6pt}
\setlength\belowrulesep{4pt}
\setlength\cmidrulewidth{5pt}
\begin{tabular}{llll}
a&b&c&d\\ \cmidrule[3pt](rl){1-3}\cmidrule[2pt](lr){3-4}
A&B&C&D\\ \cmidrule[3pt](){1-3}\morecmidrules\cmidrule[2pt](){3-4}
\end{tabular}
<table rend='inline'>
  <row>
    <cell bottom_rule_space_below='4.0pt'
	  bottom_rule_space_above='6.0pt'
	  border-bottom-width='3.0pt' bottom-border='true' halign='left'>a</cell>
    <cell bottom_rule_space_below='4.0pt'
	  bottom_rule_space_above='6.0pt'
	  border-bottom-width='3.0pt' bottom-border='true' halign='left'>b</cell>
    <cell bottom_rule_space_below='4.0pt'
	  bottom_rule_space_above='6.0pt'
	  border-bottom-width='2.0pt' bottom-border='true' halign='left'>c</cell>
    <cell bottom_rule_space_below='4.0pt'
	  bottom_rule_space_above='6.0pt'
	  border-bottom-width='2.0pt' bottom-border='true' halign='left'>d</cell>
  </row>
  <row>
    <cell bottom_rule_space_below='4.0pt'
	  bottom_rule_space_above='6.0pt'
	  border-bottom-width='3.0pt' bottom-border='true' halign='left'>A</cell>
    <cell bottom_rule_space_below='4.0pt'
	  bottom_rule_space_above='6.0pt'
	  border-bottom-width='3.0pt' bottom-border='true' halign='left'>B</cell>
    <cell bottom_rule_space_below='4.0pt'
	  bottom_rule_space_above='6.0pt'
	  border-bottom-width='3.0pt' bottom-border='true' halign='left'>C</cell>
    <cell halign='left'>D</cell>
  </row>
  <row>
    <cell cols='2'/>
    <cell top_rule_space_below='4.0pt' top_rule_space_above='6.0pt'
	  border-top-width='2.0pt' top-border='true' cols='2'/>
  </row>
</table>
back to home page
© INRIA 2005, 2006
Last modified $Date: 2015/11/23 17:24:40 $