
A Comprehensive Solution
for Grid Computing
| Version 3.2.1 2007-04-10 | Copyright © 2001-2007 INRIA |
Disclaimer
ProActive is a GRID middleware Java library for parallel, distributed, and concurrent computing, also featuring mobility and security in a uniform framework. With a reduced set of simple primitives, ProActive provides a comprehensive API allowing to simplify the programming of applications that are distributed on Local Area Network (LAN), on cluster of workstations, on P2P desktop Grids, or on Internet Grids. The library is based on an Active Object pattern that is a uniform way to encapsulate:
a remotely accessible object,
a thread as an asynchronous activity,
an actor with its own script,
a server of incoming requests,
a mobile and potentially secure entity.
On top of those basic features, ProActive also includes advanced aspects, such as:
Typed Group Communications,
Object-Oriented SPMD,
Distributed and Hierarchical Components,
Security,
Fault Tolerance with checkpointing,
a P2P infrastructure,
a powerful deployment model based on XML descriptors,
File transfer capabilities over the Grid,
a Graphical User Interface: IC2D.
ProActive is only made of standard Java classes, and requires no changes to the Java Virtual Machine, no preprocessing or compiler modification; programmers write standard Java code. Based on a simple Meta-Object Protocol, the library is itself extensible, making the system open for adaptations and optimizations. ProActive currently uses the RMI Java standard library as default portable transport layer, and also provides optimized RMI with IBIS, and HTTP transport.
ProActive features several optimizations improving performance. For instance, whenever two active objects are located within the same virtual machine, a direct communication is always achieved, without going through the network stack. This optimization is ensured even when the co-location occurs after a migration of one or both of the active objects.
ProActive and the (de facto) Standards: ProActive has an architecture that allows the library to interoperate with various official or de facto standards:
Web Service Exportation,
HTTP Transport, RMI/SSH tunneling Transport,
ssh, scp, rsh, rcp,
Globus GT2, GT3 and GT4, Unicore, GLite, ARC (NorduGrid), GSI-SSH,
LSF, PBS, Sun Grid Engine, OAR.
|
Team Leader:
Denis Caromel
INRIA
2004, Route des Lucioles
BP 93
06902 Sophia Antipolis Cedex
France
phone: +33 492 387 631
fax: +33 492 387 971
|
|
OASIS Team
|
Past and External Contributors
|
Public questions/comments/discussions should be posted on the ProActive public mailing list
Mailing list archive at
http://www.objectweb.org/wws/arc/proactive
Post bugs to ProActive bug-tracking system GForge
Table of Contents
Part I. Introduction
- Chapter 1. Principles
- Chapter 2. ProActive Installation
- 2.1. Quick Start
- 2.2. Download and expand the archive
- 2.3. Run a few examples for testing
- 2.4. CLASSPATH to set when writing application using ProActive
- 2.5. Create a java.policy file to set permissions
- 2.6. Create a log4j configuration file
- 2.7. ProActive and IDEs (Eclipse, ...)
- 2.8. Troubleshooting and support
- Chapter 3. ProActive Trouble Shooting
Part II. Guided Tour and Tutorial
- Chapter 4. Introduction to the Guided Tour and Tutorial
- Chapter 5. Introduction to ProActive Features
- Chapter 6. Hands-on programming
- Chapter 7. PI (3.14...) - Step By Step
- Chapter 8. SPMD PROGRAMMING
- Chapter 9. The nbody example
- Chapter 10. C3D - from Active Objects to Components
- Chapter 11. Guided Tour Conclusion
Part III. Programming
- Chapter 12. ProActive Basis, Active Object Definition
- Chapter 13. Active Objects: creation and advanced concepts
- 13.1. Instantiation-Based Creation
- 13.2. Object-Based Creation
- 13.3. Specifying the activity of an active object
- 13.4. Restrictions on reifiable objects
- 13.5. Using the Factory Method Design Pattern
- 13.6. Advanced: Customizing the Body of an Active Object
- 13.7. Advanced: Role of the elements of an active object
- 13.8. Asynchronous calls and futures
- 13.9. Automatic Continuation in ProActive
- 13.10. The Hello world example
- Chapter 14. Typed Group Communication
- Chapter 15. OOSPMD
- Chapter 16. Active Object Migration
- Chapter 17. Exception Handling
- Chapter 18. Branch and Bound API
- Chapter 19. High Level Patterns -- The Calcium Skeleton Framework
Part IV. Deploying
- Chapter 20. ProActive Basic Configuration
- Chapter 21. XML Deployment Descriptors
- Chapter 22. Variable Contracts for Descriptors
- Chapter 23. ProActive File Transfer Model
- Chapter 24. Using SSH tunneling for RMI or HTTP communications
- Chapter 25. Fault-Tolerance
- Chapter 26. Technical Service
- Chapter 27. ProActive Grid Scheduler
Part V. Composing
- Chapter 28. Components introduction
- Chapter 29. An implementation of the Fractal component model geared at Grid Computing
- Chapter 30. Configuration
- Chapter 31. Collective interfaces
- Chapter 32. Architecture Description Language
- Chapter 33. Component examples
- Chapter 34. Component perspectives: a support for our research work
Part VI. Advanced
- Chapter 35. ProActive Peer-to-Peer Infrastructure
- Chapter 36. Load Balancing
- Chapter 37. ProActive Security Mechanism
- Chapter 38. Exporting Active Objects and components as Web Services
- 38.1. Overview
- 38.2. Principles
- 38.3. Pre-requisite: Installing the Web Server and the SOAP engine
- 38.4. Steps to expose an active object or a component as a web services
- 38.5. Undeploy the services
- 38.6. Accessing the services
- 38.7. Limitations
- 38.8. A simple example: Hello World
- 38.9. C# interoperability: an example with C3D
- Chapter 39. ProActive on top of OSGi
- Chapter 40. An extended ProActive JMX Connector
- Chapter 41. Wrapping MPI Legacy code
Part VII. Graphical User Interface (GUI) and tools
Part VIII. Extending ProActive
- Chapter 45. How to write ProActive documentation
- Chapter 46. Adding Grahical User Interfaces and Eclipse Plugins
- Chapter 47. Developing Conventions
- Chapter 48. ProActive Test Suite API
- Chapter 49. Adding a Deployment Protocol
- Chapter 50. How to add a new FileTransfer CopyProtocol
- Chapter 51. Adding a Fault-Tolerance Protocol
- Chapter 52. MOP: Metaobject Protocol
Part IX. Back matters
- Appendix A. Frequently Asked Questions
- A.1. Running ProActive
- A.2. General Concepts
- A.2.1.
How does the node creation happen? - A.2.2.
How does the RMI Registry creation happen? - A.2.3.
What is the class server, why do we need it? - A.2.4.
What is a reifiable object? - A.2.5.
What is the body of an active object? What are its local and remote representations? - A.2.6.
What is a ProActive stub? - A.2.7.
Are the call to an Active Object always asynchronous?
- A.2.1.
- A.3. Exceptions
- A.3.1.
Why do I get an exception java.lang.NoClassDefFoundError about asm? - A.3.2.
Why do I get an exception java.lang.NoClassDefFoundError about bcel? - A.3.3.
Why do I get an exception java.security.AccessControlException access denied? - A.3.4.
Why do I get an exception when using Jini? - A.3.5.
Why do I get a java.rmi.ConnectException: Connection refused to host: 127.0.0.1 ?
- A.3.1.
- A.4. Writing ProActive-oriented code
- A.4.1.
Why aren't my object's properties updated? - A.4.2.
How can I pass a reference on an active object or the difference between this and ProActive.getStubOnThis()? - A.4.3.
How can I create an active object? - A.4.4.
What are the differences between instantiation based and object based active objects creation? - A.4.5.
Why do I have to write a no-args constructor? - A.4.6.
How do I control the activity of an active object? - A.4.7.
What happened to the former live() method and Active interface? - A.4.8.
Why should I avoid to return null in methods body? - A.4.9.
How can I use Jini in ProActive? - A.4.10.
How do I make a Component version out of an Active Object version? - A.4.11.
How can I use Jini in ProActive? - A.4.12.
Why is my call not asynchronous?
- A.4.1.
- A.5. Deployment Descriptors
- A.5.1.
What is the difference between passing parameters in Deployment Descriptor and setting properties in ProActive Configuration file? - A.5.2.
Why do I get the following message when parsing my xml deployment file: ERROR: file:~/ProActive/descriptor.xml Line:2 Message:cvc-elt.1: Cannot find the declaration of element 'ProActiveDescriptor'
- A.5.1.
- Appendix B. Reference Card
- B.1. Main concepts and definitions
- B.2. Main principles: asynchronous method calls and implicit futures
- B.3. Explicit Synchronization
- B.4. Programming AO Activity and services
- B.5. Reactive Active Object
- B.6. Service methods
- B.7. Active Object Creation:
- B.8. Groups:
- B.9. Explicit Group Synchronizations
- B.10. OO SPMD
- B.11. Migration
- B.12. Components
- B.13. Security:
- B.14. Deployment
- B.15. Exceptions
- B.16. Export Active Objects as Web services
- B.17. Deploying a fault-tolerant application
- B.18. Peer-to-Peer Infrastructure
- B.19. Branch and Bound API
- B.20. File Transfer Deployment
- Appendix C. Files of the ProActive source base cited in the manual
- Bibliography
- Index
List of Figures
- 1.1. Different computing deployment paradigms
- 1.2. Polymorphism
- 5.1. The active objects in the c3d application
- 5.2. the dispatcher GUI is launched
- 5.3. Specifying the host
- 5.4. The C3D application when a new user joins in, seen with IC2D
- 5.5. IC2D component explorer with the C3D example
- 5.6. Using the readers script
- 5.7. A GUI is started that illustrates the activities of the Reader and Writer objects.
- 5.8. With philosophers.sh or philosophers.bat
- 5.9. The GUI is started.
- 5.10. Monitoring new RMI host with IC2D
- 8.1. Running the Jacobi application, and viewing with IC2D
- 8.2. With all communications
- 8.3. With a barrier, there are many less comunications
- 8.4. IC2D viewing the Jacobi application with 9 JVMS on the same machine
- 8.5. Communication pattern - Step 1
- 8.6. Communication pattern - Step 2
- 9.1. NBody screenshot, with 3 hosts and 8 bodies
- 9.2. NBody screenshot, with the application GUI and Java3D installed
- 9.3. The nbody directory structure
- 9.4. The equation of the force between two bodies
- 10.1. Informal description of the C3D Components hierarchy
- 10.2. IC2D component explorer with the C3D example
- 12.1. The Model: Sequential, Multithreaded, Distributed
- 12.2. A call onto an active object as opposed to a call onto passive one
- 13.1. The components of an active object
- 13.2. A future object
- 13.3. Sequence Diagram - single-threaded version of the program
- 13.4. The components of an active object
- 13.5. The components of a future object before the result is set
- 13.6. All components of a future object
- 13.7. Sequence Diagram
- 13.8. Sequence Diagram
- 18.1. The API architecture.
- 18.2. Broadcasting a new solution.
- 19.1. Task Flow in Calcium
- 23.1. File Transfer Design
- 25.1. The nbody application, with Fault-Tolerance enabled
- 27.1. Representation of the scheduler and of its main objects
- 27.2. A short description of the mechanism of job deployment and submission
- 29.1. A system of Fractal components
- 29.2. A system of distributed ProActive/Fractal components (blue, yellow and white represent distinct locations)
- 29.3. Match between components and active objects
- 29.4. ProActive's Meta-Objects Protocol.
- 29.5. The ProActive MOP with component meta-objects and component representative
- 30.1. Using short cuts for minimizing remote communications.
- 31.1. Multicast interfaces for primitive and composite component
- 31.2. Broadcast and scatter of invocation parameters
- 31.3. Comparison of signatures of methods between client multicast interfaces and server interfaces.
- 31.4. Gathercast interfaces for primitive and composite components
- 31.5. Aggregation of parameters with a gathercast interface
- 31.6. Comparison of signature of methods for bindings to a gathercast interface
- 33.1. Client and Server wrapped in composite components (C and S)
- 33.2. Without wrappers, the primitive components are distributed.
- 33.3. With wrappers, where again, only the primitive components are distributed.
- 35.1. A network of hosts with some running the P2P Service
- 35.2. New peer trying to join a P2P network
- 35.3. Heart beat sent every TTU
- 35.4. Asking nodes to acquaintances and getting a node
- 35.5. Nodes and Active Objects which make up a P2P Service.
- 35.6. Dynamic Shared ProActive Typed Group.
- 35.7. nBody application deployed on P2P Infrastructure.
- 35.8. Usage example P2P network (after firsts connections)
- 35.9. A P2P Service which is sharing nodes deployed by a descriptor
- 37.1. A typical object graph with active objects
- 37.2. Certificate chain
- 37.3. Hierarchical security
- 37.4. Syntax and attributes for policy rules
- 37.5. Hierarchical Security Levels
- 37.6. The ProActive Certificate Generator (for oasis)
- 37.7. The ProActive Certificate Generator (for proactive)
- 38.1. This figure shows the steps when a active object is called via SOAP.
- 38.2. The dispatcher handling all calls
- 38.3. The first screenshot is a classic ProActive application
- 38.4. C# application communicating via SOAP
- 39.1. The OSGi framework entities
- 39.2. The Proactive Bundle uses the standard Http Service
- 40.1. This figure shows the JMX 3 levels architecture and the integration of the ProActive JMX Connector.
- 41.1. File transfer and asking for resources
- 41.2. State transition diagram
- 41.3. MPI to ProActive communication
- 41.4. ProActive to MPI communication
- 41.5. File transfer and asking for resources
- 41.6. Jacobi Relaxation - Domain Decomposition
- 41.7. IC2D Snapshot
- 41.8. Proxy Pattern
- 41.9. Process Package Architecture
- 42.1. The Monitoring Perspective
- 42.2. Monitor New Host Dialog
- 42.3. Monitor a new host
- 42.4. Set depth control
- 42.5. Set time to refresh
- 42.6. Refresh
- 42.7. Enable/Disable Monitoring
- 42.8. Show P2P objects
- 42.9. Zoom In
- 42.10. Zoom out
- 42.11. New Monitoring View
- 42.12. Virtual nodes List
- 42.13. Select the Job Monitoring view in the list
- 42.14. Select the Monitoring model
- 42.15. The monitoring views
- 42.16. Monitoring of 2 applications
- 42.17. The "Open Perspective" window
- 42.18. The open with action
- 42.19. The Launcher perspective
- 42.20. A wizard popup
- 42.21. The editor error highlighting
- 42.22. The plugin's interface
- 43.1. Main frame
- 43.2. Deployment of the application
- 43.3. Creation of a task
- 43.4. Display a result
- 43.5. State of Engines
- 45.1. A Drawing using the FIGURE tag
- 46.1. Graphical representation of the data
- 46.2. Class diagram
- 46.3. The world exploring itself for the first time
- 46.4. The Models
- 46.5. The Controllers and the factory
- 46.6. The Views
- 46.7. The data strucure of the monitoring plugin
- 46.8. Observable objects
- 46.9. Observer objects
- 46.10. Spy classes
- 46.11. Active Objects' events management
- 46.12. SVN Repository
- 46.13. ic2d.product
- 46.14. Create a new project
- 46.15. Specify name and plug-in structure
- 46.16. Specify plug-in content
- 46.17. The plug-in structure
- 46.18. Interface for editing the manifest and related files.
- 46.19. Configuration
- 46.20. Plug-in selection
- 46.21. About product Plug-ins
- 46.22. Workbench structure
- 46.23. Extensions tab (no extensions)
- 46.24. Extensions tab (org.eclipse.ui.perspectives)
- 46.25. Extensions tab (Example)
- 49.1. core.process structure
- 52.1. Metabehavior hierarchy
List of Tables
- 2.1. ProActive.zip contents
- 8.1. MPI to ProActive
- 13.1. Future creation, and asynchronous calls depending on return type
- 22.1. Variable Types
- 37.1. Result of security negotiations
- 41.1. Simple Wrapping of MPI Code
- 41.2. API for creating one Active Object per MPI process
- 41.3. MPI to ProActive Communications API
- 41.4. Java API for MPI message conversion
- 41.5. ProActiveMPI API for sending messages to MPI
- 41.6. MPI message reception from ProActive
- 41.7. MPI to MPI through ProActive C API
- 41.8. MPI to MPI through ProActive Fortran API
- 45.1. This is an example table
- 46.1. Observable and Observer objects
List of Examples
- 1.1. Class-based Active Object
- 1.2. Instantiation-based Active Object
- 1.3. Object-based Active Object
- 1.4. A possible implementation for the
TinyHelloclass - 2.1. A simple proactive-log4j file
- 10.1. The UserImpl class, a component wrapper
- 10.2. userAndComposite.fractal, a component ADL file
- 10.3. How to rename Virtual Nodes in ADL files
- 10.4. Component Lookup and Register
- 13.1. Custom Init and Run
- 13.2. Start, stop, suspend, restart a simulation algorithm in runActivity method
- 13.3. Reactive Active Object
- 13.4. A possible implementation for the
Helloclass: - 13.5. HelloClient.java
- 20.1. A configuration file example
- 21.1. C3D_Dispatcher_Render.xml
- 21.2. C3D_User.xml
- 43.1. Example: Interface Scilab
- 43.2. Descriptor deployment
- 45.1. JAVA program listing with file inclusion
- 45.2. XML program listing with file inclusion
- 46.1. MANIFEST.MF
- 46.2. ExamplePlugin.java
- 46.3. build.properties
- 46.4. plugin.xml
- 46.5. ExamplePlugin.java
- 47.1. declaring P2P loggers in the interface org.objectweb.proactive.core.util.Loggers
- 48.1. Example of HTML results
- 48.2. Agent class
- C.1. examples/RSH_Example.xml
- C.2. examples/SSH_Example.xml
- C.3. examples/SSHList_example.xml
- C.4. examples/SSHListbyHost_Example.xml
- C.5. examples/SSH_LSF_Example.xml
- C.6. examples/SSH_PBS_Example.xml
- C.7. examples/SSH_SGE_Example.xml
- C.8. examples/SSH_OAR_Example.xml
- C.9. examples/SSH_OARGRID_Example.xml
- C.10. examples/SSH_PRUN_Example.xml
- C.11. examples/Globus_Example.xml
- C.12. examples/Unicore_Example.xml
- C.13. examples/NorduGrid_Example.xml
- C.14. examples/SSH_GLite_Example.xml
- C.15. examples/SSH_MPI_Example.xml
- C.16. InitActive.java
- C.17. RunActive.java
- C.18. EndActive.java
- C.19. core/body/MetaObjectFactory.java
- C.20. core/body/ProActiveMetaObjectFactory.java
- C.21. ProActive.java
- C.22. core/process/ssh/SSHProcessList.java
- C.23. core/process/rsh/RSHProcessList.java
- C.24. core/process/rlogin/RLoginProcessList.java
- C.25. core/descriptor/data/ProActiveDescriptor.java
- C.26. Body.java
- C.27. core/body/UniversalBody.java
- C.28. InitializedHello.java
- C.29. InitializedHelloClient.java
- C.30. MigratableHello.java
- C.31. MigratableHelloClient.java
- C.32. HelloFrameController.java
- C.33. HelloFrame.java
- C.34. P2P configuration: proactivep2p.xsd
- C.35. P2P configuration: sample_p2p.xml
- C.36. SOAP configuration: webservices/web.xml
- C.37. MPI Wrapping: mpi_files/MPIRemote-descriptor.xml
GRID computing is now a key aspect, from scientific to business applications, from large scale simulations to everyday-life enterprise IT, including telcos and embedded domains. We are just entering the era of Ubiquitous Computing with many computers at hand of every single individual - after the old days of mainframes and servers, hundreds of persons sharing the same machines, and the quite current days of PCs, one person/one computer. Potentially spanning all over the world, involving several thousands or several hundred thousands of nodes, the programming of Grid applications call for a new paradigms. The ProActive Grid solution relies on systematic asynchronous method calls, allowing to master both complexity and efficiency.
Overall, ProActive promotes a few basic and simple principles:
Activites are distributed, remotely accessible objects
Interactions are done through asynchronous method calls
Results of interactions are called futures and are first class entities.
Callers can wait for results using a mechanism called wait-by-necessity
ProActive takes advantage of this sound programming model, to further propose advanced features such as groups, mobility, and components. In the framework of a formal calculus, ASP (Asynchronous Sequential processes), confluence and determinism have been proved for this programming model: CH05 and CHS04.
Asynchronous method calls with returns lead to an emerging abstraction: futures, the expected result of a given asynchronous method call. Futures turn out to be a very effective abstraction for large distributed systems, preserving both low coupling and high structuring.
Asynchronous method calls and first-class futures are provided in the unifying framework of an Active Object.
Most of the time, activities and distribution are not known at the beginning, and change over time. Seamless implies reuse, smooth and incremental transitions.
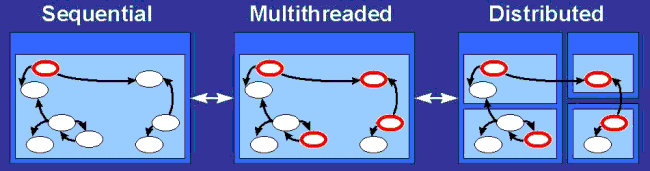
A huge gap still exists between multithreaded and distributed Java applications which impedes code reuse in order to build distributed applications from multithreaded applications. Both JavaRMI and JavaIDL, as examples of distributed object libraries in Java, put a heavy burden on the programmer because they require deep modifications of existing code in order to turn local objects into remotely accessible ones. In these systems, remote objects need to be accessed through some specific interfaces. As a consequence, these distributed objects libraries do not allow polymorphism between local and remote objects. This feature is our first requirement for a Grid Computing framework. It is strongly required in order to let the programmer concentrate first on modeling and algorithmic issues rather than lower-level tasks such as object distribution, mapping and load balancing.
Active Objects are the core of the ProActive
computing concept. An Active Object is both a Remote
Object (which allows to deploy it on a distant host) and a
Thread (which gives it its own activity, its own
independant behaviour and in concurrency with other Active Objects
deployed). Given a standard object, turning it into an Active Objects
provides:
location transparency
activity transparency
synchronization
Communications to an active object are by default asynchronous. So, an active object is: a main object + a single thread + a queue of pending requests. As such, a reference to a remote object is equivalent to a reference to a remote activity. An activity is an object ; but being in a non-uniform model, not all objects are active objects, the majority remaining standard Java objects. As there cannot be any sharing, an active object is also a unit of computational mobility (see Chapter 16, Active Object Migration).
![[Note]](images/note.png) | Note |
|---|---|
The |
On activation, an object becomes a remotely accessible entity with
its own thread of control: an active object. Here are given as example
three ways to transform a standard Object into an
Active Object:
Object[] params = new Object[] { new Integer (26), "astring" };
A a = (A) ProActive.newActive("example.A", params, node);
Example 1.1. Class-based Active Object
public class AA extends A implements Active {}
Object[] params = new Object[] { new Integer (26), "astring" };
A a = (A) ProActive.newActive("example.AA", params, node);
Example 1.2. Instantiation-based Active Object
Object-based Active Objects Allows to turn active
and set remote objects for which you do not have the source code; this is
a necessary feature in the context of code mobility.
A a = new A (26, "astring");
a = (A) ProActive.turnActive(a, node) ;
Example 1.3. Object-based Active Object
| Note |
|---|---|
Nodes allow to control the mapping to the hosts. See Section 13.1.2, “Using a Node” for an example use of a Node, and Section 21.2, “Principles” for a definition. |
Here is a summary of the computation model being used by ProActive:
Heterogeneous model both passive and active objects
Systematic asynchronous communications towards active objects
No shared passive object , Call-by-value between active objects
Automatic continuations , a transparent delegation mechanism
wait-by-necessity , automatic and transparent futures
Centralized and explicit control , libraries of abstractions
To compare to Java RMI, a Java remote object is not by essence an
activity. The fact that several threads can execute several remote method
calls simultaneously within a remote object does reveal that facet. When
writing ro.foo(p);, what ro identifies is not a remote
activity, but just a remote object. This has several consequences, along
with the presence of sharing between remote objects that prevents them
from being a unit of computational migration.
Two key features:
Wait-by-necessity: inter-objects synchronization. Systematic, implicit and transparent futures. Ease the programming of synchronization and reuse of existing methods
Polymorphism between standard and active objects
Type compatibility for classes and not just for interfaces
Needed and done for the future objects as well
Dynamic mechanism (dynamically achieved if needed)
This example implements the smallest program in ProActive. This is the easiest program you could write, using the Active Object concept. This is just to show quickly how code can be written, with minimal knowledge of the API.
You can get a more complete 'hello world' example, with deployment on a remote host, further on in the manual (Section 13.10, “The Hello world example”).
A client object displays a String received from
elsewhere (the original VM). This illustrates the creation of an Active
Object.
Only one class is needed: we have put the main method inside the class, which when deployed will be an Active Object.
This class can be used as an Active Object, serving requests. Its creation involves the following steps:
Provide an implementation for the required server-side functionalities
Provide an empty, no-arg constructor
Write a
mainmethod in order to instantiate one server object.
            public class TinyHello implements java.io.Serializable {
    static Logger logger = ProActiveLogger.getLogger(Loggers.EXAMPLES);
    private final String message = "Hello World!";

    /** ProActive compulsory no-args constructor */
    public TinyHello() {
    }

    /** The Active Object creates and returns information on its location
     * @return a StringWrapper which is a Serialized version, for asynchrony */
    public StringMutableWrapper sayHello() {
        return new StringMutableWrapper(
            this.message + "\n from " + getHostName() + "\n at " +
            new java.text.SimpleDateFormat("dd/MM/yyyy HH:mm:ss").format(new java.util.Date()));
    }

    /** finds the name of the local machine */
    static String getHostName() {
        try {
            return java.net.InetAddress.getLocalHost().toString();
        } catch (UnknownHostException e) {
            return "unknown";
        }
    }

    /** The call that starts the Acive Objects, and displays results.
     * @param args must contain the name of an xml descriptor */
    public static void main(String[] args)
        throws Exception {
        // Creates an active instance of class Tiny on the local node
        TinyHello tiny = (TinyHello) ProActive.newActive(
                TinyHello.class.getName(), // the class to deploy
                null // the arguments to pass to the constructor, here none
            ); // which jvm should be used to hold the Active Object

        // get and display a value
        StringMutableWrapper received = tiny.sayHello(); // possibly remote call
        logger.info("On " + getHostName() + ", a message was received: " + received); // potential
 wait-by-necessity
        // quitting

        ProActive.exitSuccess();
    }
}
Example 1.4. A possible implementation for the TinyHello
class
Implementing any remotely-accessible functionality is simply done
through normal Java methods in a normal Java class, in exactly the same
manner it would have been done in a non-distributed version of the same
class. Here, the only method is sayHello
Now that we know how to write the class that implements the
required server-side functionalities, let us see how to create the
server object. We want this active object to be created on the current
node, which is why we use newActive with only two
parameters (done in the main method).
The code snippet which instantiates the
TinyHello in the same VM is the following (in the
main method):
        TinyHello tiny = (TinyHello) ProActive.newActive(
                TinyHello.class.getName(), // the class to deploy
                null // the arguments to pass to the constructor, here none
            ); // which jvm should be used to hold the Active Object
This is exactly like invoking a method on a local object of the same type. The user does not have to deal with catching exceptions related to the distant deployment.
As already stated, the only modification brought to the code by
ProActive is located at the place where active objects are created. All
the rest of the code remains the same, which fosters software reuse. So
the way to call the sayHello method in this example
is the following (in the main method):
        StringMutableWrapper received = tiny.sayHello(); // possibly remote call
        logger.info("On " + getHostName() + ", a message was received: " + received); // potential
 wait-by-necessity
To launch the example, you may type:
linux> java -cp $CLASSPATH -Djava.security.policy=scripts/proactive.java.policy
            -Dlog4j.configuration=file:scripts/proactive-log4j
            org.objectweb.proactive.examples.hello.TinyHello
windows> java -cp $CLASSPATH -Djava.security.policy=scripts\proactive.java.policy
-Dlog4j.configuration=file:scripts\proactive-log4j
org.objectweb.proactive.examples.hello.TinyHelloThere are also scripts in the scripts
directory:
linux> cd scripts/unix/
linux> tinyHello.sh
windows> cd scripts/windows
windows> tinyHello.bat
[apple unix]tinyhello.sh
--- Hello World tiny example ---------------------------------
> This ClassFileServer is reading resources from classpath
ProActive Security Policy (proactive.runtime.security) not set. Runtime Security disabled
Created a new registry on port 1099
//apple.inria.fr/Node628280013 successfully bound in registry at //apple.inria.fr/Node628280013
Generating class: pa.stub.org.objectweb.proactive.examples.hello.Stub_TinyHello
Generating class: pa.stub.org.objectweb.proactive.core.util.wrapper.Stub_StringMutableWrapper
On apple/138.96.218.62, a message was received: Hello World!
  from apple/138.96.218.62
  at 03/11/2005 14:25:32
ProActive is made available for download under a LGPL license. ProActive requires the JDK 1.5 or later to be installed on your computer. Please note that ProActive will NOT run with any version prior to 1.5 since some features introduced in JDK 1.5 are essential.
Download and unzip the ProActive archive
Include in your
CLASSPATHthe ProActive jar file (ProActive/ProActive.jar) along withProActive/lib/javassist.jar, ProActive/lib/log4j.jar, ProActive/lib/xercesImpl.jar, ProActive/lib/components/fractal.jar, ProActive/lib/bouncycastle.jarDepending on your project needs, you might need to include other libraries located in the ProActive/lib directory.
Don't forget to launch the JVM with a security policy file using the option -Djava.security.policy=pathToFile. A basic policy file can be found at ProActive/scripts/proactive.java.policy. You can also specify a log4j configuration file with the property
-Dlog4j.configuration=file:pathToFile. If not specified a default logger that logs on the console will be created.
Below are described the different steps in more details.
You can download the archive file (a standard zip file) containing ProActive from the download section of the ProActive home page. You will be asked to accept the licence agreement and provide a few personal details including your email address. You will then within a few minutes receive an email.
Unzip the archive using your favorite ZIP program, such as Winzip under Windows or the unzip command-line utility on most Unix systems. Unzipping the archive creates a ProActive directory and all the files contained in the archive go into this directory and its subdirectories.
Here is a quick overview of the directory structure of the archive:
Directory or File | Description |
| ProActive bytecode that you need to include in the CLASSPATH in order to use ProActive |
| The bytecode and resources of all examples included
with ProActive. This jar file needs to be included in the
CLASSPATH only when trying to run the examples. All examples rely
on ProActive and therefore the |
| The bytecode and resources of IC2D. This jar file
needs to be included in the CLASSPATH only when trying to run the
application IC2D. IC2D relies on ProActive and therefore the
|
| The external libraries used by ProActive |
| ProActive documentation including the full api doc |
| Unix sh scripts for running the examples |
| Windows .bat batch files for running the examples |
| For source version only, the full source code of ProActive |
| For source version only, the scripts to compile ProActive using Ant. |
Table 2.1. ProActive.zip contents
You can try to run the test applications provided with ProActive.
Each example comes with a script to launch the application. Depending on
you operating system, the script you need to launch is located either in
ProActive/scripts/unix or
ProActive/scripts/windows. The source code of all
examples can be found in the directory
ProActive/src/org/objectweb/proactive/examples.
A simple example
script :
hello.shorhello.batsource :
examples/hello
This example is the ProActive version of the Readers/Writers canonical problem. To illustrate the ease-of-use of the ProActive model, different synchronization policies can be applied without even stopping the application. This example is based on a easy to use Swing GUI.
script :
readers.shorreaders.batsource :
examples/readers
This example is one possible implementation of the well-known Dining Philosophers synchronization problem. This example is based on a easy to use Swing GUI.
script :
philosophers.shorphilosophers.batsource :
examples/philosophers
Note that if you use the scripts provided with the distribution to run the examples you do not need to update your classpath.
In order to use ProActive in your
application you need to place in your CLASSPATH the
following jars files :
lib/ProActive.jarThe library itself.lib/javassist.jar in lib directory. It is used to handle bytecode manipulation.
lib/log4j.jarLog4j is the logging mechanism used in ProActive.lib/xercesImpl.jarXerces is the library used to parse and validate xml files, like Deployment Descriptors, Configuration files and Component files (see Chapter 21, XML Deployment Descriptors, Chapter 20, ProActive Basic Configuration, and Chapter 28, Components introduction).lib/components/fractal.jar Fractal is the component model used for ProActive Components (see Chapter 28, Components introduction).
lib/bouncycastle.jarThis library is used by the ProActive security framework (see Chapter 37, ProActive Security Mechanism).
You do not need to modify your CLASSPATH permanently as long as you include the two entries above using a Java IDE or a shell script.
In addition to the jar files above you may want to add the following jar files. None of them are used directly by the core functionnalities of ProActive but only in part of the library. Their are needed to compile all the code but they are not needed at runtime if those specific functionnalities are not used.
lib/jsch.jar Used when tunneling with rmissh.
lib/jini/*.jar Used to interface with Jini.
lib/globus/*.jar Used to interface with Globus.
lib/components/*.jar Used by the the Fractal components.
lib/ws/*.jar Used by the Web Services features in ProActive.
lib/ibis.jar Used by Ibis if configured as communication protocol.
lib/unicore/*.jar Used when deploying to a unicore site.
lib/glite/*.jar Used to deploy on gLite sites.
If you use the scripts provided with the distribution to run the examples an existing policy file named proactive.java.policy will be used by default.
See Permissions in the JavaTM 2 SDK to learn more about Java permissions. The option -Djava.security.policy=pathToFile will specify which policy file to use within proactive. As a first approximation, you can create a simple policy file granting all for everything :
grant {
    permission java.security.AllPermission;
}; | Note |
|---|---|
If you use the scripts provided with the distribution to run the
examples an existing log4j file named |
          # the default logging level is INFO

log4j.rootLogger=INFO, A1

#A1 uses PatternLayout
#and displays the associated message (%m)
#using the platform dependant separator (%n)
#Use %M for method names
#see log4j documentation for details

log4j.appender.A1=org.apache.log4j.ConsoleAppender
log4j.appender.A1.layout=org.apache.log4j.PatternLayout
log4j.appender.A1.layout.ConversionPattern=%m %n

#this appender displays :
# %c : name of logger,
# %C : name of the class,
# %M : method name,
# %L : line number, and the message with the following pattern
#log4j.appender.A1.layout.ConversionPattern=%c - %C{1}@%M,line %L :%n %m%n

########### Change here default logging level on a
########### per-logger basis
########### usage is log4j.logger.className=Level, Appender
Example 2.1. A simple proactive-log4j file
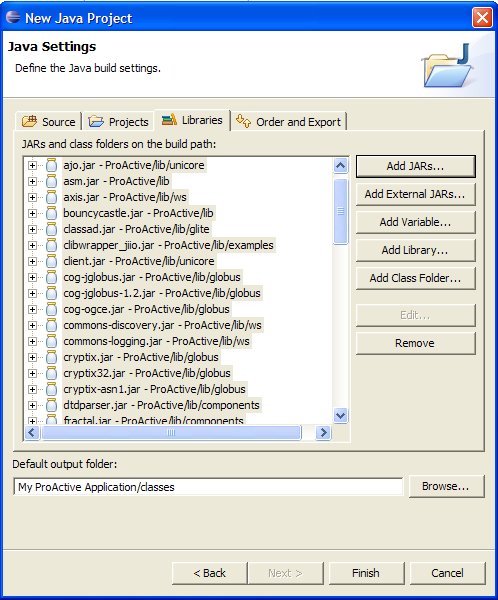
We recommend you use the Eclispe IDE to develop your ProActive applications. You can get this tool on the Eclipse website Just unzip and launch the eclipse executable. In order to develop your own ProActive application, you will need to create an eclipse project :
File -> New ... -> Project
Then choose Java Project . A wizard should appear and ask you to enter the project name :

In order to separate class files from source files (it can be useful if you write scripts which refer to these classes), you can check the Create separate source and ouput folders in the Project Layout Frame, and click on configure default ... to choose the folders names. Once you have choosen all informations about Project Name , Project location , you can click on Next .
You have to specify some java settings in order to set the application classpath. Select the Librairies tab and click on the Add External Jar... button. Add the ProActive.jar and the librairies contained in the lib/ directory of the ProActive distribution.
The Librairies tab should look like this :
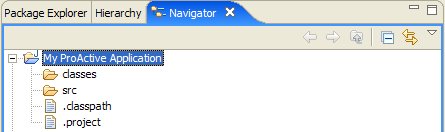
You can see now on the navigator tab on the left side, that there is a new Project with the source and output folders you've just created :
You are now able to create classes and packages that use the ProActive library.
| Note |
|---|---|
There is one file which is problematic with Eclipse:
compile$
      build compile
), there are no problems. The script checks the
java3d installation before compiling the 3d class. When java3d is not
installed, the nbody example only works only in 2d. |
All is now configured to create your ProActive application. Click on the Finish button.
We are currently developing an Eclipse plugin that will help developers to easily create ProActive applications. Have a look at the plugin documentation page, Chapter 42, IC2D: Interactive Control and Debugging of Distribution and Eclipse plugin .
If you encounter any problem with installing ProActive and running the examples, please make sure you correctly followed all the steps described above. If it doesn't help, here is a list of the most common mistakes:
Permission denied when trying to launch scripts under Linux Permissions do not allow to execute files. Just change the permissions with chmod 755 *.sh
Java complains about not being able to find ProActive's classes. Your
CLASSPATHenvironment variable does not contain the entry for the ProActive's or ASM's or Log4j's or Xerces' or Fractal's or BouncyCastle's classes.ProActive.jar,asmXX.jar, log4j.jar, xercesImpl.jar, fractal.jar, bouncycastle.jarmust be in yourCLASSPATH.Java complains about denial of access. If you get the following exceptions, you probably didn't change the file java.policy as described in Section 2.5, “Create a java.policy file to set permissions”.
org.objectweb.proactive.NodeException:
java.security.AccessControlException: access denied
(java.net.SocketPermission 127.0.0.1:1099 connect,resolve)
                at org.objectweb.proactive.core.node.rmi.RemoteNodeImpl.<init>(RmiNode.java:17)
                at org.objectweb.proactive.core.node.rmi.RemoteNodeFactory._createDefaultNode
                        (RmiNodeFactory.java, Compiled Code)
                at org.objectweb.proactive.core.node.NodeFactory.createDefaultNode(NodeFactory.java:127)
                at org.objectweb.proactive.core.node.NodeFactory.getDefaultNode(NodeFactory.java:57)
                at org.objectweb.proactive.ProActive.newActive(ProActive.java:315)
                ...
Exception in thread "main" java.lang.ExceptionInInitializerError:
java.security.AccessControlException: access denied
(java.util.PropertyPermission user.home re ad)
                at java.security.AccessControlContext.checkPermission (AccessControlContext.java, Compiled Code)
                at java.security.AccessController.checkPermission(AccessController.java:403)
                at java.lang.SecurityManager.checkPermission(SecurityManager.java:549)
                at java.lang.SecurityManager.checkPropertyAccess(SecurityManager.java:1243)
                at java.lang.System.getProperty(System.java:539)
                at org.objectweb.proactive.mop.MOPProperties.createDefaultProperties (MOPProperties.java:190)
                ...
Java complains log4j initialization If you get the following message, you probably made a mistake when giving the
-Dlog4j.configurationproperty to the java command. Be sure that the given path is right, try also to add file: before the path.log4j:WARN No appender could be found for logger ..... log4j:WARN Please initialize the log4j system properlyExamples and compilation do not work at all under Windows system: Check if your java installation is not in a path containing spaces like C:\Program Files\java or C:\Documents and Settings\java. Batch scripts, indeed, do not run properly when JAVA_HOME is set to such a directory. To get rid of those problems, the best thing to do is to install the jdk under a space-free directory and path (e.g. C:\java\j2sdk.... or D:\java\j2sdk... ) and then set the JAVA_HOME environment variable accordingly.
If you cannot solve the problem, feel free to email us for support
at <proactive@objectweb.org>. Make sure that you include a
precise description of your problem along with a full copy of the error
message you get.
In this section we present common problems encountered while trying to use ProActive. For further assistance, please post your question on the ProActive mailing list proactive@objectweb.org .
To enable the debuging logger the following log file can be used:
-Dlog4j.configuration=file:ProActive/compile/proactive-log4j
In this file, the relevant loggers can be uncommented (by removing the leading #). For example, the deployment loggers are activated with the following lines:
log4j.logger.proactive.deployment = DEBUG, CONSOLE
log4j.logger.proactive.deployment.log = DEBUG, CONSOLE
log4j.logger.proactive.deployment.process = DEBUG, CONSOLE
To function properly, ProActive requires machines to have a correctly configured hostname and domain name. If the names of a machines is not properly configured, then remote nodes will be unable to locate the machine.
To test if the involved machines are properly configured, in L(U)nix you can run the following commands:
$>hostname
localhost     //This is an error!

$>hostname -i
127.0.0.1     //This is an error!
hostname should print the hostname of the machine as known by the other hosts, and hostname -i should return the network interface accessible by other machines.
To work around misconfigured domain names ProActive can be activated to use IP adresses through the following java property:
-Dproactive.useIPaddress=true
This property should be given as parameter to java virtual machines deployed on machines who's names can not be properly resolved.
ProActive provides rmi tunneling through ssh for crossing firewalls that only allow ssh connections. Things to verify when using rmissh tunneling:
ProActlive/lib/jsch.jar must be uncluded in the classpath of the concerned machines.
The jvm that is only accesible with ssh must be started using: -Dproactive.communication.protocol=rmissh
A key without a passhprase must be installed on the machine accepting connections with ssh. It should be possible to log into the site without using an ssh-agent and without providing a password.
Methods that will be called remotely on an active object must be public. While java will impose this restriction between classes of different types, this problem usually takes place when invoking a remote method on an object of the same type.
class A{

  public void foo(A a){
   ...
   a.bar();           //This call will not be handled by the remote active object!!!
   ...
  }

  private void bar(){  //To fix this, change this method to public.
   ...
  }
}This tour is a practical introduction to ProActive, giving an illustrated introduction to some of the functionality and facilities offered by the library, by means of a step-by-step tutorial.
First off, we give an explaination on how to install and configure ProActive, in Section 4.2, “Installation and setup”.
Next are introduced several features of the library through some running examples, in Chapter 5, Introduction to ProActive Features.
Then are given some details on how this is put down in code, and you will be challenged to write your bits of code, in Chapter 6, Hands-on programming. This should give you practical experience on how to program using ProActive.
Chapter 8, SPMD PROGRAMMING, will show how to use the OO-SPMD (Object-Oriented Single Program Multiple Data) programming paradigm.
The second-last part is the complete N-Body example, in Chapter 9, The nbody example. This application is first written trivially, then some speed-ups are inserted, to show how ProActive can help you.
Finally, we close the tutorial off by showing some components. In Chapter 10, C3D - from Active Objects to Components, the C3D example is wrapped with components, and is this way exposed as components.
We hope this will help your understanding of the library and the concepts driving it.
If you need further details on how the examples work, check the ProActive applications page.
Follow the instructions for downloading and installing ProActive, in Chapter 2, ProActive Installation.
The programming exercises in the first part imply that you:
Don't forget to add the required libraries to your classpath (i.e. the libraries contained in the ProActive/lib directory, as well as either the proactive.jar archive, or the compiled classes of proactive (better if you modify the source code)
use a policy file, such as ProActive/scripts/proactive.security.policy, with the JVM option -Djava.security.policy=/filelocation/proactive.java.policy
Set the CLASSPATH as follow, putting on one line:
Under linux:
export CLASSPATH=.:./ProActive_examples.jar:./ProActive.jar:./lib/bcel.jar:\
./lib/asm.jar:./lib/log4j.jar:./lib/xercesImpl.jar:\
./lib/components/fractal.jar:./lib/bouncycastle.jar
Under windows:
set CLASSPATH=.;.\ProActive_examples.jar;.\ProActive.jar;.\lib\bcel.jar;\
.\lib\asm.jar;.\lib\log4j.jar;.\lib\xercesImpl.jar;\
.\lib\components\fractal.jar;.\lib\bouncycastle.jar
Concerning the second part of the tutorial (examples of some functionalities):
Note that the compilation is managed by Ant ; we suggest you use this tool to make modifications to the source code, while doing this tutorial. Nevertheless, you can just change the code and recompile using
compile.sh(orcompile.batunder windows)The examples used in the second part of this tutorial are provided in the /scripts directory of the distribution.
The scripts are platform dependant:
.shfiles on linux are equivalent to the.batfiles on windows.

This chapter will present some of the features offered by ProActive, namely:
parallel processing: how you can run several tasks in parallel.
synchronization: how you can synchronize tasks.
migration: how you can migrate Active Objects.
Distribution is often used for CPU-intensive applications, where parallelism is a key for performance.
A typical application is C3D.
Note that parallelisation of programs can be facilitated with ProActive, thanks to asynchronous method calls (see Section 13.8, “Asynchronous calls and futures”), as well as group communications (see Chapter 14, Typed Group Communication).
C3D is a Java benchmark application that measures the performance of a 3D raytracer renderer distributed over several Java virtual machines using Java RMI. It showcases some of the benefits of ProActive, notably the ease of distributed programming, and the speedup through parallel calculation.
Several users can collaboratively view and manipulate a 3D scene. The image of the scene is calculated by a dynamic set of rendering engines using a raytracing algorithm, everything being controlled by a central dispatcher.
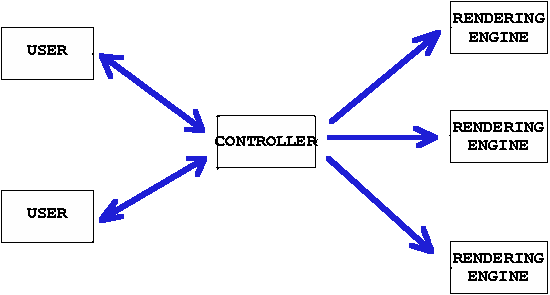
Using the script c3d_no_user, a "Dispatcher"
object is launched (ie a centralized server) as well as 4 "Renderer"
objects, which are active objects to be used for parallel
rendering.
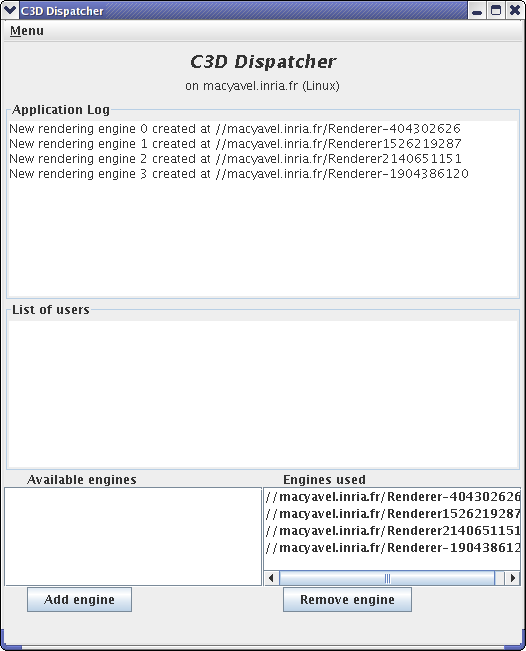
The bottom part of the window allows to choose which renderers should participate in the rendering. You may want to stop using a given machine (because for instance it is overloaded), and thus remove it from the renderers used in the current computation.
Using c3d_add_user,
Connect on the current host (proposed by default) by just giving your name.
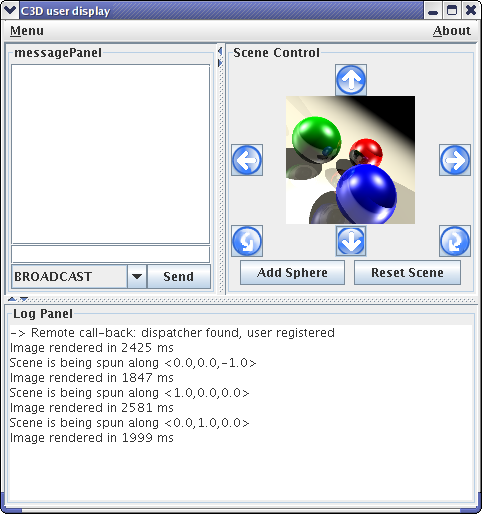
For example, the user 'alice'
Spin the scene, add a random sphere, and observe how the action takes place immediately
Add and remove renderers, and observe the effect on the 'speed up' indication from the user window.
Which configuration is the fastest for the rendering?
Are you on a multi-processor machine?
| Note |
|---|---|
You might not perceive the difference of the performance. The difference is better seen with more distributed nodes and objects (for example on a cluster) . |
Using the c3d_add_user script, and
specifying the host (set to local host
bydefault)
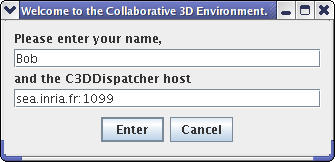
If you use rlogin, make sure the DISPLAY is properly set. You must use the same version of ProActive on both machines!
Test the collaborative behavior of the application when several users are connected.
Notice that a collaborative consensus must be reached before starting some actions (or that a timeout occured).
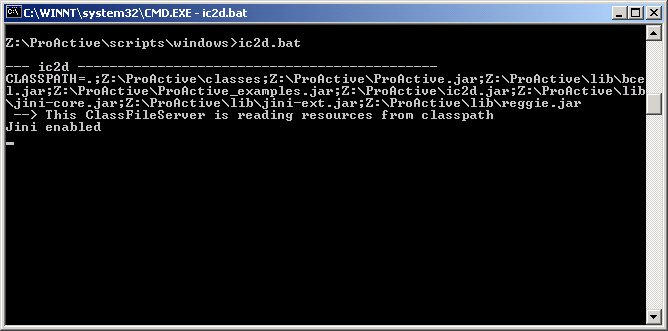
You will need at first to start IC2D using either ProActive/scripts/unix/ic2d.sh or ProActive/scripts/windows/ic2d.bat depending on your environment.
In order to visualize all Active objects, you need to acquire ('Monitoring/Monitor a new RMI host' menu):
The machine on which you started the 'Dispatcher'
The machine on which you started the second user
You'll need to type in the edit field asking it the name of each machine and the RMI port being used separated by a colon.
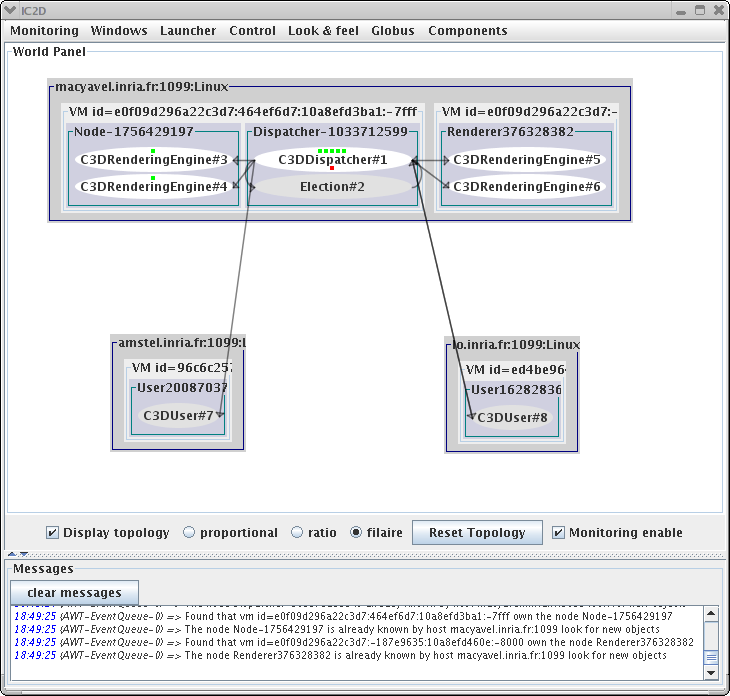
Add random spheres for instance, and observe messages (Requests) between Active Objects.
Add and remove renderers, and check graphically whether the corresponding Active Objects are contacted or not, in order to achieve the rendering.
You can textually visualize this information by activating 'add event timeline for this WorldObject' on the World panel with the right mouse button, and then 'show the event list window' on the top menu window
From IC2D, you can drag-and-drop active objects from one JVM to another. Click the right button on a C3DRenderingEngine, and drag and drop it in another JVM. Observe the migration taking place.
Add a new sphere, using all rendering engines, and check that the messages are still sent to the active object that was asked to migrate.
As migration and communications are implemented in a fully compatible manner, you can even migrate with IC2D an active object while it is communicating (for instance when a rendering action is in progress). Give it a try!
| Note |
|---|---|
You can also migrate Active Objects which create a GUI. If you do that for the User, you will see the graphical window beiung destroyed, and rebuilt once more. |
Manually you can start a new JVM - a 'Node' in the ProActive terminology - that will be used in a running system.
On a different machine, or by remote login on another host, start another Node, named for instance NodeZ
linux> startNode.sh rmi://mymachine/NodeZ &
windows> startNode.bat rmi://mymachine/NodeZ
The node should appear in IC2D when you request the monitoring of the new machine involved (Monitoring menu, then 'monitor new RMI host'.
The node just started has no active object running in it. Drag and drop one of the renderers, and check that the node is now taking place in the computation
Spin the scene to trigger a new rendering
See the topology
| Note |
|---|---|
If you feel uncomfortable with the automatic layout, switch to manual using the 'manual layout' option (right click on the World panel). You can then reorganize the layout of the machines. |
To fully distribute the computation, start several nodes (you need 2 more) and drag-and drop renderers in them.
Depending on the machines you have, the complexity of the image, look for the most efficient configuration.
You can also write components with the Fractive API, which is an implementation of Fractal in ProActive. You should check the section on components for more information (Part V, “Composing”). There is a long explanation of the C3D component version (Chapter 10, C3D - from Active Objects to Components). The visual aspect is very similar to the standard Active Object C3D version. That's on purpose, to show how easy it is to transform code into components. If you want to run a components version of c3d, try this:
scripts/unix/components$ ./c3d.sh
scripts/windows/components$ c3d.bat
The component binding is done through the Fractal ADL, which is a standard way of writing components through an xml file. You can have a visual representation with IC2D (start IC2D, menu->Components->Start the components GUI). You should specify how to read the file. You have to enter:
File->Storage:
ProActive/src.File->Open:
ProActive/src/org/objectweb/proactive/examples/components/c3d/adl/userAndComposite.fractal.
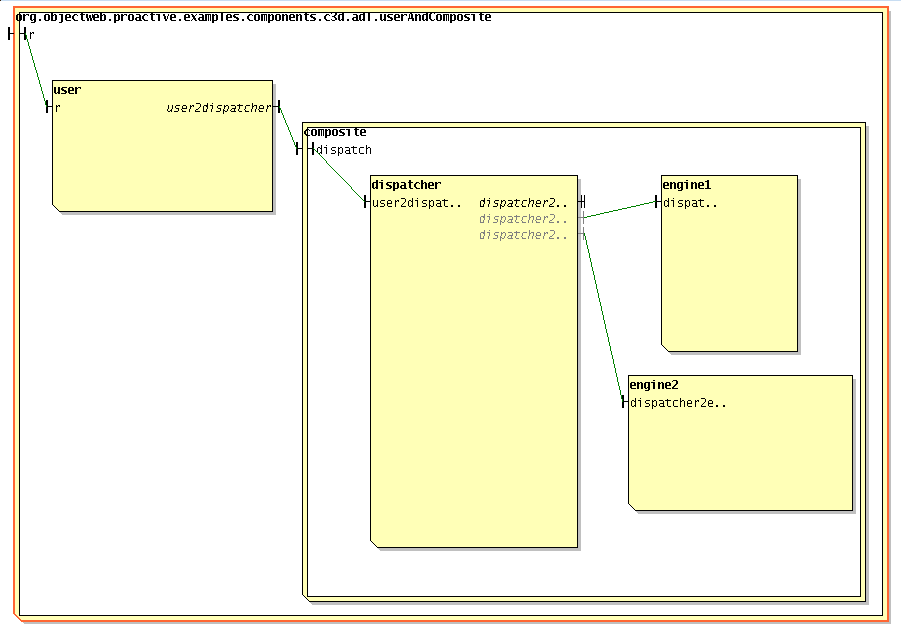
The main classes of this application are:
org.objectweb.proactive.examples.c3d.C3DUser.java
org.objectweb.proactive.examples.c3d.C3DRenderingEngine.java
org.objectweb.proactive.examples.c3d.C3DDispatcher.java
In the Dispatcher, look at the method public void
rotateScene(int i_user, String i_user_name, Vec angle) that
handles election of the next action to undertake.
ProActive provides an advanced synchronization mechanism that allows an easy and safe implementation of potentially complex synchronization policies.
This is illustrated by two examples:
The readers and the writers
The dining philosophers
The readers and the writers want to access the same data. In order to allow concurrency while ensuring the consistency of the readings, accesses to the data have to be synchronized upon a specified policy. Thanks to ProActive, the accesses are guaranteed to be allowed sequentially.
The implementation with ProActive uses 3 active objects: Reader, Writer, and the controller class (ReaderWriter).

ProActive starts a node (i.e. a JVM) on the current machine, and creates 3 Writer, 3 Reader, a ReaderWriter (the controller of the application) and a ReaderDisplay, that are active objects.

What happens when priority is set to 'reader priority'?
in
org.objectweb.proactive.examples.readers.ReaderWriter.java.
More specifically, look at the routines in:
public void evenPolicy(org.objectweb.proactive.Service service)
public void readerPolicy(org.objectweb.proactive.Service service)
public void writerPolicy(org.objectweb.proactive.Service service)
Look at the inner class MyRequestFilterm that
implements
org.objectweb.proactive.core.body.request.RequestFilter.
How does it work?
For instance, let several writers go through at the same time.
Observe the Writer Policy policy before recompiling
Recompile (using compile.sh readers or compile.bat readers)
Observe that stub classes are regenerated and recompiled
Observe the difference due to the new synchronization policy: what happens now?
Correct the bug and recompile again ; check that everything is back to normal
The 'dining philosophers' problem is a classic exercise in concurrent programming. The goal is to avoid deadlocks.
We have provided an illustration of the solution using ProActive, where all the philosophers are active objects, as well as the table (controller) and the dinner frame (user interface).
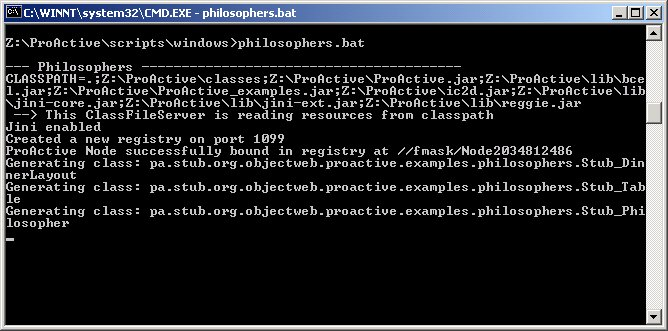
ProActive creates a new node and instantiates the active objects of the application: DinnerLayout, Table, and Philosopher
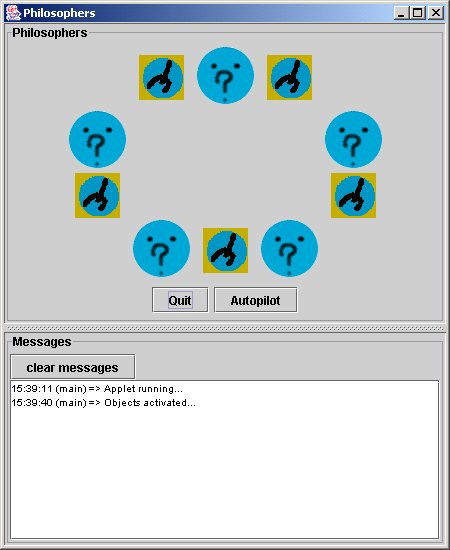
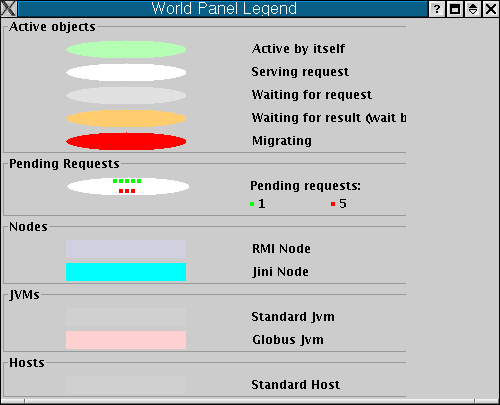
The pictures represent the state of the philosophers. They can be:
 philosophing
 hungry, wants the
fork!
hungry, wants the
fork! eating
The forks can have two states:
 taken
taken free
free
Click on the philosophers' heads to switch their modes
Test that there are no deadlocks!
Test that you can starve one of the philosophers (i.e. the others alternate eating and thinking while one never eats!)
IC2D is a graphical environment for monitoring and steering of distributed and Grid Computing applications.
Being in the autopilot mode, start the IC2D visualization application (using ic2d.sh or ic2d.bat)
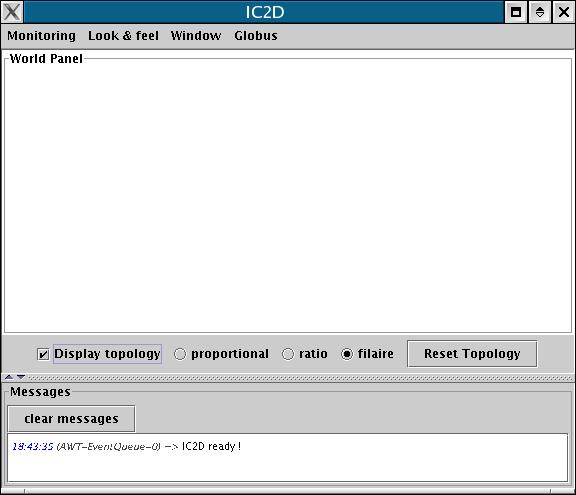

The ic2d GUI is started. It is composed of 2 panels: the main panel and the request queue panel
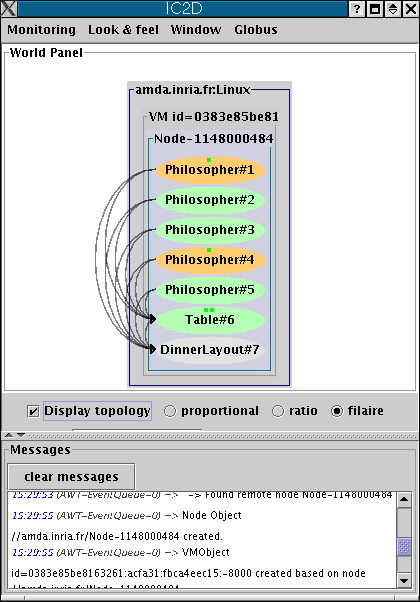
Acquire your current machine

It is possible to visualize the status of each active object (processing, waiting etc...), the communications between active objects, and the topology of the system (here all active objects are in the same node):
ProActive allows the transparent migration of objects between virtual machines.
A nice visual example is the penguin's one.
This example shows a set of mobile agents moving around while still communicating with their base and with each other. It also features the capability to move a swing window between screens while moving an agent from one JVM to the other.
Using the ic2d script
Acquire the machines you have started nodes on
On the Advanced Penguin Controller window: button 'add agent'

An agent is materialized by a picture in a java window.
Select it, and press button 'start'
Observe that the active object is moving between the machines, and that the penguin window disappears and reappears on the screen associated with the new JVM.
After selecting them, use the buttons to:
Communicate with them ('chained calls')
Start, stop, resume them
Trigger a communication between them ('call another agent')
Start the same script on a different computer, using another screen and keyboard
Monitor the corresponding JVM with IC2D
Drag-and-drop the active object 'AdvancedPenguinController' with IC2D into the newly created JVM: the control window will appear on the other computer
And its user can now control the penguins application.
Still with IC2D, doing a drag-and-drop back to the original JVM, you will be able to get back the window, and control yourself the application.
You've already seen quite sophisticated examples in the section Chapter 5, Introduction to ProActive Features. Here is an introduction to programming with ProActive.
The program that we will develop is a classic 'helloworld' example. We will increase the complexity of the example, so you get more familiar with different features of ProActive.
First, we will code a 'client-server' application, the server being an active object.
Second, we will see how we can control the activity of an active object.
Third, we will add mobility to this active object.
Eventually, we will attach a graphical interface to the active object, and will show how to move the widget between virtual machines (like in the penguin example).
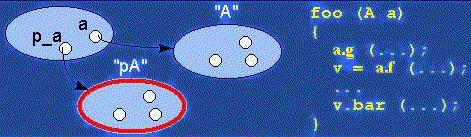
This example implements a very simple client-server application. It
has an in-depth explanation in Section 13.10, “The Hello world example”; you might
wish to skim through it. Summarized, it is a client object displaying a
StringWrapper received from a remote server.
The corresponding class diagram is the following:

Active objects, as their name indicates, have an activity of their own (an internal thread).
It is possible to add pre and post processing to this activity, just by implementing the interfaces InitActive and EndActive, that define the methods initActivity and endActivity.
The following example will help you to understand how and when you can initialize and clean the activity.
When instantiated, the activity of an object is automatically started, but it will first do what is written in the initActivity method.
Ending the activity can only be done from inside the active object (i.e. from a call to its own body). This is the reason why we have written a terminate method in the following example.
The InitializedHello class extends the Hello class, and implements the interfaces InitActive and EndActive.It acts a a server for the InitializedHelloClient class.
The main method is overriden so that it can instantiate the InitializedHello class
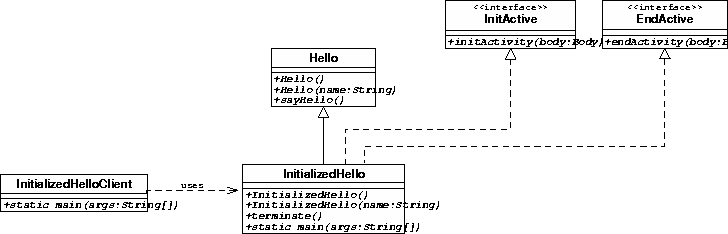
The source code of the InitializedHello class is in Example C.28, “InitializedHello.java”.
initActivity and endActivity here just log messages onto the console, so you can see when they are called.
initActivity is called at the creation of the active object, while endActive is called after the activity has terminated (thanks to the method terminate).
Here is the initActivity method:
public void initActivity(Body body) {
        System.out.println("I am about to start my activity");
}
Here is the endActivity method:
public void endActivity(Body body) {
        System.out.println("I have finished my activity");
}
The following code shows how to terminate the activity of the active object:
public void terminate() throws IOException {
        // the termination of the activity is done through a call on the
        // terminate method of the body associated to the current active object
        ProActive.getBodyOnThis().terminate();
}
The only differences from the the previous example is the classes instantiated, which are now InitializedHello (and not Hello) and InitializedHelloClient, and you will add a call to hello.terminate().
The source code of InitializedHello is in Example C.28, “InitializedHello.java”, and the code for InitializedHelloClient is in Example C.29, “InitializedHelloClient.java”.
So, create InitializedHelloClient.java and InitializedHello.java in src/org/objectweb/proactive/examples/hello
Now compile all proactive sources
cd compile
windows>build.bat examples
linux>build examples
cd ..
Add './classes' directory to CLASSPATH to use these two new source files
windows>set  CLASSPATH=.;.\classes;.\ProActive_examples.jar;.\ProActive.jar;.\lib\bcel.jar;.\lib\asm.jar;.\lib\log4j.jar;\
        .\lib\xercesImpl.jar;.\lib\fractal.jar;.\lib\bouncycastle.jar

linux>export  CLASSPATH=.:./classes:./ProActive_examples.jar:./ProActive.jar:./lib/bcel.jar:./lib/asm.jar:./lib/log4j.jar:\
./lib/xercesImpl.jar:./lib/fractal.jar:./lib/bouncycastle.jarExecution is similar to the previous example; just use the InitializedHelloClient client class and InitializedHello server class.
linux> java -Djava.security.policy=scripts/proactive.java.policy \
            -Dlog4j.configuration=file:scripts/proactive-log4j
            org.objectweb.proactive.examples.hello.InitializedHello

windows> java -Djava.security.policy=scripts\proactive.java.policy  \
              -Dlog4j.configuration=file:scripts\proactive-log4j \
org.objectweb.proactive.examples.hello.InitializedHello &linux> java -Djava.security.policy=scripts/proactive.java.policy
-Dlog4j.configuration=file:scripts/proactive-log4j \
org.objectweb.proactive.examples.hello.InitializedHelloClient //localhost/Hello
windows> java -Djava.security.policy=scripts\proactive.java.policy \
-Dlog4j.configuration=file:scripts\proactive-log4j
org.objectweb.proactive.examples.hello.InitializedHelloClient //localhost/Hello This program is a very simple one: it creates an active object that migrates between virtual machines. It is a extension of the previous client-server example, the server now being mobile.
The conditions for MigratableHello to be a migratable active object are:
- it must have a constructor without parameters: this is a result of a ProActive restriction : the active object having to implement a no-arg constructor. </ p>
- implement the Serializable interface (as it will be transferred through the network).</>
Hello, the superclass, must be able to be serialized, in order to be transferred remotely. It does not have to implement directly java.io.Serializable, but its attributes should be serializable - or transient. For more information on this topic, check Chapter 16, Active Object Migration .
We want to further enhance InitializedHello it by making migratable: we'd like to be able to move it across virtual machines.
Thus, we create a MigratableHello class, that derives from InitializedHello. This class will implement all the non-functionnal behavior concerning the migration, for which this example is created. The Hello class (and InitializedHello) is left unmodified.
Note that the migration has to be initiated by the active object itself. This explains why we have to write the moveTo method in the code of MigratableHello - i.e. a method that contains an explicit call to the migration primitive. (cf Chapter 16, Active Object Migration for migration documentation )
MigratableHello also implements a factory method for instanciating
itself as an active object : static MigratableHello
createMigratableHello(String: name)
The class diagram for the application is the following:

The code of the MigratableHello class is in Example C.30, “MigratableHello.java”.
MigratableHello derives from the Hello class from the previous example
MigratableHello being the active object itself, it has to:
- implement the Serializable interface
- provide a no-arg constructor
- provide an implementation for using ProActive's migration mechanism.
A new method getCurrentNodeLocation is added for the object to tell the node where it resides..
A factory static method is added for ease of creation.
The migration is initiated by the moveTo method:
/** method for migrating
* @param destination_node destination node
*/
public void moveTo(String destination_node) {
        System.out.println("\n-----------------------------");
        System.out.println("starting migration to node: " + destination_node);
        System.out.println("...");
        try {
                // THIS MUST BE THE LAST CALL OF THE METHOD
                ProActive.migrateTo(destination_node);
        } catch (MigrationException me) {
                System.out.println("migration failed: " + me.toString());
        }
}
Note that the call to the ProActive primitive
migrateTo is the last one of the method moveTo. See
Chapter 16, Active Object Migration for more information.
The entry point of the program is written in a separate class: MigratableHelloClient (see Example C.31, “MigratableHelloClient.java”).
It takes as arguments the locations of the nodes the object will be migrated to.
The program calls the factory method of MigratableHello to create an instance of an active object. It then moves it from node to node, pausing for a while between the transfers.
- start several nodes using the startnode
script.
windows>cd scripts/windows
                                startNode.bat //localhost/n1
                                startNode.bat //localhost/n2
linux>cd scripts/linux
                ./startNode.sh //localhost/n1
                ./startNode.sh //localhost/n2
- compile and run the program (run MigratableHelloClient), passing in parameter the urls of the nodes you'd like the agent to migrate to.
cd compile
windows>build.bat examples
linux>build examples
cd ..
linux>java
      -Djava.security.policy=scripts/proactive.java.policy
      -Dlog4j.configuration=file:scripts/proactive-log4j
      org.objectweb.proactive.examples.hello.MigratableHelloClient
      //localhost/n1 //localhost/n2
windows>java
      -Djava.security.policy=scripts\proactive.java.policy
      -Dlog4j.configuration=file:scripts\proactive-log4j
      org.objectweb.proactive.examples.hello.MigratableHelloClient
      //localhost/n1 //localhost/n2
- observe the instance of MigratableHello migrating:
During the execution, a default node is first created. It then hosts the created active object. Then the active object is migrated from node to node, each time returning 'hello' and telling the client program where it is located.
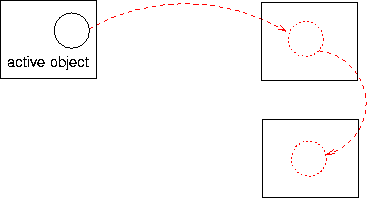
Graphical interfaces are not serializable, yet it is possible to migrate them with ProActive.
The idea is to associate the graphical object to an active object. The active object will control the activation and desactivation of this graphical entity during migrations.
Of course, this is a very basic example, but you can later build more sophisticated frames.
We will write a new active object class, that extends MigratableHello. The sayHello method will create a window containing the hello message. This window is defined in the class HelloFrame
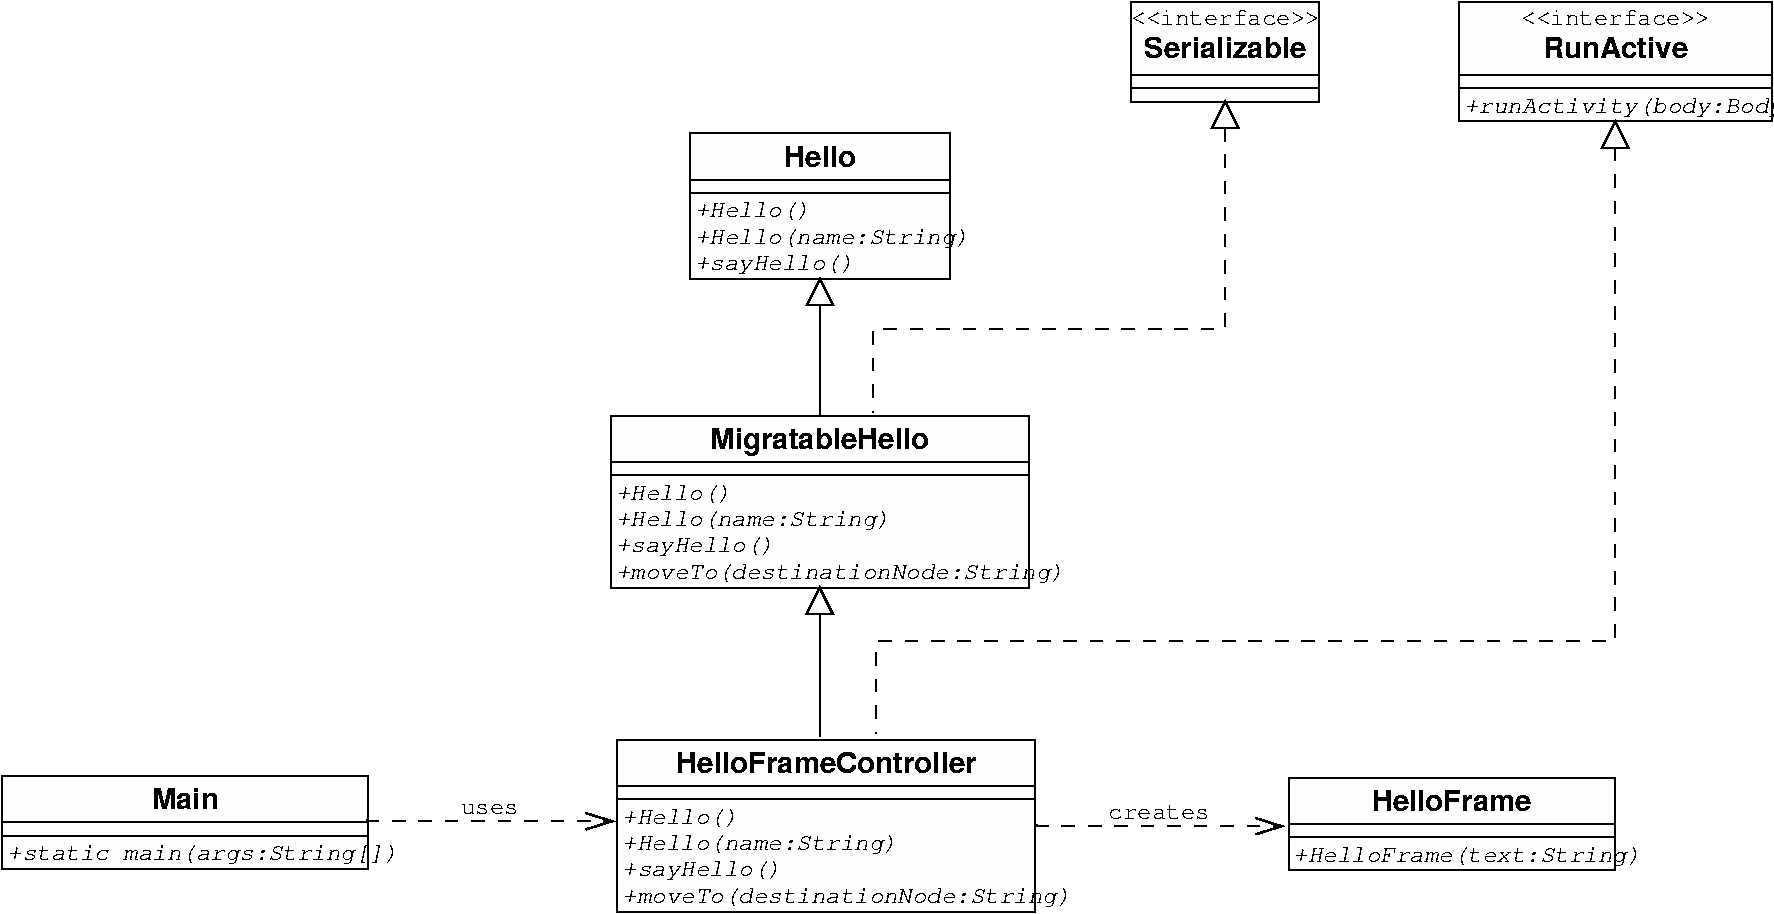
The code of the HelloFrameController is in Example C.32, “HelloFrameController.java”.
This class extends MigratableHello, and adds an activity and a migration strategy manager to the object .
It creates a graphical frame upon call of the sayHello method.
Here we have a more complex migration process than with the previous example. We need to make the graphical window disappear before and reappear in a new location after the migration (in this example though, we wait for a call to sayHello). The migration of the frame is actually controlled by a MigrationStrategyManager, that will be attached to the body of the active object.. An ideal location for this operation is the initActivity method (from InitActive interface), that we override:
/**
 * This method attaches a migration strategy manager to the current active object.
 * The migration strategy manager will help to define which actions to take before
 * and after migrating
 */
public void initActivity(Body body) {
        // add a migration strategy manager on the current active object
        migrationStrategyManager = new MigrationStrategyManagerImpl((Migratable)
 ProActive.getBodyOnThis());
        // specify what to do when the active object is about to migrate
        // the specified method is then invoked by reflection
        migrationStrategyManager.onDeparture('clean');
}
The MigrationStrategyManager defines methods such as 'onDeparture', that can be configured in the application. For example here, the method 'clean' will be called before the migration, conveniently killing the frame:
public void clean() {
        System.out.println("killing frame");
        helloFrame.dispose();
        helloFrame = null;
        System.out.println("frame is killed");
}
This is an example of a graphical class that could be associated with the active object (see code in Example C.33, “HelloFrame.java” ).
Create a new class HelloFrameControllerClient: take the code of MigratableHelloClient used in the previous part, change the class declaration to HelloFrameControllerClient and replace the line
MigratableHello migratable_hello =
      MigratableHello.createMigratableHello("agent1");
with
MigratableHello migratable_hello =
      HelloFrameController.createHelloFrameController("agent1");
Similarly to the simple migration example (use the HelloFrameControllerClient class), you will start remote nodes and specify a migration path.
you have 2 ways for handling the display of the graphical objects:
look on the display screens of the machines
export the displays: in startNode.sh, you should add the following lines before the java command:
DISPLAY=myhost:0 export DISPLAY

The displayed window: it just contains a text label with the location of the active object.
In this document we show how to create a distributed application to compute the number PI using the ProActive Grid Middleware. Distributed programming is achieved using the ProActive deployment framework combined with the active object model.
Download and install the JDK 5.0 Update 9 from here.
Set the environment variable JAVA_HOME to the java installation location.
Go into the tutorial directory: ProActive/src/org/objectweb/proactive/examples/pi/. This directory contains:
config/            <-- Configuration directory
descriptors/       <-- Deployment descriptors directory
doc/               <-- Documentation directory
fractal/           <-- Component directory
scripts/           <-- Launch scripts directory
Interval.java      <-- The parameter passed to remote objects
PiBPP.java         <-- The main code
PiComputer.java    <-- The remote object code (worker)
Results.java       <-- The results returned by the workers
MyPi.java          <-- Base class to test Pi with ProActive
In this step by step we will implement our own version of PiBPP.java.
Create the file MyPi.java inside the tutorial directory with initially the following content:
package org.objectweb.proactive.examples.pi;

import org.objectweb.proactive.ProActive;
import org.objectweb.proactive.core.descriptor.data.ProActiveDescriptor;
import org.objectweb.proactive.core.descriptor.data.VirtualNode;
import org.objectweb.proactive.core.group.ProActiveGroup;
import org.objectweb.proactive.core.node.Node;

class MyPi{

// global variables will go here

public static void main(String args[]) throws Exception{

  Integer numberOfDecimals =  new Integer(args[0]);
  String descriptorPath = args[1];

  // the main code will go here
}
Inside the main we add the code for acquiring the resources.
  ProActiveDescriptor descriptor = ProActive.getProactiveDescriptor(descriptorPath); //Parse the xml descriptor
  descriptor.activateMappings(); //Acquire the resources
  VirtualNode virtualNode = descriptor.getVirtualNode("computers-vn"); //Get the virtual node named "computers-vn"
  Node[] nodes = virtualNode.getNodes();
  PiComputer piComputer = (PiComputer) ProActiveGroup.newGroupInParallel(
                          PiComputer.class.getName(),
                          new Object[] { numberOfDecimals },
                          nodes);

  int numberOfWorkers = ProActiveGroup.getGroup(piComputer).size();
  Interval intervals = PiUtil.dividePI(numberOfWorkers, numberOfDecimals.intValue());
  ProActiveGroup.setScatterGroup(intervals);

  Result results = piComputer.compute(intervals);

  Result result= PiUtil.conquerPI(results);
System.out.println("Pi:"+result);package org.objectweb.proactive.examples.pi;
import org.objectweb.proactive.ProActive;
import org.objectweb.proactive.core.descriptor.data.ProActiveDescriptor;
import org.objectweb.proactive.core.descriptor.data.VirtualNode;
import org.objectweb.proactive.core.group.ProActiveGroup;
import org.objectweb.proactive.core.node.Node;
public class MyPi {
public static void main(String args[]) throws Exception{
Integer numberOfDecimals = new Integer(args[0]);
String descriptorPath = args[1];
ProActiveDescriptor descriptor = ProActive.getProactiveDescriptor(descriptorPath);
descriptor.activateMappings();
VirtualNode virtualNode = descriptor.getVirtualNode("computers-vn");
Node[] nodes = virtualNode.getNodes();
PiComputer piComputer = (PiComputer) ProActiveGroup.newGroupInParallel(
PiComputer.class.getName(),
new Object[] { numberOfDecimals },
nodes);
int numberOfWorkers = ProActiveGroup.getGroup(piComputer).size();
Interval intervals = PiUtil.dividePI(numberOfWorkers, numberOfDecimals.intValue());
ProActiveGroup.setScatterGroup(intervals);
Result results = piComputer.compute(intervals);
Result result= PiUtil.conquerPI(results);
System.out.println("Pi:"+result);
  descriptor.killall(true);
  System.exit(0);
}
}
The Jacobi example is made of two Java classes:
Jacobi.java: the main class
SubMatrix.java: the class implementing the SPMD code
Have a first quick look at the code, especially the Jacobi
class, looking for the strings "ProActive", "Nodes", "newSPMDGroup".
The last instruction of the class:
matrix.compute(); is an asynchronous group call. It
sends a request to all active objects in the SPMD group, triggering
computations in all the SubMatrix. We will get to the class
SubMatrix.java later on.
ProActive examples come with scripts to easily launch the execution under both Unix and Windows.For Jacobi, launch:
ProActive/scripts/unix/jacobi.sh
or
ProActive/scripts/windows/jacobi.bat
The computation stops after minimal difference is reached between two iterations (constant MINDIFF in class Jacobi.java), or after a fixed number of iteration (constant ITERATIONS in class Jacobi.java).
The provided script, using an XML descriptor, creates 4 JVMs on the current machine. The Jacobi class creates an SPMD group of 9 Active Objects; 2 or 3 AOs per JVM.
Look at the traces on the console upon starting the script; in the current case, remember that all JVMs and AOs send output to the same console. More specifically, understand the following:
Created a new registry on port 1099"
"Reading deployment descriptor ... Matrix.xml "
"created VirtualNode"
"**** Starting jvm on"
"ClassFileServer is reading resources from classpath"
"Detected an existing RMI Registry on port 1099""
"Generating class: ... jacobi.Stub_SubMatrix "
"ClassServer sent class ... jacobi.Stub_SubMatrix successfully"
You can start IC2D (script ic2d.sh or ic2d.bat) in order to visualize the JVMs and the Active Objects. Just activate the "Monitoring a new host" in the "Monitoring" menu at the top left. To stop the Jacobi computation and all the associated AOs, and JVMs, just ^C in the window where you started the Jacobi script.
Do a simple source modification, for instance changing the values of the constants MINDIFF (0.00000001 for ex) and ITERATIONS in class Jacobi.java.
Caveat: Be careful, due to a shortcoming of the Java make system (ant), make sure to also touch the class SubMatrix.java that uses the constants.
ProActive distribution comes with scripts to easily recompile the provided examples:
linux>ProActive/compile/build
or
windows>ProActive/compile/build.bat
Several targets are provided (start build without arguments to obtain them). In order to recompile the Jacobi, just start the target that recompile all the examples:
build examples
2 source files must appear as being recompiled.
Following the recompilation, rerun the examples as explained in section 1.2 above, and observe the differences.
Within the class SubMatrix.java the following methods correspond to a standard Jacobi implementation, and are not specific to ProActive:
internalCompute ()borderCompute ()exchange ()buildFakeBorder (int size)buildNorthBorder ()buildSouthBorder ()buildWestBorder ()buildEastBorder ()stop ()
The methods on which asynchronous remote method invocations take place are:
sendBordersToNeighbors ()setNorthBorder (double[] border)setSouthBorder (double[] border)setWestBorder (double[] border)setEastBorder (double[] border)
The first one sends to the appropriate neighbors the appropriate values, calling set*Border() methods asynchronously. Upon execution by the AO, the methods set*Border() memorize locally the values being received.
Notice that all those communication methods are made of purely functional Java code, without any code to the ProActive API.
On the contrary, the followings are ProActive related aspects:
buildNeighborhood ()compute ()loop ()
We will detail them in the next section.
Note: the classes managing topologies are still under development. In the next release, the repetitive and tedious topology related instructions (e.g. methods buildNeighborhood) won't have to be written explicitly by the user, whatever the topology (2D, 3D).
Let us describe the OO SPMD techniques which are used and the related ProActive methods.
First of all, look for the definition and use of the attribute "asyncRefToMe". Using the primitive "getStubOnThis()", it provides a reference to the current active object on which method calls are asynchronous. It permits the AO to send requests to itself.
For instance in
this.asyncRefToMe.loop();
Notice the absence of a classical loop. The method "loop()" is indeed asynchronously called from itself; it is not really recursive since it does not have the drawback of the stack growing. It features an important advantage: the AO will remain reactive to other calls being sent to it. Moreover, it eases reuse since it is not necessary to explicitly encode within the main SPMD loop all the messages that have to be taken into account. It also facilitates composition since services can be called by activities outside the SPMD group, they will be automatically executed by the FIFO service of the Active Object.
The method "buildNeighborhood ()" is called only once for initialization. Using a 2D topology (Plan), it constructs references to north, south, west, east neighbors -- attributes with respective names. It also construct dynamically the group of neighbors. Starting from an empty group of type SubMatrix
this.neighbors = (SubMatrix)
        ProActiveGroup.newGroup
(SubMatrix.class.getName());
such typed view of the group is used to get the group view: Group neighborsGroup = ProActiveGroup.getGroup(this.neighbors); Then, the appropriate neighbors are added dynamically in the group, e.g.:
neighborsGroup.add(this.north);
Again, the topology management classes in a future release of ProActive will simplify this process.
Let's say we would like to control step by step the execution of the SPMD code. We will add a barrier in the SubMatrix.java, and control the barrier from input in the Jacobi.java class.
In class SubMatrix.java, add a method
barrier() of the form:
String[] st= new String[1];
st[0]="keepOnGoing";
ProSPMD.barrier(st);
Do not forget to define the keepOnGoing()
method that indeed can return void, and just be empty. Find the
appropriate place to call the barrier() method in
the loop() method.
In class Jacobi.java, just after the
compute() method, add an infinite loop that, upon a
user's return key pressed, calls the method
keepOnGoing() on the SPMD group "matrix". Here are
samples of the code:
while (true) {
  printMessageAndWait();
  matrix.keepOnGoing();
}
...

private static void printMessageAndWait() {

    java.io.BufferedReader d = new java.io.BufferedReader(
                                     new java.io.InputStreamReader(System.in));
    System.out.println(" --> Press return key to continue");
    System.out.println(" or Ctrl c to stop.");
    try {
        d.readLine();
        } catch (Exception e) {
        		e.printStackTrace();
        }
Recompile, and execute the code. Each iteration needs to be activated by hitting the return key in the shell window where Jacobi was launched. Start IC2D (./ic2d.sh or ic2d.bat), and visualize the communications as you control them. Use the "Reset Topology" button to clear communication arcs. The green and red dots indicate the pending requests.
You can try and test other modifications to the Jacobi code.
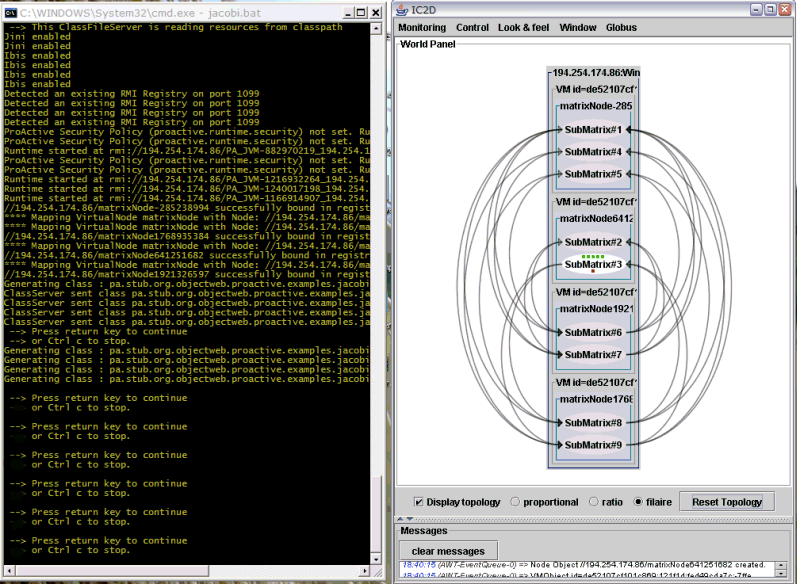
The group of neighbors built above is important wrt synchronization. Below in method "loop()", an efficient barrier is achieved only using the direct neighbors:
ProSPMD.barrier("SynchronizationWithNeighbors"+
        this.iterationsToStop, this.neighbors);
This barrier takes as a parameter the group to synchronize with: it will be passed only when the 4 neighbors in the current 2D example have reached the same point. Adding the rank of the current iteration allows to have a unique identifier for each instance of the barrier.
Try to change the barrier instruction to a total barrier:
ProSPMD.barrier("SynchronizationWithNeighbors"+
        this.iterationsToStop);
Then recompile and execute again. Using IC2D observe that many more communications are necessary.
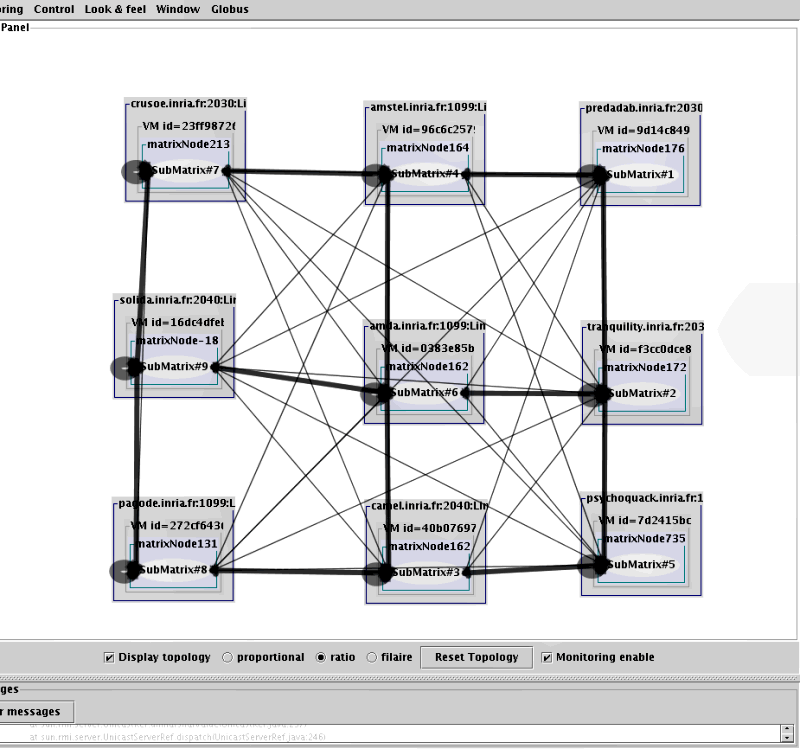
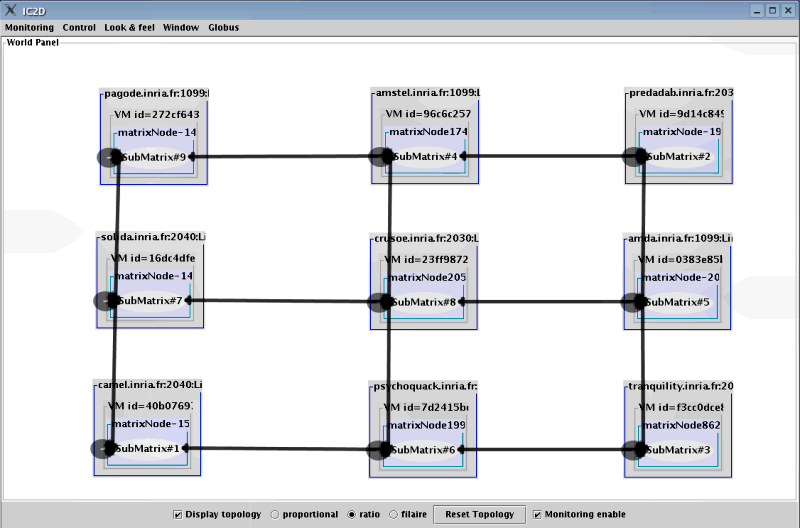
In order to get details and documentation on Groups and OO SPMD, have a look at Chapter 14, Typed Group Communication and Chapter 15, OOSPMD.
Now, we will return to the source code of Jacobi.java to understand where and how the Virtual Nodes and Nodes are being used.
The XML descriptor being used is:
ProActive/descriptors/Matrix.xml
Look for and understand the following definitions:
- Virtual Node Definition- Mapping of Virtual Nodes to JVM- JVM Definition- Process Definition
A detailed presentation of XML descriptors is available in Section 21.1, “Objectives”.
Edit the file Matrix.xml in order to change the number of JVMs being used. For instance, if your machine is powerful enough, start 9 JVMs, in order to have a single SubMatrix per JVM.

You do not need to recompile, just restart the execution. Use IC2D to visualize the differences in the configuration.
Explicit machine names
ProActive/examples/descriptors/Matrix.xml is the
XML deployment file used in this tutorial to start 4 jvms on the local
machine. This behavior is achieved by referencing in the creation tag
of Jvm1, Jvm2, Jvm3, Jvm4 a jvmProcess named with the id localProcess. To summarize briefly at least one
jvmProcess must be defined in an xml
deployment file. When this process is referenced directly in the
creation part of the jvm definition (like the example below), the jvm
will be created locally. On the other hand, if this process is
referenced by another process(rshProcess for instance, this is the case in
the next example), the jvm will be created remotely using the related
protocol (rsh in the next example).
Note that several jvmProcesses can be defined, for instance in order to specify different jvm configurations (e.g classpath, java path,...).
 <ProActiveDescriptor
 xmlns:xsi="http://www.w3.org/2001/XMLSchema-instance"
 xsi:noNamespaceSchemaLocation=
 "http://www-sop.inria.fr/oasis/proactive/schema/3.2/DescriptorSchema.xsd">
  <componentDefinition>
   <virtualNodesDefinition>
    <virtualNode name="matrixNode"
 property="multiple"/>
   </virtualNodesDefinition>
  </componentDefinition>
  <deployment>
   <mapping>
    <map virtualNode="matrixNode">
     <jvmSet>
      <vmName value="Jvm1"/>
      <vmName value="Jvm2"/>
      <vmName value="Jvm3"/>
      <vmName value="Jvm4"/>
     </jvmSet>
    </map>
   </mapping>
   <jvms>
    <jvm name="Jvm1">
     <creation>
      <processReference refid="localProcess"/>
     </creation>
    </jvm>
    <jvm name="Jvm2">
     <creation>
      <processReference refid="localProcess"/>
     </creation>
    </jvm>
    <jvm name="Jvm3">
     <creation>
      <processReference refid="localProcess"/>
     </creation>
    </jvm>
    <jvm name="Jvm4">
     <creation>
      <processReference refid="localProcess"/>
     </creation>
    </jvm>
   </jvms>
  </deployment>
  <infrastructure>
   <processes>
    <processDefinition id="localProcess">
     <jvmProcess
      class="org.objectweb.proactive.core.process.JVMNodeProcess"/>
    </processDefinition>
   </processes>
  </infrastructure>
  </ProActiveDescriptor>
Modify your XML deployment file to use the current JVM (i.e the JVM reading the descriptor) and also to start 4 JVMs on remote machines using rsh protocol.
Use IC2D to visualize the machines ("titi", "toto", "tata" and "tutu" in this example) and the JVMs being launched on them.
 <ProActiveDescriptor
 xmlns:xsi="http://www.w3.org/2001/XMLSchema-instance"
 xsi:noNamespaceSchemaLocation=
 "http://www-sop.inria.fr/oasis/proactive/schema/3.2/DescriptorSchema.xsd">
  <componentDefinition>
   <virtualNodesDefinition>
    <virtualNode name="matrixNode"
 property="multiple"/>
   </virtualNodesDefinition>
  </componentDefinition>
  <deployment>
   <mapping>
    </map>
    <map virtualNode="matrixNode">
     <jvmSet>
      <currentJvm />
      <vmName value="Jvm1"/>
      <vmName value="Jvm2"/>
      <vmName value="Jvm3"/>
      <vmName value="Jvm4"/>
     </jvmSet>
    </map>
   </mapping>
   <jvms>
    <jvm name="Jvm1">
     <creation>
      <processReference  refid="rsh_titi"/>
     </creation>
    </jvm>
    <jvm name="Jvm2">
     <creation>
      <processReference refid="rsh_toto"/>
     </creation>
    </jvm>
    <jvm name="Jvm3">
     <creation>
      <processReference
 refid="rsh_tata"/>
     </creation>
    </jvm>
    <jvm name="Jvm4">
     <creation>
      <processReference
 refid="rsh_tutu"/>
     </creation>
    </jvm>
   </jvms>
  </deployment>
  <infrastructure>
   <processes>
    <processDefinition id="localProcess">
     <jvmProcess
 class="org.objectweb.proactive.core.process.JVMNodeProcess"/>
    </processDefinition>
    <processDefinition id="rsh_titi">
     <rshProcess
 class="org.objectweb.proactive.core.process.rsh.RSHProcess"
 hostname="titi">
      <processReference
 refid="localProcess"/>
     /rshProcess>
    </processDefinition>
    <processDefinition id="rsh_toto">
     <rshProcess
 class="org.objectweb.proactive.core.process.rsh.RSHProcess"
 hostname="toto">
      <processReference
 refid="localProcess"/>
     /rshProcess>
    </processDefinition>
    <processDefinition id="rsh_tata">
     <rshProcess
 class="org.objectweb.proactive.core.process.rsh.RSHProcess"
 hostname="tata">
      <processReference
 refid="localProcess"/>
     /rshProcess>
    </processDefinition>
    <processDefinition id="rsh_tutu">
     <rshProcess
 class="org.objectweb.proactive.core.process.rsh.RSHProcess"
 hostname="tutu">
      <processReference  refid="localProcess"/>
     /rshProcess>
    </processDefinition>
   </processes>
  </infrastructure>
  </ProActiveDescriptor>
Pay attention of what happened to your previous XML deployment file. First of all to use the current jvm the following line was added just under the jvmSet tag
 <jvmSet>
 <currentJvm />
  ...
  <jvmSet>
Then the jvms are not created directly using the localProcess, but instead using other processes named rsh_titi, rsh_toto, rsh_tata, rsh_tutu
  <jvms>
  <jvm name="Jvm1">
   <creation>
    <processReference refid="rsh_titi"/>
   </creation>
  </jvm>
  <jvm name="Jvm2">
   <creation>
    <processReference refid="rsh_toto"/>
   </creation>
  </jvm>
  <jvm name="Jvm3">
   <creation>
    <processReference refid="rsh_tata"/>
   </creation>
  </jvm>
  <jvm name="Jvm4">
   <creation>
    <processReference refid="rsh_tutu"/>
   </creation>
  </jvm>
  </jvms>
Those processes as shown below are rsh processes. Note that it is mandatory for such processes to reference a jvmProcess, in this case named with the id localProcess, to create, at deployment time, a jvm on machines titi, toto, tata, tutu, once connected to those machines with rsh.
  <processDefinition id="localProcess">
  <jvmProcess
 class="org.objectweb.proactive.core.process.JVMNodeProcess"/>
 </processDefinition>
 <processDefinition id="rsh_titi">
  <rshProcess
 class="org.objectweb.proactive.core.process.rsh.RSHProcess"
 hostname="titi">
   <processReference refid="localProcess"/>
  /rshProcess>
 </processDefinition>
 <processDefinition id="rsh_toto">
  <rshProcess
 class="org.objectweb.proactive.core.process.rsh.RSHProcess"
 hostname="toto">
   <processReference refid="localProcess"/>
  /rshProcess>
 </processDefinition>
 <processDefinition id="rsh_tata">
  <rshProcess
 class="org.objectweb.proactive.core.process.rsh.RSHProcess"
 hostname="tata">
   <processReference refid="localProcess"/>
  /rshProcess>
 </processDefinition>
 <processDefinition id="rsh_tutu">
  <rshProcess
 class="org.objectweb.proactive.core.process.rsh.RSHProcess"
 hostname="tutu">
   <processReference refid="localProcess"/>
  /rshProcess>
 </processDefinition>
Using Lists of Processes
You can also use the notion of Process List, which leads to the same result but often simplifies the xml. Two tags are provided, the first is:
processListbyHost
This allows a single definition to list all hostnames on which the same JVM profile will be started.
 <ProActiveDescriptor
 xmlns:xsi="http://www.w3.org/2001/XMLSchema-instance"
 xsi:noNamespaceSchemaLocation=
 "http://www-sop.inria.fr/oasis/proactive/schema/3.2/DescriptorSchema.xsd">
  <componentDefinition>
   <virtualNodesDefinition>
    <virtualNode name="matrixNode"
 property="multiple"/>
   </virtualNodesDefinition>
  </componentDefinition>
  <deployment>
   <mapping>
    </map>
    <map virtualNode="matrixNode">
     <jvmSet>
      <currentJvm/>
      <vmName value="Jvm1"/>
     </jvmSet>
    </map>
   </mapping>
   <jvms>
    <jvm name="Jvm1">
     <creation>
      <processReference
 refid="rsh_list_titi_toto_tutu_tata"/>
     </creation>
    </jvm>
   </jvms>
  </deployment>
  <infrastructure>
   <processes>
    <processDefinition
 id="localProcess">
     <jvmProcess
 class="org.objectweb.proactive.core.process.JVMNodeProcess"/>
    </processDefinition>
    <processDefinition
 id="rsh_list_titi_toto_tutu_tata">
     <processListbyHost
 class="org.objectweb.proactive.core.process.rsh.RSHProcessList"
 hostlist="titi toto tata tutu">
      <processReference
 refid="localProcess"/>
     </processListbyHost>
    </processDefinition>
   </processes>
  </infrastructure>
  </ProActiveDescriptor>
The second is a shorthand for a set of numbered hosts with a common prefix:
processList
This is used when the machine names follow a list format, for instance titi1 titi2 titi3 ... titi100
<ProActiveDescriptor
 xmlns:xsi="http://www.w3.org/2001/XMLSchema-instance"
 xsi:noNamespaceSchemaLocation=
 "http://www-sop.inria.fr/oasis/proactive/schema/3.2/DescriptorSchema.xsd">
  <componentDefinition>
   <virtualNodesDefinition>
    <virtualNode name="matrixNode"
 property="multiple"/>
   </virtualNodesDefinition>
  </componentDefinition>
  <deployment>
   <mapping>
    </map>
    <map virtualNode="matrixNode">
     <jvmSet>
      <currentJvm/>
      <vmName value="Jvm1"/>
     </jvmSet>
    </map>
   </mapping>
   <jvms>
    <jvm name="Jvm1">
     <creation>
      <processReference
 refid="rsh_list_titi1_to_100"/>
     </creation>
    </jvm>
   </jvms>
  </deployment>
  <infrastructure>
   <processes>
    <processDefinition
 id="localProcess">
     <jvmProcess
 class="org.objectweb.proactive.core.process.JVMNodeProcess"/>
    </processDefinition>
    <processDefinition
 id="rsh_list_titi1_to_100">
     <processList
 class="org.objectweb.proactive.core.process.rsh.RSHProcessList"
 fixedName="titi" list="[1-100]"
 domain="titi_domain">
      <processReference
 refid="localProcess"/>
     </processList>
    </processDefinition>
   </processes>
  </infrastructure>
  </ProActiveDescriptor>
If you have access to your own cluster, configure the XML descriptor to launch the Jacobi example on them, using the appropriate protocol:
ssh, LSF, PBS, Globus, etc.
Have a look at Section 21.1, “Objectives” to get the format of the XML descriptor for each of the supported protocols.
In this chapter we are going to see a simple example of an MPI written program ported to ProActive.
First let's introduce what we are going to compute.
This simple program approximates pi by computing :
pi = integral from 0 to 1 of 4/( 1+x*x ) dx
Which is approximated by :
sum from k=1 to N of 4 / ( ( 1 +( k-1/2 ) **2 )
The only input data required is N, the number of iterations.
Involved files :
ProActive/doc-src/mpi_files/int_pi2.c : the original MPI implementation
ProActive/trunk/src/org/objectweb/proactive/examples/integralpi/Launcher.java : the main class
ProActive/trunk/src/org/objectweb/proactive/examples/integralpi/Worker.java : the class implementing the SPMD code
Some basic primitives are used, notice that MPI provides a rank to each process and the group size ( the number of involved processes ).
  // All instances call startup routine to get their instance number (mynum)
  MPI_Init(&argc, &argv);
  MPI_Comm_rank(MPI_COMM_WORLD, &mynum);
  MPI_Comm_size(MPI_COMM_WORLD, &nprocs);

  // Get a value for N
  solicit (&N, &nprocs, mynum);
First we need to create the group of workers (MPI processes represented by active objects). Notice that the creation of active objects is done in Launcher.java.
The group of active objects is created using specified parameters and the nodes specified in the deployement descriptor.
  // Group creation
  Worker workers = (Worker) ProSPMD.newSPMDGroup(
         Worker.class.getName(), params, provideNodes(args[0]));

  // Once the group is created and the value for N is entered we can start the workers job
  // Workers starts their job and return a group of Futures
  DoubleWrapper results = workers.start( numOfIterations );
The ProSPMD layer provides similar to MPI initialization primitives. In Worker.java you can identify this initialization. Note that one-to-one communications will be done thanks to an array view on the created group.
  // Worker initialization
  rank = ProSPMD.getMyRank();
  groupSize = ProSPMD.getMySPMDGroupSize();

  // Get all workers references
  workersArray = (Worker[]) ProActiveGroup.getGroup(ProSPMD.getSPMDGroup()).toArray(new Worker[0]);
The communication pattern is very simple, it's done in 2 steps. First the process 0 Broadcasts N then waits for the result from each other process and sums the received values.

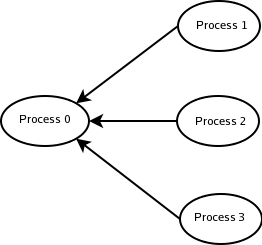
The MPI implementation involves 3 communication primitives :
MPI_Send ( Sends data to one process )
MPI_Recv ( Receives data from a sending process )
MPI_Bcast ( Broadcast a data to all processes )
Please note that MPI_Bcast, MPI_Send and MPI_Recv primitives are blocking.
  // Get a value of N from stdin for the next run and Broadcast it
  MPI_Bcast(pN, 1, MPI_INT, source, MPI_COMM_WORLD);

  // LOCAL COMPUTATION LOOP
  // ...

  if ( mynum == 0 ) { // Check if i'm the leader process
     for (i=1; i<nprocs; i++) {
        source = i;
        info = MPI_Recv(&x, 1, MPI_FLOAT, source, type, MPI_COMM_WORLD, &status); // waits
 the value from source process
        sum=sum+x; // sum up the receive value
     }
  } else {
     info = MPI_Send(&sum, 1, MPI_FLOAT, dest, type, MPI_COMM_WORLD); // if i'm not the process
 0 i send my sum
  }
The ProActive implementation is quite similar to MPI one. The fact is that all communications in ProActive are asynchronous ( non-blocking ) by default, therefore we need to specify explicitely to block until a specific request.
  // The leader collects partial results.
  // Others just send their computed data to the rank 0.

  if ( rank==0 ) { // Check if i'm the leader worker
     for ( i=1; i<groupSize; i++ ) {
         body.serve(body.getRequestQueue().blockingRemoveOldest("updateX")); // block until an
 updateX call
         sum += x;
     }
  } else {
     workersArray[0].updateX(sum);
  }
The leader blocks his request queue until another worker will do a distant call on the leader's updateX method which is :
  public void updateX(double value){
     this.x = value;
  }
| MPI | ProActive |
|---|---|
| MPI_Init and MPI_Finalize | Activities creation |
| MPI_Comm_Size | ProSPMD.getMyGroupSize |
| MPI_Comm_Rank | ProSPMD.getMyRank |
| MPI_Send and MPI_Recv | Method call |
| MPI_Barrier | ProSPMD.barrier |
| MPI_Bcast | Method call on a group |
| MPI_Scatter | Method call with a scatter group as parameter |
| MPI_Gather | Result of a group communication |
| MPI_Reduce | Programmer's method |
Table 8.1. MPI to ProActive
ProActive distribution comes with scripts to easily recompile the provided examples:
linux>ProActive/compile/build
or
windows>ProActive/compile/build.bat
Use the build script to recompile the example
build examples
2 source files must appear as being recompiled.
In ProActive/scripts/unix or windows run integralpi.sh or .bat, you can specify the number of workers from the command line. Feel free to edit scripts to specify another deployement descriptor.
bash-3.00$ ./integralpi.sh

--- IntegralPi --------------------------------------------------
The number of workers is 4
 --> This ClassFileServer is reading resources from classpath 2011
Created a new registry on port 1099
ProActive Security Policy (proactive.runtime.security) not set. Runtime Security disabled
************* Reading deployment descriptor: file:./../../descriptors/Matrix.xml ********************
created VirtualNode name=matrixNode
**** Starting jvm on amda.inria.fr
**** Starting jvm on amda.inria.fr
**** Starting jvm on amda.inria.fr
ProActive Security Policy (proactive.runtime.security) not set. Runtime Security disabled
 --> This ClassFileServer is reading resources from classpath 2012
ProActive Security Policy (proactive.runtime.security) not set. Runtime Security disabled
ProActive Security Policy (proactive.runtime.security) not set. Runtime Security disabled
 --> This ClassFileServer is reading resources from classpath 2013
 --> This ClassFileServer is reading resources from classpath 2014
**** Starting jvm on amda.inria.fr
Detected an existing RMI Registry on port 1099
Detected an existing RMI Registry on port 1099
Detected an existing RMI Registry on port 1099
ProActive Security Policy (proactive.runtime.security) not set. Runtime Security disabled
 --> This ClassFileServer is reading resources from classpath 2015
//amda.inria.fr/matrixNode2048238867 successfully bound in registry at //amda.inria.fr/matrixNode2048238867
**** Mapping VirtualNode matrixNode with Node: //amda.inria.fr/matrixNode2048238867 done
//amda.inria.fr/matrixNode690267632 successfully bound in registry at //amda.inria.fr/matrixNode690267632
**** Mapping VirtualNode matrixNode with Node: //amda.inria.fr/matrixNode690267632 done
//amda.inria.fr/matrixNode1157915128 successfully bound in registry at //amda.inria.fr/matrixNode1157915128
**** Mapping VirtualNode matrixNode with Node: //amda.inria.fr/matrixNode1157915128 done
Detected an existing RMI Registry on port 1099
//amda.inria.fr/matrixNode-814241328 successfully bound in registry at //amda.inria.fr/matrixNode-814241328
**** Mapping VirtualNode matrixNode with Node: //amda.inria.fr/matrixNode-814241328 done
4 nodes found
Generating class : pa.stub.org.objectweb.proactive.examples.integralpi.Stub_Worker

Enter the number of iterations (0 to exit) : 100000
Generating class : pa.stub.org.objectweb.proactive.examples.integralpi.Stub_Worker
Generating class : pa.stub.org.objectweb.proactive.examples.integralpi.Stub_Worker
Generating class : pa.stub.org.objectweb.proactive.examples.integralpi.Stub_Worker
Generating class : pa.stub.org.objectweb.proactive.examples.integralpi.Stub_Worker

         Worker 2 Calculated x = 0.7853956634245252 in 43 ms


         Worker 3 Calculated x = 0.7853906633745299 in 30 ms


         Worker 1 Calculated x = 0.7854006634245316 in 99 ms


         Worker 0 Calculated x = 3.141592653598117 in 12 ms


Calculated PI is 3.141592653598117 error is 8.324008149429574E-12

Enter the number of iterations (0 to exit) : This section of the guided tour goes through the different steps that you would take in writing an application with ProActive, from a simple design, to a more complicated structure. This is meant to help you get familiar with the Group facilities offered by ProActive. Please take note that this page tries to take you through the progression, step by step. You may find some more information, mainly on the design, on the web page of the applications/examples of ProActive. This is a snapshot of the ProActive nbody example running on 3 hosts with 8 bodies:

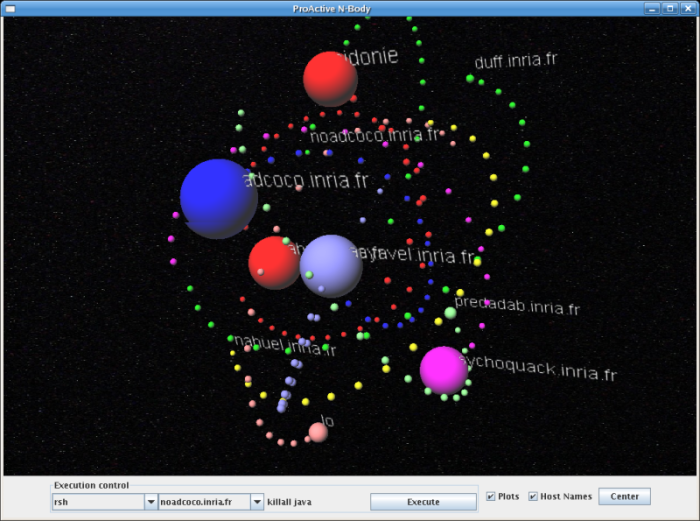
n-body is a classic problem. It consists in working out the position of bodies in space, which depend only on the gravitational forces that apply to them. A good introduction to the problem is given here. You may find a detailled explanation of the underlying mathematics here. Different ways of finding numerical solutions are given here.
In short, one considers several bodies (sometimes called particles) in space, where the only force is due to gravity. When only two bodies are at hand, this is expressed as
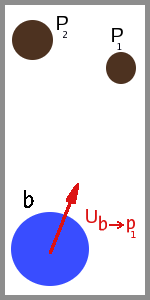 |
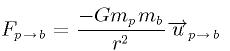
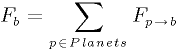 This should be read as: the total force on the body b is the sum of all the forces applied to b, generated by all the other bodies in the system. This is the force that has to be computed for every body in the system. With this force, using the usual physics formulae, (Newton's second Law)
 one may now compute the movement of a particle for a given time step (a the acceleration, v the velocity, x the position, t the time):
 |
With script located in the folder
ProActive/script/[unix|windows] do:
$ nbody.[bat|sh] [-nodisplay | -displayft | -3d | -3dft] totalNbBodies maxIter
No parameter starting in default mode (2D).
-nodisplay starting in console mode.
-displayft starting with fault-tolerance configuration.
-3d starting GUI in 3D, must have Java3d (≥ 1.4) installed and also must have ProActive compiled with it installed.
-3dft same as above with fault-tolerance configuration.
totalNbBodies is the total number of bodies, default is 4 bodies.
maxIter is the maximun number of iterations, default is 10,000 iterations.
Right after starting the application, users have to choose one algorithm for computing. The choice is between:
Simplest version, one-to-one communication and master.
Group communication and master.
Group communication, odd-even-synchronization.
Group communication, oospmd synchronization.
Barnes-Hut.
Mouse controls with the 3D GUI:
Left click: rotating.
Right click: moving the scene.
Scroll whell: zoom in/out
This guided tour is based on the files you may find in the directory ProActive/src/org/objectweb/proactive/examples/nbody. You'll find the following tree:
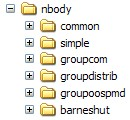
The common directory contains files reused through the different versions. 'simple' is the simplest example, 'groupcom' is the first example with Group communication, and 'groupdistrib' and 'groupoospmd' are two enhancements based on different synchronization schemes. 'barneshut' is a bit special, in that it contains a different algorithm to solve the nbody problem.
The files contained in 'common' are those that are reused throughout the different versions. Let's see what they do:
First of all there are the two files called Displayer.java and NBodyFrame.java. These handle the graphical output of the bodies, as they move about in space. They are not particularly of interest, as the GUI is not the point of this tutorial. Nonetheless, please note that the important method here is:
 public void drawBody(int x, int y, int vx, int vy,
          int weight, int d, int id) ;
Taking position, velocity, diameter and a unique identifier of the body, it updates the display window.
Then, we have the files Force.java and Planet.java. They are used to compute the interaction between two distant bodies in the universe. Since they are in the common directory, they can be modified to include other forces (for example, collision) in a simple manner, which would be spread to all the examples. A Planet is no more than a point in space, with velocity and mass - the diameter expresses the size to use for the display:
         public class Planet implements Serializable{
             public double mass;
             public double x,y,vx,vy;
                 // position and velocity
             public double diameter;
                   // diameter of the body, used by the Displayer
                   ...
Please take note that it implements Serializable because it will be sent as parameter to method calls on Active Objects, but it is good practice to have all your ProActive classes implement Serializable. For example, migration requires everything to implement it, and the same with fault-tolerance....
The Force class is just the implementation of what a physical force really is. It is the implementation of a 3D vector, with the method "add" following the physics rules.
Point3D.java and Cube.java are helper files. They simply implement what a point in space looks like, and what a region of space is. Of course, they were created as being Serializable.
And finally, the Start.java acts as the wrapper for the main() method. There is a part which reads command line parameters, counting bodies and iterations, and constructing the optional Displayer. Before choosing which example to run, it creates the nodes required by the simulation:
         // Construct deployment-related variables: pad & nodes
         descriptorPad = null;
         VirtualNode vnode;
         try { descriptorPad = ProActive.getProactiveDescriptor(xmlFileName); }
         catch (ProActiveException e) { abort(e); }
         descriptorPad.activateMappings();
         vnode = descriptorPad.getVirtualNode('Workers');
         Node[] nodes = null;
         try { nodes = vnode.getNodes(); }
         catch (NodeException e) { abort(e);
         }
The
Node [] nodesare the different JVMs that were created on possibly different machines. They are used for Active Object creation. They were specified in the descriptor used to deploy the application. You may find more information on these in Chapter 21, XML Deployment Descriptors, while Active Object creation is explained in Chapter 13, Active Objects: creation and advanced concepts. Just as an example, in the simple package, the Maestro is created on the first of these JVMs, and takes three parameters, aDomain [], anInteger, and aStart(it will be detailed later):Object [] constructorParams ; constructorParams = {domainArray, new Integer(maxIter), killsupport} ; maestro = (Maestro) ProActive.newActive ( Maestro.class.getName(), constructorParams , nodes[0] ) ;
The files contained in the other directories, 'simple', 'groupcom', 'groupdistrib' , 'groupoospmd' detail steps of increasing complexity, making the application use different concepts. 'barneshut' contains the final implementation, featuring the Barnes-Hut algorithm. But let's not go too fast. Let's have a look at the insides of the simplest implementation of the n-body problem.
This is the implementation of the simplest example of nbody. We
defined the Planet to be a passive object, and it
does nothing. It is a container for position, velocity and mass, as
we've seen in the description given higher up. The real actors are the
Domains, they do all the work. Every
Planet in the universe is associated with a
Domain, which is an Active Object.
This Domain contains the code to manage the
communication of the possitions of the Planets during
the simulation. They are created in the Start.java file:
         Rectangle universe = new Rectangle (-100,-100,100,100);
         Domain [] domainArray = new Domain [totalNbBodies];
         for (int  i = 0 ; i < totalNbBodies ; i++)  {
             Object [] constructorParams = new Object [] {
                      new Integer(i),
                      new Planet (universe)
                 };
             try {
                 // Create all the Domains used in the simulation
                 domainArray[i] = (Domain) ProActive.newActive(
                         Domain.class.getName(),
                         constructorParams,
                         nodes[(i+1) % nodes.length]
                 );
             }
             catch (ActiveObjectCreationException e) { killsupport.abort(e); }
             catch (NodeException e) {  killsupport.abort(e); }
         }
See how the call to ProActive.newActive creates
one new Active Object, a Domain,
at each iteration of the loop. The array nodes
contains all the nodes on which an Active Object may be deployed; at
each iteration, one given node, ie one JVM, is selected. The
constructorParams are the parameters that are to be
passed to the constructor of Domain, and since it's
an Object [] , the parameters may only be
Objects (don't try to build constructors using ints
in their constructor - this explains the use of the class
Integer).
The Domains, once created, are initialized, and
then they synchronize themselves by all pinging the maestro, with the
notifyFinished call:
         // init workers, from the Start class
         for (int i=0 ; i < totalNbBodies ; i ++)
             domainArray[i].init(domainArray, displayer, maestro);
          // init method, defined within each worker
          public void init(Domain [] domainArray, Displayer dp, Maestro master) {
                   this.neighbours = domainArray;
                   .....
                   maestro.notifyFinished();  // say we're ready to start
                   }
         public void notifyFinished() {
             this.nbFinished ++;
             if (this.nbFinished == this.domainArray.length) {
                 this.iter ++;
                 if (this.iter==this.maxIter)
                      this.killsupport.quit();
                 this.nbFinished = 0 ;
                   for (int i= 0 ; i < domainArray.length ; i++)
                       this.domainArray[i].sendValueToNeighbours();
           }
           }
Notice how domainArray is passed to all the
Domains, when calling init. This
is the value assigned to the local field neighbours,
which later on serves to communicate with all the other
Domains of the simulation.
The synchronization is done by the Maestro,
which counts the number of Domains that have
finished, and then asks them to go on to the next iteration. While in
their execution, the Domains gather information
concerning the position of all the other bodies, which need to be known
to move the local Planet, at every time step. This is
done using a push scheme. Instead of explicitly asking for information,
this information is automatically issued:
       public void sendValueToNeighbours() {
            for (int i = 0 ; i < this.neighbours.length ; i ++)
               if (i != this.identification) // don't notify self!
                   this.neighbours[i].setValue(this.info, this.identification);
             .....
            }

        public void setValue(Planet inf, int id) {
           this.values [id] = inf;
           this.nbReceived ++ ;
           if (this.nbReceived > this.nbvalues)  // This is a bad sign!
               System.err.println('Domain ' + identification + ' received too many answers');
           if (this.nbReceived == this.nbvalues) {
               this.maestro.notifyFinished();
               moveBody();
           }
           }
This means that each Domain sends its
information to all the other Domains, and then waits
until it has received all the positions it is waiting for. The other
Domains are stored as an array, which is called
neighbours. You may find another view of this example
on this web
page.
This is a simple improvement, which results in faster
communication. You may have noticed the Group capabilities of ProActive.
They give us the ability to call an operation on an object which is a
Group, and have it sent to all the members of the Group. We can use them
in this framework: first, create a Group (instead of having independant
Active Objects) :
           // in the Start class
            Object [][] params = ...
            Domain  domainGroup = null;
            try {
                // Create all the Domains as part of a Group
                domainGroup = (Domain) ProActiveGroup.newGroup ( Domain.class.getName(), params,
 nodes);
            }
            catch ....>
The double array params stores the parameters passed to the
constructors of the Domains we're creating.
Domain 0 will have params[0][]
passed as arguments, Domain 1 params[1][], and so on.
The nodes are the Nodes on which to create these Active Objects. Do
notice the try... catch construction which is needed
around any creation of Active Objects because it may
raise exceptions. In this previous bit of code, a
Group containing new Active
Objects has been created and all these Objects belong to the
group . You may have noticed that the type of the
Group is Domain. It's a bit strange at first, and you
may think this reference points to only one Active Object at once, but
that's not true. We're accesssing all the objects in the group, and to
be able to continue using the methods of the Domain class, the group is
typed as Domain, and
that's the reason why it's called a typed
Group.
Then this group is passed as a parameter to all the members of the Group in just one call:
// Still in the Start class
domainGroup.init(domainGroup, displayer, maestro);
This method sets the local field as a copy of the passed
parameter, and as such is unique. We can play around with it without
affecting the others. So let's remove the local
Domain from the Group, to avoid having calls on
self:
public void init(Domain domainGroup, Displayer dp, Maestro master) { this.neighbours = domainGroup; Group g = ProActiveGroup.getGroup(neighbours); g.remove(ProActive.getStubOnThis()); // no need to send information to self .....
Remember that in the previous example, the neighbours where stored in an array, and each was accessed in turn:
for (int i = 0 ; i < this.neighbours.length ; i ++) if (i != this.identification) // don't notify self! this.neighbours[i].setValue(this.info, this.identification);
Well, that's BAAAAD, or at least inefficient! Replace this by the following code, because it works faster:
this.neighbours.setValue(this.info,
this.identification);
This has the following meaning: call the method setValue, with the
given parameters, on all the members of the Group
neighbours. In one line of code, the method
setValue is called on all the Active Objects in the
group.
You may find another view of this example on this web page.
Now, do we like the idea that the synchronization is centralized
on one entity, the Maestro? I don't and it's the
bottleneck of the application anyway: once a Domain
has finished, it sends the notifyFinshed, and then sits idle. A way of
making this better is to remove this bottleneck completely! This is done
by using an odd-even scheme: if a Domain receives information from a
distant Domain too early (ie in the wrong iteration),
this information is stored, and will get used at the next iteration. In
the meantime, the local Domain does not change its iteration, because it
is still waiting for more results, in the current iteration.
public void setValue(Planet inf, int receivedIter) { if (this.iter == receivedIter) { this.currentForce.add(info, inf); this.nbReceived ++ ; if (this.nbReceived == this.nbvalues) moveBody(); } else { this.prematureValues.add(new Carrier (inf, receivedIter)); } }
Also notice how the computation is done incrementally when the
result is received (this.currentForce.add(info,
inf);), instead of when all the results have arrived. This
allows for less time spent idle. Indeed, waiting for all the results
before computing might leave idle time between setValue requests. And
then, just before computing the new position of the body, the sum of all
the forces has to be computed. It's better to have this sum ready when
needed.
The prematureValues Vector is the place where
we put the values that arrive out of sync. When a value is early, it is
queued there, and dequeued as soon as this Domain
changes iteration.
public void sendValueToNeighbours() { reset(); this.iter++; if (this.iter < this.maxIter) { neighbours.setValue(this.info, this.iter); ... // display related code treatPremature(); } ... // JVM destruction related code }
The treatPremature() method simply treats the values that were early as if they had just arrived, by calling the setValue method with the parameters stored.
You may find another view of this example on this web page.
This is another way to improve the groupcom example. It also removes the master, but this time by inserting oospmd barriers, that can be thought as behaving like the maestro class, but faster. To create functional OOspmd Groups, there is a special instruction, which takes the same parameters as a newGroup instruction:
Object [][] params = ... Domain domainGroup = null; try { domainGroup = (Domain) ProSPMD.newSPMDGroup( Domain.class.getName(), params, nodes); } catch ...
Now, to use this OOspmd group properly, we want to use the barrier() methods. We put these in the Domains code, to do the synchronization. What happens is that each Domain hits the barrier call, and then waits for all the others to have reached it, before reading its request queue again.
public void sendValueToNeighbours() { this.neighbours.setValue(this.info, this.identification); ProSPMD.barrier('barrier' + this.iter); this.iter++; this.asyncRefToSelf.moveBody(); ....
Beware, the stop-and-wait is not just after the barrier call, but
instead blocks the request queue. So if there is code after that
barrier, it will get executed. In fact, the barrier should be seen as a
prioritary request on the queue. This explains why we had to put the
code after the barrier as a method placed on an asynchronous refernce to
self. If we hadn't done it that way, but just appended the code of that
method just after the barrier, the call to moveBody()
would be executed before the barrier execution, which is exactly what we
don't want!
You may find another view of this example on this web page.
This way to construct the nbody simulation is based on a very different algorithm. This is inserted to show how one can express this algorithm in ProActive, but breaks off from the previous track, having such a different approach to solving the problem. Here's how it works:
To avoid broadcasting to every active object the new position of every particle, a tree implementation can simplify the problem by agglomerating sets of particles as a single particle, with a mass equal to the sum of masses of the all the particles:. This is the core of the Barnes-Hut algorithm. References on this can be found for example here, and here. This method allows us to have a complexity brought down to O(N log N).
In our parallel implementation, we have defined an Active
Object called Domain, which represents a
volume in space, and which contains Planets. It is
either subdivided into smaller Domains, or is a leaf
of the total tree, and then only contains Planets. A
Planet is still an Object with mass, velocity and position, but is no
longer on a one-to-one connection with a Domain. We
have cut down communications to the biggest Domains
possible : when a Planet is distant enough, its
interactions are not computed, but it is grouped with its local
neighbours to a bigger particle. Here is an example of the
Domains which would be known by the
Domain drawn in red:
 |
 |
The Domain in the lower left hand-corner, drawn in blue, is also divided into sub-Domains, but this needs not be known by the Domain in red: it assumes all the particles in the blue Domain are only one big one, centered at the center of mass of all the particles within the blue.
In this version, the Domains communicate with a
reduced set of other Domains, spanning on volumes of
different sizes. Synchronization is achieved by sending explicitely
iteration numbers, and returning when needed older positions. You may
notice that some Domains seem desynchronized with
other ones, having several iterations inbetween. That is no problem
because if they then need to be synchronized and send each other
information, a mechanism saving the older positions permits to send them
when needed.
You may find another view of this example on this web page.
In this guided tour, we tried to show different facilities provided by ProActive, based on a real problem (nbody). We first saw how to deploy the application, then tuned it by adding Group communication, then removed a bottleneck ( due to the hard synchronization ) . Finally, given is the code associated to a different algorithm, which cumbersomely shows how to get Active Objects deployed along a tree structure to communicate. Remember that there is another explanation of all this on the web.
This is an example of an application that is refactored to fit the components dogma. The standard C3D example has been taken as a basis, and component wrappers have been created. This way, one can see what is needed to transform an application into component-oriented code.
You may find the code in the examples/components/c3d directory of the proactive source.
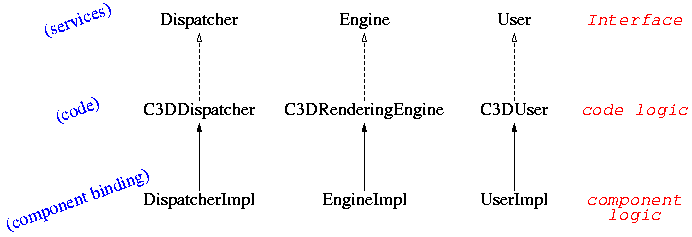
We consider the working C3D application. It's nice, and has a sleak GUI, but we now want to add component power to it! What we do is shown on the image: add wrappers around the original object classes (C3D*) and instead of linking the classes together by setting fields through the initial methods, do that in the binding methods. In other words, we have to spot exactly where C3DRenderingEngine, C3DUser and C3DDispatcher are used by a class other than itself, and turn these references into component bindings. Of course, we also have to expose the interfaces that we are going to use, hence the Dispatcher, Engine and User interface that have to be implemented.
First of all, have a look at the doc on C3D to remember how this application is written, in Section 5.2, “C3D: a parallel, distributed and collaborative 3D renderer”. Most important is the class diagram, showing C3DUser, C3DDispatcher and C3DRederingEngine. We decided that the only objects worth wrapping in components were those three. The rest is too small to be worth the hassle.
What we need to do is to extract the interfaces of the Objects,
ie find which methods are going to be called on the components. This
means find out what methods are called from outside the Active Object.
You can do that by searching in the classes where the calls are made
on active objects. For this, you have to know in
detail which classes are going to be turned into component.
If you have a code base which closely follows Object Oriented
Programming rules, the interfaces are already there. Indeed, when a
class is written, it should always go with one or more interfaces,
which present to the world what the class abilities are. In C3D
(Active Object version), these interfaces already exist: they are
called User, Engine and
Dispatcher.
| Note |
|---|---|
Tricky part: whatever way you look at components, you'll have to modify the initial code if these interfaces were not created at first go. You have to replace all the class references by their interface, when you use them in other files. For example, if we had not already used interfaces in the C3D Object code, we would have had to replace all occurrences of C3DDispatcher by occurrences of Dispatcher. |
Why do we have to do that, replacing classes by interfaces? That's due to the way components work. When the components are going to be bound, you're not binding the classes themselves (ie the container which performs operations), but [proxies to] the interfaces presenting the behaviour available. And these proxies implement the interfaces, and do not extend the classes. What is highlighted here is that components enforce good code design by separating behaviours.
You now have to create a class that englobes the previous Active
Objects, and which is a component representing the same functionality.
How do you do that? Pretty simple. All you need to do is extend the
Active Object class, and add to it the non-functional interfaces which
go with the component. You have the binding interfaces to create,
which basically say how to put together two Components, tell who is
already attached, and how to separate them. These are the
lookupFc, listFc, bindFc
and unbindFc methods.
This has been done in the *Impl files. Let's
consider, for example, the UserImpl class (it is shown below).What you
have here are those component methods. Be even more careful with this
bindFc method. In fact, it really binds the
protected Dispatcher variable
c3ddispatcher. This way, the
C3DUser code can now use this variable as if it was
addressing the real Active Object. Just to be precise, we have to
point out that you're going through proxies before reaching the
Component, then the Active Object. This is hidden by the ProActive
layer, all you should know is you're addressing a
Dispatcher, and you're fine! The
findDispatcher method has been overridden because
component lookup doesn't work like standard Active Object lookup.
public class UserImpl extends C3DUser implements BindingController, User {
/** Mandatory ProActive empty no-arg constructor */
public UserImpl() {
}
/** Tells what are the operations to perform before starting the activity of the AO.
* Registering the component and some empty fields filling in is done here.
* We also state that if migration asked, procedure is : saveData, migrate, rebuild */
public void initActivity(Body body) {
// Maybe 'binding to dispatcher' has been done before
if (this.c3ddispatcher == null) {
logger.error(
"User component could not find a dispatcher. Performing lookup");
// ask user through Dialog for userName & host
NameAndHostDialog userAndHostNameDialog = new NameAndHostDialogForComponent();
this.c3ddispatcher = userAndHostNameDialog.getValidatedDispatcher();
setUserName(userAndHostNameDialog.getValidatedUserName());
if (this.c3ddispatcher == null) {
logger.error("Could not find a dispatcher. Closing.");
System.exit(-1);
}
}
if (getUserName() == null) { // just in case it was not yet set.
setUserName("Bob");
}
// Register the User in the Registry.
try {
Fractive.register(Fractive.getComponentRepresentativeOnThis(),
UrlBuilder.buildUrlFromProperties("localhost", "User"));
} catch (IOException e) {
logger.error("Registering 'User' for future lookup failed");
e.printStackTrace();
}
super.initActivity(body);
}
/** returns all the possible bindings, here just user2dispatcher .
* @return the only posible binding "user2dispatcher" */
public String[] listFc() {
return new String[] { "user2dispatcher" };
}
/** Returns the dispatcher currently bound to the client interface of this component
* @return null if no component bound, otherwise returns the bound component */
public Object lookupFc(final String interfaceName) {
if (interfaceName.equals("user2dispatcher")) {
return c3ddispatcher;
}
return null;
}
/** Binds to this UserImpl component the dispatcher which should be used. */
public void bindFc(final String interfaceName, final Object serverInterface) {
if (interfaceName.equals("user2dispatcher")) {
c3ddispatcher = (org.objectweb.proactive.examples.c3d.Dispatcher) serverInterface;
// Registering back to the dispatcher is done in the go() method
}
}
/** Detaches the user from its dispatcher.
* Notice how it has not been called in terminate() ?
* This is due to the fact that unbinding only sets a reference to null,
* and does no cleaning up. */
public void unbindFc(final String interfaceName) {
if (interfaceName.equals("user2dispatcher")) {
c3ddispatcher = null;
}
}
}
Example 10.1. The UserImpl class, a component wrapper
If you're out of luck, the code contains instructions to retain
references to objects that call methods on the current Object. These
methods have a signature ressembling method(..., ActiveObject
ao, ...). This is called, in ProActive, with a
ProActive.getStubOnThis() (if you don't, and
instead use 'this', the code won't work correctly on remote hosts!).
If the local object uses this
ProActive.getStubOnThis(), you're going to have
trouble with components. The problem is that this design does not fit
the component paradigm: you should be using declared interfaces bound
with the bind methods, not be passing along references to self. So you
have to remove these from the code, and make it component-oriented.
But remember, you should be using bind methods
to attach other components.
| Note |
|---|---|
If you really have to keep these
|
You may be wanting to see how we have bound the components
together, now. Since the design is pretty simple, there is not much to
it. We have used the fractal ADL, to avoid hard-coding bindings. So all
of the information here is in the
examples/components/c3d/adl/ directory. There are the
components, called '...Impl' (you can see there which
interfaces they propose), and a
'userAndComposite.fractal' file, which is where the
bindings are made. It includes the use of a Composite component, just
for the fun. Specifically, it links one user to a composite made of a
dispatcher and two renderers. You may want to explore these files with
the Fractal GUI provided with IC2D, it's easier to understand
graphically. Here's the code, nevertheless, for you curiosity:
<?xml version="1.0" encoding="ISO-8859-1" ?>
<!DOCTYPE definition PUBLIC "-//objectweb.org//DTD Fractal ADL 2.0//EN"
"classpath://org/objectweb/proactive/core/component/adl/xml/proactive.dtd">
<!-- This is an example of binding a complete application. In the code below, a user component
is attached to a composite, which englobes a dispatcher and 2 renderers. -->
<definition name="org.objectweb.proactive.examples.components.c3d.adl.userAndComposite">
<!-- Creating one user component -->
<component definition="org.objectweb.proactive.examples.components.c3d.adl.UserImpl" name=
"user"/>
<component
definition="org.objectweb.proactive.examples.components.c3d.adl.compositeOfDispRend"
name="composite"/>
<!-- binding together the user and the composite -->
<binding client="user.user2dispatcher" server="composite.dispatch"/>
<controller desc="composite"/>
<!-- coordinates added by the fractal GUI of IC2D. -->
<coordinates color="-73" y0="0.11" x1="0.30" y1="0.33" name="user" x0="0.03"/>
<coordinates color="-73" y0="0.18" x1="0.99" y1="0.98" name="composite" x0="0.32">
<coordinates color="-73" y0="0.53" x1="1.00" y1="0.82" name="engine2" x0="0.57"/>
<coordinates color="-73" y0="0.10" x1="0.90" y1="0.48" name="engine1" x0="0.63"/>
<coordinates color="-73" y0="0.10" x1="0.50" y1="0.90" name="dispatcher" x0="0.1"/>
</coordinates>
</definition>
Example 10.2. userAndComposite.fractal, a component ADL file
Here's what it looks like when you explore it through the IC2D Component explorer
One feature given by the component architecture is the
possiblity to rename Virtual Nodes. Let's see how
this can be used:
Suppose you are only dealing with packaged software. That means
you may not modify the source code of some part of your application,
for instance because it is kindly given to you by some other company,
which wants to keep parts of its codebase secret. Let's say that the
deployment descriptor you're using does not reference the proper
VirtualNodes. How can you still deploy your
application in this case? Well, you have to
rename those Nodes into the names that are
fitting to your application. You should do that after the definition
of the interfaces that are defined inside the component.
Here's an example of how to do that, renaming the externally provided
name 'UserVirtualNode' to the name internally used by UserImpl 'User':
In the main ADL file (userAndComposite.fractal)
<component ... /> <!-- mapping the node names in the descriptor file to others referenced in the component's adl files. --> <exportedVirtualNodes> <exportedVirtualNode name="UserVirtualNode"> <composedFrom> <composingVirtualNode component="user" name="User"/> </composedFrom> </exportedVirtualNode> </exportedVirtualNodes> <!-- Creating one user component -->
In the User ADL file (UserImpl.fractal)
<content class="org.objectweb.proactive.examples.components.c3d.UserImpl"/> <!-- Recalling a renamed Virtual Node --> <exportedVirtualNodes> <exportedVirtualNode name="User"> <composedFrom> <composingVirtualNode component="this" name="User"/> </composedFrom> </exportedVirtualNode> </exportedVirtualNodes> <controller desc="primitive"/>
Example 10.3. How to rename Virtual Nodes in ADL files
If you add this code into the
adl, you are saying that the VirtualNode called
UserVirtualNode (found in the deployment
descriptor file the application is using) should be recognized by
the application as if it was called
User.
| Note |
|---|---|
Above has been described the way to rename a
|
When running the User Component alone, you are prompted for an address on which to lookup a Dispatcher Component. Then the two components are bound through a lookup mechanism. This is very simple to use. Here's the code to do that:
The component Registration
Fractive.register(Fractive.getComponentRepresentativeOnThis(),
UrlBuilder.buildUrlFromProperties("localhost", "Dispatcher"));
The Component lookup
ProActiveComponentRepresentative a = Fractive.lookup(
UrlBuilder.buildUrl(this.hostName, "Dispatcher", protocol, this.portNumber));
this.c3dDispatcher = (Dispatcher) a.getFcInterface("user2dispatcher");
Example 10.4. Component Lookup and Register
For the registeration, you only need a reference on the component you want to register, and build a url containing the name of the host, containing an alias for the Component.
The Fractive.lookup method uses a Url to find
the host which holds the component. This Url contains the machine name
of the host, communication protocl and portNumber, but also the lookup
name under which the desired Component has been registered under ,
here "Dispatcher". The last operation consists only in retreiving the
correct interface to which to connect to. If the interface is not
known at compile-time, it can be discovered at run-time with the
getFcInterfaces() method, which lists all the
interfaces available.
There is only one access point for this example in the scripts directory:
scripts/unix/components$ ./c3d.sh
--- Fractal C3D example ---------------------------------------------
Parameters : descriptor_file [fractal_ADL_file]
The first file describes your deployment of computing nodes.
You may want to try ../../../descriptors/components/C3D_all.xml
The second file describes your components layout.
Default is org.objectweb.proactive.examples.components.c3d.adl.userAndComposite
---------------------------------------------------------You have there the way to start this example. If you only want to start the Composite (Dispatcher + Renderer), try this (don't insert the new lines):
scripts/unix/components$ ./c3d.sh ../../../descriptors/components/C3D_all.xml \ org.objectweb.proactive.examples.components.c3d.adl.compositeOfDispRend
If you want to start only a User, you will be asked for the address of a Dispatcher to which to connect to:
scripts/unix/components$ ./c3d.sh ../../../descriptors/components/C3D_all.xml \ org.objectweb.proactive.examples.components.c3d.adl.UserImpl
This tour was intented to guide you through an overview of ProActive.
You should now be able to start programming with ProActive, and you should also have an idea of the capabilities of the library.
We hope that you liked it and we thank you for your interest in ProActive.
Further information can be found on the website. All
suggestions are welcome, please send them to <proactive@objectweb.org>.
Active objects are the basic units of activity and distribution used for building concurrent applications using ProActive. An active object runs with its own thread. This thread only executes the methods invoked on this active object by other active objects and those of the passive objects of the subsystem that belongs to this active object. With ProActive, the programmer does not have to explicitly manipulate Thread objects, unlike in standard Java.
Active objects can be created on any of the hosts involved in the computation. Once an active object is created, its activity (the fact that it runs with its own thread) and its location (local or remote) are perfectly transparent. As a matter of fact, any active object can be manipulated just like if it were a passive instance of the same class.
ProActive is a library designed for developing applications in a model introduced by the Eiffel// language. Its main features are:
The application is structured in subsystems. There is one active object (and therefore one thread) for each subsystem and one subsystem for each active object (or thread). Each subsystem is thus composed of one active object and any number of passive objects (possibly zero). The thread of one subsystem only executes methods in the objects of this subsystem.
There are no shared passive objects between subsystems.

These two main features have a lot of important consequences on the topology of the application:
Of all the objects that make up a subsystem (the active object and the passive objects), only the active object is known to objects outside of the subsystem.
All objects (both active and passive) may have references onto active objects.
If an object o1 has a reference onto a passive object o2, then o1 and o2 are part of the same subsystem.
This has also consequences on the semantics of message-passing between subsystems.
When an object in a subsystem calls a method on an active object, the parameters of the call may be references on passive objects of the subsystem, which would lead to shared passive objects. This is why passive objects passed as parameters of calls on active objects are always passed by deep-copy. Active objects, on the other hand, are always passed by reference. Symmetrically, this also applies to objects returned from methods called on active objects.
When a method is called on an active object, it returns immediately (as the thread cannot execute methods in the other subsystem). A future object, which is a placeholder for the result of the methods invocation, is returned. From the point of view of the caller subsystem, no difference can be made between the future object and the object that would have been returned if the same call had been issued onto a passive object. Then, the calling thread can continue executing its code just like if the call had been effectively performed. The role of the future object is to block this thread if it invokes a method on the future object and the result has not yet been set (i.e. the thread of the subsystem on which the call was received has not yet performed the call and placed the result into the future object): this inter-object synchronization policy is known as wait-by-necessity.
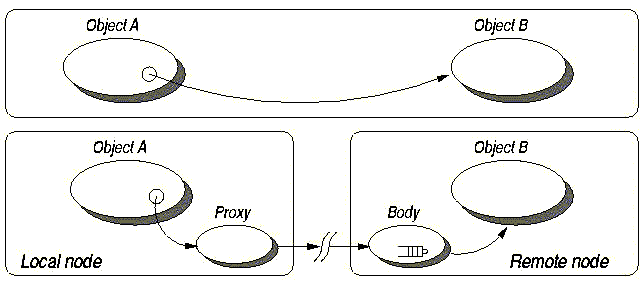
The active object is actually the composition of two objects: a body and a standard Java object. The body is not visible from the outside of the active object, then everything looks like if the standard object was active.
The body is responsible for receiving calls on the active object, storing these calls in a queue of pending calls (we also call requests. It also executes these calls in an order specified by a specific synchronization policy. If no specific synchronization policy is provided, calls are managed in a FIFO manner (first come, first served)).
Then, the thread of an active object alternatively chooses a method in the queue of pending requests and executes it. It is important to note that no parallelism is provided inside an active object. This is an important decision in the design of ProActive which enables the use of pre-post conditions and class invariants.
On the side of the subsystem which sends a call to an active object, this active object is represented by a proxy, whose main responsibility is to generate future objects for representing future values, transform calls into Request objects (in terms of metaobject, this is a reification) and perform deep-copy of passive objects passed as parameters.
Active objects are created on a per-object basis: an application can
contain active as well as passive instances of a given class. In the
remaining part of this section, we will consider that we want to create an
active instance of class example.A. Although almost any
object can be turned into an Active Object, there are some restrictions that
will be detailed below.
Any method call m done on a given instance
a of A would result in the
invocation of the method m on a by
the caller thread. By contrast, the same call done on the active object
aa created from A would result into
placing a request embedding the method call for m in
the request queue of the active object
aa. Then, later on, the active thread of
aa would eventually pick-up and serve the request for
the method m. That would result in the invocation of
m on the reified object a by the
active thread.
The code for creating a passive instance of A could
be:
A a = new A(26, "astring");
In ProActive there are two ways to
create active objects. One way is to use
ProActive.newActive and is based on the instantiation of
a new object, the other is to use ProActive.turnActive
and is based on the use of an existing object.
When using instantiation-based creation, any argument passed to the
constructor of the reified object through
ProActive.newActive is serialized and passed by copy to
the object. That's because the model behind ProActive is uniform whether the active object is
instantiated locally or remotely. The parameters are therefore guaranteed
to be passed by copy to the constructor. When using
ProActive.newActive, one needs to make sure that the
constructor arguments are Serializable. On the other
hand, the class used to create the active object does not need to be Serializable
even in the case of remotely-created Active Objects. Bear in mind also
that a reified object must have a declared empty no-args constructor in
order to be properly created.
A a;
Object[] params = new Object[] { new Integer (26), "astring" };
try {
a = (A) ProActive.newActive("example.A", params);
} catch (ActiveObjectCreationException e) {
// creation of ActiveObject failed
e.printStackTrace();
}
catch(NodeException ex){
ex.printStackTrace();
}
This code creates an active object of class A in
the local JVM. If the invocation of the constructor of class
A throws an exception, it is placed inside an exception
of type ActiveObjectCreationException. When the call to
newActive returns, the active object has been created
and its active thread is started.
The first parameter of newActive is a string containing the fully-qualified name of the class we want to make active. Parameters to the constructor have to be passed as an array of Object. Then, according to the type of the elements of this array, the ProActive runtime determines which constructor of class A to call. Nevertheless, there is still room for some ambiguity in resolving the constructor because:
As the arguments of the constructor are stored in an array of type
Object[], primitive types have to be represented by their wrappers object type. In the example above, we use anIntegerobject to wrap theintvalue 26. An ambiguity then arises if two constructor of the same class only differ by converting a primitive type to its corresponding wrapper class. In the example below, an ambiguity exists between the first and the second constructors.If one argument is null, the runtime can obviously not determine its type. This is the second source of ambiguity. In the example below, an ambiguity exists between the third and the fourth constructors if the second element of the array is
null.
public A (int i) { // } public A (Integer i) { // } public A (int i, String s) { // } public A (int i, Vector v) { // }
It is possible to pass a third parameter to the call to
newActive in order to create the new active object on
a specific JVM, possibly remote. The JVM is identified using a
Node object that offers the minimum services
ProActive needs on a given JVM to communicate with this JVM. If that
parameter is not given, the active object is created in the current JVM
and is attached to a default Node.
A node is identified by a node URL which is formed using the
protocol, the hostname hosting the JVM where is the node located and the
name of the node. The NodeFactory allows to create or
lookup nodes. The method newActive can take in
parameter a nodeURL as a String or a
Node object that points to an existing node. Here an
example:
a = (A) ProActive.newActive("example.A", params, "rmi://pluto.inria.fr/aNode"); or Node node = NodeFactory.getNode("rmi://pluto.inria.fr/aNode"); a = (A) ProActive.newActive("example.A", params, node);
Object-based creation is used for turning an existing passive object instance into an active one. It has been introduced in ProActive as an answer to the following problem. Consider, for example, that an instance of class A is created inside a library and returned as the result of a method call. As a consequence, we do not have access to the source code where the object is created, which prevents us for modifying it for creating an active instance of A. Even if it were possible, it may not be likely since we do not want to get an active instance of A for every call on this method.
When using object based creation, you create the object that is
going to be reified as an active object before hand. Therefore there is no
serialization involved when you create the object. When you invoke
ProActive.turnActive on the object two cases are
possible. If you create the active object locally (on a local node), it
will not be serialized. If you create the active object remotely (on a
remote node), the reified object will be serialized. Therefore, if the
turnActive is done on a remote node, the class used to
create the active object this way has to
beSerializable. In addition, when using
turnActive, care must be taken that no other references
to the originating object are kept by other objects after the call to
turnActive. A direct call to a method of the originating object without
passing by a ProActive stub on this object will break the model.
Code for object-based creation looks like this:
A a = new A (26, "astring"); a = (A) ProActive.turnActive(a);
As for newActive, the second parameter of
turnActive if given is the location of the active
object to be created. No parameter or null means that
the active object is created locally in the current node.
When using this method, the programmer has to make sure that no other reference on the passive object a exist after the call to turnActive. If such references were used for calling methods directly on the passive A (without going through its body), the model would no more be consistent and specialization of synchronization could no more be guaranteed.
Customizing the activity of the active object is at the core of ProActive because it allows to specify fully the behavior of an active object. By default, an object turned into an active object serves its incoming requests in a FIFO manner. In order to specify another policy for serving the requests or to specify any other behaviors one can implement interfaces defining methods that will be automatically called by ProActive.
It is possible to specify what to do before the activity starts, what the activity is and what to do after it ends. The three steps are:
the initialization of the activity (done only once)
the activity itself
the end of the activity (done only once)
Three interfaces are used to define and implement each step:
InitActive (see code in InitActive.java)
RunActive (see code in RunActive.java)
EndActive (see code in EndActive.java)
In case of a migration, an active object stops and restarts its activity automatically without invoking the init or ending phases. Only the activity itself is restarted.
Two ways are possible to define each of the three phases of an active object.
Implementing one or more of the three interfaces directly in the class used to create the active object
Passing an object implementing one or more of the three interfaces in parameter to the method
newActiveorturnActive(parameter active in those methods)
Note that the methods defined by those 3 interfaces are guaranted to be called by the active thread of the active object.
The algorithms that decide for each phase what to do are the
following (activity is the eventual object passed as
a parameter to newActive or
turnActive):
InitActive
if activity is non null and implements InitActive we invoke the method initActivity defined in the object activity else if the class of the reified object implements InitActive we invoke the method initActivity of the reified object else we don't do any initialization
RunActive
if activity is non null and implements RunActive we invoke the method runActivity defined in the object activity else if the class of the reified object implements RunActive we invoke the method runActivity of the reified object else we run the standard FIFO activity
EndActive
if activity is non null and implements EndActive we invoke the method endActivity defined in the object activity else if the class of the reified object implements EndActive we invoke the method endActivity of the reified object else we don't do any cleanup
Implementing the interfaces directly in the class used to create
the active object is the easiest solution when you control the class
that you make active. Depending on which phase in the life of the active
object you want to customize, you implement the corresponding interface
(one or more) amongst InitActive,
RunActive and EndActive. Here is
an example that has a custom initialization and activity.
import org.objectweb.proactive.*; public class A implements InitActive, RunActive { private String myName; public String getName() { return myName; } // -- implements InitActive public void initActivity(Body body) { myName = body.getName(); } // -- implements RunActive for serving request in a LIFO fashion public void runActivity(Body body) { Service service = new Service(Body); while (body.isActive()) { service.blockingServeYoungest(); } } public static void main(String[] args) throws Exception { A a = (A) ProActive.newActive("A",null); System.out.println("Name = "+a.getName()); } }
Example 13.1. Custom Init and Run
import org.objectweb.proactive.*; public class Simulation implements RunActive { private boolean stoppedSimulation=false; private boolean startedSimulation=false private boolean suspendedSimulation=false; private boolean notStarted = true; public void startSimulation(){ //Simulation starts notStarted = false; startedSimulation=true; } public void restartSimulation(){ //Simulation is restarted startedSimulation=true; suspendedSimulation=false; } public void suspendSimulation(){ //Simulation is suspended suspendedSimulation=true; startedSimulation = false; } public void stoppedSimulation(){ //Simulation is stopped stoppedSimulation=true; } public void runActivity(Body body) { Service service = new Service(Body); while (body.isActive()) { //If the simulation is not yet started wait until startSimulation method if(notStarted) service.blockingServeOldest(startSimulation()); // If the simulation is started serve request with FIFO if(startedSimulation) service.blockingServeOldest(); // If simulation is suspended wait until restartSimulation method if(suspendedSimulation) service.blockingServeOldest(restartSimulation()); // If simulation is stopped, exit if(stoppedSimulation) exit(); } }
Example 13.2. Start, stop, suspend, restart a simulation algorithm in runActivity method
Even when an AO is busy doing its own work, it can remain reactive to external events (method calls). One just has to program non-blocking services to take into account external inputs.
public class BusyButReactive implements RunActive { public void runActivity(Body body) { Service service = new Service(body); while ( ! hasToTerminate ) { ... // Do some activity on its own ... ... // Non blocking service ... service.serveOldest("changeParameters", "terminate"); ... } } public void changeParameters () {... // change computation parameters} public void terminate (){ hasToTerminate=true;} }
Example 13.3. Reactive Active Object
It also allows one to specify explicit termination of AOs (there is currently no Distributed Garbage Collector). Of course, the reactivity is up to the length of going around the loop.
Passing an object implementing the interfaces when creating the
active object is the solution to use when you do not control the class
that you make active or when you want to write generic activities policy
and reused them with several active objects. Depending on which phase in
the life of the active object you want to customize, you implement the
corresponding interface (one or more) amongst
InitActive, RunActive and
EndActive. Following is an example that has a custom
activity.
Comparing to the solution above where interfaces are directly implemented in the reified class, there is one restriction here: you cannot access the internal state of the reified object. Using an external object should therefore be used when the implementation of the activity is generic enough not to have to access the member variables of the reified object.
import org.objectweb.proactive.*; public class LIFOActivity implements RunActive { // -- implements RunActive for serving request in a LIFO fashion public void runActivity(Body body) { Service service = new Service(Body); while (body.isActive()) { service.blockingServeYoungest(); } } } import org.objectweb.proactive.*; public class A implements InitActive { private String myName; public String getName() { return myName; } // -- implements InitActive public void initActivity(Body body) { myName = body.getName(); } public static void main(String[] args) throws Exception { // newActive(classname, constructor parameter (null = none), // node (null = local), active, MetaObjectFactory (null = default) A a = (A) ProActive.newActive("A", null, null, new LIFOActivity(), null); System.out.println("Name = "+a.getName()); } }
Not all classes can give birth to active objects. There exist some restrictions, most of them caused by the 100% Java compliance, which forbids modifying the Java Virtual Machine or the compiler.
Some of these restrictions work at class-level:
Final classes cannot give birth to active object
Same thing for non-public classes
Classes without a no-argument constructor cannot be reified. This restriction will be softened in a later release of ProActive
Some other happen at the level of a method in a specific class:
Final methods cannot be used at all. Calling a final method on an active object leads to inconsistent behavior.
Calling a non-public method on an active object raises an exception. This restriction disappeared with JDK 1.2.
Creating an active object using ProActive might be a little bit
cumbersome and requires more lines of code that for creating a regular
object. A nice solution to this problem is through the use of the
factory pattern. This mainly applies to
class-based creation. It consists in adding a static method to class
pA that takes care of instantiating the active object
and returns it. The code is:
public class AA extends A { public static A createActiveA (int i, String s, Node node) { Object[] params = new Object[] {new Integer (i), s}; try { return (A) ProActive.newActive("A", params, node); } catch (Exception e) { System.err.println ("The creation of an active instance of A raised an exception: "+e); return null; } } }
It is up to the programmer to decide whether this method has to throw exceptions or not. We recommend that this method only throws exceptions that appear in the signature of the reified constructor (none here as the constructor of A that we call doesn't throw any exception). But the non functional exceptions induced by the creation of the active object have to be dealt with somewhere in the code.
There are many cases where you may want to customize the body used when creating an active object. For instance, one may want to add some debug messages or some timing behavior when sending or receiving requests. The body is a non changeable object that delegates most of its tasks to helper objects called MetaObjects. Standard MetaObjects are already used by default in ProActive but one can easily replace any of those MetaObjects by a custom one.
We have defined the MetaObjectFactory interface
(see code in core/body/MetaObjectFactory.java) able to create factories for each of those
MetaObjects. This interface is implemented by
ProActiveMetaObjectFactory (see code in core/body/ProActiveMetaObjectFactory.java) which provides all the default factories used in
ProActive.
When creating an active object, as we saw above, it is possible to
specify which MetaObjectFactory to use for that
particular instance of active object being created. The class
ProActive (see code in ProActive.java) provides extra newActive and turnActive methods
for that:
ProActive.newActive( java.lang.String, java.lang.Object[], org.objectweb.proactive.core.node.Node, org.objectweb.proactive.Active, org.objectweb.proactive.core.body.MetaObjectFactory)
ProActive.turnActive( java.lang.Object, org.objectweb.proactive.core.node.Node, org.objectweb.proactive.Active, org.objectweb.proactive.core.body.MetaObjectFactory)
First you have to write a new MetaObject factory that inherits
from ProActiveMetaObjectFactory (see code in core/body/ProActiveMetaObjectFactory.java) or directly implements the
MetaObjectFactory interface (see code in core/body/MetaObjectFactory.java), in
order to redefine everything. Inheriting from
ProActiveMetaObjectFactory is a great time saver as
you only redefine what you really need to. Here is an example:
public class MyMetaObjectFactory extends ProActiveMetaObjectFactory { private static final MetaObjectFactory instance = new MyMetaObjectFactory(); protected MyMetaObjectFactory() { super(); } public static MetaObjectFactory newInstance() { return instance; } // // -- PROTECTED METHODS ----------------------------------------------- // protected RequestFactory newRequestFactorySingleton() { return new MyRequestFactory(); } // // -- INNER CLASSES ----------------------------------------------- // protected class MyRequestFactory implements RequestFactory, java.io.Serializable { public Request newRequest(MethodCall methodCall, UniversalBody sourceBody, boolean isOneWay, long sequenceID) { return new MyRequest(methodCall, sourceBody, isOneWay, sequenceID, server); } } // end inner class MyRequestFactory }
The factory above simply redefines the
RequestFactory in order to make the body use a new
type of request. The method protected RequestFactory
newRequestFactorySingleton() is one convenience method that
ProActiveMetaObjectFactory (see code in core/body/ProActiveMetaObjectFactory.java) provides to simplify the creation of factories as
singleton. More explanations can be found in the
javadoc
of that class . The use of that factory is fairly simple. All you have
to do is to pass an instance of the factory when creating a new active
object. If we take the same example as before we have:
Object[] params = new Object[] {new Integer (26), "astring"}; try { A a = (A) ProActive.newActive("example.AA", params, null, null, MyMetaObjectFactory.newInstance()); } catch (Exception e) { e.printStackTrace() ; }
In the case of a turnActive we would
have:
A a = new A(26, "astring"); a = (A) ProActive.turnActive(a, null, null, MyMetaObjectFactory.newInstance());
In this section, we'll have a very close look at what happens when an active object is created. This section aims at providing a better understanding of how the library works and where the restrictions of Proactive come from.
Consider that some code in an instance of class A
creates an active object of class B using a piece of
code like this:
B b;
Object[] params = {<some parameters for the constructor>};
try {
// We create an active instance of B on the current node
b = (B) ProActive.newActive("B", params);
} catch (Exception e) {
e.printStackTrace () ;
}
If the creation of the active instance of B is successful, the graph of objects is as described in figure below (with arrows denoting references).
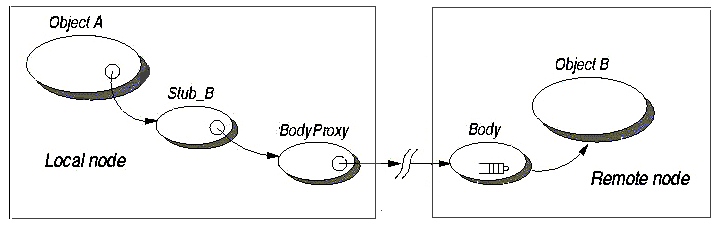
The active instance of B is actually composed of 4 objects:
a stub (
Stub_B)a proxy (
BodyProxy)a body (
Body)an instance of
B
The role of the class Stub_B is to reify all
method calls that can be performed through a reference of type
B, and only these as calling a method declared in a
subclass of B through downcasting would result in a
runtime error). Reifying a call simply means constructing an object (in
our case, all reified calls are instance of class
MethodCall) that represents the call, so that it can
be manipulated as any other object. This reified call is then processed
by the other components of the active object in order to achieve the
behavior we expect from an active object.
The idea of using a standard object for representing elements of the language that are not normally objects (such as method calls, constructor calls, references, types,...) is what metaobject programming is all about. The metaobject protocol (MOP) ProActive is built on is described in Chapter 52, MOP: Metaobject Protocol but it is not a prerequisite for understanding and using ProActive.
As one of our objectives is to provide transparent active objects,
references to active objects of class B need to be of
the same type as references to passive instances of B
(this feature is called polymorphism between
passive and active instances of the same class). This is why, by
construction, Stub_B is a subclass of class
B, therefore allowing instances of class
Stub_B to be assigned to variables of type
B.
Class Stub_B redefines each of the methods
inherited from its superclasses. The code of each method of class
Stub_B actually builds an instance of class
MethodCall in order to represent the call to this
method. This object is then passed to the BodyProxy,
which returns an object that is returned as the result of the method
call. From the caller's point of view, everything looks like if the call
had been performed on an instance of B.
Now that we know how stubs work, we can understand some of the limitations of ProActive:
Obviously,
Stub_Bcannot redefinefinalmethods inherited from classB. Therefore, calls to these methods are not reified but are executed on the stub, which may lead to unexplainable behavior if the programmer does not carefully avoid callingfinalmethods on active objects.As there are 6 final methods in the base class
Object, one may wonder how to live without them. In fact, 5 out of this 6 methods deal with thread synchronization (notify(),notifyAll()and the 3 versions ofwait()). Those method should not be used since an active object provides thread synchronization. Indeed, using the standard thread synchronization mechanism and ProActive thread synchronization mechanism at the same time might conflict and result in an absolute debugger's nightmare.The last final method in the class
ObjectisgetClass(). When invoked on an active object,getClass()is not reified and therefore performed on the stub object, which returns an object of classClassthat represents the class of the stub (Stub_Bin our example) and not the class of the active object itself (Bin our example). However, this method is seldom used in standard applications and it doesn't prevent the operatorinstanceofto work thanks to its polymorphic behavior. Therefore the expression(foo instanceof B)has the same value whether B is active or not.Getting or setting instance variables directly (not through a getter or a setter) must be avoided in the case of active objects because it results in getting or setting the value on the stub object and not on the instance of the class
B. This problem is usually worked around by using get/set methods for setting or reading attributes. This rule of strict encapsulation may also be found in JavaBeans or in most distributed object systems like RMI or CORBA.
The role of the proxy is to handle asynchronism in calls to active
object. More specifically, it creates future objects if possible and
needed, forwards calls to bodies and returns future objects to the
stubs. As this class operates on MethodCall objects,
it is absolutely generic and does not depend at all on the type of the
stub that feeds calls in through its reify
method.
The body is responsible for storing calls
(actually, Request objects) in a queue of pending
requests and processing these request according to a given
synchronization policy, whose default behavior is FIFO. The Body has its
own thread, which alternatively chooses a request in the queue of
pending ones and executes the associated call.
This is a standard instance of class B. It may
contain some synchronized information in its live
method, if any. As the body executes calls one by one, there cannot be
any concurrent execution of two portions of code of this object by two
different threads. This enables the use of pre- and post-conditions and
class invariants. As a consequence, the use of the keyword
synchronized in class B should not
be necessary. Any synchronization scheme that can be expressed through
monitors and synchronized statements can be expressed
using ProActive's high-level synchronization mechanism in a much more
natural and user-friendly way.
Whenever possible a method call on an active object is reified as an asynchronous request. If not possible the call is synchronous and blocks until the reply is received. In case the request is asynchronous, it immediately returns a future object.
This object acts as a placeholder for the result of the not-yet-performed method invocation. As a consequence, the calling thread can go on with executing its code, as long as it doesn't need to invoke methods on the returned object, in which case the calling thread is automatically blocked if the result of the method invocation is not yet available. Below are shown the different cases that can lead to an asynchronous call.
Return type | Can throw checked exception | Creation of a future | Asynchronous |
void | - | No | Yes |
Non Reifiable Object | - | No | No |
Reifiable Object | Yes | No | No |
Reifiable Object | No | Yes | Yes |
Table 13.1. Future creation, and asynchronous calls depending on return type
As we can see, the creation of a future depends not only on the caller type, but also on the return object type. Creating a future is only possible if the object is reifiable. Note although having a quite similar structure as an active object, a future object is not active. It only has a Stub and a Proxy as shown in figure below:
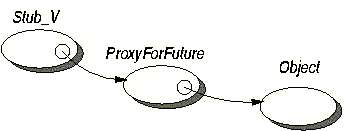
During its lifetime, an active object can create many future objects. There are all automatically kept in a FuturePool.
Each time a future is created, it is inserted in the future pool
of the corresponding active object. When the result becomes available,
the future object is removed from the pool. Although most of the methods
of the FuturePool are for internal use only and are directly called by
the proactive library we provide a method to wait until a result becomes
available. Instead of blocking until a specific future is available, the
call to waitForReply() blocks until any of the
current futures become available. An application can be found in the
FutureList class.
Any call to a future object is reified in order to be blocked if
the future is not yet available and later executed on the result
object. However, two methods don't follow this scheme: equals and
hashCode. They are often called by other methods from the Java
library, like HashTable.add() and so are most of
the time out of control from the user. This can lead very easily to
deadlocks if they are called on a not yet available object.
Instead of returning the hashcode of the object, it returns the hashcode of its proxy. Since there is only one proxy per future object, there is a unique equivalence between them.
The default implementation of equals() in the
Object class is to compare the references of two objects. In ProActive
it is redefined to compare the hashcode of two proxies. As a
consequence it is only possible to compare two future object, and not
a future object with a normal object.
There are some drawbacks with this technique, the main one being
the impossibility to have a user override the default
HashTable and equals()
methods.
The toString() method is most of the time
called with System.out.println() to turn an object
into a printable string. In the current implementation, a call to this
method will block on a future object like any other call, thus, one
has to be careful when using it. As an example, trying to print a
future object for debugging purpose will most of the time lead to a
deadlock. Instead of displaying the corresponding string of a future
object, you might consider displaying its hashCode.
First, let's introduce the example we'll use throughout this
section. Let us say that some piece of code in an instance of class
A calls method foo on an active
instance of class B. This call is asynchronous and
returns a future object of class V. Then, possibly
after having executed some other code, the same thread that issued the
call calls method bar on the future object returned
by the call to foo.
In a sequential, single-threaded version of the same
application, the thread would have executed the code of the calling
method in class A up to the call of
foo, then the code of foo in
class B, then back to the code of the calling
method in class A up to the call to
bar, then the code of bar in
class V, and finally back to the code of the
calling method in class A until its end. The
sequence diagram below summarizes this execution. You can notice how
the single thread successively executes code of different methods in
different classes.
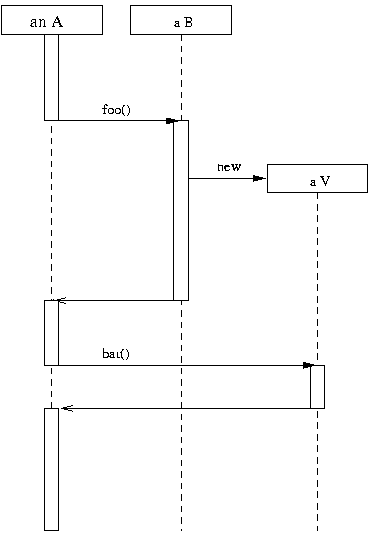
Let us first get an idea of what the graph of objects at execution (the objects with their references to each other) looks like at three different moments of the execution:
Before calling
foo, we have exactly the same setup as after the creation of the active instance ofBand summarized in the figure below: an instance of classAand an active instance of classB. As all active objects, the instance of classBis composed of a stub (an instance of classStub_B, which actually inherits directly fromB), aBodyProxy, aBodyand the actual instance ofB.After the asynchronous call to
foohas returned,Anow holds a reference onto a future object representing the not-yet-available result of the call. It is actually composed of aStub_Vand aFutureProxyas shown on the figure below.Right after having executed
fooon the instance ofB, the thread of theBodysets the result in the future, which results in theFutureProxyhaving a reference onto aV(see figure below).

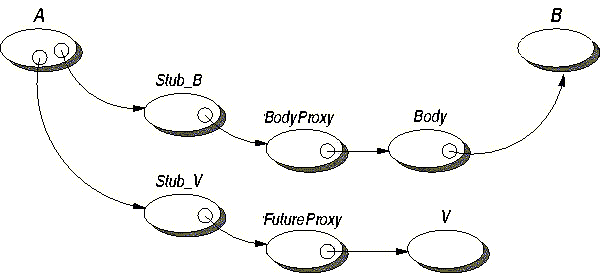
Let us now concentrate on how and when and by which thread the
different methods are called. We have two threads: the thread that
belongs to the subsystem A is part of (let's call
it the first thread), and the thread that belongs
to the subsystem B is part of (the second
thread).
The first thread invokes foo on an instance
of Stub_B, which builds a
MethodCall object and passes it to the
BodyProxy as a parameter of the call to
reify. The proxy then checks the return type of the
call (in this case V) and generates a future object
of type V for representing the result of the method
invocation. The future object is actually composed of a
Stub_V and a FutureProxy. A
reference onto this future object is set in the
MethodCall object, which will prove useful once the
call is executed. Now that the MethodCall object is
ready, it is passed as a Request to the Body of the
Active Object as a parameter. The body simply appends this request to
the queue of pending requests and returns immediately. The call to
foo that an A issued now returns
a future object of type Stub_V, that is a subclass
of V.
At some point, possibly after having served some other requests,
the second thread (the active thread) picks up
the request issued by the first thread some time
ago. It then executes the embedded call by calling
foo on the instance of B with
the actual parameters stored in the MethodCall
object. As specified in its signature, this call returns an object of
type V. The second thread is
then responsible for setting this object in the future object (which
is the reason why MethodCall objects hold a
reference on the future object created by the
FutureProxy). The execution of the call is now
over, and the second thread can select another
request to serve in the queue and execute it.
In the meantime, the first thread has
continued executing the code of the calling method in class
A. At some point, it calls bar
on the object of type Stub_V that was returned by
the call to foo. This call is reified thanks to the
Stub_V and processed by the
FutureProxy. If the object the future represents is
available (the second thread has already set it
in the future object, which is described in figure below, the call is
executed on it and returns a value to the calling code in
A.
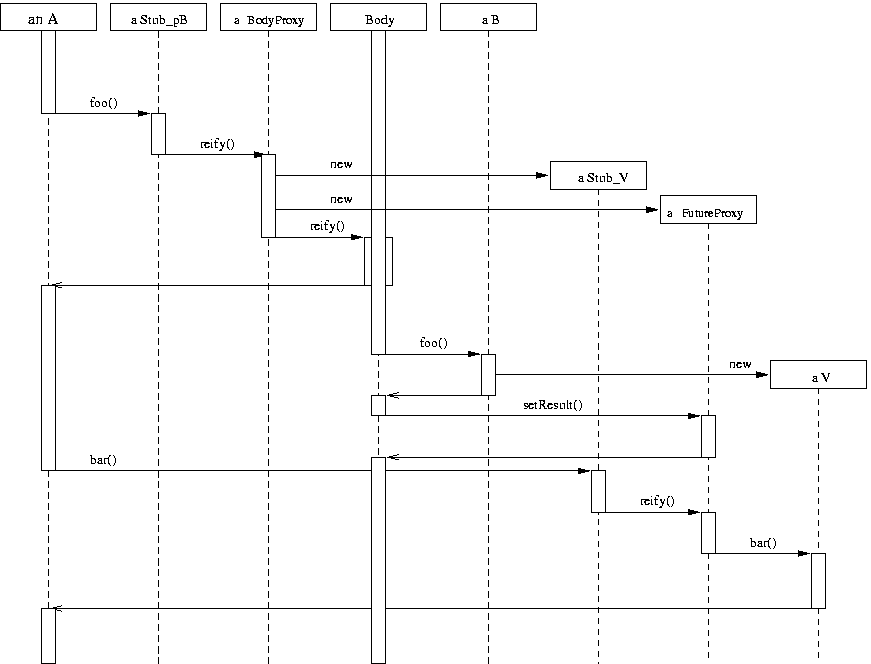
If it is not yet available, the first thread is suspended in
FutureProxy until the second thread sets the result
in the future object (see figure below).
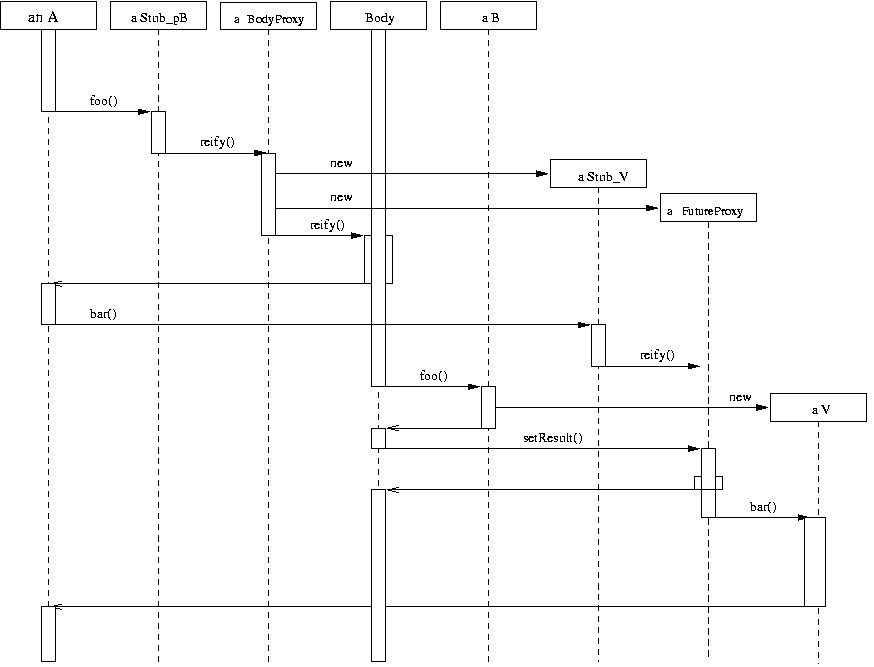
There are few things to remember with asynchronous method calls and futures, in order to avoid annoying debugging sessions:
Constructor with no-args: this constructor will be used either for the Active Objects creation(if not present, an exception might be thrown) or Future creation for a method call (if not present, the method call is synchronous). Avoid to put initialization stuff in this constructor, as it might lead to unexpected behavior. Indeed this constructor is called for the stub creation.
Make your classes implement Serializable interface since ProActive deals with objects that cross the network
Think to use wrappers instead of primitive types or final classes for methods result type otherwise you will loose the asynchronism capabilities. For instance if one of your object has a method
int giveSolution(parameter)calling this method with ProActive is sychronous. So to keep the asynchronism it is advised to use
IntWrapper giveSolution(parameter)In that case call to this method is asynchronous.
All wrappers are in the package: org.objectweb.proactive.core.util.wrapper
ProActive provides more used primitive type wrappers, there are 2 versions of each, one mutable, and the other which is immutable.
Only the methods return type are concerned not the parameters.
Avoid to return null in Active Object methods: on the caller side the test if(result_from_method == null) has no sense. Indeed result_from_method is a couple Stub-FutureProxy as explained above, so even if the method returns null, result_from_method cannot be null:
public class MyObject{ public MyObject(){ //empty constructor with no-args } public Object getObject{ if(.....) { return new Object(); } else { return null; --> to avoid in ProActive } } }
On the caller side:
MyObject o = new MyObject(); Object result_from_method = o.getObject(); if(result_from_method == null){ ...... }
This test is never true, indeed, result_from_method is Stub-->Proxy-->null if the future is not yet available or the method returns null or Stub-->Proxy-->Object if the future is available, but result_from_method is never null.
An Automatic Continuation is due to the propagation of a future outside the activity that has sent the corresponding request.
Automatic Continuations allow to pass in parameter or return as a result future objects(or objects containing a future) without blocking to wait the result object of the future. When the result is available on the object that originated the creation of the future, this object must update the result in all objects to which it passed the future.
Message sending
Automatic Continuations can occur when sending a request (parameter of the request is a future or contains a future) or when sending a reply (the result is a future or contains a future).
Outgoing futures are registered in the FuturePool of the Active Object sending this future(request or reply). Registration for couple(Future,BodyDestination) as an Automatic Continuation occurs when the future is serialized(indeed every request or reply are serialized before being sent, and the future is part of the request or the reply). More precisely, a thread T sending the message(request or reply)---therefore the thread doing the serialization---, keeps in a static table (FuturePool.bodyDestination) a reference of the destination body. Hence when a future F is serialized by the same thread T(since futures are part of request or reply, it is the same thread serializing the request --or reply-- and the future), it looks up in the static table, if there is a destination D registered for the thread T. If true, the future notifies its FuturePool (that it is going to leave), which in turn registers couple (F,D) as an Automatic Continuation
When value V is available for the future F, V is propagated to all objects that received the fututre F. This Update is realized by a particular thread located in the FuturePool.
Message reception
When a message is received(request or reply) by an Active Object, this message can contain a future. So the Active Object registers this future in the FuturePool to be able to update it when the value will be available. This registration takes place in two steps:
When the future is deserialized, it registers in a static table (FuturePool.incomingFutures
In Receive[Request-Reply] method, it is checked if one or many futures are registerd in that table, then, if true these futures are registerd in the FuturePool in a standart way.
The following piece of code shows both cases: passing a future as parameter or as a result.
class C { .... public static void main(String[] args){ ...... A a = newActive(A); A b = newActive(B); Result r1 = a.foo(); //r1 is a future Result r2 = b.bar(r1); //r1 is passed as parameter Result r3 = b.bar2(); // see ** ........ } //end of main ... } //end of class C
where
class A { ... public Result foo(){ ... } ... } //end of class A
and
class B { ... public Result bar (Result r) { ... } public Result bar2 () { A a = newActive(A); return a.foo(); // ** future is sent as a result } } //end of class B
We will illustrate here how a future is first created, then passed as parameter to a method later on.
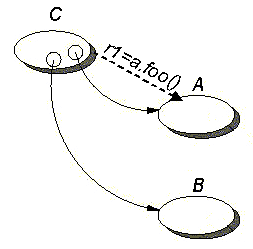
Let us say that some piece of code in main method of an object C calls method foo() on an instance of class A.

This call is asynhronous and returns a future object Future_r1 of class Result.
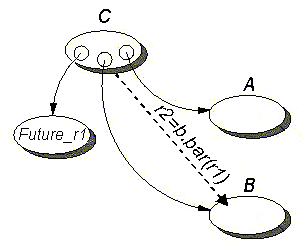
Then method bar() is called on an instance of class B passing future Future_r1 as a parameter to the method
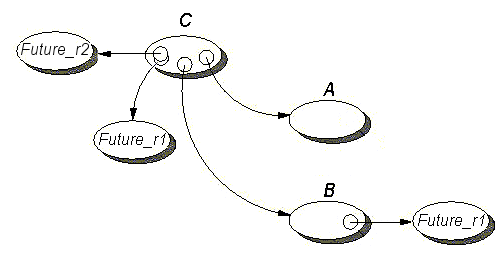
This call is asynhronous and returns a future object Future_r2 of class Result. B needs the value of Future_r1 which is not yet available in order to return the result of method bar(), so it gets the future too.
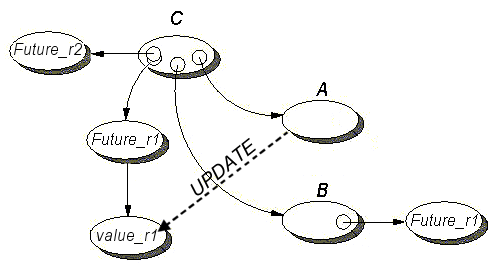
The value of the result for the call to method foo is now available, so A updates the value of Future_r1

C updates the value of Future_r1 for B
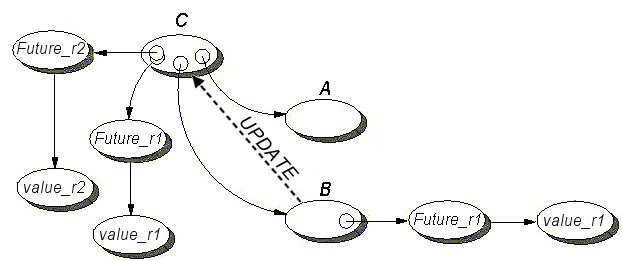
B returns the value for the call to method bar() and updates the value of Future_r2 for C
This example implements a very simple client-server application. A
client object display a String received from a remote
server. We will see how to write classes from which active and remote
objects can be created, how to find a remote object and how to invoke
methods on remote objects.
Only two classes are needed: one for the server object
Hello and one for the client that accesses it
HelloClient.
This class implements server-side functionalities. Its creation involves the following steps:
Provide an implementation for the required server-side functionalities
Provide an empty, no-arg constructor
Write a
mainmethod in order to instantiate one server object and register it with an URL.
public class Hello { private String name; private String hi = "Hello world"; private java.text.DateFormat dateFormat = new java.text.SimpleDateFormat("dd/MM/yyyy HH:mm:ss"); public Hello() { } public Hello(String name) { this.name = name; } public String sayHello() { return hi + " at " + dateFormat.format(new java.util.Date())+ " from node: " + org.objectweb.proactive.ProActive.getBodyOnThis().getNodeURL(); } public static void main(String[] args) { // Registers it with an URL try { // Creates an active instance of class HelloServer on the local node Hello hello = (Hello)org.objectweb.proactive.ProActive.newActive(Hello.class.getName(), new Object[]{"remote"}); java.net.InetAddress localhost = java.net.InetAddress.getLocalHost(); org.objectweb.proactive.ProActive.register(hello, "//" + localhost.getHostName() + "/Hello"); } catch (Exception e) { System.err.println("Error: " + e.getMessage()); e.printStackTrace(); } } }
Example 13.4. A possible implementation for the Hello
class:
Implementing any remotely-accessible functionality is simply done through normal Java methods in a normal Java class, in exactly the same manner it would have been done in a non-distributed version of the same class. This has to be contrasted with the RMI approach, where several more steps are needed:
Define a remote interface for declaring the remotely-accessible methods.
Rewrite the class so that it inherits from
java.rmi.server.UnicastRemoteObject, which is the root class of all remote objects.Add remote exceptions handling to the code.
You may have noticed that class Hello has a
constructor with no parameters and an empty implementation. The
presence of this empty no-arg constructor is imposed by ProActive
and is actually a side-effect of ProActive's transparent
implementation of active remote objects (as a matter of fact, this
side-effect is caused by ProActive being implemented on top of a
100% Java metaobject protocol). If no such constructor is provided,
active objects cannot be created.
If no constructor at all is provided, active objects can still be created because, in this specific case, all Java compilers provide a default no-arg empty constructor. If a no-arg constructor is provided but its implementation is not empty, unwanted behavior may appear because the no-arg constructor is always called when an active object is created, whatever code the user can write.
Now that we know how to write the class that implements the
required server-side functionalities, let us see how to create the
server object. In ProActive, there is actually no difference between
a server and a client object as both are remote objects.Creating the
active object is done through instantiation-based
creation. We want this active object to be created on the
current node, which is why we use newActive with
only two parameters. In order for the client to obtain an initial
reference onto this remote object, we need to register it in the
registry (which is actually the well-known
rmiregistry) with a valid RMI URL.
The responsibility of this class is first to locate the remote server object, then to invoke a method on it in order to retrieve a message, and finally display that message.
public class HelloClient { public static void main(String[] args) { Hello myServer; String message; try { // checks for the server's URL if (args.length == 0) { // There is no url to the server, so create an active server within this VM myServer = (Hello)org.objectweb.proactive.ProActive.newActive(Hello.class.getName(), new Object[]{"local"}); } else { // Lookups the server object System.out.println("Using server located on " + args[0]); myServer = (Hello)org.objectweb.proactive.ProActive.lookupActive(Hello.class.getName(), args[0]); } // Invokes a remote method on this object to get the message message = myServer.sayHello(); // Prints out the message System.out.println("The message is: " + message); } catch (Exception e) { System.err.println("Could not reach/create server object"); e.printStackTrace(); System.exit(1); } } }
Example 13.5. HelloClient.java
The operation of lookup simply means
obtaining a reference onto an object from the URL it is bound to.
The return type of method
Proactive.lookupActive() is
Object, then we need to cast it down into the
type of the variable that holds the reference
(Hello here). If no object is found at this URL,
the call to Proactive.lookupActive() returns
null.
This is exactly like invoking a method on a local object of
the same type. The user does not have to deal with catching
distribution related exceptions like, for example, when using RMI or
CORBA. Future versions of ProActive will provide an exception
handler mechanism in order to process these exceptions in a separate
place than the functional code. As class String
is final, there cannot be any asynchronism here
since the object returned from the call cannot be replaced by a
future object (this restriction on final classes
is imposed by ProActive's implementation).
In order to run both the client and server in the same VM, the client creates an active object in the same VM if it doesn't find the server's URL. The code snippet which instantiates the Server in the same VM is the following:
if (args.length == 0) { // There is no url to the server, so create an active server within this VM myServer = (Hello)org.objectweb.proactive.ProActive.newActive( Hello.class.getName(), new Object[]{"local"}); }
To launch the Client and the Server, just type:
linux> java -Djava.security.policy=scripts/proactive.java.policy -Dlog4j.configuration=file:scripts/proactive-log4j org.objectweb.proactive.examples.hello.HelloClient
windows> java -Djava.security.policy=scripts\unix\proactive.java.policy -Dlog4j.configuration=file:scripts\unix\proactive-log4j org.objectweb.proactive.examples.hello.HelloClient &
Just start the main method in the
Hello class.
linux> java -Djava.security.policy=scripts/proactive.java.policy -Dlog4j.configuration=file:scripts/proactive-log4j org.objectweb.proactive.examples.hello.Hello &
windows> java -Djava.security.policy=scripts\proactive.java.policy -Dlog4j.configuration=file:scripts\proactive-log4j org.objectweb.proactive.examples.hello.Hello
linux> java -Djava.security.policy=scripts/proactive.java.policy -Dlog4j.configuration=file:scripts/proactive-log4j org.objectweb.proactive.examples.hello.HelloClient //localhost/Hello &
windows> java -Djava.security.policy=scripts\proactive.java.policy -Dlog4j.configuration=file:scripts\proactive-log4j org.objectweb.proactive.examples.hello.HelloClient //localhost/Hello
Log on to the server's host, and launch the
Hello class.
linux remoteHost> java -Djava.security.policy=scripts/proactive.java.policy -Dlog4j.configuration=file:scripts/proactive-log4j org.objectweb.proactive.examples.hello.Hello &
windows remoteHost> java -Djava.security.policy=scripts\proactive.java.policy -Dlog4j.configuration=file:scripts\proactive-log4j org.objectweb.proactive.examples.hello.Hello
Log on to the client Host, and launch the client
linux clientHost> java -cp $CLASSPATH -Djava.security.policy=scripts/proactive.java.policy -Dlog4j.configuration=file:scripts/proactive-log4j org.objectweb.proactive.examples.hello.HelloClient //remoteHost/Hello &
windows clientHost> java -cp $CLASSPATH -Djava.security.policy=scripts\proactive.java.policy -Dlog4j.configuration=file:scripts\proactive-log4j org.objectweb.proactive.examples.hello.HelloClient //remoteHost/Hello
| Note |
|---|---|
There is also a Guided Tour section on the Hello world example: Chapter 6, Hands-on programming |
Group communication is a crucial feature for high-performance and Grid computing. While previous works and libraries proposed such a characteristic (e.g. MPI, or object-oriented frameworks), the use of groups imposed specific constraints on programmers, for instance the use of dedicated interfaces to trigger group communications.
We aim at a more flexible mechanism. We propose a scheme where, given a Java class, one can initiate group communications using the standard public methods of the class together with the classical dot notation; in that way, group communications remains typed.
In order to ease the use of the group communication, we provide a
set of static methods on the ProActiveGroup class and a
set of methods on the Group interface.
Here, a short compilation about the syntax and some method used in the Group Communication API is presented. More informations follow.
// created at once, // with parameters specified in params, // and on the nodes specified in nodes A ag1 = (A) ProActiveGroup.newGroup( 'A', params, [nodes]); // A general group communication without result // A request to foo is sent in parallel to all active objects // in the target group (ag1) ag1.foo(...); // A general group communication with a result V vg = ag1.bar(...); // vg is a typed group of 'V': operation // below is also a collective operation // triggered on results vg.f1();
Any object that is reifiable has the ability to be included in a
group. Groups are created using the static method
ProActiveGroup.newGroup. The common superclass for all
the group members has to be specified, thus giving the group a minimal
type.
Let us take a standard Java class:
class A { public A() {} public void foo (...) {...} public V bar (...) {...} ... }
Here are examples of some group creation operations:
// Pre-construction of some parameters: // For constructors: Object[][] params = {{...} , {...} , ... }; // Nodes to identify JVMs to map objects Node[] nodes = { ... , ..., ... }; // Solution 1: // create an empty group of type 'A' A ag1 = (A) ProActiveGroup.newGroup('A'); // Solution 2: // a group of type 'A' and its members are // created at once, // with parameters specified in params, // and on the nodes specified in nodes A ag2 = (A) ProActiveGroup.newGroup('A', params, nodes); // Solution 3: // a group of type 'A' and its members are // created at once, // with parameters specified in params, // and on the nodes directly specified A ag3 = (A) ProActiveGroup.newGroup('A', params[], {rmi://globus1.inria.fr/Node1, rmi://globus2.inria.fr/Node2});
Elements can be included into a typed group only if their class equals or extends the class specified at the group creation. For example, an object of class B (B extending A) can be included to a group of type A. However based on Java typing, only the methods defined in the class A can be invoked on the group.
The typed group representation we
have presented corresponds to the functional view of groups of objects. In
order to provide a dynamic management of groups, a second and
complementary representation of a group has been designed. In order to
manage a group, this second representation must be used instead. This
second representation, the management
representation, follows a more standard pattern for grouping
objects: the Group interface.
We are careful to have a strong coherence between both
representations of the same group, which implies that modifications
executed through one representation are immediately reported on the other
one. In order to switch from one representation to the other, two methods
have been defined : the static method named
ProActiveGroup.getGroup, returns the Group form
associated to the given group object; the method
getGroupBytype defined in the Group
interface does the opposite.
Below is an example of when and how to use each representation of a group:
// definition of one standard Java object // and two active objects A a1 = new A(); A a2 = (A) ProActive.newActive('A', paramsA[], node); B b = (B) ProActive.newActive('B', paramsB[], node); // Note that B extends A // For management purposes, get the representation // as a group given a typed group, created with // code on the left column: Group gA = ProActiveGroup.getGroup(ag1); // Now, add objects to the group: // Note that active and non-active objects // may be mixed in groups gA.add(a1); gA.add(a2); gA.add(b); // The addition of members to a group immediately // reflects on the typed group form, so a method // can be invoked on the typed group and will // reach all its current members ag1.foo(); // the caller of ag1.foo() may not belong to ag1 // A new reference to the typed group // can also be built as follows A ag1new = (A) gA.getGroupByType();
The particularity of our group communication mechanism is that the result of a typed group communication is also a group. The result group is transparently built at invocation time, with a future for each elementary reply. It will be dynamically updated with the incoming results, thus gathering results. Nevertheless, the result group can be immediately used to execute another method call, even if all the results are not available. In that case the wait-by-necessity mechanism implemented by ProActive is used.
// A method call on a group, returning a result V vg = ag1.bar(); // vg is a typed group of 'V': operation // below is also a collective operation // triggered on results vg.f1();
As said in the Group creation section, groups whose type is based on final classes or primitive types cannot be built. So, the construction of a dynamic group as a result of a group method call is also limited. Consequently, only methods whose return type is either void or is a 'reifiable type', in the sense of the Meta Object Protocol of ProActive, may be called on a group of objects; otherwise, they will raise an exception at run-time, because the transparent construction of a group of futures of non-reifiable types fails.
To take advantage with the asynchronous remote method call model of
ProActive, some new synchronization mechanisms have been added. Static
methods defined in the ProActiveGroup class enable to
execute various forms of synchronisation. For instance:
waitOne, waitN,
waitAll, waitTheNth,
waitAndGet. Here is an exemple:
// A method call on a typed group V vg = ag1.bar(); // To wait and capture the first returned // member of vg V v = (V) ProActiveGroup.waitAndGetOne(vg); // To wait all the members of vg are arrived ProActiveGroup.waitAll(vg);
Regarding the parameters of a method call towards a group of objects, the default behaviour is to broadcast them to all members. But sometimes, only a specific portion of the parameters, usually dependent of the rank of the member in the group, may be really useful for the method execution, and so, parts of the parameter transmissions are useless. In other words, in some cases, there is a need to transmit different parameters to the various members.
A common way to achieve the scattering of a global parameter is to use the rank of each member of the group, in order to select the appropriate part that it should get in order to execute the method. There is a natural traduction of this idea inside our group communication mechanism:the use of a group of objects in order to represent a parameter of a group method call that must be scattered to its members.
The default behaviour regarding parameters passing for method call
on a group, is to pass a deep copy of the group of type P to all members.
Thus, in order to scatter this group of elements of type P instead, the
programmer must apply the static method setScatterGroup
of the ProActiveGroup class to the group. In order to
switch back to the default behaviour, the static method
unsetScatterGroup is available.
// Broadcast the group gb to all the members // of the group ag1: ag1.foo(gb); // Change the distribution mode of the // parameter group: ProActiveGroup.setScatterGroup(gb); // Scatter the members of gb onto the // members of ag1: ag1.foo(gb);
SPMD stands for Single Program Multiple Data. Merged into an object-oriented framework, an SPMD programming model becomes an OOSPMD programming model.
The typed group communication system can be used to simulate MPI-style collective communication. Contrary to MPI that requires all members of a group to collectively call the same communication primitive, our group communication scheme let the possibility to one activity to call a method on the group.
The purpose of the our group communication is to free the programmer from having to implement the complex communication code required for setting identical group in each SPMD activity, group communication, thereby allowing the focus to be on the application itself.
This page presents the mechanism of typed group communication as an new alternative to the old SPMD programming model. While being placed in an object-oriented context, this mechanism helps the definition and the coordination of distributed activities. The approach offers, through modest size API, a better structuring flexibility and implementation. The automation of key communication mechanisms and synchronization simplifies the writing of the code.
The main principle is rather simple: an spmd group is a group of active objects where each one has a group referencing all the active objects.
An spmd group is a ProActive typed group built with the ProSPMD.newSPMDGroup() method. This method looks like the ProActiveGroup.newGroup(); they have similar behavior (and overloads). The difference is that each members of an spmd group have a reference to a group containing all the others members and itself (i.e. a reference to the spmd group itself).
Given a standard Java class:
class A { public A() {} public void foo (...) {...} public void bar (...) {...} ... }
The spmd group is built as follow:
Object[][] params = {{...} , {...} , ... };
Node[] nodes = { ... , ..., ... };
A agroup = (A) ProSPMD.newSPMDGroup('A', params[], nodes);
Object members of an spmd group are aware about the whole group. They can obtain some informations about the spmd group they belong to such as the size of the group, their rank in the group, and a reference to the group in order to get more informations or to communicate with method invocations. Those informations are respectively obtained using the static methods getMySPMDGroupSize(), getMyRank(), and getSPMDGroup() of the ProSPMD class.
ProActive provides three kinds of barrier to synchronize activities. The feature is specially useful in a SPMD programming style. A barrier stops the activity of the active object that invokes it until a special condition is satisfied. Notice that, as the opposite of MPI or such libraries, the ProActive barriers do not stop the current activity immediately (when the barrier method is encountered). The current method actually keeps on executing until the end. The barrier will be activated at the end of the service: no other service will be started until all the AOs involved in the barrier are at that same point.
The three barriers are named:
the Total Barrier
the Neighbor Barrier
the Method-based Barrier
Here is a presentation about how to use those barriers.
Total barrier directly involves the spmd group. A call to barrier(String) will block until all the members in the spmd group have themselves reach and called the identical ProSPMD.barrier() primitive. A call communicates with all the members of the spmd group. The barrier is released when the Active Object has received a barrier message from all other members of the spmd group (including itself).
The string parameter is used as unique identity name for the barrier. It is the programmer responsibility to ensure that two (or more) different barriers with the same id name are not invoked simultaneously.
Let us take a Java class that contains a method calling a total barrier, here the method foo:
class A { public A() {} public void foo (...) { ... ProSPMD.barrier('MyBarrier'); } public void bar (...) {...} ... }
Note that usually, strings used as unique ID are more complex; they can be based on the full name of the class or the package (org.objectweb.proactive.ClassName), for example. The spmd group is built as follow:
Object[][] params = {{...} , {...} , ... };
Node[] nodes = { ... , ..., ... };
A agroup = (A) ProSPMD.newSPMDGroup('A', params[], nodes);
Here the main method of our application:
agroup.foo(); agroup.bar();
The call to barrier launched by all members (in the invocation of foo) ensures that no one will initiate the bar method before all the foo methods end.
The programmer have to ensure that all the members of an spmd group call the barrier method otherwise the members of the group may indefinitely wait.
The Neighbor barrier is a kind of light weighted barrier, involving not all the member of an spmd group, but only the Active Objects specified in a given group.
barrier(String,group) initiates a barrier only with the objects of the specified group. Those objects, that contribute to the end of the barrier state, are called neighbors as they are usually local to a given topology, An object that invoke the Neighbor barrier HAVE TO BE IN THE GROUP given as parameter. The barrier message is only sent to the group of neighbors.
The programmer has to explicitly build this group of neighbors. The topology API can help him or her to build such group. Topologies are groups. They just give special access to their members or (sub)groups members. For instance, a matrix fits well with the topology Plan that provides methods to get the reference of neighbor members (left, right, up, down). See the javadoc of the topology package for more information:
org.objectweb.proactive.core.group.topology
Like for the Total barrier, the string parameter represents a unique identity name for the barrier. The second parameter is the group of neighbors built by the programmer. Here is an example:
ProSPMD.barrier('MyString', neighborGroup);
Refer to the Jacobi example to see a use of the Neighbor barrier. Each submatrix needs only to be synchronized with the submatrixes which it is in contact.
This barrier increases the asynchronism and reduce the amount of exchanged messages.
The Method barrier does no more involve extra messages to communicate (i.e. the barrier messages). Communications between objects to release a barrier are achieved by the standard method call and request reception of ProActive.
The method barrier(String[]) stops the active object that calls it, and wait for a request on the specified methods to resume. The array of string contains the name of the awaited methods. The order of the methods does not matter. For example:
ProSPMD.barrier({'foo', 'bar', 'gee'});
The caller will stop and wait for the three methods. bar or gee can came first, then foo. If one wants wait for foo, then wait for bar, then wait for gee, three calls can be successively done:
ProSPMD.barrier({'foo'});
ProSPMD.barrier({'bar'});
ProSPMD.barrier({'gee'});
A method barrier is used without any group (spmd or not). To learn more on Groups, please refer to Chapter 14, Typed Group Communication.
Barriers are not triggered at the place they are declared in the code. Instead, they are run at the end of the method. Look at this code:
public void MyMethodWithBarrier () { foo(); ProSPMD.barrier("barrier"); bar(); }
In this case, the call to bar() will be made BEFORE
the barrier is really triggered. In fact, the barriers only start blocking
at the END of the method. If you use something like
this.asyncRefToSelf.bar(), it's ok, because then this
call is put on the request queue, and will be effectively run
AFTER the end of the current method. But if, like in the
previous case (with the bar() method), a call is declared
before the end of the method, then the barrier will be run after this call
is made.
To enforce the barrier, you should make the barrier the last action of your method, or you can use this trick:
foo();
ProSPMD.barrier("barrier");
this.asyncRefToSelf.bar();
| Note |
|---|---|
The behavior of barrier is peculiar in this sense. You should keep in mind this particularity when writing code with barriers. |
The migration of an active object can be triggered by the active
object itself, or by an external agent. In both cases a single primitive
will eventually get called to perform the migration. It is the method
migrateTo accessible from a migratable body (a body
that inherits from MigratableBody).
In order to ease the use of the migration, we provide 2 sets of
static methods on the ProActive class. The first set is
aimed at the migration triggered from the active object that wants to
migrate. The methods rely on the fact that the calling thread is the active thread of the active object:
migrateTo(Object o): migrate to the same location as an existing active objectmigrateTo(String nodeURL): migrate to the location given by the URL of the nodemigrateTo(Node node): migrate to the location of the given node
The second set is aimed at the migration triggered from another agent than the target active object. In this case the external agent must have a reference to the Body of the active object it wants to migrate.
migrateTo(Body body, Object o, boolean priority): migrate to the same location as an existing active objectmigrateTo(Body body, String nodeURL, boolean priority): migrate to the location given by the URL of the nodemigrateTo(Body body, Node node, boolean priority): migrate to the location of the given node
Any active object has the ability to migrate. If it references some passive objects, they will also migrate to the new location. Since we rely on the serialization to send the object on the network, the active object must implement the serializable interface. To migrate, an active object must have a method which contains a call to the migration primitive. This call must be the last one in the method, i.e the method must return immediately after. Here is an example of a method in an active object:
public void moveTo(String t) { try { ProActive.migrateTo(t); } catch (Exception e) { e.printStackTrace(); } }
We don't provide any test to check if the call to migrateTo is the
last one in the method, hence if this rule is not enforced, it can lead to
unexpected behavior. Now to make this object move, you just have to call
its moveTo() method.
import org.objectweb.proactive.ProActive; public class SimpleAgent implements Serializable { public SimpleAgent() { } public void moveTo(String t) { try { ProActive.migrateTo(t); } catch (Exception e) { e.printStackTrace(); } } public String whereAreYou() { try { return InetAddress.getLocalHost().getHostName(); } catch (Exception e) { return 'Localhost lookup failed'; } } public static void main (String[] args) { if (!(args.length>0)) { System.out.println('Usage: java migration.test.TestSimple hostname/NodeName '); System.exit(-1); } SimpleAgent t = null; try { // create the SimpleAgent in this JVM t = (SimpleAgent) ProActive.newActive('migration.test.SimpleAgent',null); } catch (Exception e) { e.printStackTrace(); } // migrate the SimpleAgent to the location identified by the given node URL // we assume here that the node does already exist t.moveTo(args[0]); System.out.println('The Active Object is now on host ' + t.whereAreYou()); } }
The class SimpleAgent implements Serializable so
the objects created will be able to migrate. We need to provide an empty
constructor to avoid side effects during the creation of active objects.
This object has two methods, moveTo() which makes it
migrate to the specified location, and whereAreYou()
which returns the hostname of the new location of the agent.
In the main method, we first need to create an active object, which
is done through the call to newActive(). Once this is
done, we can call methods on it as on any object. We call its
moveTo method which will make it migrate to the node
specified as parameter and then we ask it what is its current
location.
The migration of an active object uses the serialization. Unfortunately, not all the objects in the Java language are serializable. We are going to see a simple method to deal with such attributes in the case their value does not need to be saved. For more complex cases, the reader can have a look to the Java RMI specifications.
When a NotSerializable exception is thrown, the
first step to solve the problem is to identify the variable responsible,
i.e the one which is not serializable... In front of the declaration of
this variable, put the keyword transient. This
indicates that the value of this variable should not be serialized. After
the first migration, this field will be set to null since it has not been
saved. So we have to rebuild it upon arrival of the active object on its
new location. This can easily be done by providing in the active object
the standard method
private void readObject(java.io.ObjectInputStream in) throws java.io.IOException, ClassNotFoundException;
See the Serializable interface in the standard
JavaDoc to learn more.
There are two way to communicate with an active object which has migrated :
Forwarders
An active object upon leaving a site leaves behind a special object, a forwarder, which is in charge of forwarding incoming messages to the next destination. As time goes, a chain of forwarders builds between a caller and the mobile object. Any message sent to the latter will go through the chain to reach the agent. There is a virtual path between a caller and a mobile object.
Location Server
Communicating with a mobile object can be done with an explicit reference towards the mobile entity, which requires a mean to get its current location is necessary.
In that case there is a two steps communication: first there should be a search to obtain an up-to-date reference (localization), and then the actual communication. The simplest solution is to have a unique location server which maintains a database of the known position of the agents. When an object wants to communicate with an object which has migrated, it queries the serv er which sends back a new reference. If this is the correct one then the communication takes place, otherwise a new query is issued.
Both techniques have their drawbacks. Two problems arise when using a forwarding scheme, especially if the ambition is scalable mobile agents over WAN. First, the forwarders use resources on a site as long as they have not been garbage collected. Thus if a chain exists between to objects, it will remains even if there is no new communications going by. Second, the longer the chain is, the more likely it will be cut because of a hardware or software failure. As a consequence, while forwarders are more efficient under some conditions, they do not appear to be scalable, nor reliable.
The server on the other hand is a single point of failure and a potential bottleneck. If a server is to help communicating with a higher number of mobile agents, then it might not be able to serve requests quickly enough. Furthermore, in case of a crash, it is not possible to communicate with mobile objects until the server is back. It si possible to avoid most of these issues by having redundant servers with load balancing at the cost of increaing complexity.
Based on these observations and taking into account the variability of the environment, we propose a configurable communication protocol which offers the main benefits from both the forwarder and the server while avoiding their drawbacks. Configurable with discrete and continuous parameters, it can be tailored to the environment to offer both performance and reliability.
We introduce time limited forwarders which remain alive only for a limited period. When their lifetime is over, they can just be removed. First of all, this brings an important advantage: scalability due to absence of the DGC and the systematic reclaim of forwarding resources. But of course, this first principle increases the risks of having the forwarding chain cut since this can now happen during the normal execution of the application without any failure. In such a situation, we will rely on a server which will be considered as an alternative solution. This increases the overall reliability.
It is possible to rely on the forwarder to maintain the location of the agent by having them update the server. When they reach the end of their lifetime, they can send to the server their outgoing reference which could be the adress of the agent or another forwarder. The Updating forwarder parameter can be true or false. If true, the main advantage is that it releases the agent from most of the updates. In order to increase reliability, it is possible to have the agent also update the server on a regular basis. This leads us to the third principle.
Each mobile agent has a nominal Time To Update (TTU) after which it will inform the localization server of its new location. Clearly, there are two differents events that influence when a localization server of its current position :
the number of migrations it has performed since its last update,
the time it has spent on the current node without having updated the server.
This observation leads us to the fourth principle :
The TTu is defined as the first occurence of two potential events since the last update:
maxMigrationNb : the number of migrations,
maxTimeOnSite : the time already spent on the current site.
If we consider that both the agent and the forwarders can send updates to the server, the server must be able to make the difference between messages from the forwarders and from the agent; those are always the most up to date. Also, since we don't have any constraint on the Time To Live (TTL) of the forwarders, it could be that a forwarder at the beginning of a chain dies after on at the end. If this happens and we are not careful when dealing with the requests, the server could erase a more up to date reference with an old one.
To summarize, the adaptable mechanism we propose to localize mobile objects, is parameterized by the following values :
TTL forwarder :
- ttl : time (in milliseconds),
- updatingForwarder : boolean,
TTU agents :
- maxMigrationNb : integer,
- maxTimeOnSite : time (in milliseconds).
As a default, ProActive uses a strategy "Forwarders based". It means that the forwarders have a unlimited lifetime and the agent never updates the location server.
To configure your own strategy, you have to edit the file src/org/objectweb/proactive/core/config/ProActiveConfiguration.xml. The four properties are the following :
proactive.mixedlocation.ttl
the TTL value in milliseconds. Use -1 to indicate that the forwarders have a unlimited lifetime.
proactive.mixedlocation.updatingForwarder
true or false.
proactive.mixedlocation.maxMigrationNb
indicates the number of migrations without updating the server. Use -1 to indicate that the agent never updates the server.
proactive.mixedlocation.maxTimeOnSite
the max time spent on a site before updating the server. You can use -1 to indicate that there is no limited time to spend on a site.
A location server is available in the package org.objectweb.proactive.core.body.migration.MixedLocationServer. It can be launched using scripts/unix/migration/LocationServer. You can indicate on which node it have to be running.
Limitation : there can be only one LocationServer for the migration.
In the asynchronous environment provided by ProActive, exceptions cannot be handled the same as in a sequential environment. Let's see the problem with exceptions and asynchrony in a piece of code:
try { Result r = someAO.someMethodCall(); // Asynchronous method call that can throw an exception // ... doSomethingWith(r); } catch (SomeException se) { doSomethingWithMyException(se); }
In this piece of code, as the method call in line 2 is asynchronous, we don't wait for its completion and continue the execution. So, it's possible the control flow exits the try. In this case, if the method call ends up with an exception, we cannot throw it anymore back in the code because we are no more in the try block. That's why, by default, ProActive method calls with potential exceptions are handled synchronously.
The ProActive solution to this problem is to put barriers around try/catch blocks. This way, the control flow cannot exit the block, the exception can be handled in the appropriate catch block, and the call is asynchronous within the block.
With this configuration, the potential exception can be throw for several points:
When accessing a future
In the barrier
Using the provided API (see after)
Let's reuse the previous example to see how to use these barriers
ProActive.tryWithCatch(SomeException.class); try { Result r = someAO.someMethodCall(); // Asynchronous method call that can throw an exception // ... doSomethingWith(r); ProActive.endTryWithCatch(); } catch (SomeException se) { doSomethingWithMyException(se); } finally { ProActive.removeTryWithCatch(); }
With this code, the call in line 3 will be asynchronous, and the exception will be handled in the correct catch block. Even if this implies waiting at the end of the try block for the completion of the call.
Let's see in detail the needed modifications to the code:
ProActive.tryWithCatch() call right before the try block. The parameter is either the caught exception class or an array of these classes if there are many
ProActive.endWithTry() at the end of the try block
ProActive.removeTryWithCatch() at the beginning of the finally block, so the block becomes mandatory
These needed annotations can be seen as cumbersome, so we provide a tool to add them automatically to a given source file. It transforms the first example code in the second. Here is a sample session with the tool:
$ ProActive/scripts/unix/trywithcatch.sh MyClass.java
--- ProActive TryWithCatch annotator -----------------------
$ diff -u MyClass.java~ MyClass.java
--- MyClass.java~
+++ MyClass.java
@@ -1,9 +1,13 @@
public class MyClass {
public MyClass someMethod(AnotherClass a) {
+ ProActive.tryWithCatch(AnException.class);
try {
return a.aMethod();
+ ProActive.endTryWithCatch();
} catch (AnException ae) {
return null;
+ } finally {
+ ProActive.removeTryWithCatch();
}
}
}As we can see, ProActive method calls are added to make sure all calls within try/catch blocks are handled asynchronously.
We have seen the 3 methods mandatory to perform asynchronous calls with exceptions, but the complete API includes two more calls. So far, the blocks boundaries define the barries. But, some control over the barrier is provided thanks to two additional methods.
The first method is ProActive.throwArrivedException(). During a computation an exception may be raised but there is no point from where the exception can be thrown (a future or a barrier). The solution is to call the ProActive.throwArrivedException() method which simply queries ProActive to see if an exception has arrived with no opportunity of being thrown back in the user code. In this case, the exception is thrown by this method.
The method behaviour is thus dependant on the timing. That is, calling this method may or may not result in an exception being thrown, depending on the time for an exception to come back. That's why another method is provided, this is ProActive.waitForPotentialException(). Unlike the previous one, this method is blocking. After calling this method, either an exception is thrown, or it is assured that all previous calls in the block completed successfully, so no exception can be thrown from the previous calls.
In the first part, we were concerned with functional exception. That is, exceptions originating from 'business' code. The middleware adds its set of exceptions that we call Non-Functional Exceptions (NFE): network errors, ... ProActive has a mechanism for dealing with these exceptions.
We have classified the non functional exceptions in two categories: those on the proxy, and those on the body. So, exceptions concerning the proxy are in the org.objectweb.proactive.core.exceptions.proxy package and inherits from the ProxyNonFunctionalException package.
The NFE mechanism in ProActive calls user defined handlers when a NFE is thrown. A handler implements the following interface:
public interface NFEListener { public boolean handleNFE(NonFunctionalException e); }
The handleNFE method is called with the exception to handle as parameter. The boolean return code indicates if the handler could do something with the exception. This way, if no handler could do anything with a given exception, the default behavior is used.
If the exception is on the proxy side, the default behaviour is to throw the exception which is a RuntimeException. But on the proxy side, the default behaviour is to log the exception with its stack trace to avoid killing an active object.
These handlers are associated to entities generating exceptions. These are: an active object proxy, a body, a JVM. Given a NFE, the handlers on the local JVM will be executed, then either those associated to the proxy or the body depending on the exception.
Here is an example about how to add a handler to an active object on its side (body):
ProActive.addNFEListenerOnAO(myAO, new NFEListener() { public boolean handleNFE(NonFunctionalException nfe) { // Do something with the exception... // Return true if we were able to handle it return true; } });
Handlers can also be added to the client side (proxy) of an active object with
ProActive.addNFEListenerOnProxy(ao, handler)
or to a JVM with
ProActive.addNFEListenerOnJVM(handler)
and even to a group with
ProActive.addNFEListenerOnGroup(group, handler)
These handlers can also be removed with
ProActive.removeNFEListenerOnAO(ao, handler), ProActive.removeNFEListenerOnProxy(ao, handler), ProActive.removeNFEListenerOnJVM(handler) ProActive.removeNFEListenerOnGroup(group, handler)
It's also possible to define an handler only for some exception types, for example:
ProActive.addNFEListenerOnJVM( new TypedNFEListener( SendRequestCommunicationException.class, new NFEListener() { public boolean handleNFE(NonFunctionalException e) { // Do something with the SendRequestCommunicationException... // Return true if we were able to handle it return true; } }));
You can use NFE for example, to automatically remove dead elements from a ProActive group when trying to contact them. This can be achieved using the following construction:
ProActive.addNFEListenerOnGroup(group, FailedGroupRendezVousException.AUTO_GROUP_PURGE);
Note that this currently works only for one-way calls.
The outline of this short handbook:
The Branch and Bound (BnB) consists to an algorithmic technique for exploring a solution tree from which returns the optimal solution.
The main goal of this BnB API is to provide a set of tools for helping the developpers to parallelize his BnB problem implementation.
The main features are:
Hidding computation distribution.
Dynamic task splitting.
Automatic solution gathering.
Task communications for broadcasting best current solution.
Different behaviors for task allocation, provided by the API or yourself.
Open API for extensions.
Further research information is available here.
The next figure show the architecture of the API:
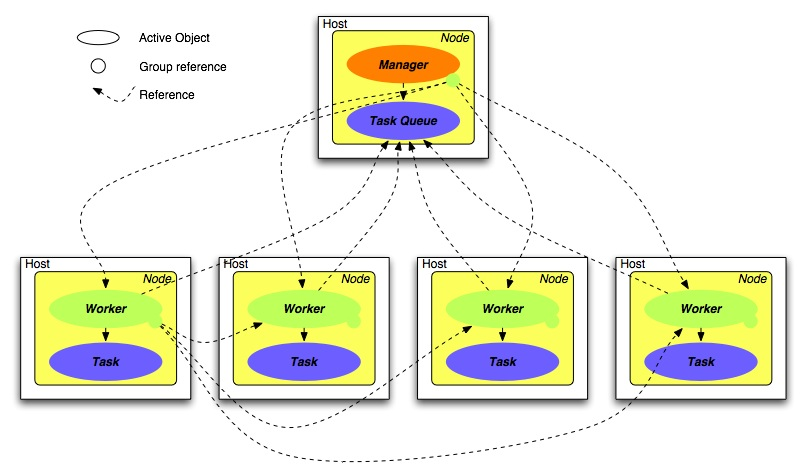
The API active objects are:
Manager: the main point of the API. It is the master for deploying and managing Workers. Also, it attributes Tasks to free workers. The Tasks are provided the Task Queue.
Task Queue: provides Task in a specific order to the Manager.
Worker: broadcasts solution to all Task, and provides the API environment to the Tasks.
Task: the user code to compute.
All Workers have a group reference on all the others. The next figure show step by step how a Task can share a new better solution with all:
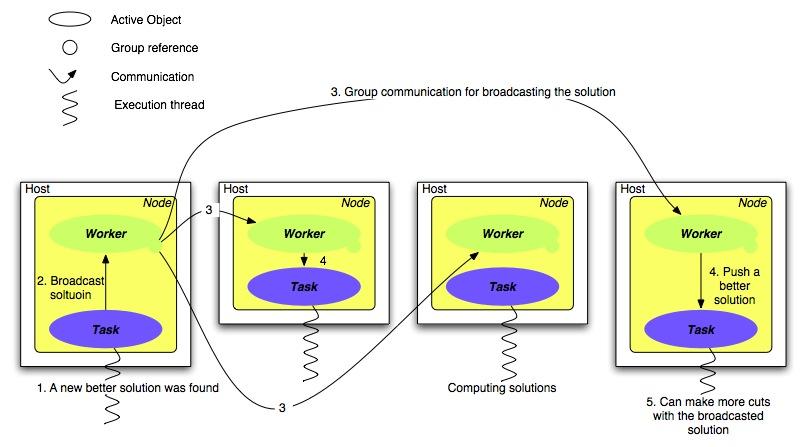
Finally, the methods order execution:
rootTask.initLowerBound(); // compute a first lower bound
rootTask.initUpperBound(); // compute a first upper bound
Vector splitted = rootTask.split(); // generate a set of tasks
for i in splitted do in parallel
splitted[i].initLowerBound();
splitted[i].initUpperBound();
Result ri = splitted.execute()
Result final = rootTask.gather(Result[] ri); // gathering all result
Keep in mind that is only 'initLower/UpperBound' and 'split' methods are called on the root task. The 'execute' method is called on the root task's splitted task.
The Task object is located in this followed package:
org.objectweb.proactive.branchnbound.core
All abstract methods are described bellow:
It is the place where the user has to put his code for solving a part and/or the totality of his BnB problem. There are 2 main usages of it. The first one consists to divide the task and returning no result. The second is to try to improve the best solution.
This is for helping the user when he wants to divide a task. In a future work we have planned to use this method in an automatic way.
This one is not abstract but it is strongly recommended to override it. The default behavior is to return the smallest Result gave by the compareTo method. That's why it is also recommended to override the compareTo(Object) method.
Some class variables are provided by the API to help the user for keeping a code clear. See next their descriptions:
protected Result initLowerBound; // to store the lower bound protected Result initUpperBound; // to store the upper bound protected Object bestKnownSolution; // setted automaticaly by the API // with the best current solution protected Worker worker; // to interact with the API (see after)
From the Task, specialy within the execute() method, the user has to interact with the API for sending sub-tasks, which result from a split call, to the task queue, or broadcasting to other tasks a new better solution, etc.
The way to do that is to use the class variable: worker.
Broadcasting a new better solution to all the other class:
this.worker.setBestCurrentResult(newBetterSolution);Sending a set of sub-tasks for computing:
this.worker.sendSubTasksToTheManager(subTaskList);For a smarter split, checking that the task queue needs more tasks:
BooleanWrapper workersAvailable = this.worker.isHungry();
This manages the task allocation. The main functions are: providing tasks in a sepcial order, and keeping results back.
For the moment, there are 2 different queue types provided by the API:
BasicQueueImpl: provides tasks in FIFO order.
LargerQueueImpl: provides tasks in a larger order, as Breadth First Search algorithm.
By extending the TaskQueue you can use a specialized task allocator for your need.
Finally, it is the main entry point for starting, and controlling your computation.
Task task = new YourTask(someArguments); Manager manager = ProActiveBranchNBound.newBnB(task, nodes, LargerQueueImpl.class.getName()); Result futureResult = manager.start(); // this call is asynchronous
Tip: use the constructor ProActiveBranchNBound.newBnB(Task, VirtualNode[], String) and do not activate virtual nodes. This method provides a faster deployment and active objects creation way. Communications between workers are also optimized by a hierarchic group based on the array of virtual nodes. That means when it is possible define a virtual node by clusters.
This example solves the permutation flowshop scheduling problem, with the monoobjective case. The main objective is to minimized the overall completion time for all the jobs, i.e. makespan. A flowshop problem can be represented as a set of n jobs; this jobs have to scheduled on a set of m machines. Each jobs is defined by a set of m distinct operations. The goal consists to determine the sequence used for all machines to execute operations.
The algorithm used to find the best solution, tests all permutations and try to cut bad branches.
Firstly, the Flowshop Task:
import org.objectweb.proactive.ProActive; import org.objectweb.proactive.branchnbound.core.Result; import org.objectweb.proactive.branchnbound.core.Task; import org.objectweb.proactive.branchnbound.core.exception.NoResultsExcepti\ on; public class FlowShopTask extends Task { public FlowShopTask() { // the empty no args constructor for ProActive } /** * Contruct a Task which search solution for all permutations to the * Flowshop problem. Use it to create the root Task. */ public FlowShopTask(FlowShop fs) { this.flowshopProblem = fs; } }
Now, implement all Task abstract methods.
Computation bound methods:
// Compute the lower bound public void initLowerBound() { this.lowerBound = this.computeLowerBound(this.fs); } // Compute the upper bound public void initUpperBound() { this.upperBound = this.computeUpperBound(this.fs); }
The split method:
public Vector split() { // Divide the set of permutations in 10 sub-tasks int nbTasks = 10; Vector tasks = new Vector(nbTasks); for (int i = 0 ; i < nbTasks ; i++){ tasks.add(new FlowShopTask(this, i, nbTasks)); } return tasks; }
Then, the execute method:
public Result execute() { if (! this.iHaveToSplit()) { // Test all permutation while((FlowShopTask.nextPerm(currentPerm)) != null) { int currentMakespan; fsr.makespan = ((FlowShopResult)this.bestKnownSolution).makespan; fsr.permutation = ((FlowShopResult)this.bestKnownSolution).permutat\ ion; if ((currentMakespan = FlowShopTask.computeConditionalMakespan( fs, currentPerm, ((FlowShopResult) this.bestKnownSolution).makespan, timeMachine)) < 0) { //bad branch int n = currentPerm.length + currentMakespan; FlowShopTask.jumpPerm(currentPerm, n, tmpPerm[n]); // ... } else { // better branch than previous best fsr.makespan = currentMakespan; System.arraycopy(currentPerm, 0, fsr.permutation, 0, currentPerm.length); r.setSolution(fsr); this.worker.setBestCurrentResult(r); } } } else { // Using the Stub for an asynchronous call this.worker.sendSubTasksToTheManager( ((FlowShopTask) ProActive.getStubOnThis()).split()); } // ... r.setSolution(bestKnownSolution); return r; }
This example is available in a complete version here.
Calcium is part of the ProActive Grid Middleware for programming structured parallel and distributed applications. The framework provides a basic set of structured patterns (skeletons) that can be nested to represents more complex patterns. Skeletons are considered a high level programming model because all the parallelisms details are hidden from the programmer. In Calcium, distributed programming is achieved by using ProActive deployment framework and active object model.
The following steps must be performed for programming with the framework.
Define the skeleton structure.
Implement the classes of the structure (the muscle codes).
Create a new Calcium instance.
Provide an input of problems to be solved by the framework.
Collect the results.
View the performance statistics.
Problems inputed into the framework are treated as tasks. The tasks are interpreted by the remote skeleton interpreters as shown in the following Figure:
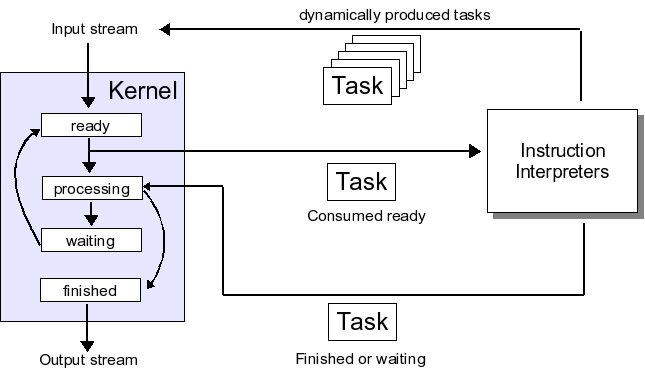
In this example we will implement skeleton that finds prime numbers for an interval of numbers using a naive approach.
The approach we will use corresponds to dividing the original search space into several smaller search spaces. Therefore, the most suitable pattern corresponds to Divide and Conquer.
// Dac(<Divide>,<Condition>,<Skeleton>,<Conquer>) Skeleton<Challenge> root = new DaC<Challenge>( new ChallengeDivide(1), new ChallengeDivideCondition(2), new Seq<Challenge>(new SolveChallenge(3)), new ConquerChallenge(4));
We will call the problem as Challenge and we will represent it using the following class.
class Challenge implements Serializable{
public int max, min, solvableSize;
public Vector<Integer> primes;
/**
* Creates a new challenge for finding primes.
* @param min The minimum of the interval.
* @param max The maximum of the interval.
* @param solvableSize The size of the problems to be solved.
*/
public Challenge(int min, int max, int solvableSize){
this.min=min;
this.max=max;
this.solvableSize=solvableSize;
primes=new Vector<Integer>();
}
}Note that the skeleton structure is parametrized using the Challenge class.
public class ChallengeDivide implements Divide<Challenge>{ public Vector<Challenge> divide(Challenge param) { Challenge ttUp = new Challenge(1+param.min+(param.max-param.min)/2,param.max,param.solvableSize); Challenge ttDown = new Challenge(param.min,param.min+(param.max-param.min)/2, param.solvableSize); Vector<Challenge> v = new Vector<Challenge>(); v.add(ttUp); v.add(ttDown); return v; } }
public class ChallengeDivideCondition implements Condition<Challenge>{ public boolean evalCondition(Challenge params) { return params.max-params.min > params.solvableSize; } }
public class SolveChallenge implements Execute<Challenge>{ public Challenge execute(Challenge param) { for(int i=param.min;i<=param.max;i++){ if(isPrime(i)){ param.primes.add(new Integer(i)); } } return param; } //... }
public class ConquerChallenge implements Conquer<Challenge>{ public Challenge conquer(Challenge parent, Vector<Challenge> p) { for(Challenge param:p){ parent.max=Math.max(parent.max, param.max); parent.min=Math.min(parent.min, param.min); parent.primes.addAll(param.primes); } Collections.sort(parent.primes); return parent; } }
Skeleton<Challenge> root = ...; //Step 1 ResourceManager manager= new ProActiveManager(descriptor, "local"); Calcium<Challenge> calcium = new Calcium<Challenge>(manager);
Stream<Board> stream = calcium.newStream(root); stream.input(new Challenge(1,6400,300)); stream.input(new Challenge(1,100,20)); stream.input(new Challenge(1,640,64)); calcium.boot(); //begin the evaluation
for(Challenge res = stream.getResult(); res != null; res = stream.getResult()) System.out.println(res); //print results calcium.shutdown(); //release the resources
Skeletons can be composed in the following way:
S := farm(S)|pipe(S1,S2)|if(cond,S1,S2)|while(cond,S)|for(i,S)|D&C(cond,div,S,conq)|map(div, S, conq)|Seq(f)
Each skeleton represents a different parallelism described as follows:
Farm , also known as Master-Slave, corresponds to the task replication pattern where a specific function must be executed over a set of slaves.
Pipe corresponds to computation divided in stages were the stage n+1 is always executed after the n-th stage.
If corresponds to a decision pattern, were a choice must be made between executing two functions.
While corresponds to a pattern were a function is executed while a condition is met.
For corresponds to a pattern were a function is executed a specific number of times.
Divide and Conquer corresponds to a pattern were a problem is divided into several smaller problems while a condition is met. The tasks are solved and then solutions are then conquered into a single final solution for the original problem.
Map corresponds to a pattern were the same function is applied to several parts of a problem.
In Calcium, remote resources are acquired using ProActive's deployment framework in the following way:
ResourceManager manager = new ProActiveManager("descriptor/path/to/file.xml", "virtualNodeName");Additionally, for debugging purposes, two other resource managers are available: MonoThreaded and MultiThreaded:
ResourceManager manager = new MonoThreadedManager(); //or ResourceManager manager = new MultiThreadedManager(2); //Two threads
There are two ways to obtain performance statistics.
These statistics refer to the global state of the framework by providing state information. The tasks can be in three different states: ready for execution, processing, waiting for other tasks to finish, and finished (ready to be collected by the user). The statistics corresponding to these states are:
Number of tasks on each state.
Average time spent by the tasks on each state.
Statistics for a specific moment can be directly retrieved from the Calcium instance:
StatsGlobal statsGlobal = calcium.getStatsGlobal()
An alternative is to create a monitor that can be performe functions based on the statistics. In the following example we activate a simple logger monitor that prints the statistics every 5 seconds.
Monitor monitor= new SimpleLogMonitor(calcium, 5);
monitor.start();
...
monitor.stop();This statistics are specific for each result obtained from the framework. They provide information on how the result was obtained:
Execution time for each muscle of the skeleton.
Time spent by this task in the ready, processing, waiting and executing state. Also, the wallclock and computation time are provided.
Data parallelism achieved: tree size, tree depth, number of elements in the tree.
In order to get easier and more flexible configuration in ProActive, we introduced an xml file where all ProActive related configuration is located. It represents properties that will be added to the System when an application using ProActive is launched. Some well-known properties(explained after) will determine the behaviour of ProActive services inside a global application. That file can also contain user-defined properties to be used in their application.
Using this file is very straightforward, since all lines must follow the model: <prop key='somekey' value='somevalue'/>
Those properties will be set in the System using System.setProperty(key,value) if and only if this property is not already set in the System.
If an application is using ProActive, that file is loaded once when a method is called through a ProActive 'entry point'. By 'entry point' we mean ProActive class, NodeFactory class, RuntimeFactory class (static block in all that classes).
For instance calling ProActive.newActive or NodeFactory.getNode .... loads that file. This only occurs once inside a jvm.
As said before this file can contain user-defined properties. It means that people used to run their application with:
java .... -Dprop1=value1 -Dprop2=value2 .... -Dpropn=valuen can define all their properties in the ProActive configuration file with:
<prop key='prop1' value='value1'/>
<prop key='prop2' value='value2'/>
...
<prop key='propn' value='valuen'/>
There is a default file with default ProActive options located under ProActive/src/org/objectweb/proactive/core/config/ProActiveConfiguration.xml. This file is automatically copied with the same package structure under the classes directory when compiling source files with the ProActive/compile/build facility. Hence it is included in the jar file of the distribution under org/objectweb/proactive/core/config/ProActiveConfiguration.xml (See below for default options).
People can specify their own configuration file by running their application with proactive.configuration option, i.e
java ... -Dproactive.configuration=pathToTheConfigFile. In that case, the given xml file is loaded. Some ProActive properties(defined below) are required for applications using ProActive to work, so even if not defined in user config file, they will be loaded programatically with default values. So people can just ignore the config file if they are happy with the default configuration or create their own file if they want to change ProActive properties values or add their own properties
A specific tag: <ProActiveUserPropertiesFile> is provided in Deployment Descriptors (see Chapter 21, XML Deployment Descriptors) to notify remote jvms which configuration file to load once created:
<jvmProcess class='org.objectweb.proactive.core.process.JVMNodeProcesss'> ... <ProActiveUserPropertiesFile> <absolutePath value='/net/home/rquilici/config.xml'/> </ProActiveUserPropertiesFile> ... </jvmProcess>
proactive.communication.protocol represents the communication protocol i.e the protocol, objects on remote JVMS are exported with. At this stage several protocols are supported: RMI(rmi), HTTP(http), IBIS/RMI(ibis), SSH tunneling for RMI/HTTP(rmissh), JINI(jini). It means that once the JVM starts, Nodes, Active Objects that will be created on this JVM, will export themselves using the protocol specified in proactive.communication.protocol property. They will be reachable transparently through the given protocol.
schema.validation . Two values are possible:enable, disable. If enable, all xml files will be validated against provided schema. Default is disable
proactive.future.ac . Two values are possible:enable, disable If 'enable' is chosen, Automatic Continuations are activated (see Section 13.9, “Automatic Continuation in ProActive”). Default is enable
Note that if not specified those properties are set programmatically with the default value.
Note that those properties should not be altered if the programmer uses deployment descriptor files. See Chapter 25, Fault-Tolerance and more specifically Section 25.2.3, “Configure fault-tolerance for a ProActive application” for more details.
proactive.ft . Two values are possible: enable, disable. If enable, the fault-tolerance is enable and a set of servers must be defined with the following properties. Default value is disable.
proactive.ft.server.checkpoint is the URL of the checkpoint server.
proactive.ft.server.location is the URL of the location server.
proactive.ft.server.recovery is the URL of the recovery process .
proactive.ft.server.resource is the URL of the resource server.
proactive.ft.server.global is the URL of the global server. If this property is set, all others proactive.fr.server.* are ignored.
proactive.ft.ttc is the value of the Time To Checkpoint counter, in seconds. The default value is 30 sec.
proactive.p2p.acq is the communication protocol that's used to communicate with this P2P Service. All ProActive communication protocols are supported: rmi, http, etc. Default is rmi.
proactive.p2p.port represents the port number on which to start the P2P Service. Default is 2410. The port is used by the communication protocol.
proactive.p2p.noa: Number Of Acquaintances (NOA) is the minimal number of peers one peer needs to know to keep up the infrastructure. By default, its value is 10 peers.
proactive.p2p.ttu: Time To Update (TTU) each peer sends an heart beat to its acquaintances. By default, its value is 1 minutes.
proactive.p2p.ttl: Time To Live (TTL) represents messages live time in hops of JVMs (node). By default, its value is 5 hops.
proactive.p2p.msg_capacity is the maximum memory size to stock message UUID. Default value is 1000 messages UUID.
proactive.p2p.expl_msg is the percentage of agree response when peer is looking for acquaintances. By default, its value is 66%.
proactive.p2p.booking_max uses during booking a shared node. It's the maximum time in millisecond to create at less an active object in the shared node. After this time and if no active objects are created the shared node will leave and the peer which gets this shared node will be not enable to use it more. Default is 3 minutes.
proactive.p2p.nodes_acq_to uses with descriptor file. It is the timeout in milliseconds for nodes acquisition. The default value is 3 minutes.
proactive.p2p.lookup_freq also uses with descriptor file. It is the lookup frequency in milliseconds for re-asking nodes. By default, it's value is 30 seconds.
proactive.p2p.multi_proc_nodes if true deploying one shared nodes by CPU that means the p2p service which is running on a bi-pro will share 2 nodes, else only one node is shared independently of the number of CPU. By default, it's value is true, i.e. 1 shared node for 1 CPU.
proactive.p2p.xml_path is the XML deployment descriptor file path for sharing nodes more than a single node.
The following properties are specific to the rmissh protocol (see Chapter 24, Using SSH tunneling for RMI or HTTP communications).
proactive.ssh.port: the port number on which all the ssh daemons to which this JVM must connect to are expected to listen. If this property is not set, the default is 22.
proactive.ssh.username: the username which will be used during authentication with all the ssh daemons to which this JVM will need to connect to. If this property is not set, the default is the user.name java property.
proactive.ssh.known_hosts: a filename which identifies the file which contains the traditional ssh known_hosts list. This list of hosts is used during authentication with each ssh daemon to which this JVM will need to connect to. If the host key does not match the one stored in this file, the authentication will fail. If this property is not set, the default is System.getProperty ('user.home') + '/.ssh/known_hosts'
proactive.ssh.key_directory: a directory which is expected to contain the pairs of public/private keys used during authentication. the private keys must not be encrypted. The public keys filenames must match '*.pub'. Private keys are ignored if their associated public key is not present. If this property is not set, the default is System.getProperty ('user.home') + '/.ssh/'
proactive.tunneling.try_normal_first: if this property is set to 'yes', the tunneling code always attempts to make a direct rmi connection to the remote object before tunneling. If this property is not set, the default is not to make these direct-connection attempts. This property is especially useful if you want to deploy a number of objects on a LAN where only one of the hosts needs to run with the rmissh protocol to allow hosts outside the LAN to connect to this frontend host. The other hosts located on the LAN can use the try_normal_first property to avoid using tunneling to make requests to the LAN frontend.
proactive.tunneling.connect_timeout: this property specifies how long the tunneling code will wait while trying to establish a connection to a remote host before declaring that the connection failed. If this property is not set, the default value is 2000ms.
proactive.tunneling.use_gc: if this property is set to 'yes', the client JVM does not destroy the ssh tunnels are soon as they are not used anymore. They are queued into a list of unused tunnels which can be reused. If this property is not set or is set to another value, the tunnels are destroyed as soon as they are not needed anymore by the JVM.
proactive.tunneling.gc_period: this property specifies how long the tunnel garbage collector will wait before destroying a unused tunnel. If a tunnel is older than this value, it is automatically destroyed. If this property is not set, the default value is 10000ms.
proactive.rmi.port represents the port number on which to start the RMIRegistry. Default is 1099. If an RMIRegistry is already running on the given port, jms use the existing registry
proactive.http.port represents the port number on which to start the HTTP server. Default is 2010. If this port is occupied by another application, the http server starts on the first free port(given port is incremented transparently)
proactive.useIPaddress if set to true, IP adresses will be used instead of machines names. This property is particularly usefull to deal with sites that do not host a DNS
proactive.hostname when this property is set, the host name on which the jvm is started is given by the value of the property. This property is particularly usefull to deal with machines with two network interfaces
proactive.locationserver represents the location server class to instantiate when using Active Objects with Location Server
proactive.locationserver.rmi represents the url under which the Location Server is registered in the RMIRegistry
fractal.provider This property defines the bootstrap component for the Fractal component model
proactive.classloader runtimes created with this property enabled fetch missing classes using a special mechanism (see the classloader package javadoc ). This is an alternative to RMI dynamic class downloading, useful for instance when performing hierarchical deployment.
Note that as mentionned above, user-defined properties can be added.
A configuration file could have following structure:
<ProActiveUserProperties> <properties> <prop key='schema.validation' value='disable'/> <prop key='proactive.future.ac' value='enable'/> <prop key='proactive.communication.protocol' value='rmi'/> <prop key='proactive.rmi.port' value='2001-2005'/> .... <prop key='myprop' value='myvalue'/> .... </properties> </ProActiveUserProperties>
Example 20.1. A configuration file example
| Note |
|---|---|
In order to have ProActive parse correctly the document, the following are mandatory:
|
Parameters tied to the deployment of an application should be totally described in a xml deployment descriptor. Hence within the source code, there are no longer any references to:
Machine names
Creation Protocols
Registry/Lookup and Communications Protocols
rmi
http
rmissh
ibis
soap
Files Transfers
scp, rcp
unicore, arc (nordugrid)
other protocols like globus, glite will be supported soon
A ProActive application can be deployed on different hosts, with different protocols without changing the source code
Within a ProActive program, active objects are still created on Nodes
newActive(String, Object[], Node);
Nodes can be obtained from VirtualNodes (VN) declared and defined in a ProActiveDescriptor
Nodes are actual entities:
But VirtualNodes are names in program source, to which corresponds one or a set of Nodes after activationrunning into a JVM, on a host
they are the result of mapping VN --> JVMs
After activation the names of Nodes mapped with a VirtualNode are VirtualNode name + random number
VNs have the following characteristics:
a VN is uniquely identified as a String ID
a VN is defined in a ProActiveDescriptor
a VN has an object representation in a program after activation
Additional methods are provided to create groups of active objects on VirtualNodes. In that case an Active Object(member of the group) is created on each nodes mapped to the VirtualNode given as parameter
newActiveAsGroup(String, Object[], VirtualNode); turnActiveAsGroup(Object, String, VirtualNode);
Within a ProActiveDescriptor file, it is specified:
the mapping of VN to JVMs
the way to create, acquire JVMs using processes defined in the lower infrastructure part
local, remote processes or combination of both to create remote jvms.
For instance defining an sshProcess that itself references a local jvmProcess. At execution, the ssh process will launch a jvm on the remote machine specified in hostname attribute of sshProcess definition.
files transfers
fault tolerance, P2P, security
Example:
<ProActiveDescriptor xmlns:xsi='http://www.w3.org/2001/XMLSchema-instance' xsi:noNamespaceSchemaLocation='DescriptorSchema.xsd'> <componentDefinition> <virtualNodesDefinition> <virtualNode name='Dispatcher'/> </virtualNodesDefinition> </componentDefinition> <deployment> <mapping> <map virtualNode='Dispatcher'> <jvmSet> <vmName value='Jvm1'/> </jvmSet> </map> </mapping> <jvms> <jvm name='Jvm1'> <creation> <processReference refid='jvmProcess'/> </creation> </jvm> </jvms> </deployment> <infrastructure> <processes> <processDefinition id='jvmProcess'> <jvmProcess class='org.objectweb.proactive.core.process.JVMNodeProcess'/> </processDefinition> </processes> </infrastructure> </ProActiveDescriptor>
This example shows a VirtualNode called Dispatcher, that is mapped to a jvm called Jvm.This Jvm1will be created using the process called jvmProcess which is defined in the infrastructure part(This part will be discussed later, just notice that there are two parts in the descriptor, an abstract one containing VirtualNode definition and deployment informations and a more concrete one containing concrete infrastructure informations, that is where all processes are defined).
Typical example of a program code:
ProActiveDescriptor pad = ProActive.getProactiveDescriptor(String xmlFile); //--------- Returns a ProActiveDescriptor object from the xml file VirtualNode dispatcher = pad.getVirtualNode('Dispatcher'); //-------- Returns the VirtualNode Dispatcher described in the xml file as a java object dispatcher.activate(); // -------- Activates the VirtualNode Node node = dispatcher.getNode(); // -------- Returns the first node available among nodes mapped to the VirtualNode C3DDispatcher c3dDispatcher = newActive( 'org.objectweb.proactive.core.examples.c3d.C3DDispatcher',param, node); ..........................
Set of methods are provided in org.objectweb.proactive.descriptor.ProActiveDescriptor to manipulate VirtualNodes, to activate several VirtualNodes at the same time .... and in org.objectweb.proactive.core.descriptors.VirtualNode to manipulate and get nodes associated to VirtualNodes.
Mapping one to one: 1 VN --> 1 JVM
<virtualNodesDefinition> <virtualNode name='Dispatcher'/> </virtualNodesDefinition> <deployment> <mapping> <map virtualNode='Dispatcher'> <jvmSet> <vmName value='Jvm0'/> </jvmSet> </map> </mapping>
Another possibility for the one to one mapping is to map 1 VN to the jvm running the program. In that case the lookup protocol can be specified but is optionnal(default value is the property proactive.communication.protocol) as it is shown in the following:<virtualNodesDefinition> <virtualNode name='Dispatcher'/> </virtualNodesDefinition> <deployment> <mapping> <map virtualNode='Dispatcher'> <jvmSet> <currentJvm protocol='rmi'/> or <currentJvm/> </jvmSet> </map> </mapping>
Since it is the current jvm, it has not to be redifined later in the descriptor. This will be shown in a complete example
Mapping one to n: 1 VN --> N JVMs
<virtualNodesDefinition> <virtualNode name='Renderer' property='multiple'/> </virtualNodesDefinition> <deployment> <mapping> <map virtualNode='Renderer'> <jvmSet> <currentJvm/> <vmName value='Jvm1'/> <vmName value='Jvm2'/> <vmName value='Jvm3'/> <vmName value='Jvm4'/> </jvmSet> </map> </mapping>
Note that the property attribute is set to multiple if you want to map 1 VN to multiple JVMs, and then a set of JVMs is defined for the VirtualNode Renderer. Four values are possible for the property attribute: unique which means one to one mapping, unique_singleAO: one to one mapping and only one AO deployed on the corresponding node, multiple: one to N mapping, multiple_cyclic: one to N mapping in a cyclic manner. This property is not mandatory but an exception can be thrown in case of incompatibility. For instance property set to unique, and more than one jvm defined in the jvmSet tag. In case of property set to unique_singleAO method getUniqueAO() in class org.objectweb.proactive.core.descriptor.data.VirtualNode called on such VirtualNode returns the unique AO createdThree other attributes timeout, waitForTimeout, minNodeNumber can be set when defining a virtualNode
<virtualNodesDefinition> <virtualNode name='Dispatcher' timeout='200' waitForTimeout='true'/> <virtualNode name='Renderer' timeout='200' minNodeNumber='3'/> </virtualNodesDefinition>
The timeout attribute represents an amount of time(in milliseconds) to wait before accessing Nodes mapped on the VirtualNode. The waitForTimeout attribute is a boolean. If set to true, you will have to wait exaclty timeout seconds before accessing Nodes. If set to false, timeout represents the maximum amount of time to wait, it means that if all nodes are created before the timeout expires, you get access to the Nodes. Defaut value for waitForTimeout attribute is false. The minNodeNumber attribute defines the minimum number of nodes to be created before accessing the nodes. If not defined, access to the nodes will occur once the timeout expires, or the number of nodes expected are effectively created. Setting this attribute allows to redefine the number of nodes expected, we define it as the number of nodes needed for the VirtualNode to be suitable for the application. In the exammple above, once 3 nodes are created and mapped to the VirtualNode Renderer, this VirtualNode starts to give access to its nodes. Those options are very usefull when there is no idea about how many nodes will be mapped on the VirtualNode(which is often unususal). Those attributes are optional.
Mapping n to one: N VN --> 1 JVMs
<virtualNodesDefinition> <virtualNode name='Dispatcher' property='unique_singleAO'/> <virtualNode name='Renderer' property='multiple'/> </virtualNodesDefinition> <deployment> <mapping> <map virtualNode='Dispatcher'> <jvmSet> <vmName value='Jvm1'/> </jvmSet> </map> <map virtualNode='Renderer'> <jvmSet> <vmName value='Jvm1'/> <vmName value='Jvm2'/> <vmName value='Jvm3'/> <vmName value='Jvm4'/> </jvmSet> </map> </mapping>
In this example both VirtualNodes Dispatcher and Renderer have a mapping with Jvm1, it means that at deployment time, both VirtualNodes will get nodes created in the same JVM. Here is the notion of co-allocation in a JVM.VirtualNode registration
Descriptors provide the ability to register a VirtualNode in a registry such RMIRegistry, JINI Lookup, HTTP registry, IBIS/RMI Registry Service. Hence this VirtualNode will be accessible by another application as it is described in the VirtualNodes Acquisition section. The protocol(registry) to use can be specified in the descriptor, if not specified, the VirtualNode will register using the protocol specified in proactive.communication.protocol property.
<virtualNodesDefinition> <virtualNode name='Dispatcher' property='unique_singleAO'/> <virtualNodesDefinition/> <deployment> <register virtualNode='Dispatcher' protocol='rmi'/> or <register virtualNode='Dispatcher'/> <!--using this syntax, registers the VirtualNode with the protocol specified in proactive.communication.protocol property --> <mapping> <map virtualNode='Dispatcher'> <jvmSet> <vmName value='Jvm0'/> </jvmSet> </map> </mapping>
The register tag allows to register the VirtualNode Dispatcher when activated, on the local machine in the RMIRegistry. As said before this VirtualNode will be accessible by another application using the lookup tag(see below) or using method: ProActive.lookupVirtualNode(String).
Descriptors provide the ability to acquire a VirtualNode already deployed by another application. Such VirtualNodes are defined in VirtualNodes Acquisition tag as it is done for VirtualNodesDefinition except that no property and no mapping with jvms are defined since such VNs are already deployed. In the deployment part, the lookup tag gives information on where and how to acquire the VirtualNode. Lookup will be performed when activating the VirtualNode.
<virtualNodesAcquisition> <virtualNode name='Dispatcher'/> </virtualNodesAcquisition> .......... <deployment> .......... <lookup virtualNode='Dispatcher' host='machine_name' protocol='rmi' port='2020'/> </deployment>
As mentioned in the previous section, in order to acquire VirtualNode Dispatcher, it must have been previously registered on the specified host by another application. Sometimes, the host where to perform the lookup will only be known at runtime, it that case it is specified in the descriptor with '*' for the host attribute
<lookup virtualNode='Dispatcher' host='*' protocol='rmi'/>
Then when the host name is available, ProActive provides method setRuntimeInformations in class org.objectweb.proactive.core.descriptor.data.VirtualNode to update the value and to perform the lookup. Typical example of code:
ProActiveDescriptor pad = ProActive.getProactiveDescriptor(String xmlFileLocation);
//----------- Returns a ProActiveDescriptor object from the xml file
pad.activateMappings;
// -------------------activate all VirtualNodes(definition and acquisition)
vnDispatcher =
pad.getVirtualNode('Dispatcher');
..........................
vnDispatcher.setRuntimeInformations('LOOKUP_HOST','machine_name);
//--------------set the property 'LOOKUP_HOST at runtime
To summarize all VirtualNodes are activated by calling activate methods except if '*' is set for a VirtualNode to be acquired. In that case the lookup will be performed when giving host informations.
Registration and lookup can be performed automatically when using tags in the descriptor as well as programmatically using static methods provided in org.objectweb.Proactive class:
ProActive.registerVirtualNode(
VirtualNode virtualNode,
String registrationProtocol,
boolean replacePreviousBinding );
ProActive.lookupVirtualNode(String url, String protocol);
ProActive.unregisterVirtualNode(VirtualNode virtualNode);
1 JVM --> 1 Node
........................... <jvm name='jvm1'> <creation> <processReference refid='jvmProcess'/> </creation> </jvm> .................................
In this example, jvm1 will be created using the process called jvmProcess (discussed later, this process represents a java process and can be seen as java ProActiveClassname command)1 JVM --> N Nodes on a single JVM
........................... <jvm name='jvm1' askedNodes='3'> <creation> <processReference refid='jvmProcess'/> </creation> </jvm> .................................
1 JVM --> N Nodes on N JVMs
This is the case when the process referenced is a cluster process(LSF, PBS, GLOBUS, ....) or a process list (see Process list)
Descriptors give the ability to acquire JVMs instead of creating them. To do so, it must be specified in the acquisition tag which service to use in oder to acquire the JVMs. Services will be described below, in the infrastructure part. At this point 2 services are provided: RMIRegistryLookup and P2PService service.
........................... <jvm name='jvm1'> <acquisition> <serviceReference refid='lookup'/> </acquisition> </jvm> .................................
In this example, Jvm1 will be acquired using the service called lookup (discussed later, this service represents a way to acquire a JVM). Note that the name lookup is totally abstract, with the condition that a service with the id lookup is defined in the infrastructure part
To avoid mistake when building XML descriptors, ProActive provides an XML Schema called DescriptorSchema.xsd. Then to validate your file against this schema, the following line must be put at the top of the xml document as it is done for all ProActive examples.
<ProActiveDescriptor
xmlns:xsi='http://www.w3.org/2001/XMLSchema-instance'
xsi:noNamespaceSchemaLocation='Location_of_DescriptorSchema.xsd'>
Note that this schema is available in the ProActive distribution package under ProActive\descriptor directory. Using descriptors related methods (Proactive.getProactiveDescriptor(file)) triggers automatic and transparent validation of the file using Xerces2_4_0 if the ProActive property schema.validation is set to enable (see Chapter 20, ProActive Basic Configuration for more details). If a problem occurs during the validation, an error message is displayed. Otherwise, if the validation is successful, no message appear. An XML validation tool such as XMLSPY5.0(windows) can also be used to validate XML descriptors.
Following XML files examples are used for the C3D application. The first file is read when launching the C3DDispatcher. The second one is read every time a C3DUser is added. Both files contain many features described earlier in this document.
<ProActiveDescriptor
xmlns:xsi='http://www.w3.org/2001/XMLSchema-instance'
xsi:noNamespaceSchemaLocation='DescriptorSchema.xsd'>
<componentDefinition>
<virtualNodesDefinition>
<virtualNode name='Dispatcher' property='unique_singleAO'/>
<virtualNode name='Renderer' property='multiple'/>
</virtualNodesDefinition>
</componentDefinition>
<deployment>
<register virtualNode='Dispatcher'/>
<mapping>
<map virtualNode='Dispatcher'>
<jvmSet>
<currentJvm/>
</jvmSet>
</map>
<map virtualNode='Renderer'>
<jvmSet>
<vmName value='Jvm1'/>
<vmName value='Jvm2'/>
<vmName value='Jvm3'/>
<vmName value='Jvm4'/>
</jvmSet>
</map>
</mapping>
<jvms>
<jvm name='Jvm1'>
<creation>
<processReference
refid='jvmProcess'/>
</creation>
</jvm>
<jvm name='Jvm2'>
<creation>
<processReference
refid='jvmProcess'/>
</creation>
</jvm>
<jvm name='Jvm3'>
<creation>
<processReference
refid='jvmProcess'/>
</creation>
</jvm>
<jvm name='Jvm4'>
<creation>
<processReference
refid='jvmProcess'/>
</creation>
</jvm>
</jvms>
</deployment>
<infrastructure>
<processes>
<processDefinition
id='jvmProcess'>
<jvmProcess
class='org.objectweb.proactive.core.process.JVMNodeProcess'/>
</processDefinition>
</processes>
</infrastructure>
</ProActiveDescriptor>
Example 21.1. C3D_Dispatcher_Render.xml
This example represents xml deployment descriptor for the C3D application. The abstract part containing VirtualNodes definition and deployment informations has already been explained. To summarize, two VirtualNodes are defined Dispatcher and Renderer. Dispatcher is mapped to the jvm running the main(), and will be exported using the protocol specified in proactive.communication.protocol property. This VirtualNode will be registered in a Registry(still using the protocol specified in proactive.communication.protocol property) when activated. Renderer is mapped to a set of JVMs called Jvm1, ..., Jvm4.
<ProActiveDescriptor
xmlns:xsi='http://www.w3.org/2001/XMLSchema-instance'
xsi:noNamespaceSchemaLocation='DescriptorSchema.xsd'>
<componentDefinition>
<virtualNodesDefinition>
<virtualNode name='User'/>
</virtualNodesDefinition>
<virtualNodesAcquisition>
<virtualNode name='Dispatcher'/>
</virtualNodesAcquisition>
</componentDefinition>
<deployment>
<mapping>
<map virtualNode='User'>
<jvmSet>
<currentJvm/>
</jvmSet>
</map>
</mapping>
<lookup virtualNode='Dispatcher'
host='*' protocol='rmi'/>
</deployment>
<infrastructure>
<processes>
<processDefinition
id='jvmProcess'>
<jvmProcess
class='org.objectweb.proactive.core.process.JVMNodeProcess'/>
</processDefinition>
</processes>
</infrastructure>
</ProActiveDescriptor>
Example 21.2. C3D_User.xml
This file is read when addind a C3DUser. Two VirtualNodes are defined User which is mapped to the jvm running the main(), whose acquisition method is performed by looking up the RMIRegistry and Dispatcher in the virtualNodesAcquisition part which will be the result of a lookup in the RMIRegistry of a host to be specified at runtime.
In the previous example, all defined JVMs will be created using jvmProcess process. This name is abstract like the other ones, it means that it can be changed. This process is totally defined in the infrastructure part. Of course the process name in the creation part must point at an existing defined process in the infrastructure part. For instance if the name in the creation tag is localJVM, there must be a process defined in the infrastructure with the id localJVM
As said before, all processes are defined in the infrastructure part, under the processes tag. In the previous example, the
defined process jvmProcess will create
local JVMs. The class attribute defines the class to instantiate in
order to create the process. ProActive library provides one class to
instantiate in order to create processes that will launch local JVMs:
org.objectweb.proactive.core.process.JVMNodeProcess
<infrastructure> <processes> <processDefinition id='jvmProcess'> <jvmProcess class='org.objectweb.proactive.core.process.JVMNodeProcesss'> <classpath> <absolutePath value='/home/ProActive/classes'/> <absolutePath value='/home/ProActive/lib/bcel.jar'/> <absolutePath value='/home/ProActive/lib/asm.jar'/> <absolutePath value='/home/ProActive/lib/jini-core.jar'/> <absolutePath value='/home/ProActive/lib/jini-ext.jar'/> <absolutePath value='/home/ProActive/lib/reggie.jar'/> </classpath> <javaPath> <absolutePath value='/usr/local/jdk1.4.0/bin/java'/> </javaPath> <policyFile> <absolutePath value='/home/ProActive/scripts/proactive.java.policy'/> </policyFile> <log4jpropertiesFile> <relativePath origin='user.home' value='ProActive/scripts/proactive-log4j'/> </log4jpropertiesFile> <ProActiveUserPropertiesFile> <absolutePath value='/home/config.xml'/> </ProActiveUserPropertiesFile> <jvmParameters> <parameter value='-Djava.library.path=/home1/fabrice/workProActive/ProActive/lib'/> <parameter value='-Dsun.boot.library.path=/home1/fabrice/workProActive/ProActive/lib'/> <parameter value=-Xms512 -Xmx512'/> </jvmParameters> </jvmProcess> </processDefinition> </processes> </infrastructure>
As shown in the example above, ProActive provides the ability to define or change the classpath environment variable, the java path, the policy file path, the log4j properties file path, the ProActive properties file path (see Chapter 20, ProActive Basic Configuration for more details) and also to pass parameters to the JVM to be created. Note that parameters to be passed here are related to the jvm in opposition to properties given in the configuration file (see Chapter 20, ProActive Basic Configuration), which is more focused on ProActive or application behaviour. In fact parameters given here will be part of the java command to create other jvms, whereas properties given in the config file will be loaded once the jvm is created.
If not specified, there is a default value (except for the jvmParameters element) for each of these variables. In the first example of this section, just the Id of the process, and the class to instantiate are defined. You might want to define the classpath or java path or policyfile path, etc, when creating remote JVMs(discussed later) if the home directory is not the same on your machine and on the machine where you want to create the JVM or for instance if you want to interact with Windows OS if you work on Linux and vice versa. As shown in the example paths to files can be either absolute or relative. If relative, an origin must be provided, it can be user.home or user.dir or user.classpath and it is resolved locally, i.e on the jvm reading the descriptor and not on the remote jvm that is going to be created.
As mentionned in the configuration file (see Chapter 20, ProActive Basic Configuration), if the <ProActiveUserPropertiesFile> is not defined for remote jvms, they will load a default one once created.
Even if not shown in this example, a specific tag is provided for XbootClasspath option under the form
<bootclasspath> <relativePath origin='user.home' value='/IOFAb/Ibis/'/> <relativePath origin='user.home' value='/IOFAb/classlibs/jdk'/> </bootclasspath>
With XML Deployment Descriptor, ProActive provides the ability to create remote Nodes (remote JVMs). You can specify in the descriptor if you want to access the remote host with rsh, ssh, rlogin, lsf, pbs, oar, prun, globus, unicore, arc (nordugrid), glite. How to use these protocols is explained in the following examples. Just remind that you can also combine these protocols.The principle of combination is fairly simple, you can imagine for instance that you will log on a remote cluster frontend with ssh, then use pbs to book nodes and to create jvms on each. You will also notice that there is at least one combination for each remote protocol. Indeed each remote protocol must have a pointer either on another remote protocol or on a jvmProcess to create a jvm(discussed previoulsy).
You can find here several examples of supported protocols and useful combinations.
Note that it is mandatory for using all these features, that ProActive is installed on each host, of course on the local host as well as on each host where you want to create Nodes
RSH
........................... <jvm name='jvm1'> <creation> <processReference refid='rshProcess'/> </creation> </jvm> ................................. <processes> <processDefinition id='jvmProcess'> <jvmProcess class='org.objectweb.proactive.core.process.JVMNodeProcess'/> </processDefinition> <processDefinition id='rshProcess'> <rshProcess class='org.objectweb.proactive.core.process.rsh.RSHProcess' hostname='sea.inria.fr'> <processReference refid='jvmProcess'/> </rshProcess> </processDefinition> </processes>
For the Jvm2 the creation process is rshProcess(still an abstract name), which is defined in the infrastructure section. To define this process you have to give the class to instantiate to create the rsh process. ProActive providesorg.objectweb.proactive.core.process.rsh.RSHProcessto create rsh process. You must give the remote host name to log on with rsh. You can define as wellusername='toto'if you plan to use rsh with -l option. As said before this rsh process must reference a local process, and in the example, it references the process defined with the id jvmProcess. It means that once logged on sea.inria.fr with rsh, a local JVM will be launched, ie a ProActive node will be created on sea.inria.fr thanks to the process defined by jvmProcess.Check examples/RSH_Example.xml for a complete rsh deployment example.
RLOGIN
........................... <jvm name='jvm1'> <creation> <processReference refid='rloginProcess'/> </creation> </jvm> ................................. <processes> <processDefinition id='jvmProcess'> <jvmProcess class='org.objectweb.proactive.core.process.JVMNodeProcess'/> </processDefinition> <processDefinition id='rloginProcess'> <rloginProcess class='org.objectweb.proactive.core.process.rlogin.RLoginProcess' hostname='sea.inria.fr'> <processReference refid='jvmProcess'/> </rloginProcess> </processDefinition> </processes>
You can use rlogin in the same way that you would use rshSSH
........................... <jvm name='jvm1'> <creation> <processReference refid='sshProcess'/> </creation> </jvm> ................................. <processes> <processDefinition id='jvmProcess'> <jvmProcess class='org.objectweb.proactive.core.process.JVMNodeProcess'/> </processDefinition> <processDefinition id='sshProcess'> <sshProcess class='org.objectweb.proactive.core.process.ssh.SSHProcess' hostname='sea.inria.fr'> <processReference refid='jvmProcess'/> </sshProcess> </processDefinition> </processes>
ProActive providesorg.objectweb.proactive.core.process.ssh.SSHProcessto create ssh process.In order to use ssh to log on a remote host, you must perform some actions. First you need to copy your public key (located in identity.pub under ~/.ssh on your local machine) in the authorized_keys(located under ~/.ssh) file of the remote host. Then to avoid interactivity, you will have to launch on the local host the ssh-agent command: ssh-agent $SHELL, this command can be put in your .xsession file, in order to run it automatically when logging on your station. Then launching ssh-add command to add your identity. Running this command will ask you to enter your passphrase, it is the one you provided when asking for an ssh key pair.
Note also that if the generated key pair is not encrypted (no passphrase), you do not need to run neither the ssh-agent, nor the ssh-add command. Indeed it is sufficient when using non encrypted private key, to only copy the public key on the remote host (as mentionned above) in order to get logged automatically on the remote host.
These steps must be performed before running any ProActive application using ssh protocol. If you are not familiar with ssh, see openSSH
Check examples/SSH_Example.xml for a complete ssh deployment example.
ProActive provides a way to define a list of processes for RSH, SSH, RLOGIN protocols. Using processList or processListbyHost elements avoids having a long deployment file when many machines with similar names are going to be connected with protocols mentionned before. The first example below shows how to use processList tag, the second how to use processListbyHost.
........................... <jvm name='jvm1'> <creation> <processReference refid='processlist'/> </creation> </jvm> ................................. <processes> <processDefinition id='jvmProcess'> <jvmProcess class='org.objectweb.proactive.core.process.JVMNodeProcess'/> </processDefinition> <processDefinition id='processlist'> <processList class='org.objectweb.proactive.core.process.ssh.SSHProcessList' fixedName='node-' list='[0-100;2]^[10,20]' padding='3' domain='sophia.grid5000.fr'> <processReference refid='jvmProcess'/> </processList> </processDefinition> </processes>
When using processList tag, the class attribute can take 3 values:
according to the protocol being used is ssh, rsh or rlogin. The fixedName attribute is mandatory and represents the fixed part shared by all machine's names. The list attribute is also mandatory and can take several forms: [m-n] means from m to n with a step 1, [m-n;k] means from m to n with a step k (m, m+k, m+2k, ....), [m-n]^[x,y] means from m to n exluding x and y, [m-n]^[x,y-z] means from m to n exluding x and values from y to z, [m-n;k]^[x,y] same as before except that the step is k. The padding attribute is optional (default is 1) and represents the number of digits. Finally the domain attribute is mandatory and represents the last part shared by all machine's names. So in the exemple above, a jvm is going to be created using ssh on machines: node000.sophia.grid5000.fr, node002.sophia.grid5000.fr,..., node098.sophia.grid5000.fr, node100.sophia.grid5000.fr (note that step is 2) excluding machines: node010.sophia.grid5000.fr and node020.sophia.grid5000.fr.org.objectweb.proactive.core.process.ssh.SSHProcessList (see core/process/ssh/SSHProcessList.java),
org.objectweb.proactive.core.process.rsh.RSHProcessList (see core/process/rsh/RSHProcessList.java),
org.objectweb.proactive.core.process.rlogin.RLoginProcessList (see core/process/rlogin/RLoginProcessList.java),
........................... <jvm name='jvm1'> <creation> <processReference refid='processlist'/> </creation> </jvm> ................................. <processes> <processDefinition id='jvmProcess'> <jvmProcess class='org.objectweb.proactive.core.process.JVMNodeProcess'/> </processDefinition> <processDefinition id='processlist'> <processListbyHost class='org.objectweb.proactive.core.process.ssh.SSHProcessList' hostlist='crusoe waha nahuel' domain='inria.fr'> <processReference refid='jvmProcess'/> </processListbyHost> </processDefinition> </processes>
Using processListbyHost element allows to give a hostlist separated with a whitespace. The class attribute is defined as described in the processList tag. The domain attribute is optional since the complete hostname can also be provided in the hostlist attribute. In the example, a jvm is going to be created using ssh on crusoe.inria.fr, waha.inria.fr, nahuel.inria.fr.
Check examples/SSHList_example.xml or examples/SSHListbyHost_Example.xml for list examples.
LSF
This protocol is used to create Nodes(JVMs) on a cluster. ProActive provides
org.objectweb.proactive.core.process.lsf.LSFBSubProcessto create bsub process.In this part we assume that you want to submit a job from a machine which is not the cluster frontend. As described before, you can combine protocols. In this case , you will have to define a process to log on the front-end of the cluster(rlogin if your machine is on the same LAN than the cluster front-end, else ssh (Remember that to use ssh you will have to run some commands as explained above).
<jvm name='Jvm2'> <creation> <processReference refid='sshProcess'/> </creation> </jvm> ................................................... <processes> <processDefinition id='jvmProcess'> <jvmProcess class='org.objectweb.proactive.core.process.JVMNodeProcess'/> </processDefinition> <processDefinition id='bsubInriaCluster'> <bsubProcess class='org.objectweb.proactive.core.process.lsf.LSFBSubProcess'> <processReference refid='jvmProcess'/> <bsubOption> <hostlist>cluster_machine1 cluster_machine2<hostlist/> <processor>6</processor> <scriptPath> <absolutePath value='/home/ProActive/scripts/cluster/startRuntime.sh'/> </scriptPath> </bsubOption> </bsubProcess> </processDefinition> <processDefinition id='sshProcess'> <sshProcess class='org.objectweb.proactive.core.process.ssh.SSHProcess' hostname='sea.inria.fr'> <processReference refid='bsubInriaCluster'/> </sshProcess> </processDefinition> </processes>
In this example, the JVM called Jvm2 will be created using ssh to log on the cluster front end. Then a bsub command will be generated thanks to the process defined by bsubInriaCluster. This bsub command will create Nodes on several cluster machines, since bsubInriaCluster references the jvmProcess defined process. All tags defined under <bsubOption> are not mandatory, but they can be very usefull. The <hostlist> tag defines possible candidates in the job attribution, if not set the job will be allocated among all cluster's machines. The <processor> tag defines the number of processor requested, if not set, one processor is requested. The <resourceRequirement> tag defines the expected number of processors per machine. For instance <resourceRequirement value='span[ptile=2]'/> ensures that 2 processors per machines will be used, whereas value='span[ptile=1]' forces that LSF allocates only only one processor per machine. It represents the -R option of LSF. At last <scriptPath> defines the path on the cluster front end of the script startRuntime.sh which is necessary to run ProActive on a cluster. This script is located under Proactive/scripts/unix/cluster. If not set the default location is set as ~/Proactive/scripts/unix/cluster.
It is exactly the same with rlogin instead of ssh.
If you want to submit the job directly from the cluster entry point, define only the bsubProcess, like in the above example and skip the ssh definition.
<jvm name='Jvm2'> <creation> <processReference refid='bsubInriaCluster'/> </creation> </jvm> ................................................... <processes> <processDefinition id='jvmProcess'> <jvmProcess class='org.objectweb.proactive.core.process.JVMNodeProcess'/> </processDefinition> <processDefinition id='bsubInriaCluster'> <bsubProcess class='org.objectweb.proactive.core.process.lsf.LSFBSubProcess' interactive='true' queue='short'> <processReference refid='jvmProcess'/> <bsubOption> <hostlist>cluster_machine1 cluster_machine2<hostlist/> <processor>6</processor> <scriptPath> <absolutePath value='/home/ProActive/scripts/unix/cluster/startRuntime.sh'/> </scriptPath> </bsubOption> </bsubProcess> </processDefinition> </processes>
Note that in the example above two attributes: interactive and queue appear. They are optional, and have a default value: respectively false and normal. They represent option in the bsub command: interactive mode, and the name of the queue.
Check also examples/SSH_LSF_Example.xml .
PBS
This protocol is used to create jobs on cluster managed by PBS, PBSPro or Torque. ProActive provides
org.objectweb.proactive.core.process.pbs.PBSBSubProcessto create pbs processes. As explained for LSF you can combine protocols in order for instance to log on the cluster's frontal with ssh, then to create nodes using PBS, or you can also use only PBS without ssh if you are already logged on the frontend. Example below shows how to combine an ssh process to log on the cluster, then a PBS process that references a jvmProcess in order to create nodes on processors requested by PBS.<jvm name='Jvm2'> <creation> <processReference refid='sshProcess'/> </creation> </jvm> ................................................... <processes> <processDefinition id='jvmProcess'> <jvmProcess class='org.objectweb.proactive.core.process.JVMNodeProcess'/> </processDefinition> <processDefinition id='pbsCluster'> <pbsProcess class='org.objectweb.proactive.core.process.pbs.PBSSubProcess'> <processReference refid='jvmProcess'/> <pbsOption> <hostsNumber>4</hostsNumber> <processorPerNode>1</processorPerNode> <bookingDuration>00:15:00</bookingDuration> <outputFile>/home1/rquilici/out.log</outputFile> <scriptPath> <absolutePath value='/home/ProActive/scripts/unix/cluster/pbsStartRuntime.sh'/> </scriptPath> </pbsOption> </pbsProcess> </processDefinition> <processDefinition id='sshProcess'> <sshProcess class='org.objectweb.proactive.core.process.ssh.SSHProcess' hostname='frontend'> <processReference refid='pbsCluster'/> </sshProcess> </processDefinition> </processes>
Note that not all options are listed here, and some options mentionned in the example are optionnal: hostsNumber represents the number of host requested using pbs(default is 1), processorPerNode represents the number of processor per hosts requested(1 or 2, default is 1), bookingDuration represents the duration of the job(default is 1 minute), outputFile represents the file where to put the ouput of the job(default is specified by pbs), scriptPath represents the location on the frontend_host of the script pbsStartRuntime.sh(default is /user.home/ProActive/scripts/unix/cluster/pbsStartRuntime.sh).
Check also examples/SSH_PBS_Example.xml.
Sun Grid Engine
This protocol is used to create jobs on cluster managed by Sun Grid Engine. ProActive provides
org.objectweb.proactive.core.process.gridengine.GridEngineSubProcessto create grid engine processes. As explained above you can combine protocols in order for instance to log on the cluster's frontal with ssh, then to create nodes using SGE, or you can also use only SGE without ssh if you are already logged on the frontend. Example below shows how to combine an ssh process to log on the cluster, then a SGE process that references a jvmProcess in order to create nodes on processors requested by SGE.<jvm name='Jvm2'> <creation> <processReference refid='sshProcess'/> </creation> </jvm> ................................................... <processes> <processDefinition id='jvmProcess'> <jvmProcess class='org.objectweb.proactive.core.process.JVMNodeProcess'/> </processDefinition> <processDefinition id='sgeCluster'> <gridengineProcess class='org.objectweb.proactive.core.process.gridengine.GridEngineSubProcess'> <processReference refid='jvmProcess'/> <gridEngineOption> <hostsNumber>4</hostsNumber> <bookingDuration>00:15:00</bookingDuration> <scriptPath> <absolutePath value='/home/ProActive/scripts/unix/cluster/gridEngineStartRuntime.sh'/> </scriptPath> <parallelEnvironment>mpi</parallelEnvironment> </gridEngineOption> </gridengineProcess> </processDefinition> <processDefinition id='sshProcess'> <sshProcess class='org.objectweb.proactive.core.process.ssh.SSHProcess' hostname='frontend'> <processReference refid='sgeCluster'/> </sshProcess> </processDefinition> </processes>
As mentionned previously, many options exist, and correspond to the main options specified in an SGE system. ScriptPath represents the location on the frontend_host of the script gridEngineStartRuntime.sh (default is /user.home/ProActive/scripts/unix/cluster/gridEngineStartRuntime.sh).
Check also examples/SSH_SGE_Example.xml.
OAR:
OAR is a cluster protocol developed at INRIA Alpes and used on Grid5000. ProActive provides
org.objectweb.proactive.core.process.oar.OARSubProcessto use such protocol.As explained above you can combine protocols in order for instance to log on the cluster's frontal with ssh, then to create nodes using OAR, or you can also use only OAR without ssh if you are already logged on the frontend. Example below shows how to combine an ssh process to log on the cluster, then an OAR process that references a jvmProcess in order to create nodes on processors requested by OAR.<jvm name='Jvm2'> <creation> <processReference refid='sshProcess'/> </creation> </jvm> ................................................... <processes> <processDefinition id='jvmProcess'> <jvmProcess class='org.objectweb.proactive.core.process.JVMNodeProcess'/> </processDefinition> <processDefinition id='oarCluster'> <oarProcess class='org.objectweb.proactive.core.process.oar.OARSubProcess'> <processReference refid='jvmProcess'/> <oarOption> <resources>node=2,weight=2</resources> <scriptPath> <absolutePath value='/home/ProActive/scripts/unix/cluster/oarStartRuntime.sh'/> </scriptPath> </oarOption> </oarProcess> </processDefinition> <processDefinition id='sshProcess'> <sshProcess class='org.objectweb.proactive.core.process.ssh.SSHProcess' hostname='frontend'> <processReference refid='oarCluster'/> </sshProcess> </processDefinition> </processes>
As mentionned previously, many options exist, and correspond to the main options specified in an OAR system. ScriptPath represents the location on the frontend_host of the script oarStartRuntime.sh (default is /user.home/ProActive/scripts/unix/cluster/oarStartRuntime.sh).
Check also examples/SSH_OAR_Example.xml and examples/SSH_OARGRID_Example.xml.
PRUN:
PRUN is a cluster protocol developed at Amsterdam to manage their cluster. ProActive provides
org.objectweb.proactive.core.process.prun.PrunSubProcessto use such protocol.Check also examples/SSH_PRUN_Example.xml.
GLOBUS
Like ssh, using globus requires some steps to be performed. In particular the java COG Kit (no need for the whole GT) must be installed on the machine that will originates the RSL request. See COG Kit Installation for how to install the client kit. Then you have to initialize your proxy by running COG_INSTALLATION/bin /grid-proxy-init, you will be asked for a passphrase, it is the one you provided when requesting a user certificate at globus.org. Once these steps are performed you can run ProActive application using GRAM protocol.
ProActive provides
org.objectweb.proactive.core.process.globus.GlobusProcessto create globus process.<jvm name='Jvm2'> <creation> <processReference refid='globusProcess'/> </creation> </jvm> ................................................... <processes> <processDefinition id='jvmProcess'> <jvmProcess class='org.objectweb.proactive.core.process.JVMNodeProcess'/> </processDefinition> <processDefinition id='globusProcess'> <globusProcess class='org.objectweb.proactive.core.process.globus.GlobusProcess' hostname='globus1.inria.fr'> <processReference refid='jvmProcess'/> <environment> <variable name='DISPLAY' value='machine_name0.0'/> </environment> <globusOption> <count>10</count> </globusOption> </globusProcess> </processDefinition> </processes>
In this example, Jvm2 will be created using GRAM. An RSL request will be generated with informations provided in the descriptor. For instance, the <environment> tag is not mandatory, but for the globus host to export the DISPLAY on your machine, you can define the value in the descriptor as well as other environment variable, except the classpath(or java path,...) which must be defined in the jvmProcess referenced by globusProcess as explained before. <globusOption> is neither manatory. Default value for <count> element is 1. It represents the number of processor requested.
Check also examples/Globus_Example.xml.
UNICORE:
ProActive provides
org.objectweb.proactive.core.process.unicore.UnicoreProcessto use such protocol.Check also examples/Unicore_Example.xml.
ARC (NorduGrid):
ProActive provides
org.objectweb.proactive.core.process.nordugrid.NGProcessto use such protocol.To use ARC you will need to download the ARC Client
Check also examples/NorduGrid_Example.xml.
GLITE
ProActive provides
org.objectweb.proactive.core.process.glite.GLiteProcessto use such protocol.Check also examples/SSH_GLite_Example.xml.
MPI
ProActive provides
org.objectweb.proactive.core.process.mpi.MPIDependentProcessto use such protocol. You have to couple this process with the DependentListProcessDecorator explained below.Check also examples/SSH_MPI_Example.xml.
<processDefinition id='mpiProcess'> <mpiProcess class='org.objectweb.proactive.core.process.mpi.MPIDependentProcess' mpiFileName='my_mpi_program'> <commandPath value='/usr/bin/mpirun' /> <mpiOptions> <hostsNumber>16</hostsNumber> <localRelativePath> <relativePath origin="user.home" value='/ProActive/scripts/unix' /> </localRelativePath> <remoteAbsolutePath> <absolutePath value='/home/user' /> </remoteAbsolutePath> </mpiOptions> </mpiProcess> </processDefinition> <processDefinition id='dependentProcessSequence'> <dependentProcessSequence class='org.objectweb.proactive.core.process.DependentListProcessDecorator'> <processReference refid='pbsProcess' /> <processReference refid='mpiProcess' /> </dependentProcessSequence> </processDefinition> <processDefinition id='sshProcess'> <sshProcess class='org.objectweb.proactive.core.process.ssh.SSHProcess' hostname='frontend' > <processReference refid='dependentProcessSequence' /> </sshProcess> </processDefinition>
<?xml version='1.0' encoding='UTF-8'?> <ProActiveDescriptor xmlns:xsi='http://www.w3.org/2001/XMLSchema-instance' xsi:noNamespaceSchemaLocation='DescriptorSchema.xsd'> <virtualNodesDefinition> <virtualNode name='PenguinNode' property='multiple'/> <virtualNodesDefinition/> <deployment> <mapping> <map virtualNode='PenguinNode'> <jvmSet> <vmName value='Jvm1'/> <vmName value='Jvm2'/> <vmName value='Jvm3'/> <vmName value='Jvm4'/> </jvmSet> </map> </mapping> <jvms> <jvm name='Jvm1'> <creation> <processReference refid='jvmProcess'/> </creation> </jvm> <jvm name='Jvm2'> <creation> <processReference refid='jvmProcess'/> </creation> </jvm> <jvm name='Jvm3'> <creation> <processReference refid='sshInriaCluster'/> </creation> </jvm> <jvm name='Jvm4'> <creation> <processReference refid='globusProcess'/> </creation> </jvm> </jvms> </deployment> <infrastructure> <processes> <processDefinition id='jvmProcess'> <jvmProcess class='org.objectweb.proactive.core.process.JVMNodeProcess'/> </processDefinition> <processDefinition id='jvmProcess1'> <jvmProcess class='org.objectweb.proactive.core.process.JVMNodeProcess'> <classpath> <relativePath origin='userHome' value='/ProActive/classes'/> <relativePath origin='userHome' value='/ProActive/lib/bcel.jar'/> <relativePath origin='userHome' value='/ProActive/lib/asm.jar'/> <relativePath origin='userHome' value='/ProActive/lib/jini-core.jar'/> <relativePath origin='userHome' value='/ProActive/lib/jini-ext.jar'/> <relativePath origin='userHome' value='/ProActive/lib/reggie.jar'/> ............. </classpath> <javaPath> <absolutePath value='/usr/local/jdk1.4.0/bin/java'/> </javaPath> <policyFile> <absolutePath value='/home/ProActive/scripts/proactive.java.policy'/> </policyFile> <log4jpropertiesFile> <absolutePath value='/home/ProActive/scripts/proactive-log4j'/> </log4jpropertiesFile> <ProActiveUserPropertiesFile> <absolutePath value='/home/config.xml'/> </ProActiveUserPropertiesFile> </jvmProcess> </processDefinition> <processDefinition id='bsubInriaCluster'> <bsubProcess class='org.objectweb.proactive.core.process.lsf.LSFBSubProcess'> <processReference refid='jvmProcess1'/> <bsubOption> <hostlist>cluster_group1 cluster_group2<hostlist/> <processor>4</processor> <resourceRequirement value='span[ptile=2]'/> <scriptPath> <absolutePath value='/home/ProActive/scripts/unix/cluster/startRuntime.sh'/> </scriptPath> </bsubOption> </bsubProcess> </processDefinition> <processDefinition id='sshInriaCluster'> <sshProcess class='org.objectweb.proactive.core.process.ssh.SSHProcess' hostname='sea.inria.fr'> <processReference refid='bsubInriaCluster'/> </sshProcess> </processDefinition> <processDefinition id='globusProcess'> <globusProcess class='org.objectweb.proactive.core.process.globus.GlobusProcess' hostname='cluster.inria.fr'> <processReference refid='jvmProcess1'/> <environment> <variable name='DISPLAY' value='machine_name0.0'/> </environment> <globusOption> <count>10</count> </globusOption> </globusProcess> </processDefinition> </processes> </infrastructure> </ProActiveDescriptor>
This xml deployment descriptor shows how to deploy the Penguin application on several places. Two Nodes will be created locally. We can see that with the definition of Jvm1 and Jvm2. These JVMs will be created locally since they reference directly the process defined by jvmProcess. Jvm3 will be created on the cluster using ssh to log on sea.inria.fr (cluster entry point)and then bsub to request processors and to create jvms on each. Here, two nodes will be created on machines that belong to cluster_group1 or cluster_group2 since processor tag is set to 2, and the hoslist tag gives cluster_group1 cluster_group2 as candidates. At Last Jvm4 will be created using globus It will access cluster.inria.fr and request 10 processors. We can notice that two local processes were defined, the reason is that the first one jvmProcess will use default value for the classpath, java path and policyfile path, whereas for the second one jvmProcess1 , we need to define these value, since the home directory is different between the local machine, and globus and the cluster(home dir is the same on globus machines and on the cluster, that is why both processes reference the same local process: jvmProcess1).
Even if quite a lot of things can be configured in the xml files, sometimes you will have to perform additional steps to get everything working properly, it is the case when using ssh, or globus as seen before. In this example, DISPLAY variable is defined for the globus process, that means that we want the penguin icon to appears on the local machine, be carefull to authorize your X server to display such icons by running the following command before launching the application: xhost +cluster.inria.fr. On the cluster side you need to create under ~/.ssh a file called environment where you define the DISPLAY variable. If you are not familiar with ssh, see openSSH
This process is used when a process is dependent on an another process. The first process of the list can be any process but the second one must be a DependentProcess thus has to implement the org.objectweb.proactive.core.process.DependentProcess interface.
Check also examples/SSH_MPI_Example.xml.
<processDefinition id='dependentProcessSequence'> <dependentProcessSequence class='org.objectweb.proactive.core.process.DependentListProcessDecorator'> <processReference refid='pbsProcess' /> <processReference refid='mpiProcess' /> </dependentProcessSequence> </processDefinition> <processDefinition id='sshProcess'> <sshProcess class='org.objectweb.proactive.core.process.ssh.SSHProcess' hostname='frontend' > <processReference refid='dependentProcessSequence' /> </sshProcess> </processDefinition>
As mentionned previously, instead of creating jvms, ProActive gives the possibility to acquire existing jvms. To do so, as shown in the example below, a service must be referenced in the acquisition tag. At this point two services are implemented: RMIRegistryLookup: this service performs a lookup in an RMIRegistry at the url specified in the service definition to find a ProActiveRuntime(a jvm) with the given name. P2PService service allows when using ProActive's P2P infrastructure to get as many jvms as desired.
<?xml version='1.0' encoding='UTF-8'?> <ProActiveDescriptor xmlns:xsi='http://www.w3.org/2001/XMLSchema-instance' xsi:noNamespaceSchemaLocation='DescriptorSchema.xsd'> <componentDefinition> <virtualNodesDefinition> <virtualNode name='VnTest' property='multiple'/> </virtualNodesDefinition> </componentDefinition> <deployment> <mapping> <map virtualNode='VnTest'> <jvmSet> <vmName value='Jvm1'/> <vmName value='Jvm2'/> </jvmSet> </map> </mapping> <jvms> <jvm name='Jvm1'> <acquisition> <serviceReference refid='lookupRMI'/> </acquisition> </jvm> <jvm name='Jvm2'> <acquisition> <serviceReference refid='lookupP2P'/> </acquisition> </jvm> </jvms> </deployment> <infrastructure> <services> <serviceDefinition id='lookupRMI'> <RMIRegistryLookup url='//localhost:2020/PA_JVM1'/> </serviceDefinition> <serviceDefinition id='lookupP2P'> <P2PService nodesAsked='2'acq='rmi' port='2410' NOA='10' TTU='60000' TTL='10'> <peerSet> <peer>rmi://localhost:3000</peer> </peerSet> </P2PService> </serviceDefinition> </services> </infrastructure> </ProActiveDescriptor>
The RMIRegistryLookup service needs only an url to perform the lookup. Many options exist for the P2PService service: nodesAsked represents the number of JVMs to acquire, the peer element represents an entry point in the P2P system, many peers can be specified. Elements acq and port represent the communication protocol and the listening port for the P2P Service, if a P2P Service is already running with this configuration the descriptor will use this one else a new one is started. Chapter 35, ProActive Peer-to-Peer Infrastructure provides more information.
The example above shows a VirtualNode VnTest, that is mapped with two jvms, Jvm1 and Jvm2. Jvm1 represents one jvm that will be acquired using an RMI Lookup, Jvm2 represents two jvms that will be found in the P2P infrastructure, so at the end 3 acquired jvms are expected.
Fault Tolerance can also be defined at the service level. See Chapter 25, Fault-Tolerance for more information.
ProActive gives the ability to kill all JVMs and Nodes deployed with an XML descriptor with the method: killall(boolean softly) in class ProActiveDescriptor (this class's code is in core/descriptor/data/ProActiveDescriptor.java)
ProActiveDescriptor pad = ProActive.getProactiveDescriptor(String xmlFileLocation); //----------- Returns a ProActiveDescriptor object from the xml file pad.activateMappings(); ... pad.killall(false); //----------- Kills every jvms deployed with the descriptor
If softly is set to false, all jvms created when activating the descriptor are killed abruptely. If true a jvm that originates the creation of a rmi registry waits until registry is empty before dying. To be more precise a thread is created to ask periodically the registry if objects are still registered.
There is the possiblity to use only the infrastructure part in order to create processes. A Schema called ProcessSchema located in the examples directory allows to validate XML files for processes. ProActive provides also the ability to use all processes defined above without using XML Deployment Descriptor. You can programmatically create such processes.
In order to get familiar on how to create processes programmatically, see the Process package
org.objectweb.proactive.core.process
The objective of this feature is to allow the use of variables with XML descriptors. Variables can be defined: directly in the descriptor, using independent files, or inside the deploying application's code (with an API).
The variable tags are usefull inside a descriptor because they can factorize frequent parameters. (For example, a variable like ${PROACTIVE_HOME} can be defined, set and used in an XML Descriptor.) But also, because they can be used to establish a contract between the Program and the Descriptor.
| Type | Ability to set value | Ability to set empty value | Priority |
|---|---|---|---|
| DescriptorVariable | Descriptor | Program | Descriptor |
| ProgramVariable | Program | Descriptor | Program |
| DescriptorDefaultVariable | Descriptor, Program | - | Program |
| ProgramDefaultVariable | Program, Descriptor | - | Descriptor |
| JavaPropertyVariable | Descriptor, Program | - | JavaProperty |
| JavaPropertyDescriptorDefault | JavaProperty, Descriptor, Program | Program | JavaProperty, Descriptor, Program |
| JavaPropertyProgramDefault | JavaProperty, Descriptor, Program | Descriptor | JavaProperty, Program, Descriptor |
Table 22.1. Variable Types
Variables can be set in more than one place. When the value is set on multiple places, then the definition specified in the priority column will take precedence. In the priority column, items towards the left have more priority.
To help identify the user cases where the variable types might be useful, we have defined the concept of programmer and deployer. The programmer is the person writing the application code. The deployer corresponds to the responsible of writing the deployment descriptor. The variables represent rights and responsabilities between the two parties (contract) as specified in the following table:
Type | Behavior | When to use this type |
descriptorVariable | The value has to be set in the descriptor, and cannot be specified in the program. | If the deployer wants to use a value, without giving the possibility to the programmer to modify it. The programmer can define this variable to empty, to force the descriptor to set a value. |
programVariable | The value must be set in the program, and cannot be specified in the descriptor. | If the programmer wants to use a value, without giving the possibility to the descriptor to modify it. The descriptor can define this variable to empty, to force the programmer to set a value. |
descriptorDefaultVariable | A default value must be specified in the descriptor. The programmer has the ability not to change the value in the program. Nevertheless, if the value is changed in the program, then this new value will have precedence over the one defined in the descriptor. | If the programmer may override the default value, but the responsability of setting a default belongs to the deployer. |
programDefaultVariable | A default value must be specified in the program. The descriptor has the ability not to change the value. Nevertheless, if the value is changed in the descriptor, then this new value will have precedence over the one defined in the program. | If the deployer may override the default value, but the responsability of setting a default belongs to the programmer. |
javaPropertyVariable | Takes the value from the corresponding Java property. | When a variable will only be known at runtime through the Java properties, and no default has to be provided by the descriptor or the application. |
| javaPropertyDescriptorDefault | Takes the value from the corresponding java property. A default value can also be set from the descriptor or the program. If no property is found, the descriptor default value will override the program default value. | When the descriptor sets a default value, that can be overrided at deployment using a java property. |
| javaPropertyProgramDefault | Takes the value from the corresponding java property. A defualt value can also be set from the program or the descriptor. If no property is found, the program default value will override the program default value | When the program sets a default value, than can be overrided at deployment using a java property. |
All variables must be set in a variable section at the beginning of the descriptor file in the following way:
<variables>
<descriptorVariable name="PROACTIVE_HOME" value="ProActive/dist/ProActive"/>
<descriptorDefaultVariable name="NUMBER_OF_VIRTUAL_NODES" value="20"/>
<programVariable name="VIRTUAL_NODE_NAME"/>
<javaPropertyVariable name="java.home"/>
<javaPropertyDescriptorDefault name="host.name" value="localhost"/>
<javaPropertyProgramDefault name="priority.queue"/>
<!-- Include external variables from files-->
<includeXMLFile location="file.xml"/>
<includePropertyFile location="file.properties"/>
</variables>
...
<!-- Usage example-->
<classpath>
<absolutePath value="${USER_HOME}/${PROACTIVE_HOME}/ProActive.jar"/>
...
</classpath>
... XML_LOCATION="/home/user/descriptor.xml";
VariableContract variableContract= new VariableContract();
variableContract.setVariableFromProgram( "VIRTUAL_NODE_NAME", "testnode", VariableContractType.ProgramVariable);
variableContract.setVariableFromProgram( "NUMBER_OF_VIRTUAL_NODES", "10", VariableContractType.DescriptorDefaultVariable);
variableContract.setVariableFromProgram( "priority.queue", "vip", VariableContractType.JavaPropertyProgramDefault);
ProActiveDescriptor pad = ProActive.getProactiveDescriptor(XML_LOCATION, variableContract);
//Usage example
VariableContract vc=pad.getVariableContract;
String proActiveHome=vc.getValue("PROACTIVE_HOME");Is built using XML property tags.
File: file.xml
<!-- Definition of the specific context --> <variables> <descriptorVariable name="USER_HOME" value="/usr/home/team"/> <descriptorVariable name="PROACTIVE_HOME" value="ProActive/dist/ProActive"/> <descriptorVariable name="NUM_NODES" value="45"/> </variables>
This approach uses Sun microsystems properties file format. The format is plain text with one definition per line in the format variable = value, as shown in the following example:
File: file.properties
# Definition of the specific context USER_HOME = /usr/home/team PROACTIVE_HOME = ProActive/dist/ProActive NUM_NODES: 45
Variables defined in this format will be declared as DescriptorVariable type. Note that colon (:) can be used instead of equal (=).
import org.objectweb.proactive.core.xml.VariableContract; import org.objectweb.proactive.core.xml.VariableContractType;
VariableContractType.DefaultVariable
VariableContractType.DescriptorDefaultVariable
VariableContractType.ProgramVariable
VariableContractType.ProgramDefaultVariable
VariableContractType.JavaPropertyVariable
VariableContractType.JavaPropertyDescriptorDefault
VariableContractType.JavaPropertyProgramDefault
The API for setting variables from the Program is shown below. The name corresponds to the variable name, and the value to the variable content. The type corresponds to a VariableContractType.
public void VariableContract.setVariableFromProgram( String name, String value, VariableContractType type); public void VariableContract.setVariableFromProgram( HashMap map, VariableContractType type);
The API for adding a multiple variables is shown above. The variable name/value pair is specified as the key/content of the HashMap.
Currently we provide support for the following type of transfers:
To a remote node (Push)
From a remote node (Pull)
The transfer can take place at any of the following moments:
Deployment Time: At the beggining of the application to input the data.
Retrieval Time: At the end of the application to collect results.
During the user application: To transfer information between nodes.
To achieve this, we have implemented File Transfer support in two ways:
File Transfer API
Descriptor File Transfer support.
import org.objectweb.proactive.filetransfer.*; static public FileVector FileTransfer.pushFile(Node n, File source, File destination); static public FileVector FileTransfer.pushFile(Node n, File[] source, File[] destination); static public FileVector FileTransfer.pullFile(Node n, File source, File destination); static public FileVector FileTransfer.pullFile(Node n, File[] source, File[] destination);
These methods can be used to put and get files on a remote Node while the user's application is running. Note that these methods behave asynchronously, and in the case of the pullFile method, the returned File is a future. For further information on asynchronism and futures, please refer to the Asynchronous calls and futures section of this manual.
In the following example, a Node is deployed using a descriptor file. A file is then pushed from localhost@localSource to nodehost@remoteDest, using the paths specified in a java.io.File type object. Afterwards, a file is pulled from nodehost@remoteSource and saved at localhost@localDest, in the same fashion.
import org.objectweb.proactive.filetransfer.*; pad = ProActive.getProactiveDescriptor(XML_LOCATION); VirtualNode testVNode = pad.getVirtualNode("example"); testVNode.activate(); Node[] examplenode = testVNode.getNodes(); File localSource = new File("/local/source/path/file"); File remoteDest = new File("/remote/destination/path/file"); FileVector filePushed =FileTransfer.pushFile(examplenode[0],localSource, remoteDest); filePushed.waitForAll(); //wait for push to finish File remoteSource = new File("/remote/source/path/file"); File localDest = new File("/local/destination/path/file"); FileVector filePulled = FileTransfer.pullFile(examplenode[0], remoteSource, localDest); File file = filePulled.getFile(0); //wait for pull to finish
File Transfers can also be specified using ProActive Descriptors. The main advantage of this scheme is that it allows deployment and retrieval of input and output (files). In this section we will concentrate on mainly three topics:
XML Descriptor File Transfer Tags
Deployment File Transfer
Retrieval File Transfer
The File Transfer related tags, are placed inside the descriptor at three different parts (or levels).
The first one corresponds to the fileTransferDefinitions tag, which contains a list of FileTransfer definitions. A FileTransfer definition is a high level representation of the File Transfer, containing mainly the file names. It is created in such a way, that no low level information such as: hosts, protocols, prefix is present (this is the role of the low level representation). The following example shows a FileTranfer definition named example:
.... </deployment> <fileTransferDefinitions> <fileTransfer id="example"> <file src="hello.dat" dest="world.dat"/> <file src="hello.jar" dest="world.jar"/> <file src="hello.class" dest="world.class"/> <dir src="exampledir" dest="exampledir"/> </fileTransfer> <fileTransfer id="anotherExample"> ... </fileTransfer> ... </fileTransferDefinitions> <infrastructure> ....
The FileTransfer definitions can be referenced through their names, from the VirtualNode tags using two attributes:fileTransferDeploy and fileTransferRetrieve. The first one, corresponds to the file transfer that will take place at deployment time, and the second one corresponds to the file transfer that the user will trigger once the user application is done.
<virtualNode name="exampleVNode" fileTransferDeploy="example" fileTransferRetrieve="example"/>
All the low level information such as: hosts, username, protocols, prefix, etc... is declared inside each process. Both fileTransferDeploy and fileTransferRetrieve are specified separetly using a refid attribute. The refid can be a direct reference to a FileTransfer definition, or set using the keyword implicit. If implicit is used, then the reference will be inherited from the corresponding VirtualNode. In the following example both mechanisms (Deploy and Retrieve) reference indirectly and directly the example definition:
<processDefinition id="xyz">
<sshProcess>
...
<!-- Inside the process, the FileTransfer tag becomes an element instead of
an attribute. This happens because FileTransfer information is process specific.
Note that the destination hostname and username can be omitted,
and implicitly inferred from the process information. -->
<fileTransferDeploy refid="implicit"> <!-- referenceID or keyword "implicit" (inherit)-->
<copyProtocol>processDefault, rcp, scp, pft</copyProtocol>
<sourceInfo prefix="/home/user"/>
<destinationInfo prefix="/tmp" hostname="foo.org" username="smith" />
</fileTransferDeploy>
<fileTransferRetrieve refid="example">
<sourceInfo prefix="/tmp"/>
<destinationInfo prefix="/home/user"/>
</fileTransferRetrieve>
</sshProcess>
</processDefinition>
In the example above, fileTransferDeploy has an implicit refid. This means that the File Transfer definitions used will be inherited from the VirtualNode. The first element shown inside this tag corresponds to copyProtocol. The copyProtocol tag specified the sequence of protocols that will be executed to achieve the FileTransfer at deployment time. Notice the processDefault keyword, which specifies the usage of the default copy protocol associated with this process. In the case of the example, this corresponds to an sshProcess and therefore the Secure Copy Protocol (scp) will be tried first. To complement the higher level File Transfer definition, other information can be specified as attributes in the sourceInfo and destinationInfo elements. For the case of FileTransferDeploy, these tags currently correspond to: prefix, hostname and username.
For fileTransferRetrieve, no copyProtocol needs to be specified. ProActive will use it's internal mechanism to transfer the files. This implies that no hostname or username are required.
pftp (ProActive File Transfer Protocol)
scp (ssh processDefault)
rcp (rsh processDefault)
unicore (Unicore processDefault)
nordugrid (Nordugrid processDefault)
The trigger (start) of the File Transfer will take place when the deployment of the descriptor file is executed. In the case of external protocols (scp, rcp), this will take place before the process deployment. In the case of internal protocols (unicore, nordugrid), this will take place with the process deployment. In any case, it should be noted that intersting things can be achieved, such as transfering the ProActive libraries into the deploying machine using an on-the-fly style. This means that it is possible to deploy on remote machines without having ProActive pre-installed. Even further, when the network allows, it is also possible to transfer other required libraries like the JRE (Java Runtime Envirorment).
There is one protocol that behaves differently from the rest, the ProActive FileTransfer Protocol (pftp). The pftp uses the ProActive FileTranfer API (described earier), to transfer files between nodes. The main advantage of using the pftp is that no external copy protocols are required to transfer files at deployment time. Therefore, if the grid infrastructure does not provide a way to transfer files, a FileTransfer Deploy can still take place using the pftp. On the other hand, the main drawback of using pftp is that ProActive must already be install on the remote machines, and thus on-the-fly deployment is not possible.
Since distributed application's termination is difficult to detect. The responsability of triggering the deployment corresponds to the user. To achieve this, we have provided a specific mehod that will trigger the retrieval of all files associated with a VirtualNode.
import org.objectweb.proactive.core.descriptor.data; public FileWrapper VirtualNode.fileTransferRetrieve();
This will trigger the retrieval of all the files specified in the descriptor, from all the nodes that were deployed using this virtual node using the pftp. The following shows an example:
import org.objectweb.proactive.core.descriptor.data; pad = ProActive.getProactiveDescriptor(XML_LOCATION); VirtualNode testVNode = pad.getVirtualNode("example"); testVNode.activate(); Node[] examplenode = testVNode.getNodes(); ... FileWrapper fw = testVNode.fileTransferRetrieve(); ... File f[]=fw.getFiles() //wait-for-files to arrive
As a result of calling this method an array of type File[] will be created, representing all the retrieved files.
This section provides internal details and information on how the File Transfer is implemented. Reading the following section to use the File Transfer mechanisms provided by ProActive is not necessary.
This definitions can be referenced from a VirtualNode. They contain the most basic information of a FileTransfer:
A unique definition identification name.
Files: source and optionally the destination name.
Directories: source and optionally the destination name. Also the exclude and include patterns (not yet available feature).
References from the VirtualNode are made using the unique definition name.
These definitions contain more architecture specific information, and are therefore contained within the Process:
A reference to an abstract definition, or the "implicit" key word indicating the reference will be inherited from the VirtualNode.
A sequence of Copy Protocols that will be used.
Source and Destination information: prefix, username, hostname, file separator, etc...
If some of this information (like username or hostname) can be inferred from the process, it is not necessary to declare it in the definition. Optionally, the information contained in the protocol can be overridden if specified.
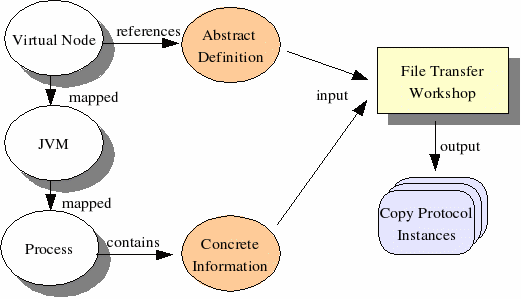
When a FileTransfer starts, both abstract and concrete information are merged using the FileTransfer Workshop. The result of this process correspons to a sequence of CopyProtocols, as specified in the Concrete Definition.
Each CopyProtocol will be tried before the deployment takes place, until one succeeds. After one succeed are all fail, the process deployment will take place.
The File Transfer API is built on top of ProActive's active object and future file asynchronism model. When pulling or pushing a file from a Node, two service Active Objects (AO) are created. One is placed on the local machine and the otherone on the remote site. The file is then split into blocks, and transfered over the network using remote invocations between these two AO.
ProActive allows users to tunnel all of their RMI or HTTP communications over SSH: it is possible to specify in ProActive deployment descriptors which JVMs should export their RMI objects through a SSH tunnel.
This kind of feature is useful for two reasons:
it might be necessary to encrypt the RMI communications to improve the RMI security model.
the configuration of the network in which a given ProActive application is deployed might contain firewalls which reject or drop direct TCP connections to the machines which host RMI objects. If these machines are allowed to receive ssh conections over their port 22 (or another port number), it is possible to multiplex and demultiplex all RMI connections to that host through its ssh port.
To successfully use this feature with reasonable performance, it is mandatory to understand:
the configuration of the underlying network: location and configuration of the firewalls.
the communication patterns of the underlying ProActive runtime: which JVM makes requests to which JVMs.
the communication patterns of your ProActive objects: which object makes requests to which object. For example: A -> B, B -> C, A ->C
No two networks are alike. The only thing they share is the fact that they are all different. Usually, what you must look for is:
is A allowed to open a connection to B?
is B allowed to open a connection to A? (networks are rarely symetric)
If you use a TCP or a UDP-based communication protocol (ie: RMI is based on TCP), these questions can be translated into 'what ports on B is A allowed to open a connection to?'. Once you have answered this question for all the hosts used by your application, write down a small diagram which outlines what kind of connection is possible. For example:
Firewall Firewall
| * * |
| ----> Internet <---- |
A | <---- ----> | B
| 22 22 |
This diagram summarizes the fact that host A is protected by a firewall which allows outgoing connections without control but allows only incoming connections on port 22. Host B is also protected by a similar firewall.
To execute a ProActive application, you need to 'deploy' it. Deployment is performed by the ProActive runtime and is configured by the ProActive deployment descriptor of the initial host. During deployment, each newly- created ProActive runtime performs a request to the initial ProActive runtime. The initial runtime also performs at least one request on each of these distant runtime.
This 2-way communication handshake makes it necessary to correctly configure the network to make sure that the filtering described above does not interfere with the normal operation of the ProActive runtimes.
Once an application is properly deployed, the application objects deployed by the ProActive runtime start making requests to each other. It is important to properly identify what object connects to what object to identify the influence of the network configuration on these communication patterms.
Whenever a request is made to a non-local ProActive object, this request is performed with the communication protocol specified by the destination JVM. Namely, each JVM is characterized by a a unique property named proactive.communication.protocol which is set to one of:
rmi
http
rmissh
ibis
jini
This property uniquely identifies the protocol which is used by each client of the JVM to send data to this JVM. To use different protocols for different JVMs, two solutions exist:
one is to edit the ProActive deployment descriptors and to pass the property as a command-line option to the JVM:
<jvmProcess class='org.objectweb.proactive.core.process.JVMNodeProcess'/> .... <jvmParameters> <parameter value='-Dproactive.communication.protocol=rmissh'/> </jvmParameters> ... </jvmProcess>the other one is to set in the ProActive Configuration file(introduced in a previous chapter) on the remote host the property proactive.communication.protocol to the desired protocol
<prop key='proactive.communication.protocol' value='rmissh'/>
Finally, if you want to set this property on the initial deployment JVM (the JVM that starts the application), you will need to specify the -Dproactive.communication.protocol=rmissh argument yourself on the JVM command line.
This protocol is a bit special because it keeps a lot of compatibility with the rmi protocol and a lot of options are available to 'optimize' it.
This protocol can be used to automatically tunnel all RMI communications through SSH tunnels. Whenever a client wishes to access a distant rmissh server, rather than connecting directly to the distant server, it first creates a SSH tunnel (so-called port-forwarding) from a random port locally to the distant server on the distant host/port. Then, all it has to do to connect to this server is to pretend this server is listening on the local random port choosen by the ssh tunnel. The ssh daemon running on the server host receives the data for this tunnel, decapsulates it and forwards it to the real server.
Thus, whenever you request that a JVM be accessed only through rmissh (namely, whenever you set its proactive.communication.protocol to rmissh), you need to make sure that an ssh daemon is running on its host. ProActive uses the jsch client ssh library to connect to this daemon.
The properties you can set to configure the behavior of the ssh tunneling code are listed below. All these properties are client-side properties:
proactive.ssh.port: the port number on which all the ssh daemons to which this JVM must connect to are expected to listen. If this property is not set, the default is 22.
proactive.ssh.username: Two possible syntaxes: username alone .e.g. proactive.ssh.username=jsmith, it represents the username which will be used during authentication with all the ssh daemons to which this JVM will need to connect to.
Or you can use the form proactive.ssh.username=username1@machine1;username2@machine2;...;usernameN@machineN. Note that several usernames without machine's names is not allowed and won't be parsed properly.
If this property is not set, the default is the user.name java property.
proactive.ssh.known_hosts: a filename which identifies the file which contains the traditional ssh known_hosts list. This list of hosts is used during authentication with each ssh daemon to which this JVM will need to connect to. If the host key does not match the one stored in this file, the authentication will fail. If this property is not set, the default is System.getProperty ('user.home') + '/.ssh/known_hosts'
proactive.ssh.key_directory: a directory which is expected to contain the pairs of public/private keys used during authentication. the private keys must not be encrypted. The public keys filenames must match '*.pub'. Private keys are ignored if their associated public key is not present. If this property is not set, the default is System.getProperty ('user.home') + '/.ssh/'
proactive.tunneling.try_normal_first: if this property is set to 'yes', the tunneling code always attempts to make a direct rmi connection to the remote object before tunneling. If this property is not set, the default is not to make these direct-connection attempts. This property is especially useful if you want to deploy a number of objects on a LAN where only one of the hosts needs to run with the rmissh protocol to allow hosts outside the LAN to connect to this frontend host. The other hosts located on the LAN can use the try_normal_first property to avoid using tunneling to make requests to the LAN frontend.
proactive.tunneling.connect_timeout: this property specifies how long the tunneling code will wait while trying to establish a connection to a remote host before declaring that the connection failed. If this property is not set, the default value is 2000ms.
proactive.tunneling.use_gc: if this property is set to 'yes', the client JVM does not destroy the ssh tunnels as soon as they are not used anymore. They are queued into a list of unused tunnels which can be reused. If this property is not set or is set to another value, the tunnels are destroyed as soon as they are not needed anymore by the JVM.
proactive.tunneling.gc_period: this property specifies how long the tunnel garbage collector will wait before destroying a unused tunnel. If a tunnel is older than this value, it is automatically destroyed. If this property is not set, the default value is 10000ms.
Note that the use of SSH tunneling over RMI still allows dynamic classloading through HTTP. For the dynamic classloading our protocol creates an SSH tunnel over HTTP, in order to get missing classes. It is also important to notice that all you have to do in order to use SSH tunneling is to set the proactive.communication.protocol property to rmissh and to use the related properties if needed(in major cases default behavior is sufficient), ProActive takes care of everything else.
ProActive can provide fault-tolerance capabilities through two differents protocols: a Communication-Induced Checkpointing protocol (CIC) or a pessimistic message logging protocol (PML). Making a ProActive application fault-tolerant is fully transparent; active objects are turned fault-tolerant using Java properties that can be set in the deployment descriptor (see Chapter 21, XML Deployment Descriptors). The programmer can select at deployment time the most adapted protocol regarding the application and the execution environment.
Persistence of active objects is obtained through standard Java serialization; a checkpoint thus consists in an object containing a serialized copy of an active object and few informations related to the protocol. As a consequence, a fault-tolerant active object must be serializable.
Each active object in a CIC fault-tolerant application have to checkpoint at least every TTC (Time To Checkpoint) seconds. When all the active objects have taken a checkpoint, a global state is formed. If a failure occurs, the entire application must restarts from such a global state. The TTC value depends mainly on the assessed frequency of failures. A little TTC value leads to very frequent global state creation and thus to a little rollback in the execution in case of failure. But a little TTC value leads also to a bigger overhead between a non-fault-tolerant and a fault-tolerant execution. The TTC value can be set by the programmer in the deployment descriptor.
The failure-free overhead induced by the CIC protocol is usually low, and this overhead is quasi-independent from the message communication rate. The counterpart is that the recovery time could be long since all the application must restart after the failure of one or more active object.
Each active object in a PML fault-tolerant application have to checkpoint at least every TTC seconds and all the messages delivered to an active object are logged on a stable storage. There is no need for global synchronization as with CIC protocol, each checkpoint is independent: if a failure occurs, only the faulty process have to recover from its latest checkpoint. As for CIC protocol, the TTC value impact the global failure-free overhead, but the overhead is more linked to the communication rate of the application.
Regarding the CIC protocol, the PML protocol induces a higher overhead on failure-free execution, but the recovery time is lower as a single failure does not involve all the system.
Warning: For the version 3.0, those two protocols are not compatible: a fault-tolerance application can use only one of the two protocols. This compatibility will be provide in the next version.
To be able to recover a failed active object, the fault-tolerance system must have access to a resource server. A resource server is able to return a free node that can host the recovered active object.
A resource server is implemented in ProActive in
ft.servers.resource.ResourceServer. This server can
store free nodes by two differents way:
at deployment time: the user can specify in the deployment descriptor a resource virtual node. Each node mapped on this virtual node will automaticaly register itself as free node at the specified resource server.
at execution time: the resource server can use an underlying p2p network (see Chapter 35, ProActive Peer-to-Peer Infrastructure) to reclaim free nodes when a hosting node is needed.
Note that those two mechanisms can be combined. In that case, the resource server first provides node registered at deployment time, and when no more such nodes are available, the p2p network is used.
Fault-tolerance mechanism needs servers for the checkpoints
storage, the localization of the active objects, and the failure
detection. Those servers are implemented in the current version as a
unique server (ft.servers.FTServer), that implements
the interfaces of each server (ft.servers.*.*). This
global server also includes a resource server.
This server is a classfile server for recovered active objects. It must thus have access to all classes of the application, i.e. it must be started with all classes of the application in its classpath.
The global fault-tolerance server can be launched using the
ProActive/scripts/[unix|windows]/FT/startGlobalFTServer.[sh|bat]
script, with 5 optional parameters:
the protocol:
-proto [cic|pml]. Default value iscic.the server name:
-name <serverName>. The default name is FTServer.the port number:
-port <portNumber>. The default port number is 1100.the fault detection period:
-fdperiod <periodInSec>. This value defines the time between two consecutive fault detection scanning. The default value is 10 sec. Note that an active object is considered as faulty when it becomes unreachable, i.e. when it becomes unable to receive a message from another active object.the URL of a p2p service (see Chapter 35, ProActive Peer-to-Peer Infrastructure) that can be used by the resource server:
-p2p <serviceURL>. There is no default value for this option.
The server can also be directly launched in the java source code,
using
org.objectweb.proactive.core.process.JVMProcessImpl
class:
GlobalFTServer server = new JVMProcessImpl(
new org.objectweb.proactive.core.process.AbstractExternalProcess.StandardOutputMessageLogger());
this.server.setClassname('org.objectweb.proactive.core.body.ft.servers.StartFTServer');
this.server.startProcess();Note that if one of the servers is unreachable when a fault-tolerant application is deploying, fault-tolerance is automatically and transparently disabled for all the application.
Fault-tolerance capabilities of a ProActive application are set in
the deployment descriptor, using the faultTolerance
service. This service is attached to a virtual
node: active objects that are deployed on this virtual node
are turned fault-tolerant. This service must first defines the protocol
that have to be used for this application. The user can select the
appropriate protocol with the entry <protocol
type='[cic|pml]'/> in the definition of the service.
The service also defines servers URLs:
<globalServer url='...'/>set the URL of a global server, i.e. a server that implements all needed methods for fault-tolerance mechanism (stable storage, fault detection, localization). If this value is set, all others URLs will be ignored.<checkpointServer url='...'/>set the URL of the checkpoint server, i.e. the server where checkpoints are stored.<locationServer url='...'/>set the URL of the location server, i.e. the server responsible for giving references on failed and recovered active objects.<recoveryProcess url='...'/>set the URL of the recovery process, i.e. the process responsible for launching the recovery of the application after a failure.<resourceServer url='...'/>set the URL of the resource server, i.e. the server responsible for providing free nodes that can host a recovered active object.
Finally, the TTC value is set in
fault-tolerance service, using <ttc
value='x'/>, where x is expressed in
seconds. If not, the default value (30 sec) is
used.
Here is an example of deployment descriptor that deploys 3 virtual
nodes: one for deploying fault-tolerant active objects, one for
deploying non-fault-tolerant active object (if needed), and one as
resource for recovery. The two fault-tolerance behaviors correspond to
two fault-tolerance services, appli and
resource. Note that non-fault-tolerant active objects
can communicate with fault-tolerant active objects as usual. Chosen
protocol is CIC and TTC is set to 5 sec for all the application.
<ProActiveDescriptor>
<componentDefinition>
<virtualNodesDefinition>
<virtualNode name='NonFT-Workers' property='multiple'/>
<virtualNode name='FT-Workers' property='multiple' ftServiceId='appli'/>
<virtualNode name='Failed' property='multiple' ftServiceId='resource'/>
</virtualNodesDefinition>
</componentDefinition>
<deployment>
<mapping>
<map virtualNode='NonFT-Workers'>
<jvmSet>
<vmName value='Jvm1'/>
</jvmSet>
</map>
<map virtualNode='FT-Workers'>
<jvmSet>
<vmName value='Jvm2'/>
</jvmSet>
</map>
<map virtualNode='Failed'>
<jvmSet>
<vmName value='JvmS1'/>
<vmName value='JvmS2'/>
</jvmSet>
</map>
</mapping>
<jvms>
<jvm name='Jvm1'>
<creation>
<processReference refid='linuxJVM'/>
</creation>
</jvm>
<jvm name='Jvm2'>
<creation>
<processReference refid='linuxJVM'/>
</creation>
</jvm>
<jvm name='JvmS1'>
<creation>
<processReference refid='linuxJVM'/>
</creation>
</jvm>
<jvm name='JvmS2'>
<creation>
<processReference refid='linuxJVM'/>
</creation>
</jvm>
</jvms>
</deployment>
<infrastructure>
<processes>
<processDefinition id='linuxJVM'>
<jvmProcess
class='org.objectweb.proactive.core.process.JVMNodeProcess'/>
</processDefinition>
</processes>
<services>
<serviceDefinition id='appli'>
<faultTolerance>
<protocol type='cic'></protocol>
<globalServer url='rmi://localhost:1100/FTServer'></globalServer>
<ttc value='5'></ttc>
</faultTolerance>
</serviceDefinition>
<serviceDefinition id='resource'>
<faultTolerance>
<protocol type='cic'></protocol>
<globalServer url='rmi://localhost:1100/FTServer'></globalServer>
<resourceServer url='rmi://localhost:1100/FTServer'></resourceServer>
<ttc value='5'></ttc>
</faultTolerance>
</serviceDefinition>
</services>
</infrastructure>
</ProActiveDescriptor>Persistence of active objects is obtained through standard Java serialization; a checkpoint thus consists in an object containing a serialized copy of an active object and a few informations related to the protocol. As a consequence, a fault-tolerant active object must be serializable. If a non serializable object is activated on a fault-tolerant virtual node, fault-tolerance is automatically and transparently disabled for this active object.
Standard Java thread, typically main method, cannot be turned fault-tolerant. As a consequence, if a standard main method interacts with active objects during the execution, consistency after a failure can no more be ensured: after a failure, all the active objects will roll back to the most recent global state but the main will not.
So as to avoid such inconsistency on recovery, the programmer must minimizes the use of standard main by, for example, delegating the initialization and launching procedure to an active object.
... public static void main(String[] args){ Initializer init = (Initializer)(ProActive.newActive('Initializer.getClas\ s.getName()', args); init.launchApplication(); System.out.println('End of main thread'); } ...
The object init is an active object, and as
such will be rolled back if a failure occurs: the application is kept
consistent.
To keep fault-tolerance fully transparent (see the technical report for more details), active objects can take a checkpoint before the service of a request. As a first consequence, if the service of a request is infinite, or at least much greater than TTC, the active object that serves such a request can no more take checkpoints. If a failure occurs during the execution, this object will force the entire application to rolls back to the beginning of the execution. The programmer must thus avoid infinite method such as
... public void infiniteMethod(){ while (true){ this.doStuff(); } } ...
The second consequence concerns the definition of the
runActivity() method (see runActive).
Let us consider the following example:
... public void runActivity(Body body) { org.objectweb.proactive.Service service = new org.objectweb.proactive.Se\ rvice(body); while (body.isActive()) { Request r = service.blockingRemoveOldest(); ... /* CODE A */ ... /* CHECKPOINT OCCURRENCE */ service.serve(r); } } ...
If a checkpoint is triggered before the service of
r, it characterizes the state of the active object at
the point /* CHECKPOINT OCCURRENCE */. If a failure
occurs, this active object is restarted by calling the
runActivity() method, from a state in which
the code /* CODE A */ has been already
executed. As a consequence, the execution looks like if
/* CODE A */ was executed two times.
The programmer should then avoid to alter the state of an active
object in the code preceding the call to
service.serve(r) when he redefines the
runActivity() method.
All the activities of a fault-tolerant application must be deterministic
(see [BCDH04]
for more details). The programmer must then avoid the use of non-deterministic
methods such as Math.random().
Fault-tolerance in ProActive is still not compliant with the following features:
active objects exposed as Web services (see Chapter 38, Exporting Active Objects and components as Web Services), or reachable using http protocol,
and security (see Chapter 37, ProActive Security Mechanism), as fault-tolerance servers are implemented using standard RMI.
You can find in
ProActive/scripts/[unix|windows]/ft/nbodyft.[sh|bat]
a script that starts a fault-tolerant version of the ProActive
NBody example. This script actually call the
ProActive/scripts/[unix|windows]/nbody.[sh|bat]
script with the option -displayft. The java source
code is the same as the standard version. The only difference is the
'Execution Control' panel added in the graphical interface, which allows
the user to remotely kill Java Virtual Machine so as to trigger a
failure by sending a killall java signal. Note that
this panel will not work with Windows operating system, since the
killall does not exist. But a failure can be
triggered for example by killing the JVM process on one of the
hosts.

This snapshot shows a fault-tolerant execution with 8 bodies on 3 different hosts. Clicking on the 'Execute' button will trigger the failure of the host called Nahuel and the recovery of the 8 bodies. The checkbox Show trace is checked: the 100 latest positions of each body are drawn with darker points. These traces allow to verify that, after a failure, each body finally reach the position it had just before the failure.
Before starting the fault-tolerant body example, you have to edit
the ProActive/descriptors/FaultTolerantWorkers.xml
deployment descriptor so as to deploy on your own hosts (HOSTNAME), as follow:
...
<processDefinition id='jvmAppli1'>
<rshProcess
class='org.objectweb.proactive.core.process.rsh.RSHJVMProcess'
hostname='HOSTNAME'>
<processReference refid='jvmProcess'/>
</rshProcess>
</processDefinition>
...Of course, more than one host is needed to run this example, as failure are triggered by killing all Java processes on the selected host.
The deployment descriptor must also specify the GlobalFTServer
location as follow, assuming that the script
startGlobalFTServer.sh has been started on the host
SERVER_HOSTAME:
...
<services>
<serviceDefinition id='appli'>
<faultTolerance>
<protocol type='cic'></protocol>
<globalServer
url='rmi://SERVER_HOSTAME:1100/FTServer'></globalServer>
<ttc value='5'></ttc>
</faultTolerance>
</serviceDefinition>
<serviceDefinition id='ressource'>
<faultTolerance>
<protocol type='cic'></protocol>
<globalServer
url='rmi://SERVER_HOSTAME:1100/FTServer'></globalServer>
<resourceServer
url='rmi://SERVER_HOSTAME:1100/FTServer'></resourceServer>
<ttc value='5'></ttc>
</faultTolerance>
</serviceDefinition>
</services>
...Finally, you can start the fault-tolerant ProActive NBody and choose the version you want to run:
~/ProActive/scripts/unix/FT> ./nbodyFT.sh
Starting Fault-Tolerant version of ProActive NBody...
--- N-body with ProActive ---------------------------------
**WARNING**: $PROACTIVE/descriptors/FaultTolerantWorkers.xml MUST BE SET \
WITH EXISTING HOSTNAMES !
Running with options set to 4 bodies, 3000 iterations, display true
1: Simplest version, one-to-one communication and master
2: group communication and master
3: group communication, odd-even-synchronization
4: group communication, oospmd synchronization
5: Barnes-Hut, and oospmd
Choose which version you want to run [12345]:
4
Thank you!
--> This ClassFileServer is reading resources from classpath
Jini enabled
Ibis enabled
Created a new registry on port 1099
//tranquility.inria.fr/Node-157559959 successfully bound in registry at //t\
ranquility.inria.fr/Node-157559959
Generating class: pa.stub.org.objectweb.proactive.examples.nbody.common.St\
ub_Displayer
************* Reading deployment descriptor: file:./../../.././descriptors/\
FaultTolerantWorkers.xml ********************For effective components, non-functional aspects must be added to the application functional code. Likewise enterprise middleware and component platforms, in the context of Grids, services must be deployed at execution in the component containers in order to implement those aspects. This work proposes an architecture for defining, configuring, and deploying such Technical Services in a Grid platform.
A technical service is a non-functional requirement that may be dynamically fulfilled at runtime by adapting the configuration of selected resources.
From the programmer point of view, a technical service is a
class that implements the
TechnicalService
interface. This class defines how to configure a node.
package org.objectweb.proactive.core.descriptor.services; public interface TechnicalService { public void init(HashMap argValues); public void apply(Node node); }
From the deployer point of view, a technical service is a set of ”variable-value” tuples, each of them configuring a given aspect of the application environment.
<technical-service id="myService" class="services.Service1"> <arg name="name1" value="value1" /> <arg name="name2" value="value2" /> </technical-service>
The class attribute defines the implementation of the
service, a class which must implement the
TechnicalService
interface.
The configuration parameters of the service are specified by
arg
tags in the deployment descriptor. Those parameters are
passed to the
init
method as a map associating the name of a parameter as a key
and its value. The
apply
method takes as parameter the node on which the service must
be applied. This method is called after the creation or
acquisition of a node, and before the node is used by the
application.
| Note |
|---|---|
Two or several technical services could be combined if they touch separate aspects. Indeed, two different technical services, which are conceptually orthogonal, could be incompatible at source code level .
That is why a virtual node can be configured by only
one
technical service. However, combining two technical
services can be done at source code level, by providing
a class extending
|
<ProActiveDescriptor> <componentDefinition> <virtualNodesDefinition> <virtualNode name="master" property="multiple" serviceRefid="ft-master" /> <virtualNode name="slaves" property="multiple" serviceRefid="ft-slaves" /> </virtualNodesDefinition> </componentDefinition> ... <infrastructure> <processes> <processDefinition id="localJVM"> <jvmProcess class="JVMNodeProcess" /> </processDefinition> </processes> <aquisition> <aquisitionDefinition id="p2pservice"> <P2PService nodesAsked="100000"> <peerSet> <peer>rmi://registry1:3000</peer> </peerSet> </P2PService> </acquisitionDefinition> </services> </infrastructure> <technicalServiceDefinitions> <service id="ft-master" class="services.FaultTolerance"> <arg name="proto" value="pml" /> <arg name="server" value="rmi://host/FTServer1" /> <arg name="TTC" value="60" /> </service> <service id="ft-slaves" class="services.FaultTolerance"> <arg name="proto" value="cic" /> <arg name="server" value="rmi://host/FTServer2" /> <arg name="TTC" value="600" /> </service> </technicalServiceDefinitions> </ProActiveDescriptor>
In order to help programmers for implementing their owns technical services, we have added a property system to the nodes. This is usefull for configuring technical services.
Get the current node:
Node localNode = ProActive.getNode();
Using properties:
String myProperty = localNode.getProperty(myKeyAsString);
localNode.setProperty(myKeyAsString, itsValueAsString);
The seminal paper [ CDD06c ] .
The first presentation of this work is available here .
The work of this paper [ CCDMCompFrame06 ] is based on Technical Services.
The Scheduler is a service used to enhance the user's experience to the proActive environment. A scheduler is created to administer the deployment and the maintenance of a list of jobs over various platforms and infrastructure (Grid or P2P infrastructure) following one of many set of rules regarding the job management. In addition to this, the scheduler offers a shell based command submitter and is integrated in IC2D to enable an ease of interactions. In this chapter, we will expose how the scheduler works, what policies govern the job manipulation, how to create a job and how to get the jobs and the nodes state using either a shell based command submitter or the IC2D GUI.
The scheduler service is the result of a collaboration between 3 active objects (Scheduler, Job Manager, and Ressource Manager) each of wich has its own functionality. The Scheduler object is the main object and is a non GUI daemon that is connected to a job and a ressource management objects. The job management class (class that extends from AbstractPolicy) contains a set of guidelines, a policy, upon which the jobs will be served. You can choose from one of the following policies: a time policy serving the fastest jobs first, a space policy serving the smallest jobs or the ones that need the least number of ressources, a FIFO policy and a composite policy of the previously mentioned policies. The job management object also maintains a description of all the jobs and monitors the deployment of all the jobs. It communicates with the ressource management object (RessourceManager) for the node allocation and disallocation and receives queing orders and job status notification requests from the main scheduler object.
When a job is submitted (see below for the definition of a scheduler job Section 27.2.1, “Job creation”), it is first parsed to extract its information and then balanced to the job manager which adds it to the waiting queue. As precised before, the job manager refers to a policy and to the availability of the needed ressources (ressource manager) to choose the job to be served and to deploy the job on one of the reserved nodes. Once deployed, the job gets the nodes reserved from the scheduler by calling the ProActiveDescriptor activate() method and then the getVirtualNode("VNName") method. The job manager also deploys an agent on the main node to keep track of the deployed job and to set the system properties of the VM. It will also keep pinging this AO to ensure that the job is still alive.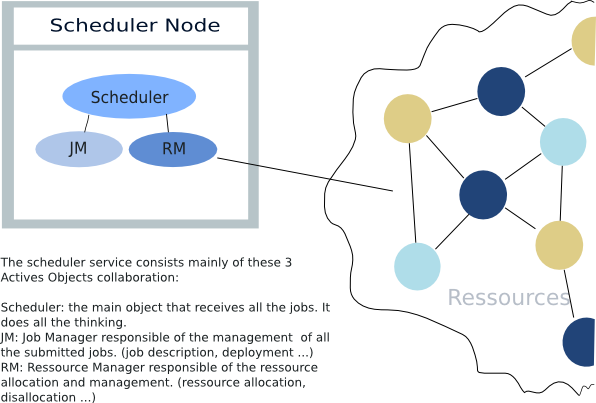
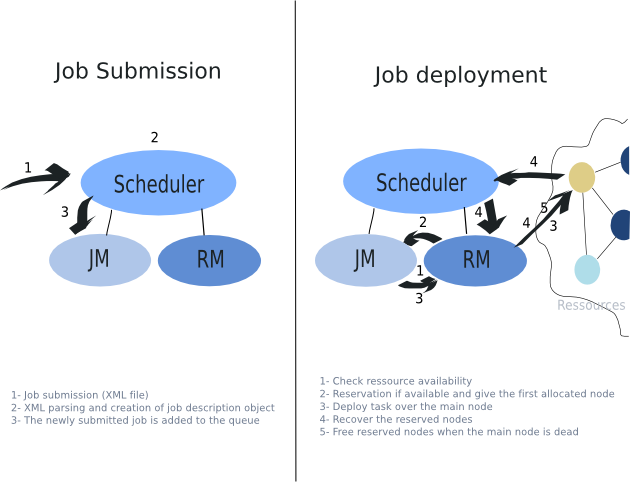
There are, for the moment, 4 policies that are used by the job manager of which we distinguish:
FIFO Policy: is the traditional policy that serves the submitted jobs in the same order of their submittal.
Time Policy: serves the fastest jobs first, the ones that are estimated to occupy the ressources with the less amount of possible time.
Space Policy: serves the smallest jobs, the ones that need the smallest number of ressources. If, by any chance, we find more than one job with the same amount of needed ressources, the oldest job in the queue is served first.
Mixed Policy: any combination of the precited policies.
The job creation doesn't differ much from the normal code written with ProActive. The main difference is that all the jobs must implement an interface containing the definition of the main constants. We'll see, shortly, a brief example of a job but first we need to know about the definition of a job in ProActive. A job is a combination of a main class (or a jar package) and a descriptor deployment file. The descriptor file contains all the needed information for the deployment. The most important part for the submission of a job is the main definition part that shouldn't be forgotten.
<mainDefinition id="main" class="org.objectweb.proactive.scheduler.jobTemplate.Hello"> <arg value="param1"/> <arg value="param2"/> <mapToVirtualNode value="schedulervn"/> <classpath> <absolutePath value="test/classes/" /> <absolutePath value="test/src/" /> </classpath> </mainDefinition>
Here is the main class definition: we mention the name of the class and enumerate all the main parameters as well as the mapping to the main Virtual Node and an optional new tag that can help you launch a job if its not resident in the actual class path of the scheduler. The definition of the Virtual node is done in the same manner as for any job description with the difference of an acquisition method instead of a creation one:
<jvm name="Jvm1"> <acquisition> <serviceReference refid="ProactiveScheduler"/> </acquisition> </jvm> ... <serviceDefinition id="ProactiveScheduler"> <ProActiveScheduler numberOfNodes="2" minNumberOfNodes="1" schedulerUrl="rmi://localhost:1234" jvmParameters="-Dname=value"/> </serviceDefinition>
In the service definition part we see that we want to contact the ProActiveScheduler service with the following attribute tags:
numberOfNodes: the number of nodes gives an estimate of the maximum number of nodes needed
minNumberOfNodes: the minimum number of node is an optional attribut that is used to refer that the application may begin if the minimum amount of needed ressources is satisfied.
schedulerUrl: is the scheduler url to make sure that we can effectively contact the scheduler and get the reserved nodes in the activation part of the program
jvmParameters: are the system properties of the main JVM.
To follow: startDate, priority, estimatedTime ....
This is a complete example of the xml prototype of the job_template.xml:
<?xml version="1.0" encoding="UTF-8"?> <ProActiveDescriptor xmlns:xsi="http://www.w3.org/2001/XMLSchema-instance" xsi:noNamespaceSchemaLocation= "http://www-sop.inria.fr/oasis/proactive/schema/3.2/DescriptorSchema.xsd"> <mainDefinition id="main" class="org.objectweb.proactive.scheduler.jobTemplate.Hello"> <arg value="param1"/> <arg value="param2"/> <mapToVirtualNode value="schedulervn"/> <classpath> <absolutePath value="test/classes/" /> <absolutePath value="test/src/" /> </classpath> </mainDefinition> <componentDefinition> <virtualNodesDefinition> <virtualNode name="schedulervn" property="multiple" /> </virtualNodesDefinition> </componentDefinition> <deployment> <mapping> <map virtualNode="schedulervn"> <jvmSet> <vmName value="Jvm1"/> </jvmSet> </map> </mapping> <jvms> <jvm name="Jvm1"> <acquisition> <serviceReference refid="ProactiveScheduler"/> </acquisition> </jvm> </jvms> </deployment> <infrastructure> <services> <serviceDefinition id="ProactiveScheduler"> <ProActiveScheduler numberOfNodes="2" minNumberOfNodes="1" schedulerUrl="rmi://localhost:1234" jvmParameters="-Dname=value"/> </serviceDefinition> </services> </infrastructure> </ProActiveDescriptor>
Attention: It's banned the use of currentJVM tag.
Next we need to create the program that we need to execute on the remote nodes:
public class Hello implements java.io.Serializable, org.objectweb.proactive.scheduler.JobConstants { public static void main(String[] args) throws Exception { // get the complete path of the xml descriptor file on the remote node String xmlFile = System.getProperty(XML_DESC); // Access the nodes of the descriptor file ProActiveDescriptor descriptorPad = ProActive.getProactiveDescriptor(xmlFile); descriptorPad.activateMappings(); // get the reserved nodes VirtualNode vnode = descriptorPad.getVirtualNode("schedulervn"); Node[] nodes = vnode.getNodes(); ... ... // wait for the job to finish and do the cleaning of the active objects if not // the scheduler ensures the cleaning implicitly ... ... // exit the program System.exit(); } }
This is a short sample of the job that shall run on the scheduler. As you may have noticed, there is nothing new except for the first line. The thing is that we do not need to set the complete XML path. The scheduler takes care of the file transfert of the XML Deployment descriptor to the remote node and sets automatically the system property of the complete XML path on the remote node prior to the activation.
As you may have noticed, there is no difference with the current example except for the System.getProperty() call.
There are lots of scripts in the schduler directory in the unix directory of the scripts directory of the ProActive library.
ProActive/scripts/unix/scheduler/
If you want you can call from the terminal after launching the scheduler one of the following scripts that shall launch either the:
Simple hello world program that creates one Virtual Node containing 2 nodes:
$ ./LaunchHello.sh
Simple hello world program that creates 2 VIrtual Nodes containing 1 node:
$ ./LaunchHello2.sh
The C3D application by submitting the renderer to the scheduler and then by adding a new user by the use of the old script in the scripts directory.
$ ./LaunchC3DRenderer.sh $ ../c3d_add_user.sh
There is a shell based program that helps you interact with the scheduler by first connecting to the scheduler daemon. This program offers the basic commands mainly the job submission and deletion, and a view of the status of the jobs (waiting, deployed) and that of the nodes (free, reserved, busy).
You can launch this program using a shell script:
$ProActive/scripts/unix/communicator.sh [schedulerURL]
Or a BAT script under windows:
$ProActive/scripts/windows/communicator.bat [schedulerURL]
You can use this program to start the connection and the interation with the scheduler. You can submit the scheduler URL or else the program connects by default to the following url: "rmi://localhost:1234/SchedulerNode/"
bash-3.00$ ./communicator.sh --- Communicator ---------------------------------------------- [Scheduler] Starting Scheduler command listener --> This ClassFileServer is reading resources from classpath Generating class : pa.stub.org.objectweb.proactive.scheduler.Stub_Scheduler > ? The commands available are: sub, stat, del, nodes, kill, exit >
Once connected you will see a console where you can choose one of the following commands:
stat: this command will give a complete report of all the jobs queued, deployed and finished. We can mention the jobId of the specified job we need to fetch it's proper description ..
> stat [jobId]
nodes: this command will give a complete report of all the nodes freed, reserved and busy. We can mention the nodeURL of the specified node we need to fetch it's proper description and state ..
> nodes [nodeURL]
sub: this command will enable you to post a job by posting the xml description of the job
> sub file_name.xml
del: this command will enable you to delete a job posted by the same user with the given jobId
> del jobId
exit: this command is used to exit the communicator program
> exit
If you are unsure of the command you are using or about how to use it you can always consult the help menu in our program by using the "?" command as follows:
> ? [command name]
This will give you all the available commands that can be used if no command is specified or else it will give you a full descriptor of the command submitted.
All daemon logs are written in a file. All logs are available in:
SchedulerDIR/logs
It is nevertheless possible to use the scheduler API for the allocation and disallocation of the ressources in real time programming. The Scheduler class offers you the possibility to connect to the scheduler daemon using the connectTo(SchedulerURL) method and then allocate the needed ressources using the getNodes(ressourceNb, estimatedTime) which adds the job to the waiting queue like any job that contacts the Scheduler for ressources and then returns a Vector of the reserved nodes. In the end we need to free the reserved nodes by calling the method del(jobId) that frees and cleans all the reserved nodes. We should note here that when the job submits its demand to get some nodes from the scheduler, it is automatically associated with a jobId that we can get by consulting the jobId of one of the reserved nodes like follow: node.getNodeInformation().getJobID(). Below is a complete example of how we can use the API.
public class HelloNoDescriptor implements java.io.Serializable { public static void main(String[] args) throws Exception { // Get the scheduler URL from the main argument and connect to the scheduler String schedulerURL = args[0]; Scheduler scheduler = Scheduler.connectTo(schedulerURL); // demand from the scheduler 1 node and tell it that the estimated time // for the task to finish is about 3 seconds Vector nodes = scheduler.getNodes(1, 3); Node node = (Node) nodes.get(0); ... ... // we should think of freeing the nodes here scheduler.del(mainNode.getNodeInformation().getJobID()); } }
There's a script in the scheduler directory of the scripts directory that shall run this prog:
$ ./HelloNoDescriptor.sh
These are the main methods used to ask for nodes from the scheduler. Next, you will find here a detailed description of all the classes and all their methods and how you could enhance or add certain features to the scheduler.
Here you shall find a detailed explanation about the classes that form the scheduler API. You'll also find out an explanation of the role and methods of each one.
This is the most important part that you should learn first. You can find out here how the jobs are represented in the queue and where the descriptions are saved while queing or deploying the application. In general there are 2 ways of submitting a job to the scheduler service: it's either by submitting a descriptor or by using the API while programming. So there are 2 objects for each kind of submission, the first (GenericJob) offers a mean to store the job's description before adding it to the waiting queue and the second (JobNoDescriptor) will contain a reference to the first object but will also contain a method that will detect the nodes reservation and will return the reserved nodes to the job that's using the API rather than the deployment descriptor. Either way, after the job deployment, the job's description will be part of a new object (DeployedTask) along with an agent object responsible of keeping track, in the case of a deployment, and changing the system properties of the main node. And we created an interface called JobConstants in which we keep the constants to help the programmer and to ensure the simplicity of the creation of the programs that shall be submitted to the scheduler.
This class includes the definition and description of the tasks and mainly contains some setters and getters. You'll find these attributes
"classname" of the class to be run
"priority" of the job
"userId" is the id of the user who posted the job.
"submitDate" gives the date when the task was submitted.
"mainParameters" contains the parameters that should be submitted to the job when starting it.
"ressourceNb" indicates the number of processors needed to execute this job.
"estimatedTime" gives an estimate of the time to finish the task.
"xmlName" gives a mean to store the path to the deployment descriptor if present.
"startDate" is the date when the job should start execution
"jobId" is the id of the job
"jvmParameters" is the JVM system properties of the main node
"jobStatus" is the status of the job. It can take one of the following values: queued, deployed, finished
"classPath" offers the class paths of the main node
"minRessourceNb" is an optional field that, if set, indicates the minimum required ressource to enable the job to run
This is the class that supports the jobs that have no XML descriptor API. They use directly the Scheduler API to get nodes. In short when a job with no decriptor submits its demand to reserve a certain amount of ressources, this causes the generation of a GenericJob object that will be added to the queue like any normal job and of an active object of this class that shall throw the allocated nodes as soon as he detects their reservation before we dispose of his services.
getNodes(): This method is used to detect the node reservation event and to help fetch those reserved nodes. Returns a vector of all the reserved nodes.
public Vector getNodes();
runActivity(): The runActivity is reimplemented to stop the service and to destroy the active object after the getNodes method is called.
public void runActivity(Body body);
Class that contains the description of the task and the reference to an agent that keeps track of the job evolution. This agent helps setting the main JVM system properties as well a simple method to make sure that this node stays alive (the ping() method, an empty method to ensure that the main node is still alive).
getTaskDescription(): returns the GenericJob associated to this deployed job.
public GenericJob getTaskDescription();
isAlive(): this method is a sort of pinging method. It gives the status of the main node (alive or dead). Returns true if the main node is alive, false otherwise.
public BooleanWrapper isAlive();
The queue class offers a mean of queueing the jobs. It contains a HashMap in which every GenericJob object created will be stored after associating it with a jobId. In short this class keeps the main methods used for the HashMap namely:
size(): Returns the number of the waiting jobs.
public int size();
containsId(jobId): tests the existence of the job with the specified jobId.
public boolean containsId(String jobIds);
put(job): Inserts the job to the queue and gives it an Id. If the queue is full then this method throws a QueueFullException.
public void put(GenericJob task) throws QueueFullException;
keySet(): Gives a list of the IDs of the waiting jobs.
public Set keySet();
get(jobId): Returns the job associated with the job Id.
public GenericJob get(String jobId);
remove(jobId): Removes and returns the job associated with the job Id from the queue.If there is no job associated to this jobId then this method returns null.
public GenericJob remove(String jobId);
isEmpty(): true if the queue is empty, false otherwise.
public boolean isEmpty();
values(): returns a collection of the genericJob description
public Collection values();
The job manager is an object that acts upon a policy to serve the waiting jobs. In general we dispose of an abstract class (AbstractPolicy) that contains all the essential tools for the job managers to run. Mainly, the insertion and deployement of tasks, and an abstract comparer that should be redefined in the specific policies.
sub(job): Insert the job's description object in the queue.
public BooleanWrapper sub(GenericJob task);
del(jobId): Deletes the job from the queue and stops it if it has already been launched.
public BooleanWrapper del(String jobId);
stat(jobId): Gives description of all the jobs that are curently running in forms of a Vector if no specific id is specified, else, it gives the description of the specified job if it exists.
public Vector stat(String jobId);
isToBeServed(job1, job2): This is an abstract comparer method to be redefined by the specifique policy... Returns true if task1 is to be served before task2 according to the policy.
abstract public boolean isToBeServed(GenericJob job1, GenericJob job2);
nextTask():Returns the job that should run next (according to the implemented policy).
public String nextTask();
execute(): This method is used to execute a task if the required ressources are available.
public void execute();
checkRunningTasks(): Check the list of the running tasks to find out if there is one that's finished so that we can free the allocated ressources.
public void checkRunningTasks();
The ressource manager is an object that has the main purpose of managing the ressources. It is, in fact, responsible for the allocation, disallocation and creation or retrieval of the "ressources" (processing power). This class contains 3 main hashmaps one for each kind of node (unused, reserved, busy) and implements the node event listener to enable the detection of the newly created and/or acquired ressources.
getAvailableNodesNb(): This method returns the number of ressources available.
public int getAvailableNodesNb();
freeNodes(jobId, mainIsDead): frees the allocated nodes of the job associated to the specified jobId. The parameter mainIsDead is there to specify if the main node is dead to know if it is useless or not so we can know if we have to dispose of it.
public void freeNodes(String jobId, boolean mainIsDead);
nodeFreer(nodes, jobId, mainIsDead): frees the nodes and does the cleaning. This method is used because we are unsure of the place of the nodes wether they are in the usedNodes queue or in the reservedNodes queue. This method is never used externally, the freeNodes method usually tests the stat of the job before submitting the command to this method.
private void nodeFreer(Vector nodes, String jobId, boolean mainIsDead);
reserveNodes(jobId, ressourceNumber): Reserve "ressourceNumber" of ressources and returns the first reserved node. This method usually puts those reserved nodes in the reservedNodes queue for later retrieval while activating.
public Node reserveNodes(String jobId, int ressourceNumber);
getNodes(jobId, askedNodes): Returns all the nodes that were reserved to the job and moves them from the waiting queue to the used queue.
public Node[] getNodes(String jobId, int askedNodes);
sec(ressourceNumber): Tests the availlability of "ressourceNumber" of ressources.
public BooleanWrapper isAvailable(int ressourceNumber);
nodes(nodeURL): Provides the information about the nodes (state, job running, properties ...) Returns a vector of the nodes description.
public Vector nodes(String nodeURL);
checkReservation(jobId): checks to find out wether the job with the specified jobId has had its needed ressources reserved.
public BooleanWrapper checkReservation(String jobId);
This is the class of the scheduler daemon. This class offers many methods to ensure flexibility and to offer methods for all kind of services. For instance, it is possible to interact with the scheduler via 4 basic methods sub for job submission, del for job deletion, stat for job statistics and nodes for nodes information. It is also possible to create a new Scheduler daemon via the call of the start(policy) method and to connect to a previously created scheduler via connectTo(schedulerURL). Once a job is submitted via a descriptor it will need to be parsed to extract its information and when it comes to deployment time it will need to get its nodes this is why we will need the following methods fetchJobDescription for xml parsing that will create a temporary GenericJob object that can only be accessed during parsing time via getTmpJob so that we can set its atributes and finally to commit the object to the queue we will need the commit object method, then, when deploying the task, we will need to connect to the scheduler to fetch the reserved nodes by the use of the getNodes method.
Scheduler(policyName): Scheduler constructor that instanciate an active object used to manage jobs knowing the policy class name and creates an active object ressource manager.
public Scheduler (String policyName);
sub(job): Insert a job in the queue of the scheduler.
public BooleanWrapper sub(GenericJob job);
del(jobId): Deletes the job from the queue and stops it if it has already been launched.
public BooleanWraper del(String jobId);
stat(jobId): Gives description of all the jobs that are curently running in forms of a Vector if no specific id is specified, else, it gives the description of the specified job if it exists.
public Vector stat(String jobId);
nodes(jobId, askedNodesnodeURL): Provides the information about the nodes (state, job running, ...)
public Vector nodes(String nodeURL);
createScheduler(policyName): This method is used to create a unique scheduler object on the machine. If the scheduler isn't already created, it creates a new instance a new scheduler with a job manager following the specified policyName.
static public void createScheduler(String policyName);
start(policyName): Starts the scheduler. Calls the createScheduler method and creates a new scheduler.
public static void start(String policyName);
fetchJobDescription(xmlDescriptorURL): This method launches the parsing of the XML file to extract the description of the job submitted prior to its submission to the queue. Returns the jobId of the newly created object
public StringMutableWrapper fetchJobDescription(String xmlDescriptorURL);
connectTo(schedulerURL): connects to the scheduler node and fetchs the scheduler daemon using the submitted url. Returns a reference to the Scheduler object else it doesn't try to create a scheduler service and returns null.
public static Scheduler connectTo(String schedulerURL);
getNodes(ressourceNb, estimatedTime): This method is used while programming .. You can use it to reserve submit your demand for ressources... This method will create an active object containing the job's description in a genericJob object and submit it to the queue like any usual job but the trick is that to make sure that the reserved nodes can get to the demanding job this active object will stay waiting for the ressource allocation and when finished it will submit those reserved nodes to the job.
public Vector getNodes (int ressourceNb, int estimatedTime);
getReservedNodes(jobID, askedNodes): Returns an array of the reserved nodes of the object with the specified jobId. This method is used while parsing the XML deployment descriptor when activating the deployment descriptor.
public Node [] getReservedNodes(String jobID, int askedNodes);
commit(jobID): commits the job's description after parsing and submits it to the waiting queue.
public void commit(String jobID);
getTmpJob(jobID): Gets the temporary created generic job object to change it's attribute's content. It is important to note that this method is only used while parsing..
public GenericJob getTmpJob(String jobID);
This class represents a service to acquire the nodes of a given Job from the scheduler service. This service can be defined and used transparently when using XML Deployment descriptor. This object is a service that will automatically connect to the scheduler object when instanciated via the procured url. Here also we have an interface, called SchedulerConstants, containing the necessary constants needed by the scheduler and the scheduler lookup service.
getNodes(): This is the method to get nodes form the scheduler ressource manager.
public Node [] getNodes();
getServiceName(): Gives the service name or the scheduler node name of the scheduler daemon.
public String getServiceName();
getSchedulerService(): Returns the scheduler service object.
public Scheduler getSchedulerService();
getNodeNumber(): Returns the askedNodes.
public int getNodeNumber();
setNodeNumber(nodeNumber): Sets the number of nodes to be acquired with this Scheduler service.
public void setNodeNumber(int nodeNumber);
getMinNodeNumber(): Returns the min askedNodes number.
public int getMinNodeNumber();
setMinNodeNumber(nodeNumber): Sets the min number of nodes to be acquired with this Scheduler service. By minimum we mark that if the right policy is selected this number would be judged as suffisant to start the application.
public void setMinNodeNumber(int nodeNumber);
This is the main class used for parsing the jobs submitted with the xml deployment descriptor file. This class will launch the parsing of the file and the extraction of the descriptions of the job.
notifyEndActiveHandler(): we redefine this method so that we can collect in the end the total amount of information from the created Virtual nodes. Like for instance the total amount of needed ressources.
protected void notifyEndActiveHandler(String name, UnmarshallerHandler activeHandler) throws org.xml.sax.SAXException;
This is the main class used to communicate with the scheduler daemon to submit the commands to the scheduler like the submission, deletion and statistics of any job and the nodes status command. The communicator offer a console interaction program with the scheduler daemon. For more information about the communicator please refer to Section 27.2.2, “Interaction with the scheduler”. Here you will only find the technical explanation and the method names.
communicator(schedulerURKL): This is the constructor that's used to create a communicator. It tries to establish a connection with the scheduler daemon and to get the scheduler object before we begin with the submission of commands.
public Communicator (String schedulerURL);
pad(string, pad_len): This function is used to make the String right-justified. If the String is bigger then pad_len then this function will add blanks in the beginning to make sure that the String is right-justified over the pad_len space else it will return the String unchanged.
private String pad(String s, int pad_len);
center(string, pad_len): This function is u sed to make the String center-justified. If the String is smaller then pad_len then this function will add blanks in the beginning and in the end to make sure that the String is right-justified over the pad_len space else it will return the String unchanged.
private String center(String s, int pad_len);
log(message, isError): Logs the message either as a normal message or as an error depending on the isError type. If the isError is true then the submitted message is an error else it's a normal one.
private static void log(String msg, boolean isError);
flush(message): sets an immediate flush of the normal message.
private static void flush(String message);
helpScreen(command): Is the help console. Here we can either set specific help for a specific command or we can add the command name of the newly created command
public void helpScreen(String command);
handleCommand(command): Here we shall handle the submitted command, check the validity of the command then call the related method or subroutine to launch the command. Returns true if the execution occured normaly, false otherwise.
private boolean handleCommand(String command);
startCommandListener(): Starts the command listener object and begins with to take the commands.
private void startCommandListener();
viewNodes(nodes, specific): This method is used to display the descriptions of all the nodes or of a specific node on the shell prompt. Nodes contains the nodes to be displayed and specific is set to true if the command demands the view of a specific node.
public void viewNodes(Vector nodes, boolean specific);
viewJobs(jobs, specific): This method is used to display the descriptions of all the jobs or of a specific job on the shell prompt. Jobs contains the job status of either all the jobs or of a specific one and specific indicates wether the command needs the description of a specific job or that of all the jobs.
public void viewJobs(Vector jobs, boolean specific);
We can always change the ressource acquisition method, the job description or create a new policy to serve the jobs and even create a new command that can be used for the scheduler. In this section you'll find out what are the steps that should be taken in this regard.
To ensure the independance between the acquisition of the nodes and the ressource reservation and manipulation, we created an object named RessourceListener which main purpose is to wait for the creation of the nodes and add it to the unusedNodes list. So in order to change the ressource acquisition mode you'd have to change only the RessourceListener class. One important thing that you don't have to forget is that the ressourceListener object has to take the reference to the unusedNodes queue of the ressourceManager, while instanciating, to be able to submit the nodes to the ressourceManager. So we can either think of changing directly the code of the RessourceListener class or think of only changing the xmlURL and the Virtual Node names in the RessourceManager constructor when instanciating the ressourceListener:
public RessourceManager(BooleanWrapper b) { unusedNodes = new Vector(); reservedNodes = new Vector(); usedNodes = new Vector(); // launches the specific ressourceListener that shall listen for the nodes // created and add the newly created node to the queue. String xmlURL = "/user/cjarjouh/home/ProActive/src/org/objectweb/proactive/scheduler/test.xml" ; Vector vnNames = new Vector(); vnNames.add("SchedulerVN"); new RessourceListener(this.unusedNodes, xmlURL, vnNames); }
To add a new description for the job we shall have to modify the schema, the GenericJob class and add a code to fetch the content of this new attribute in the parsers. And we shall have to add those stuff in no particular order:
Modify the schema:
So in order for the parser to be able to detect this new addition we must modify the schema and put the definition of the new attribute in the ProActiveSchedulerType description tag.
<xs:complexType name="ProActiveSchedulerType"> <xs:attribute name="numberOfNodes" type="xs:positiveInteger" use="required" /> <xs:attribute name="minNumberOfNodes" type="xs:positiveInteger" use="optional" /> <xs:attribute name="schedulerUrl" type="xs:string" use="optional" /> <xs:attribute name="jvmParameters" type="xs:string" use="optional" /> </xs:complexType>
Modify the genericJob:
This code contain the description of the job as pre-cited before in the Section 27.3.1.1.1, “GenericJob” paragraphe. In this object we shall add this new attribute and add also some setters and some getters to manipulate this new addition.
Modify the parser:
When trying to modify the parser we shall see wether the newly created description is specific or if the attribut must be collected in general from all the Virtual Nodes. For instance, the numberOfNodes attribute is a non local attribute because in general for the scheduler to know wether to deploy or not the job it needs to have the total number of ressources needed. On the other hand, the schedulerURL attribute is local and is only used within the service for the acquisition of the nodes. Now that we know the difference, how can we tell the parser to extract the information following the 2 methods.
If the attribute is local we must add the attribute in the ProActiveSchedulerHandler of the ServiceDefinitionHandler class. We can add it to the startContextElement() method like this:
if (scheduler != null) { // fetch an attribute String jvmParam = attributes.getValue("jvmParameters"); // get the job's object description GenericJob job = scheduler.getTmpJob(jobId); // set the description because it's local if (checkNonEmpty(nbOfNodes)) { job.setJVMParameters(jvmParam); } // fetch another attribute but this one is non local String minNumberOfNodes = attributes.getValue("minNumberOfNodes"); // set the attribute of the service associated to the node for later retrieval if (checkNonEmpty(minNumberOfNodes)) { schedulerLookupService.setMinNodeNumber(Integer.parseInt(minNumberOfNodes)); } }
On the other hand if the thing is global, we shall think of setting the value inside the schedulerService like in the example above and then head back to the ProActiveJobHandler in the notifyEndActiveHandler() method and add it to the loop which can help fetch all the values associated to every virtual node and regroup them in one single attribute. Like for example, for the numberOfNodes demanded we add a counter to count the needed ressources and set the value to the job description like follow:
for (int i=0; i<vns.length; ++i) { VirtualNode vn = vns[i]; ArrayList vms = ((VirtualNodeImpl)vn).getVirtualMachines(); for (int j=0; j<vms.size(); ++j) { VirtualMachine vm = (VirtualMachine) vms.get(j); UniversalService service = vm.getService(); if (service.getServiceName().equals(SchedulerConstants.SCHEDULER_NODE_NAME)) { SchedulerLookupService schedulerLookupService = ((SchedulerLookupService) service); // here we shall calculate the sum of the non local attribute nodeNb += schedulerLookupService.getNodeNumber(); minNodeNb += schedulerLookupService.getMinNodeNumber(); } } } // and here we shall set the job description ... GenericJob job = scheduler.getTmpJob(jobId); job.setRessourceNb(nodeNb); job.setMinNbOfNodes(minNodeNb); scheduler.commit(jobId);
A job manager is, like mentioned before, an object for managing the ressources based on a specific policy. If you like to add a policy then you have to follow the following steps based on what kind of policy you want to add. In general, there is 2 kinds of policies that can be created: a simple policy and a mixed policy.
The first and the most basic kind of policy is the simple policy. It must be based on an existing quality of the job. If the attribute of the job doesn't exist you shoulld think of adding it first like directed in the previous paragraphe Section 27.3.2.2, “How to change or add a new description for the job”. For instance, if you want to create a new policy that serves the jobs with the highest priority first you have to create your own class, for example PriorityPolicy, and extend it from the AbstractPolicy class and implement the isToBeServed comparor method that compars 2 tasks in order to find the job with the highest priority. This is the complete example that can really explain how to create this simple code:
public class PriorityPolicy extends AbstractPolicy { public PriorityPolicy() { // TODO Auto-generated constructor stub } public PriorityPolicy(RessourceManager ressourceManager) { super(ressourceManager); } /** * Returns true if job1 is to be served before job2 according to the policy. * @param job1 * @param job2 * @return true if job1 is to be served before job2. */ public boolean isToBeServed(GenericJob job1, GenericJob job2) { return (job1.getPriority() >= job2.getPriority()); } }
The second is a more advanced kind of policy but, nevertheless, is simple to add. There's the MixedPolicy class that's already created to take an undetermined number of policies, given their policyNames, to serve jobs according to more than one policy. So we can use this policy to form a specific policy according to the user's demands. But first the constituting pollicies must be created like directed in the previous paragraphe Section 27.3.2.3.1, “Adding a simple policy”. For instance, if you want to create a new policy that serves the shortest jobs with the highest priority first we need to combine the PriorityPolicy with the TimePolicy class and extend the newly created class, for example TimePriorityPolicy, from the MixedPolicy class instead of the basic AbstractPolicy class. This is the complete example that can really explain how to create this simple code:
public class TimePriorityPolicy extends MixedPolicy { private static Vector classes; static { classes = new Vector(); classes.add("org.objectweb.proactive.scheduler.policy.PriorityPolicy"); classes.add("org.objectweb.proactive.scheduler.policy.TimePolicy"); } public TimePriorityPolicy() { // TODO Auto-generated constructor stub } public TimePriorityPolicy(RessourceManager ressourceManager) { super(ressourceManager, classes); } }
To be able to add a new command we must first create the command in the specific object, for example if the command is relative to nodes we must think of creating it in the RessourceManager class and if it is relative to jobs we must think of creating it in the AbstractPolicy class. Either way all the demands must go through the scheduler daemon then we also need to put the method in the scheduler class and call the specific command from there.
Once the command is created we can add it to the communicator program in the HandleCommand method after creating its relative constant for the command name and for the command prototype. Then after adding a link to the method we should think of adding the help to the helpScreen method. For example if we need to create a command like the submission of a job we must create the method in the jobManager then make a method that calls this method from within the scheduler object. After this we must jump to the command class and create the constants, the help and the command like follows.
As we said before we must begin by creating the constants and insert the name of the newly created command in the constants area. The newly created command will have the name "sub" and stored in the constant with the tag SUB_CMD. On the other hand the prototype of the SUB_CMD is is "sub xmlFile" and is also stored in another constant with the SUB_PROTO tag. These constants will be used shortly after.
/* These are the constants namely the commands that are used */ private static final String SUB_CMD = "sub"; private static final String SUB_PROTO = SUB_CMD + " XMLDescriptorOfTheJob";
Then we shall need to add certain functionalities for the command to work properly. We must head to the handleCommand method and add it to first to the list of known commands and then we will be more technical and make sure of the validity of the command before executing it.
// we add the command here along with old commands to make sure that the // command is a valid one or is part of the commands that figure in the // communicator glossary of recognized terms. if (!command.startsWith(SUB_CMD) && ... ) { System.out.println("UNKNOWN COMMAND!!..."); log("unknown command submitted: " + command, true); return false; } String error = null; // then we add what the command should do in here ... // if the command is a sub command then ... if (command.startsWith(SUB_CMD)) { flush(command); // Here we make sure that the command is being used correctly before we // continue withe execution of the sub command ... if (command.equals(SUB_CMD)) { error = SUB_PROTO + "\n"; } else { String XMLDescriptorFile = command.substring(command.indexOf(' ')+1); this.scheduler.fetchJobDescription(XMLDescriptorFile); } }
Last but not least we'll add the documentation to the command in the helpMenu method:
// Here we test the validity of the command and check if the comman dis known // in the communicator database ... if (!command.endsWith(SUB_CMD) && !command.endsWith(STAT_CMD) && .... ) { System.out.println("No such command: " + command.substring(1)); log("No help available for " + command, true); return; } result = "\n"; if (!command.equals("?")){ String keyword = command.substring(2); result += "This command's prototype is: "; // Here we shall add the specific help of the newly created command // along with the previously created commands ... if (keyword.equals(SUB_CMD)) { result += SUB_PROTO; result += "\n\n"; result += "This command is used to submit a job to the scheduler.\n\n"; result += "XMLDescriptorOfTheJob is the absolute path to the " + "XML Deployment Descriptor of the job to be submitted\n"; } else if (keyword.equals(STAT_CMD)) { .... } result += "\n"; } else { // and in the end we must add it to the list of known commands that will appear // when executing the "?" command result += "The commands available are: " + SUB_CMD + ", " + STAT_CMD + ", " + DEL_CMD + ", " + NODES_CMD + ", " + KILL_CMD + ", " + EXIT_CMD; } result += "\n"; System.out.println(result);
Computing Grids and Peer-to-Peer networks are inherently heterogeneous and distributed, and for this reason they present new technological challenges: complexity in the design of applications, complexity of deployment, reusability, and performance issues.
The objective of this work is to provide an answer to these problems through the implementation for ProActive of an extensible, dynamical and hierarchical component model, Fractal.
This document is an overview of the implementation of Fractal with ProActive.
It presents:
the goals and the reasons for a new implementation of the Fractal model,
extensions to Fractal and conformance to the Fractal specification,
architectural concepts of the implementation,
the current Architecture Description Language,
some examples to illustrate the use of the API and the distribution of components,
ongoing research work and future directions.
This work contributes to the CoreGRID european project on Grid computing, by participating to the definition of a programming model for Grid components (the Grid Component Model), and by providing a prototype reference implementation of this model.
Fractal defines a general conceptual model, along with a programming application interface (API) in Java. According to the official documentation, the Fractal component model is 'a modular and extensible component model that can be used with various programming languages to design, implement, deploy and reconfigure various systems and applications, from operating systems to middleware platforms and to graphical user interfaces'.
There is a reference implementation, called Julia.
We first tried to use Julia to manipulate active objects (the fundamental entities in ProActive), but we wouldn't have been able to reuse the features of the Proactive library, because of the architectures of the libraries.
Julia manipulates a base class by modifying the bytecode or adding interception objects to it. On the other hand, ProActive is based on a meta-object protocol and provides a reference to an active object through a typed stub. If we wanted to use active objects with Julia, the Julia runtime would try to manipulate the stub, and not the active object itself. And if trying to force Julia to work on the same base object than ProActive, the control flow could not traverse both ProActive and Julia.
Eventually, re-implementing ProActive using Julia could be a solution (a starting point could be the 'protoactive' example of Julia), but this would imply a full refactoring of the library, and therefore quite a few resources...
More generally speaking, Julia is designed to work with standard objects, but not with the active objects of ProActive. Some features (see next section) would not be reusable using Julia with ProActive active objects.
Therefore, we decided to provide our own implementation of Fractal, geared at Grid Computing and based on the ProActive library.
This implementation is different from Julia both in its objectives and in the programming technniques. As previously stated, we target Grid and P2P environments. The programming techniques and the architecture of the implementation is described in a following section.
Consider a standard system of Fractal components:
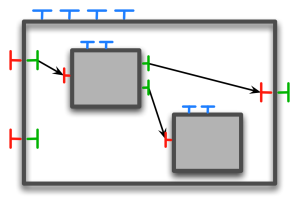
ProActive/Fractal features distributed components:
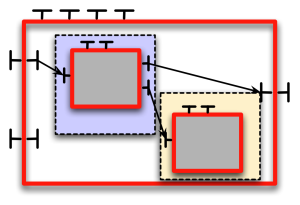
Figure 29.2. A system of distributed ProActive/Fractal components (blue, yellow and white represent distinct locations)
Each component is implemented as one (at least) active object:
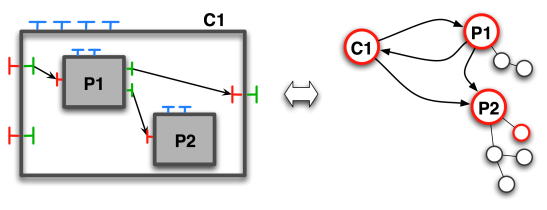
The combination of the Fractal model with the ProActive library leverages the Fractal component model and provides an implementation for Grid computing.
Distribution is achieved in a transparent manner over the Java RMI protocol thanks to the use of a stub/proxy pattern. Components are manipulated indifferently of their location (local or on a remote JVM).
ProActive provides a deployment framework for creating a distributed component system. Using a configuration file and the concept of virtual nodes, this framework:
connects to remote hosts using supported protocols, such as rsh, rlogin, ssh, globus, lsf etc...
creates JVMs on these hosts
instantiates components on these newly created JVMs
A fundamental concept of the ProActive library is this of Active Objects (see Chapter 12, ProActive Basis, Active Object Definition), where activities can actually be redefined (see also Chapter 13, Active Objects: creation and advanced concepts) to customize their behavior.
Asynchronous method calls with transparent futures is a core feature of ProActive (Section 13.8, “Asynchronous calls and futures”), and it allows concurrent processing. Indeed, suppose a caller invokes a method on a callee. This method returns a result on a component. With synchronous method calls, the flow of execution of the caller is blocked until the result of the method called is received. In the case of intensive computations, this can be relatively long. With asynchronous method calls, the caller gets a future object and will continue its tasks until it really uses the result of the method call. The process is then blocked (it is called wait-by-necessity) until the result has effectively been calculated.
We address collective interactions (1-to-n and n-to-1 interactions between components) through Chapter 31, Collective interfaces, namely gathercast and multicast interfaces.
The Fractal specification defines conformance levels for implementations of the API (section 7.1. of the Fractal 2 specification). The implementation for ProActive is conformant up to level 3.3. In other words, it is fully compliant with the API. Generic factories (template components) are provided as ADL templates.
We are currently implementing a set of predefined standard conformance tests for the Fractal specification.
The API is the same for any Fractal implementation, though some classes are implementation-specific:
The fractal provider class, that corresponds to the
fractal.provider parameters of the JVM, is
org.objectweb.proactive.core.component.Fractive. The
Fractive class acts as:
a bootstrap component
a GenericFactory for instantiating new components
a utility class providing static methods to create collective interfaces and retreive references to ComponentParametersController
The controller description and the content description of the
components, as specified in the method public Component
newFcInstance(Type type, Object controllerDesc, Object contentDesc)
throws InstantiationException of the
org.objectweb.fractal.api.factory.Factory class,
correspond in this implementation to the classes
org.objectweb.proactive.core.component.ControllerDescription
and
org.proactive.core.component.ContentDescription.
Collective interactions are an extension to the Fractal model, described in section Chapter 31, Collective interfaces, that relies on collective interfaces.
Collective interfaces are bound using the standard Fractal binding mechanism.
As this implementation is based on ProActive, several conditions are required (more in Chapter 13, Active Objects: creation and advanced concepts):
the base class for the implementation of a primitive component has to provide an empty, no-args constructor.
for asynchronous invocations, return types of the methods provided by the interfaces of the components have to be reifiable and methods must not throw exceptions.
The implementation of the Fractal model is achieved by reusing the extensible architecture of ProActive, notably the meta-object protocol and the management of the queue of requests. As a consequence, components are fully compatible with standard active objects and as such, inherit from the features active objects exhibit: mobility, security, deployment etc.
A fundamental idea is to manage the non-functional properties at the meta-level: each component is actually an active object with dedicated meta-objects in charge of the component aspects.
ProActive is based on a meta-object protocol (MOP), that allows the addition of many aspects on top of standard Java objects, such as asynchronism and mobility. Active objects are referenced indirectly through stubs: this allows transparent communications, would the active objects be local or remote.
The following diagram explains this mechanism:
Java objects 'b' and 'a' can be in different virtual machines (the
network being represented here between the proxy and the body, though
the invocation might be local). Object 'b' has a reference on active
object 'a' (of type A) through a stub (of type
A because it is generated as a subclass of
A) and a proxy. When 'b' invokes a method on
'stub_A', the invocation is forwarded through the
communication layer (possibly through a network) to the body of the
active object. At this point, the call can be intercepted by
meta-objects, possibly resulting in induced actions, and then the call
is forwarded to the base object 'a'.
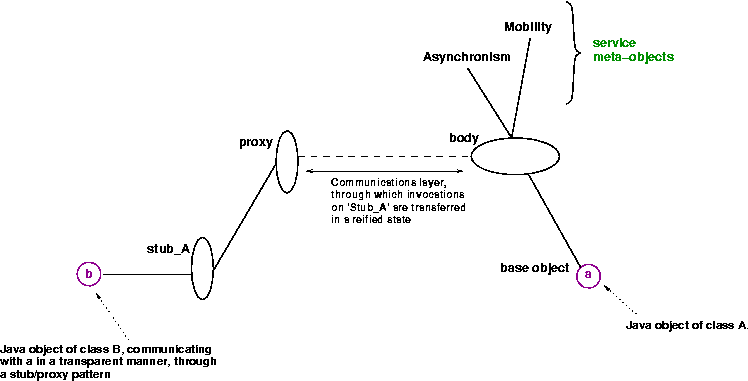
The same idea is used to manage components: we just add a set of meta-objects in charge of the component aspects.
The following diagram shows what is changed:
A new set of meta-objects, managing the component aspect
(constituting the controller of the component, in the Fractal
terminology), is added to the active object 'a'. The standard ProActive
stub (that gives a representation of type A on the figure) is not used
here, as we manipulate components. In Fractal, a reference on a
component is of type Component, and references to
interfaces are of type Interface. 'b' can now
manipulate the component based on 'a' through a specific stub, called a
component representative. This component
representative is of type Component, and
also offers references to control and functional interfaces, of type
Interface. Note that classes representing functional
interfaces of components are generated on the fly: they are specific to
each component and can be unknown at compile-time.
Method invocations on Fractal interfaces are reified and transmitted (possibly through a network) to the body of the active object corresponding to the component involved. All standard operations of the Fractal API are now accessible.
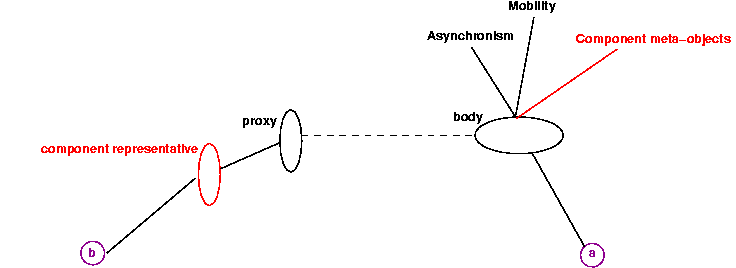
In our implementation, because we make use of the MOP's facilities, all components are constituted of one active object (at least), are they composite or primitive components. If the component is a composite, and if it contains other components, then we can say it is constituted of several active objects. Also, if the component is primitive, but the programmer of this component has put some code within it for creating new active objects, the component is again constituted of several active objects.
As a result, a composite component is an active object built on
top of the CompositeComponent class, and a parallel
component is built on top of the ParallelComponent
class. These classes are empty classes, because for composite and
parallel components, all the action takes place in the meta-level. But
they are used as a base to build active objects, and their names help to
identify them with the IC2D visual monitoring tool.
Invoking a method on an active object means invoking a method on
the stub of this active object. What usually happens then is that the
method call is reified as a Request object and
transferred (possibly through a network) to the body of the active
object. It is then redirected towards the queue of requests, and
delegated to the base object according to a customizable serving policy
(standard is FIFO).
Component requests, on the other hand, are tagged so as to distinguish between functional requests and controller requests. A functional request targets a functional interface of the component, while a controller request targets a controller of the component.
Like in the standard case (without components), requests are served from the request queue. The serving policy has to be FIFO to ensure coherency. This is where the life cycle of the components is controlled: the dispatching of the request is dependent upon the nature of the request, and corresponds to the following algorithm:
loop
if componentLifeCycle.isStarted()
get next request
// all requests are served
else if componentLifeCycle.isStopped()
get next controller request
// only controller requests are served
;
if gotten request is a component life cycle request
if request is start --> set component state to started ;
if request is stop --> set component state to stopped ;
;
; This section explains how to customize the membranes of component through the configuration, composition and creation of controllers and interceptors.
It is possible to customize controllers, by specifying a control interface and an implementation.
Controllers are configured in a simple XML configuration file, which has the following structure:
<componentConfiguration>
<controllers>
<controller>
<interface>ControllerInterface</interface>
<implementation>ControllerImplementation</implementation>
</controller>
... Unless they some controllers are also interceptors (see later on), the controllers do not have to be ordered.
A default configuration file is provided, it defines the default controllers available for every ProActive component (super, binding, content, naming, lifecycle and component parameters controllers).
A custom configuration file can be specified (in this example with "thePathToMyConfigFile") for any component in the controller description parameter of the newFcInstance method from the Fractal API:
componentInstance = componentFactory.newFcInstance(
myComponentType,
new ControllerDescription(
"name",
myHierarchicalType,
thePathToMyControllerConfigFile),
myContentDescription); The controller interface is a standard interface which defines which methods are available.
When a new implementation is defined for a given controller interface, it has to conform to the following rules:
The controller implementation must extend the AbstractProActiveController class, which is the base class for component controllers in ProActive, and which defines the constructor AbstractProActiveController(Component owner).
The controller implementation must override this constructor:
public ControllerImplementation(Component owner) {
super(owner);
} The controller implementation must also override the abstract method setControllerItfType(), which sets the type of the controller interface:
protected void setControllerItfType() {
try {
setItfType(ProActiveTypeFactory.instance().createFcItfType(
"Name of the controller",
TypeFactory.SINGLE));
} catch (InstantiationException e) {
throw new ProActiveRuntimeException("cannot create controller type: " +
this.getClass().getName());
}
} The controller interface and its implementation have to be declared in the component configuration file.
Controllers can also act as interceptors: they can intercept incoming invocations and outgoing invocations. For each invocation, pre and post processings are defined in the methods beforeInputMethodInvocation, afterInputMethodInvocation, beforeOutputMethodInvocation, and afterOutputMethodInvocation. These methods are defined in the interfaces InputInterceptor and OutputInterceptor, and take a MethodCall object as an argument. MethodCall objects are reified representations of method invocations, and they contain Method objects, along with the parameters of the invocation.
Interceptors are configured in the controllers XML configuration file, by simply adding input-interceptor="true" or/and output-interceptor="true" as attributes of the controller element in the definition of a controller (provided of course the specified interceptor is an input or/and output interceptor). For example a controller that would be an input interceptor and an output interceptor would be defined as follows:
<componentConfiguration>
<controllers>
....
<controller
input-interceptor="true" output-interceptor="true"
>
<interface>InterceptorControllerInterface</interface>
<implementation>ControllerImplementation</implementation>
</controller>
... Interceptors can be composed in a basic manner: sequentially.
For input interceptors, the beforeInputMethodInvocation method is called sequentially for each controller in the order they are defined in the controllers configuration file. The afterInputMethodInvocation method is called sequentially for each controller in the reverse order they are defined in the controllers configuration file.
If in the controller config file, the list of input interceptors is in this order (the order in the controller config file is from top to bottom):
InputInterceptor1 InputInterceptor2
This means that an invocation on a server interface will follow this path:
--> caller --> InputInterceptor1.beforeInputMethodInvocation --> InputInterceptor2.beforeInputMethodInvocation --> callee.invocation --> InputInterceptor2.afterInputMethodInvocation --> InputInterceptor1.afterInputMethodInvocation
For output interceptors, the beforeOutputMethodInvocation method is called sequentially for each controller in the order they are defined in the controllers configuration file. The afterOutputMethodInvocationmethod is called sequentially for each controller in the reverse order they are defined in the
controllers configuration file.
If in the controller config file, the list of input interceptors is in this order (the order in the controller config file is from top to bottom):
OutputInterceptor1 OutputInterceptor2
This means that an invocation on a server interface will follow this path
--> currentComponent --> OutputInterceptor1.beforeOutputMethodInvocation --> OutputInterceptor2.beforeOutputMethodInvocation --> callee.invocation --> OutputInterceptor2.afterOutputMethodInvocation --> OutputInterceptor1.afterOutputMethodInvocation
An interceptor being a controller, it must follow the rules explained above for the creation of a custom controller.
Input interceptors and output interceptors must implement respectively the interfaces InputInterceptor and OutputInterceptor, which declare interception methods (pre/post interception) that have to be implemented.
Here is a simple example of an input interceptor:
public class MyInputInterceptor extends AbstractProActiveController
implements InputInterceptor, MyController {
public MyInputInterceptor(Component owner) {
super(owner);
}
protected void setControllerItfType() {
try {
setItfType(ProActiveTypeFactory.instance().createFcItfType("my control\
ler",
MyController.class.getName(), TypeFactory.SERVER,
TypeFactory.MANDATORY, TypeFactory.SINGLE));
} catch (InstantiationException e) {
throw new ProActiveRuntimeException("cannot create controller " +
this.getClass().getName());
}
}
// foo is defined in the MyController interface
public void foo() {
// foo implementation
}
public void afterInputMethodInvocation(MethodCall methodCall) {
System.out.println("post processing an intercepted an incoming functiona\
l invocation");
// interception code
}
public void beforeInputMethodInvocation(MethodCall methodCall) {
System.out.println("pre processing an intercepted an incoming functional\
invocation");
// interception code
}
}
The configuration file would state:
<componentConfiguration>
<controllers>
....
<controller
input-interceptor="true">
<interface>
MyController
</interface>
<implementation>
MyInputInterceptor
</implementation>
</controller>
...
In this implementation of the Fractal component model, Fractal components are active objects. Therefore it is possible to redefine their activity. In this context of component based programming, we call an activity redefined by a user a functional activity.
When a component is instantiated, its lifecycle is in the STOPPED state, and the functional activity that a user may have redefined is not started yet. Internally, there is a default activity which handles controller requests in a FIFO order.
When the component is started, its lifecycle goes to the STARTED state, and then the functional activity is started: this activity is initialized (as defined in InitActive), and run (as defined in RunActive).
2 conditions are required for a smooth integration between custom management of functional activities and lifecycle of the component:
the control of the request queue must use the org.objectweb.proactive.Service class
the functional activity must loop on the body.isActive() condition (this is not compulsory, but it allows to automatically end the functional activity when the lifecycle of the component is stopped. It may also be managed with a custom filter).
Control invocations to stop the component will automatically set the isActive() return value to false, which implies that when the functional activity loops on the body.isActive() condition, it will end when the lifecycle of the component is set to STOPPED.
Communications between components in a hierarchical model may involve the crossing of several membranes, and therefore paying the cost of several indirections. If the invocations are not intercepted in the membranes, then it is possible to optimize the communication path by shortcutting: communicating directly from a caller component to a callee component by avoiding indirections in the membranes.
In the Julia implementation, a shortcut mechanism is provided for components in the same JVM, and the implementation of this mechanism relies on code generation techniques.
We provide a shortcut mechanism for distributed components, and the implementation of this mechanism relies on a "tensioning" technique: the first invocation determines the shortcut path, then the following invocations will use this shortcut path.
For example, in the following figure, a simple component system, which consists of a composite containing two wrapped primitive components, is represented with different distributions of the components. In a, all components are located in the same JVM, therefore all communications are local communications. If the wrapping composites are distributed on different remote jvms, all communications are remote because they have to cross composite enclosing components. The short cut optimization is a simple bypassing of the wrapper components, which results in 2 local communications for the sole functional interface.

Shortcuts are available when composite components are synchronous components (this does not break the ProActive model, as composite components are structural components). Components can be specified as synchronous in the ControllerDescription object that is passed to the component factory:
ControllerDescription controllerDescription =
new ControllerDescription("name", Constants.COMPOSITE, Constants.SYNCHRONOUS);
When the system property proactive.components.use_shortcuts is set to true, the component system will automatically establish short cuts between components whenever possible.
In this chapter, we consider multiway communications - communications to or from several interfaces - and notably parallel communications, which are common in Grid computing.
Our objective is to simplify the design of distributed Grid applications with multiway interactions.
The driving idea is to manage the semantics and behavior of collective communications at the level of the interfaces.
Grid computing uses the resources of many separate computers connected by a network (usually the Internet) to solve large-scale computation problems. Because of the number of available computers, it is fundamental to provide tools for facilitating communications to and from these computers. Moreover, Grids may contain clusters of computers, where local parallel computations can be very efficiently performed - this is part of the solution for solving large-scale computation problems - , which means that programming models for Grid computing should include parallel programming facilities. We address this issue, in the context of a component model for Grid computing, by introducing collective interfaces.
The component model that we use, Fractal, proposes two kinds of cardinalities for interfaces, singleton or collection, which result in one-to-one bindings between client and server interfaces. It is possible though to introduce binding components, which act as brokers and may handle different communication paradigms. Using these intermediate binding components, it is therefore possible to achieve one-to-n, n-to-one or n-to-n communications between components. It is not possible however for an interface to express a collective behavior: explicit binding components are needed in this case.
We propose the addition of new cardinalities in the specification of Fractal interfaces, namely multicast and gathercast. Multicast and gathercast interfaces give the possibility to manage a group of interfaces as a single entity (which is not the case with a collection interface, where the user can only manipulate individual members of the collection), and they expose the collective nature of a given interface. Moreover, specific semantics for multiway invocations can be configured, providing users with flexible communications to or from gathercast and multicast interfaces. Lastly, avoiding the use of explicit intermediate binding components simplifies the programming model and type compatibility is automatically verified.
The role and use of multicast and gathercast interfaces are complementary. Multicast interfaces are used for parallel invocations, whereas gathercast interfaces are used for synchronization and gathering purposes.
Note that in our implementation of collective interfaces, new features of the Java language introduced in Java 5 are extensively used, notably annotations and generics.
A multicast interface transforms a single invocation into a list of invocations
A multicast interface is an abstraction for 1-to-n communications. When a single invocation is transformed into a set of invocations, these invocations are forwarded to a set of connected server interfaces. A multicast interface is unique and it exists at runtime (it is not lazily created). The semantics of the propagation of the invocation and of the distribution of the invocation parameters are customizable (through annotations), and the result of an invocation on a multicast interface - if there is a result - is always a list of results.
Invocations forwarded to the connected server interfaces occur in parallel, which is one of the main reasons for defining this kind of interface: it enables parallel invocations, with automatic distribution of invocation parameters.
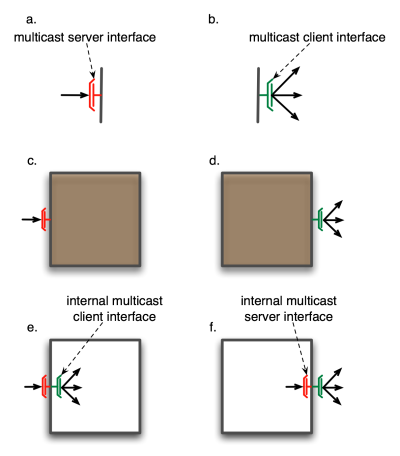
A multicast invocation leads to the invocation services offered by one or several connected server interfaces, with possibly distinct parameters for each server interface.
If some of the parameters of a given method of a multicast interface are lists of values, these values can be distributed in various ways through method invocations to the server interfaces connected to the multicast interface. The default behavior - namely broadcast - is to send the same parameters to each of the connected server interfaces. In the case some parameters are lists of values, copies of the lists are sent to each receiver. However, similar to what SPMD programming offers, it may be adequate to strip some of the parameters so that the bound components will work on different data. In MPI for instance, this can be explicitly specified by stripping a data buffer and using the scatter primitive.
The following figure illustrates such distribution mechanisms: broadcast (a.) and scatter (b.)
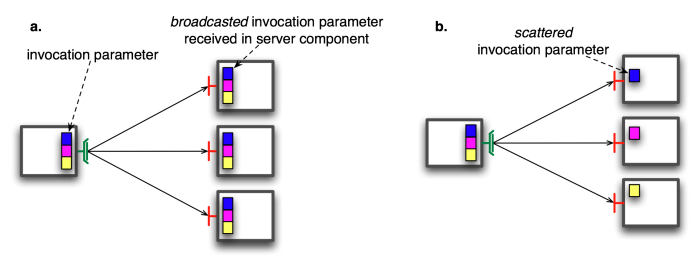
Invocations occur in parallel and the distribution of parameters is automatic.
3 modes of distribution of parameters are provided by default, and define distribution policies for lists of parameters:
BROADCAST, which copies a list of parameters and sends a copy to each connected server interface.
ParamDispatchMode.BROADCAST
ONE-TO-ONE, which sends the ith parameter to the connected server interface of index i. This implies that the number of elements in the annotated list is equal to the number of connected server interfaces.
ParamDispatchMode.ONE_TO_ONE
ROUND-ROBIN, which distributes each element of the list parameter in a round-robin fashion to the connected server interfaces.
ParamDispatchMode.ROUND_ROBIN
It is also possible to define a custom distribution by specifying the distribution algorithm in a class which implements the org.objectweb.proactive.core.component.type.annotations.multicast.ParamDispatch interface.
@ParamDispatchMetadata(mode =ParamDispatchMode.CUSTOM, customMode = CustomParametersDispatch.class
))
If the invoked method returns a value, then the invocation on
the multicast interface returns an ordered collection of result
values: a parameterized list, or List<T>.
This implies that, for the multicast interface, the signature of the
invoked method has to explicitly specify
List<T> as a return type. This also implies
that each method of the interface returns either nothing, or a list.
Valid return types for methods of multicast interfaces are illustrated
as follows:
public List<Something> foo(); public void bar();
Note that our implementation of collective interfaces extensively uses new features of the Java language introduced in Java 5, such as generics and annotations.
The distribution of parameters in our framework is specified in the definition of the multicast interface, using annotations.
Elements of a multicast interface which can be annotated are: interface, methods and parameters. The different distribution modes are explained in the next section. The examples in this section all specify broadcast as the distribution mode.
A distribution mode declared at the level of the interface defines the distribution mode for all parameters of all methods of this interface, but may be overriden by a distribution mode declared at the level of a method or of a parameter.
The annotation for declaring distribution policies at level of
an interface is
@org.objectweb.proactive.core.component.type.annotations.multicast.ClassDispatchMetadata
and is used as follows:
@ClassDispatchMetadata(mode=@ParamDispatchMetadata(mode=ParamDispatchMode.BROADCAST)) interface MyMulticastItf { public void foo(List<T> parameters); }
A distribution mode declared at the level of a method defines the distribution mode for all parameters of this method, but may be overriden at the level of each individual parameter.
The annotation for declaring distribution policies at level of a
method is
@org.objectweb.proactive.core.component.type.annotations.multicast.MethodDispatchMetadata
and is used as follows:
@MethodDispatchMetadata(mode = @ParamDispatchMetadata(mode =ParamDispatchMode.BROADCAST)) public void foo(List<T> parameters);
The annotation for declaring distribution policies at level of a
parameter is
@org.objectweb.proactive.core.component.type.annotations.multicast.ParamDispatchMetadata
and is used as follows:
public void foo(@ParamDispatchMetadata(mode=ParamDispatchMode.BROADCAST) List<T> parameters);
For each method invoked and returning a result of type
T, a multicast invocation returns an aggregation of
the results: a List<T>.
There is a type conversion, from return type
T in a method of the server interface, to return
type List<T> in the corresponding method of
the multicast interface. The framework transparently handles the type
conversion between return types, which is just an aggregation of
elements of type T into a structure of type
list<T>.
Multicast interfaces manipulate lists of parameters (say,
List<ParamType>), and expect lists of results
(say, List<ResultType>). With respect to a
multicast interface, connected server interfaces, on the contrary, may
work with lists of parameters (List<ParamType),
but also with individual parameters (ParamType) and
return individual results (ResultType).
Therefore, the signatures of methods differ from a
multicast client interface to its connected server
interfaces. This is illustrated in the following figure: in
a. the foo method of the multicast interface returns
a list of elements of type T collected from the
invocations to the server interfaces, and in b. the
bar method distributes elements of type
A to the connected server interfaces.
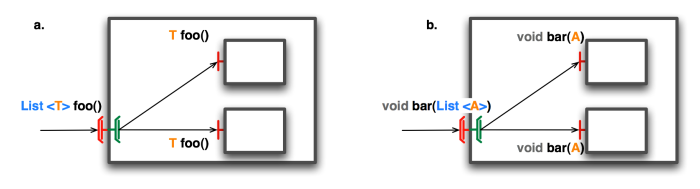
Figure 31.3. Comparison of signatures of methods between client multicast interfaces and server interfaces.
For a given multicast interface, the type of server interfaces which may be connected to it can be infered by applying the following rules: for a given multicast interface,
the server interface must have the same number of methods
for a given method method foo of the multicast interface, there must be a matching method in the server interface:
named foo
which returns:
void if the method in the multicast method returns void
T if the multicast method returns list<T>
for a given parameter List<T> in the multicast method, there must be a corresponding parameter, either List<T> or T, in the server interface, which matches the distribution mode for this parameter.
The compatibility of interface signatures is verified automatically at binding time, resulting in a documented IllegalBindingException if signatures are incompatible.
A gathercast interface transforms a list of invocations into a single invocation
A gathercast interface is an abstraction for n-to-1 communications. It handles data aggregation for invocation parameters, as well as process coordination. It gathers incoming data, and can also coordinate incoming invocations before continuing the invocation flow, by defining synchronization barriers.
Gathering operations require knowledge of the participants of the collective communication (i.e. the clients of the gathercast interface). Therefore, the binding mechanism, when performing a binding to a gathercast interface, provides references on client interfaces bound to the gathercast interface. This is handled transparently by the framework. As a consequence, bindings to gathercast interfaces are bidirectional links.
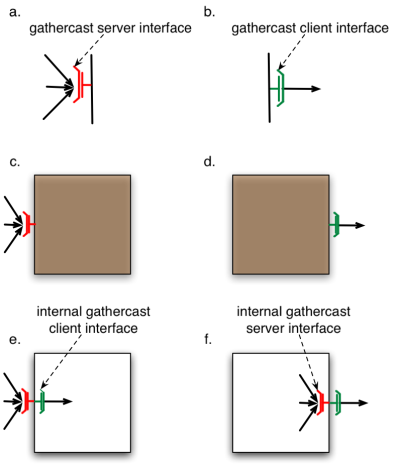
Gathercast interfaces aggregate parameters from method invocations from client interfaces into lists of invocations parameters, and they redistribute results to each client interface.
Invocation parameters are simply gathered into lists of parameters. The indexes of the parameters in the list correspond the index of the parameters in the list of connected client interfaces, managed internally by the gathercast interface.

The result of the invocation transformed by the gathercast interface is a list of values. Each result value is therefore indexed and redistributed to the client interface with the same index in the list of client interfaces managed internally by the gathercast interface.
Similarly to the distribution of invocation parameters in multicast interfaces, a redistribution function could be applied to the results of a gathercast invocation, however this feature is not implemented yet.
An invocation from a client interface to a gathercast interface is asynchronous, provided it matches the usual conditions for asynchronous invocations in ProActive, however the gathercast interface only creates and executes a new invocation with gathered parameters when all connected client interfaces have performed an invocation on it.
It is possible to specify a timeout, which corresponds to the maximum amount of time between the moment the first invocation of a client interface is processed by the gathercast interface, and the moment the invocation of the last client interface is processed. Indeed, the gathercast interface will not forward a transformed invocation until all invocations of all client interfaces are processed by this gathercast interface.
Timeouts for gathercast invocations are specified by an annotation on the method subject to the timeout, the value of the timeout is specified in milliseconds:
@org.objectweb.proactive.core.component.type.annotations.gathercast.MethodSynchro(timeout=20)
If a timeout is reached before a gathercast interface could gather
and process all incoming requests, a
org.objectweb.proactive.core.component.exceptions.GathercastTimeoutException
is returned to each client participating in the invocation. This
exception is a runtime exception.
Gathercast interfaces manipulate lists of parameters (say,
List<ParamType>), and return lists of results
(say, List<ResultType>). With respect to a
gathercast interface, connected client interface work with parameters
which can be contained in the lists of parameters of the methods of the
bound gathercast interface (ParamType), and they return results which
can be contained in the lists of results of the methods of the bound
gathercast interface (ResultType).
Therefore, by analogy to the case of multicast interfaces,
the signatures of methods differ from a gathercast server
interface to its connected client interfaces. This is
illustrated in the following figure: the foo method of interfaces which
are client of the gathercast interface exhibit a parameter of type
V, the foo method of the gathercast interface
exhibits a parameter of type List<V>.
Similarly, the foo method of client interfaces return a parameter of
type T, and the foo method of the gathercast
interface returns a parameter of type
List<T>.
The compatibility of interface signatures is verified automatically at binding time, resulting in a documented IllegalBindingException if signatures are incompatible
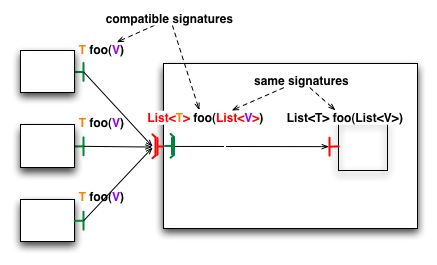
The Architecture Description Language (ADL) is used to configure and deploy component systems. The architecture of the system is described in a normalized XML file.
The ADL has been updated and is now an extension of the standard Fractal ADL, allowing to reuse ProActive-specific features such as distributed deployment using deployment descriptors.
The distributed deployment facilities offered by ProActive are reused, and the notion of virtual node is integrated in the component ADL. For this reason, the components ADL has to be associated with a deployment descriptor (this is done at parsing time: both files are given to the parser).
One should refer to the Fractal ADL tutorial for more detailed information about the ADL. Here is a short overview, and a presentation of some added features.
Note that because this ADL is based on the Fractal ADL, it requires the following libraries (included in the /lib directory of the ProActive distribution): fractal-adl.jar, dtdparser.jar, ow_deployment_scheduling.jar
Components are defined in definition files, which are .fractal files. The syntax of the document is validated against a DTD retreived from the classpath
classpath://org/objectweb/proactive/core/component/adl/xml/proactive.dtd
The definition element has a name (which must be the same name that the file's) and inheritance is supported through the attribute 'extends':
definition name='org.objectweb.proactive.examples.components.helloworld.hell oworld-distributed-wrappers'
The exportedVirtualNodes elements is described later in this section
Components can be specified and created in this definition, and these components can themselves be defined in other definition files:
component name='client-wrapper' definition='org.objectweb.proactive.examples.c omponents.helloworld.ClientType'
Nesting is allowed for composite components and is done by adding other 'component' elements.
The binding element specifies bindings between interfaces of components ', and specifying 'this' as the name of the component refers to the current enclosing component.
binding client='this.r' server='client.r'
The controller elements can have the following 'desc' values: 'composite', 'parallel' or 'primitive'. A parallel component and the components it contains should be type-compatible
Primitive components specify the content element, which indicates the implementation class containing the business logic for this component:
content class='org.objectweb.proactive.examples.components.helloworld.ClientImpl'
The virtual-node element offers distributed deployment information. It can be exported and composed in the exportedVirtualNodes element.
The component will be instantiated on the virtual node it specified (or the one that it exported). For a composite or a parallel component, it means it will be instantiated on the (first if there are several nodes mapped) node of the virtual node. For a primitive component, if the virtual node defines several nodes (cardinality='multiple'), there will be as many instances of the primitive component as there are underlying nodes. Each of these instances will have a suffixed name looking like:
primiveComponentName-cyclicInstanceNumber-nwhere primitiveComponentName is the name defined in the ADL. This automatic replication is used in the parallel components.
virtual-node name='client-node' cardinality='single'
The syntax is similar to the standard Fractal ADL, and the parsing engine has been extended. Features specific to ProActive are:
Virtual nodes have a cardinality property: either 'single' or 'multiple'. When 'single', it means the virtual node in the deployment descriptor should contain 1 node ; when 'multiple', it means the virtual node in the deployment descriptor should contain more than 1 node.
Virtual nodes can be exported and composed.
Template components are not handled.
The controller description includes 'parallel' as a valid attribute.
The validating DTD has to be specified as: classpath://org/objectweb/proactive/core/component/adl/xml/proactive.dtd
The easiest way to understand the ADL is to see an example (Section 33.2.5, “The HelloWorld ADL files”). It corresponds to the helloworld example described later in this document.
Components are deployed on the virtual node that is specified in their definition ; it has to appear in the deployment descriptor unless this virtual node is exported. In this case, the name of the exported virtual node should appear in the deployment descriptor, unless this exported virtual node is itself exported.
When exported, a virtual node can take part in the composition of other exported virtual nodes. The idea is to further extend reusability of existing (and packaged, packaging being a forthcoming feature of Fractal) components.
In the example, the component defined in helloworld-distributed-wrappers.fractal exports the virtual nodes VN1 and VN2:
exportedVirtualNodes exportedVirtualNode name='VN1' composedFrom composingVirtualNode component='client' name='client-node' /composedFrom /exportedVirtualNode exportedVirtualNode name='VN2' composedFrom composingVirtualNode component='server' name='server-node'/ /composedFrom /exportedVirtualNode /exportedVirtualNodes
VN1 is composed of the exported virtual node 'client-node' from the component named client
In the definition of the client component (ClientImpl.fractal), we can see that client-node is an exportation of a virtual node which is also name 'client-node':
exportedVirtualNodes
exportedVirtualNode name='client-node'
composedFrom
composingVirtualNode component='this' name='client-node'/
/composedFrom
/exportedVirtualNode
/exportedVirtualNodes
...
virtual-node name='client-node' cardinality='single'/
Although this is a simplistic example, one should foresee a situation where ClientImpl would be a prepackaged component, where its ADL could not be modified ; the exportation and composition of virtual nodes allow to adapt the deployment of the system depending on the existing infrastructure. Colocation can be specified in the enclosing component definition (helloworld-distributed-wrappers.fractal):
exportedVirtualNodes exportedVirtualNode name='VN1' composedFrom composingVirtualNode component='client' name='client-node' composingVirtualNode component='server' name='server-node'/ /composedFrom /exportedVirtualNode /exportedVirtualNodes
As a result, the client and server component will be colocated / deployed on the same virtual node. This can be profitable if there is a lot of communications between these two components.
When specifying 'null' as the name of an exported virtual node, the components will be deployed on the current virtual machine. This can be useful for debugging purposes.
ADL definitions correspond to component factories. ADL definition can be used directly:
Factory factory = org.objectweb.proactive.core.component.adl.FactoryFactory.getFactory();
Map context = new HashMap();
Component c = (Component) factory.newComponent("myADLDefinition",context);
It is also possible to use the launcher tool, which parses the ADL, creates a corresponding component factory, and
instantiates and assembles the components as defined in the ADL, is started from the org.objectweb.proactive.core.component.adl.Launcher class:
Launcher [-java|-fractal] <definition> [ <itf> ] [deployment-descriptor])
where [-java|-fractal] comes from the Fractal ADL Launcher (put -fractal for ProActive components, this will be made optional for ProActive components in the next release), <definition> is the name of the component to be instantiated and started, <itf> is the name of its Runnable interface, if it has one, and <deployment-descriptor> the location of the ProActive deployment descriptor to use. It is also possible to use this class directly from its static main method.
Three examples are presented: code snippets for visualizing the transition between active objects and components, the 'hello world', from the Fractal tutorial, and C3D component version. The programming model is Fractal, and one should refer to the Fractal documentation for other detailed examples.
In Java, objects are created by instantiation of classes. With ProActive, one can create active objects from Java classes, while components are created from component definitions. Let us first consider the 'A' interface:
public interface A { public String foo(); // dummy method }
'AImpl' is the class implementing this interface:
public class AImpl implements A { public AImpl() {} public String foo() { // do something } }
The class is then instantiated in a standard way:
A object = new AImpl();
Active objects are instantiated using factory methods from the ProActive class (see Section 13.10, “The Hello world example”). It is also possible to specify the activity of the active object, the location (node or virtual node), or a factory for meta-objects, using the appropriate factory method.
A active_object = (A)ProActive.newActive( AImpl, // signature of the base class new Object[] {}, // Object[] aNode, // location, could also be a virtual node );
As components are also active objects in this implementation, they benefit from the same features, and are configurable in a similar way. Constructor parameters, nodes, activity, or factories, that can be specified for active objects, are also specifiable for components. The definition of a component requires 3 sub-definitions: the type, the description of the content, and the description of the controller.
The type of the component (i.e. the functional interfaces provided and required) is specified in a standard way: (as taken from the Fractal tutorial)
We begin by creating objects that represent the types of the components of the application. In order to do this, we must first get a bootstrap component. The standard way to do this is the following one (this method creates an instance of the class specified in the fractal.provider system property, and uses this instance to get the bootstrap component):
Component boot = Fractal.getBootstrapComponent();
We then get the TypeFactory interface provided by this bootstrap component:
TypeFactory tf = (TypeFactory)boot.getFcInterface('type-factory');
We can then create the type of the first component, which only provides a A server interface named 'a':
// type of the a component ComponentType aType = tf.createFcType(new InterfaceType[] { tf.createFcItfType('a', 'A', false, false, false) });
The second step in the definition of a component is the definition of its content. In this implementation, this is done through the ContentDescription class:
ContentDescription contentDesc = new ContentDescription( AImpl, // signature of the base class new Object[] {}, // Object[] aNode // location, could also be a virtual node );
Properties relative to the controller can be specified in the ControllerDescription:
ControllerDescription controllerDesc = new ControllerDescription( 'myName', // name of the component Constants.PRIMITIVE // the hierarchical type of the component // it could be PRIMITIVE, COMPOSITE, or PARALLEL );
Eventually, the component definition is instantiated using the standard Fractal API. This component can then be manipulated as any other Fractal component.
Component component = componentFactory.newFcInstance( componentType, // type of the component (defining the client and server interfaces) controllerDesc, // implementation-specific description for the controller contentDesc // implementation-specific description for the content );
There are 2 kinds of interfaces for a component: those that offer services, and those that require services. They are named respectively server and client interfaces.
From a Java class, it is fairly natural to identify server interfaces: they (can) correspond to the Java interfaces implemented by the class. In the above example, 'a' is the name of an interface provided by the component, corresponding to the 'A' Java interface.
On the other hand, client interfaces usually correspond to attributes of the class, in the case of a primitive component. If the component defined above requires a service from another component, say the one corresponding to the 'Service' Java interface, the AImpl class should be modified. As we use the inversion of control pattern, a BindingController is provided, and a binding operation on the 'requiredService' interface will actually set the value of the 'service' attribute, of type 'Service'.
First, the type of the component is changed:
// type of the a component ComponentType aType = tf.createFcType(new InterfaceType[] { tf.createFcItfType('a', 'A', false, false, false), tf.createFcItfType('requiredService', 'A', true, false, false) });
The Service interface is the following:
And the AImpl class is:
// The modified AImpl class public class AImpl implements A, BindingController { Service service; // attribute corresponding to a client interface public AImpl() {} // implementation of the A interface public String foo() { return service.bar(); // for example } // implementation of BindingController public Object lookupFc (final String cItf) { if (cItf.equals('requiredService')) { return service; } return null; } // implementation of BindingController public void bindFc (final String cItf, final Object sItf) { if (cItf.equals('requiredService')) { service = (Service)sItf; } } // implementation of BindingController public void unbindFc (final String cItf) { if (cItf.equals('requiredService')) { service = null; } } }
The mandatory helloworld example (from the Fractal tutorial) shows the different ways of creating a component system (programmatically and using the ADL), and it can easily be implemented using ProActive.
You can find the code for this example in the package org.objectweb.proactive.examples.components.helloworld of the ProActive distribution.
The code is almost identical to the Fractal tutorial's example.
The differences are the following:
The reference example is provided for level 3.3. implementation, whereas this current implementation is compliant up to level 3.2: templates are not provided. Thus you will have to skip the specific code for templates.
The
newFcInstancemethod of theGenericFactoryinterface, used for directly creating components, takes 2 implementation-specific parameters. So you should use theorg.objectweb.proactive.component.ControllerDescriptionandorg.objectweb.proactive.component.ContentDescriptionclasses to define ProActive components. (It is possible to use the same parameters than in Julia, but that hinders you from using some functionalities specific to ProActive, such as distributed deployment or definition of the activity).Collective interfaces could be implemented the same way than suggested, but using the
Fractive.createCollectiveClientInterfacemethod will prove useful with this implementation: you are then able to use the functionalities provided by the typed groups API.Components can be distributed
the ClientImpl provides an empty no-args constructor.
The helloworld example is a simple client-server application, where the client (c) and the server (s) are components, and they are both contained in the same root component (root).
Another configuration is also possible, where client and server are wrapped around composite components (C and S). The goal was initially to show the interception shortcut mechanism in Julia. In the current ProActive implementation, there are no such shortcuts, as the different components can be distributed, and all invocations are intercepted. The exercise is still of interest, as it involves composite components.

This section is specific to the ProActive implementation, as it uses the deployment framework of this library.
If the application is started with (only) the parameter 'distributed', the ADL used is 'helloworld-distributed-no-wrappers.fractal', where virtualNode of the client and server components are exported as VN1 and VN2. Exported virtual node names from the ADL match those defined in the deployment descriptor 'deployment.xml'.
One can of course customize the deployment descriptor and deploy components onto virtually any computer, provided it is connectable by supported protocols. Supported protocols include LAN, clusters and Grid protocols (see Chapter 21, XML Deployment Descriptors).
Have a look at the ADL files 'helloworld-distributed-no-wrappers.fractal' and 'helloworld-distributed-wrappers.fractal'. In a nutshell, they say: 'the primitive components of the application (client and server) will run on given exported virtual nodes, whereas the other components (wrappers, root component) will run on the current JVM.
Therefore, we have the two following configurations:
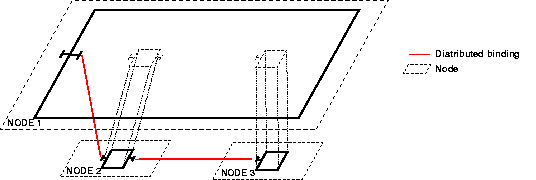
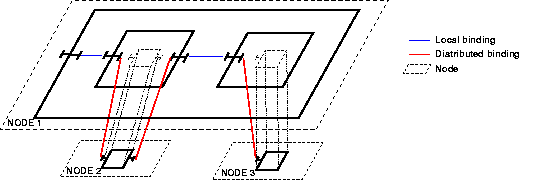
Currently, bindings are not optimized. For example, in the configuration with wrappers, there is an indirection that can be costly, between the client and the server. We are currently working on optimizations that would allow to shortcut communications, while still allowing coherent dynamic reconfiguration. It is the same idea than in Julia, but we are dealing here with distributed components. It could imply compromises between dynamicity and performance issues.
You can either compile and run the code yourself, or follow the instructions for preparing the examples and use the script helloworld_fractal.sh (or .bat). If you choose the first solution, do not forget to set the fractal.provider system property.
If you run the program with no arguments (i.e. not using the parser, no wrapper composite components, and local deployment) , you should get something like this:
01 --> This ClassFileServer is reading resources from classpath 02 Jini enabled 03 Ibis enabled 04 Created a new registry on port 1099 05 //crusoe.inria.fr/Node363257273 successfully bound in registry at //crusoe.inria.fr/Node363257273 06 Generating class: pa.stub.org.objectweb.proactive.core.component.type.Stub_Composite 07 Generating class: pa.stub.org.objectweb.proactive.examples.components.helloworld.Stub_ClientImpl 08 Generating class: pa.stub.org.objectweb.proactive.examples.components.helloworld.Stub_ServerImpl
You can see:
line 01: the creation of the class file server which handles the on-the-fly generation and distribution of ProActive stubs and component functional interfaces
line 04: the creation of a rmi registry
line 05: the registration of the default runtime node
line 06 to 08: the on-the-fly generation of ProActive stubs (the generation of component functional interfaces is silent)
Then you have (the exception that pops out is actually the expected result, and is intended to show the execution path):
01 Server: print method called 02 at org.objectweb.proactive.examples.components.helloworld.ServerImpl.print(ServerImpl.java:37) 03 at sun.reflect.NativeMethodAccessorImpl.invoke0(Native Method) 04 at sun.reflect.NativeMethodAccessorImpl.invoke(NativeMethodAccessorImpl.java:39) 05 at sun.reflect.DelegatingMethodAccessorImpl.invoke(DelegatingMethodAccessorImpl.java:25) 06 at java.lang.reflect.Method.invoke(Method.java:324) 07 at org.objectweb.proactive.core.mop.MethodCall.execute(MethodCall.java:373) 08 at org.objectweb.proactive.core.component.request.ComponentRequestImpl.serveInternal(ComponentRequestImpl.java:163) 09 at org.objectweb.proactive.core.body.request.RequestImpl.serve(RequestImpl.java:108) 10 at org.objectweb.proactive.core.body.BodyImpl$ActiveLocalBodyStrategy.serve(BodyImpl.java:297) 11 at org.objectweb.proactive.core.body.AbstractBody.serve(AbstractBody.java:799) 12 at org.objectweb.proactive.core.body.ActiveBody$FIFORunActive.runActivity(ActiveBody.java:230) 13 at org.objectweb.proactive.core.body.ActiveBody.run(ActiveBody.java:145) 14 at java.lang.Thread.run(Thread.java:534) 15 Server: begin printing... 16 --------> hello world 17 Server: print done.
What can be seen is very different from the output you would get with the Julia implementation. Here is what happens (from bottom to top of the stack):
line 14: The active object runs its activity in its own Thread
line 12: The default activity is to serve incoming request in a FIFO order
line 08: Requests (reified method calls) are encapsulated in ComponentRequestImpl objects
line 06: A request is served using reflection
line 02: The method invoked is the print method of an instance of ServerImpl
Now let us have a look at the distributed deployment: execute the program with the parameters 'distributed parser'. You should get something similar to the following:
01 --> This ClassFileServer is reading resources from classpath 02 Jini enabled 03 Ibis enabled 04 Created a new registry on port 1099 05 ************* Reading deployment descriptor: file:/0/user/mmorel/ProActive/classes/org/objectweb/proactive/examplescomponents/helloworld/deployment\ .xml ******************** 06 created VirtualNode name=VN1 07 created VirtualNode name=VN2 08 created VirtualNode name=VN3 09 **** Starting jvm on crusoe.inria.fr 10 --> This ClassFileServer is reading resources from classpath 11 Jini enabled 12 Ibis enabled 13 Detected an existing RMI Registry on port 1099 14 //crusoe.inria.fr/VN1462549848 successfully bound in registry at //crusoe.inria.fr/VN1462549848 15 **** Mapping VirtualNode VN1 with Node: //crusoe.inria.fr/VN1462549848 done 16 Generating class: pa.stub.org.objectweb.proactive.examples.components.helloworld.Stub_ClientImpl 17 **** Starting jvm on crusoe.inria.fr 18 --> This ClassFileServer is reading resources from classpath 19 Jini enabled 20 Ibis enabled 21 Detected an existing RMI Registry on port 1099 22 //crusoe.inria.fr/VN21334775605 successfully bound in registry at //crusoe.inria.fr/VN21334775605 23 **** Mapping VirtualNode VN2 with Node: //crusoe.inria.fr/VN21334775605 done 24 Generating class: pa.stub.org.objectweb.proactive.examples.components.helloworld.Stub_ServerImpl 25 //crusoe.inria.fr/Node1145479146 successfully bound in registry at //crusoe.inria.fr/Node1145479146 26 Generating class: pa.stub.org.objectweb.proactive.core.component.type.Stub_Composite 27 MOPClassLoader: class not found, trying to generate it 28 ClassServer sent class Generated_java_lang_Runnable_r_representative successfully 39 MOPClassLoader: class not found, trying to generate it 30 ClassServer sent class Generated_java_lang_Runnable_r_representative successfully 31 MOPClassLoader: class not found, trying to generate it 32 ClassServer sent class Generated_org_objectweb_proactive_examples_components_helloworld_Service_s_representative successfully 33 MOPClassLoader: class not found, trying to generate it 34 ClassServer sent class Generated_org_objectweb_proactive_examples_components_helloworld_ServiceAttributes_attribute_controller_representative succe\ ssfully 35 ClassServer sent class pa.stub.org.objectweb.proactive.examples.components.helloworld.Stub_ServerImpl successfully
What is new is:
line 05 the parsing of the deployment descriptor
line 09 and 17: the creation of 2 virtual machines on the host 'crusoe.inria.fr'
line 15 and 24: the mapping of virtual nodes VN1 and VN2 to the nodes specified in the deployment descriptor
line 35: the dynamic downloading of the stub class for ServerImpl: the stub class loader does not find the classes of the stubs in the current VM, and fetches the classes from the ClassServer
line 28, 30, 32, 34: the dynamic downloading of the classes corresponding to the components functional interfaces (they were silently generated)
Then we get the same output than for a local deployment, the activity of active objects is independent from its location.
01 Server: print method called 02 at org.objectweb.proactive.examples.components.helloworld.ServerImpl.print(ServerImpl.java:37) 03 at sun.reflect.NativeMethodAccessorImpl.invoke0(Native Method) 04 at sun.reflect.NativeMethodAccessorImpl.invoke(NativeMethodAccessorImpl.java:39) 05 at sun.reflect.DelegatingMethodAccessorImpl.invoke(DelegatingMethodAccessorImpl.java:25) 06 at java.lang.reflect.Method.invoke(Method.java:324) 07 at org.objectweb.proactive.core.mop.MethodCall.execute(MethodCall.java:373) 08 at org.objectweb.proactive.core.component.request.ComponentRequestImpl.serveInternal(ComponentRequestImpl.java:163) 09 at org.objectweb.proactive.core.body.request.RequestImpl.serve(RequestImpl.java:108) 10 at org.objectweb.proactive.core.body.BodyImpl$ActiveLocalBodyStrategy.serve(BodyImpl.java:297) 11 at org.objectweb.proactive.core.body.AbstractBody.serve(AbstractBody.java:799) 12 at org.objectweb.proactive.core.body.ActiveBody$FIFORunActive.runActivity(ActiveBody.java:230) 13 at org.objectweb.proactive.core.body.ActiveBody.run(ActiveBody.java:145) 14 at java.lang.Thread.run(Thread.java:534) 15 Server: begin printing... 16 ->hello world 17 Server: print done.
org.objectweb.proactive.examples.components.helloworld.helloworld-distributed-wrappers.fractal
<?xml version="1.0" encoding="ISO-8859-1" ?>
<!DOCTYPE definition PUBLIC "-//objectweb.org//DTD Fractal ADL 2.0//EN"
"classpath://org/objectweb/proactive/core/component/adl/xml/proactive.dtd">
<definition name=
"org.objectweb.proactive.examples.components.helloworld.helloworld-distributed-wrappers">
<interface name="r" role="server" signature="java.lang.Runnable"/>
<exportedVirtualNodes>
<exportedVirtualNode name="VN1">
<composedFrom>
<composingVirtualNode component="client" name="client-node"/>
</composedFrom>
</exportedVirtualNode>
<exportedVirtualNode name="VN2">
<composedFrom>
<composingVirtualNode component="server" name="server-node"/>
</composedFrom>
</exportedVirtualNode>
</exportedVirtualNodes>
<component name="client-wrapper" definition=
"org.objectweb.proactive.examples.components.helloworld.ClientType">
<component name="client" definition=
"org.objectweb.proactive.examples.components.helloworld.ClientImpl"/>
<binding client="this.r" server="client.r"/>
<binding client="client.s" server="this.s"/>
<controller desc="composite"/>
</component>
<component name="server-wrapper" definition=
"org.objectweb.proactive.examples.components.helloworld.ServerType">
<component name="server" definition=
"org.objectweb.proactive.examples.components.helloworld.ServerImpl"/>
<binding client="this.s" server="server.s"/>
<controller desc="composite"/>
</component>
<binding client="this.r" server="client-wrapper.r"/>
<binding client="client-wrapper.s" server="server-wrapper.s"/>
</definition>
org.objectweb.proactive.examples.components.helloworld.ClientType.fractal
<?xml version="1.0" encoding="ISO-8859-1" ?>
<!DOCTYPE definition PUBLIC "-//objectweb.org//DTD Fractal ADL 2.0//EN"
"classpath://org/objectweb/proactive/core/component/adl/xml/proactive.dtd">
<definition name="org.objectweb.proactive.examples.components.helloworld.ClientType" extends=
"org.objectweb.proactive.examples.components.helloworld.RootType">
<interface name="r" role="server" signature="java.lang.Runnable"/>
<interface name="s" role="client" signature=
"org.objectweb.proactive.examples.components.helloworld.Service"/>
</definition>
org.objectweb.proactive.examples.components.helloworld.ClientImpl.fractal
<?xml version="1.0" encoding="ISO-8859-1" ?>
<!DOCTYPE definition PUBLIC "-//objectweb.org//DTD Fractal ADL 2.0//EN"
"classpath://org/objectweb/proactive/core/component/adl/xml/proactive.dtd">
<definition name="org.objectweb.proactive.examples.components.helloworld.ClientImpl" extends=
"org.objectweb.proactive.examples.components.helloworld.ClientType">
<exportedVirtualNodes>
<exportedVirtualNode name="client-node">
<composedFrom>
<composingVirtualNode component="this" name="client-node"/>
</composedFrom>
</exportedVirtualNode>
</exportedVirtualNodes>
<content class="org.objectweb.proactive.examples.components.helloworld.ClientImpl"/>
<virtual-node name="client-node" cardinality="single"/>
</definition>
org.objectweb.proactive.examples.components.ServerType
<?xml version="1.0" encoding="ISO-8859-1" ?>
<!DOCTYPE definition PUBLIC "-//objectweb.org//DTD Fractal ADL 2.0//EN"
"classpath://org/objectweb/proactive/core/component/adl/xml/proactive.dtd">
<definition name="org.objectweb.proactive.examples.components.helloworld.ServerType">
<interface name="s" role="server" signature=
"org.objectweb.proactive.examples.components.helloworld.Service"/>
</definition>
org.objectweb.proactive.examples.components.helloworld.ServerImpl
<?xml version="1.0" encoding="ISO-8859-1" ?>
<!DOCTYPE definition PUBLIC "-//objectweb.org//DTD Fractal ADL 2.0//EN"
"classpath://org/objectweb/proactive/core/component/adl/xml/proactive.dtd">
<definition name="org.objectweb.proactive.examples.components.helloworld.ServerImpl" extends=
"org.objectweb.proactive.examples.components.helloworld.ServerType">
<exportedVirtualNodes>
<exportedVirtualNode name="server-node">
<composedFrom>
<composingVirtualNode component="this" name="server-node"/>
</composedFrom>
</exportedVirtualNode>
</exportedVirtualNodes>
<content class="org.objectweb.proactive.examples.components.helloworld.ServerImpl"/>
<attributes signature=
"org.objectweb.proactive.examples.components.helloworld.ServiceAttributes">
<attribute name="header" value="->"/>
<attribute name="count" value="1"/>
</attributes>
<controller desc="primitive"/>
<virtual-node name="server-node" cardinality="single"/>
</definition>
The Comanche example is a nice introduction to component based development with Fractal. It explains how to design applications using components, and how to implement these applications using the Fractal API.
You will notice that the example presented in this tutorial is based
on Comanche, a simplistic http server. However, this example extensively
uses reference passing through components. For example
Request objects are passed by reference. This is
incompatible with the ProActive programming model, where, to avoid shared
passive objects, all passive objects passed to active objects are actually
passed by copy
(see Chapter 12, ProActive Basis, Active Object Definition). As active objects are themselves passed by
reference, one could argue that we could turn some passive object into
active objects. This would allow remote referencing through stubs.
Unfortunately, for reasons specific to the Sockets and Streams
implementations, (Socket streams implementations do not provide empty
no-arg constructors), it is not easily possible to encapsulate some of the
needed resource classes into active objects.
There is a complete example of migrative Active Object code to Component code. This can be seen in the Guided Tour: Chapter 10, C3D - from Active Objects to Components.
The ProActive/Fractal framework is a functional and flexible implementation of the Fractal API and model. One can configure and deploy a system of distributed components, including Grids. The framework also proposes extensions for collective interactions (gathercast and multicast interfaces), allocation configuration through virtual nodes extensions, and some optimizations.
It is now a mature framework for developing Grid applications, and as such it is a basis for experimenting new research paths.
One of the challenges of Grid computing is to handle changes in the execution environments, which are not predictable in systems composed of large number of distributed components on heterogeneous environments. For this reason, the system needs to be dynamically reconfigurable, and must exhibit autonomic properties.
Simple and deterministic dynamic reconfiguration is a real challenge in systems that contain hierarchical components that feature their own activities and that communicate asynchronously.
The autonomic computing paradigm is related to this challenge because is consists of building applications out of self-managed components. Components which are self-managed are able to monitor their environment and adapt to it by automatically optimizing and reconfiguring themselves. The resulting systems are autonomous and automatically fulfill the needs of the users, but the complexity of adaptation is hidden to them. Autonomicity of components represents a key asset for large scale distributed computing. We are also
Encapsulation properties, components with configurable activities, and system description in ADL files provide safe basis for model checking of component systems.
For instance:
Behavioral information on components can be specified in extended ADL files.
Automatas can be generated from behavioral information and structural description.
Model checking tools are used to verify the automatas.
The Vercors platform investigates such kinds of scenarii.
Distributed computational applications are designed by defining a functional or do- main decomposition, and these decompositions often present structural similarities (master-slave, 2D-Grid, pipeline etc.).
In order to facilitate the design of complex systems with large number of entities and recurring similar configurations, we plan to propose a mechanism for defining parameterizable assembly patterns in the Fractal ADL, particularly for systems that contain parameterized numbers of identical components.
Another area of investigation is the tools for configuring, deploying and monitoring distributed component systems.
Because component based programming is somewhat analogous to the assembly of building blocks into a functional product, graphical tools are well suited for the design and monitoring of component based systems. The Fractal community actually proposes such a tool: the Fractal GUI. We have extended this tool to evaluate the feasibility of a full-fledge graphical interface for the design and monitoring of distributed components. The result is available within the IC2D GUI, you can try it out, but consider it as a product in alpha state. Development is indeed currently discontinued as we are waiting for a new release of the Fractal GUI, and some features are only partially implemented (runtime monitoring, composition of virtual nodes).
The GUI allows the creation of ADL files representing component systems, and - the other way around - also allows to load ADL files and get a visual representation of systems described in the ADL files. We have worked on the manipulation of virtual nodes - a deployment abstraction -: components display the virtual nodes where they are deployed, and it is also possible to compose virtual nodes
Ultimately, we would like to couple the visualization of components at runtime (currently unavailable here) with the standard monitoring capabilities of IC2D: we would get a structural view of the application in the Fractal GUI, and a topological view in the standard IC2D.
If you want to try out the extended Fractal GUI for ProActive (for versions of ProActive < 3.2):
start IC2D
Components --> start components GUI
to load an ADL file:
File --> Storage --> select the storage repository which is the root repository of your ADL files. For example you can select the 'src' directory of the ProActive distribution
File --> Open --> select an ADL file in the storage repository. For example you can select the 'helloworld-distributed-wrappers.fractal' file in the src/org/objectweb/proactive/examples/components/helloworld directory of the ProActive distribution.
to modify an ADL file, you can use the Graph tab for a structural view, while the Dialog tab gives you access to the properties of the components, including the composition of the virtual ndoes.
to save an ADL file: File --> Save
| Note |
|---|---|
Since version 3.2 the experimental GUI in IC2D is not functional anymore. Developments are discontinued as we are moving towards an eclipse plugin integrated with the new eclipse-plugin-based version of IC2D. A proposal specification for this new GUI is available here. We intend add extension for Grid-specific features (control of deployment, visual abstractions etc.) |
Other areas of research that we are opening around this work include:
wrapping legacy codes (MPI for instance) for interoperability with existing software
packaging: a bit like enterprise archives for Enterprise JavaBeans, though there is also a notion of composition of deployment that needs to be addressed.
formalism (ProActive is based on a formal deterministic model for asynchronous distributed objects)
MxN data redistribution: automatic redistribution of data from M components to N components
Computational Peer-To-Peer (P2P) is becoming a key execution environment. The potential of 100,000 nodes interconnected to execute a single application is rather appealing, especially for Grid computing. Mimicking data P2P, one could start a computation that no failure would ever be able to stop (and maybe nobody).
The ProActive P2P aims to use spare CPU cycles from organization's or institution's desktop workstations.
This short document explains how to create a simple computational P2P network. This network is a dynamic JVMs network which works like computational nodes.
The P2P infrastructure works as an overlay network. It works with a P2P Service which is a peer which in turn is in computational node. The P2P Service is implemented with a ProActive Runtime and few Active Objects. The next figure shows an example of a network of hosts where some JVMs are running and several of them are running the P2P Service.
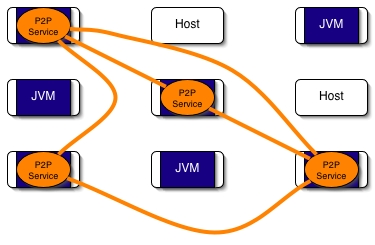
Example of a ProActive P2P infrastructure.
Figure 35.1. A network of hosts with some running the P2P Service
When the P2P infrastructure is running, it is very easy to obtain some nodes (JVMs). The next section describes how to use it.
Further research information is available at http://www-sop.inria.fr/oasis/Alexandre.Di_Costanzo/AdC/Publications.html.
The goals of this work are to use sparse CPU cycles from institutions' desktop workstations combined with grids and clusters. Desktop workstations are not available all the time for sharing computation times with different users other than the workstation owner. Grids and clusters have the same problem as normal users don't want to share their usage time.
Managing different sorts of resources (grids, clusters, desktop workstations) as a single network of resources with a high instability between them needs a fully decentralized and dynamic approach.
Therefore, P2P is a good solution for sharing a dynamic JVM network, where JVMs are the shared resources. Thereby, the P2P Infrastructure is a P2P network which shares JVMs for computation. This infrastructure is completely self-organized and fully configurable.
Before going on to consider the P2P infrastructure, it's important to define what Peer-to-Peer is.
There are a lot of P2P definitions, many of them are similar to other distributed infrastructures, such as Grid, client / server, etc. There are 2 better definitions which describe really P2P well:
From Peer-to-Peer Harnessing the Power of Disruptive Technologies (edited by Andy Oram):
'[...] P2P is a class of applications that take advantage of resources - available at the edges of the Internet [...]'
And from A Definition of Peer-to-Peer Networking for the Classification of Peer-to-Peer Architectures and Applications (Rdiger Schollmeier - P2P'01):
'[...] Peers are accessible by other peers directly [...] Any arbitrary chosen peer can be removed from the network without fault [...]'
P2P's focus on sharing, decentralization, instability and fault tolerance.
A fresh (or new) peer which would like to join the P2P network, will encounter a serious bootstrapping problem or first contact problem: 'How can it connect to the P2P network?'
A solution for that is to use a specific protocol. ProActive provides an interface for a network-centric services protocol which is named JINI. JINI can be used for discovering services in a dynamic computing environment, such as a fresh peer which would like to join a P2P network. This protocol is perfectly adapted to solve the bootstrapping problem. However, there is a serious drawback for using a protocol such as JINI as peer discovering protocol. JINI is limited to working only in the same sub-network. That means JINI doesn't pass through firewalls or NAT and can't be considered to be used for Internet.
Therefore, a different solution for the bootstrapping problem was chosen. The solution for ProActive first contact P2P is inspired from Data P2P Networks. This solution is based on real life , i.e. when a person wants to join a community, this person has to first know another person who is already a member of the community. After the first person has contacted the community member, the new person is introduced to all the community members.
The ProActive P2P bootstrapping protocol works as follows:
A fresh peer has a list of 'server' addresses. These are peers which have a high potential to be available and to be in the P2P network, they are in a certain way the P2P network core.
With this list the fresh peer tries to contact each server. When a server is reached the server is added to ithe fresh peer's list of known peers (acquaintances).
Then the fresh peer knows some servers, it is in the P2P Network and it is no longer a fresh peer, it is a peer of the P2P network.
Furthermore, in the case of the fresh peer not able to contact any servers from the list, the fresh peer will try every TTU (see below, about Time To Update parameter) to re-contact all of them until one or several of them are finally available. At any moment when the peer knows nobody because all of its acquaintances are no longer available, the peer will try to contact all the servers as explained earlier.
An example of a fresh peer which is trying to join a P2P network is shown by the next Figure. The new peer has 2 servers to contact in order to join the existing P2P infrastructure.
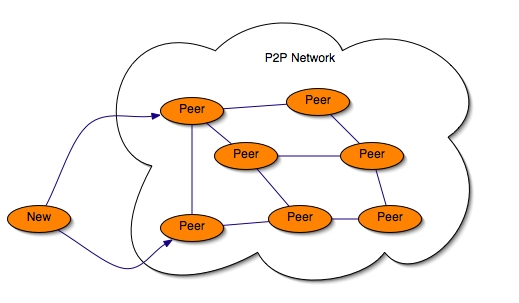
The main particularity of a P2P network is the peers high volatility. This results from various attributes which compose P2P:
Peers run on different kinds of computers: desktop workstations, laptops, servers, cluster nodes, etc.
Each peer has a particular configuration: operating system, etc.
Communicating network between peers consists of different speed connections: modem, 100Mb Ethernet, fiber channel, etc.
Peers are not available all the time and not all at the same moment.
Peer latency is not equal for all.
etc.
The result is the instability of the P2P network. But the ProActive P2P infrastructure deals with these problems with transparency.
ProActive P2P infrastructure aims to maintain a created P2P network alive while there are available peers in the network, this is called self-organizing of the P2P network. Because P2P doesn't have exterior entities, such as centralized servers which maintain peer data bases, the P2P network has to be self-organized. That means all peers should be enabled to stay in the P2P network by their own means.
There is a solution which is widely used in data P2P networks; this consists of each peer keeping a list of their neighbors, a peer's neighbor is typically a peer close to it (IP address or geographically).
In the same way, this idea was selected to keep the ProActive P2P infrastructure up. All peers have to maintain a list of acquaintances. At the beginning, when a fresh peer has just joined the P2P infrastructure, it knows only peers from its bootstrapping step (Section 35.2.2.1, “Bootstrapping: First Contact”). However, depending on how long the list of servers is, many of them could be unreachable, unavailable, etc. and the fresh peer ends up knowing a small number of acquaintances. Knowing a small number of acquaintances is a real problem in a dynamic P2P network when all the servers will be unavailable, the fresh peer will be unconnected from the P2P infrastructure.
Therefore, the ProActive P2P infrastructure uses a specific parameter called: Number Of Acquaintances (NOA). This is a minimum size of the list of acquaintances of all peers. The more the peers are highly dynamic, the more NOA should be high. Thereby, a peer must discover new acquaintances through the P2P infrastructure.
In Section 35.2.2.3, “Asking Computational Nodes”, we will see in detail how the message protocol works. For the moment we will just explain briefly the discovering acquaintances process without going into detail about the message protocol.
The peer called 'Alice' has 2 acquaintances resulting from its first contact with the P2P infrastructure and by default NOA is 10 peers. Alice must find at least 8 peers to be able to stay with a certain guarantee inside the infrastructure.
The acquaintance discovering works as follows:
Send an exploring message to all of its acquaintances, and wait for responses from new acquaintances (not peers that have already been contacted peers and not already known peers).
When receiving an exploring message:
Forward the message to acquaintances until the message Time To Live (TTL) reaches 0.
Choose to be or not to be an acquaintance of the asking peer.
In order to not have isolated peers in the infrastructure, all peers registration are symmetric. That means if Alice knows the peer 'Bob', Bod also knows Alice. Hence, when a peer chooses whether to be an acquaintance or not, the peer has to check previously in its own acquaintance list if it doesn't already know the asking peer. Next, if it's an unknown peer, the peer decides with a random function to be an acquaintance or not. With the parameter of agree responses, it is possible to configure the percentage of positive responses to an exploring message. The random function is a temporary solution to solve the flooding problem due to the message protocol (see Section 35.2.2.3, “Asking Computational Nodes”), we are thinking of using a new parameter Maximum Number of Acquaintances and improving the message protocol. For the moment, we don't consider peers IP addresses or geographical location of the peers as an acquaintances criteria.
As the P2P infrastructure is a dynamic environment, the list of acquaintances must also be dynamic. Many acquaintances could be unavailable and must be removed of the list. When the size of the list is less than the NOA, the peer has to discover new peers. Therefore, all peers keep their lists up-to-date. That's why a new parameter must be introduced: Time To Update (TTU). The peer must frequency check its own acquaintances' list to remove unavailable peers and discover new peers. To verify the acquaintances availability, the peer send a Heart Beat to all of its acquaintances. The heart beat is sent every TTU.
The next figure shows a peer which is sending a heart beat to all of its acquaintances.
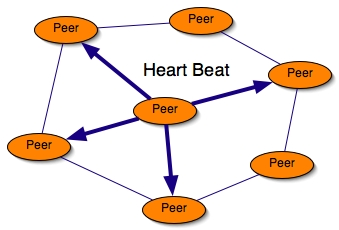
The main goal of this work is to provide an infrastructure for sharing computational nodes (JVMs). Therefore, a resource query mechanism is needed; there are 2 types of resources in this context, thus 2 query types:
Exploring the P2P infrastructure to search new acquaintances.
Asking free computational nodes to deploy distributed applications.
The mechanism is similar to Gnutella's communication system: Breadth-First Search algorithm (BFS). The system is message-based with application-level routing.
All BFS messages must contain this information:
A Unique Universal Message Identifier (UUID): this message identifier is not totally universally unique, it is just unique for the infrastructure;
The Time To Live (TTL) infrastructure parameter, in number of hops;
A reference to the requester peer. The peer waits for responses for nodes or acquaintances.
Our BFS inspired version works as follow:
Broadcasting a request message to all of its acquaintances with an UUID, and TTL, and number of asked nodes.
When receiving a message:
Test the message UUID, is it an old message?
Yes, it is: continue;
No, it's not:
Keep the UUID;
I have a free node:
Send the node reference to the caller and waiting an ACK until timeout
if timeout is reached or NACK
continue;
if ACK and asked nodes - 1 > 0 and TTL > 0 then
Broadcast with TTL - 1 and asked nodes -1
continue;
Gnutella's BFS got a lot of justified critics for scaling, bandwidth, etc. It is true this protocol is not good enough but we're working to improve it. We are inquiring into solutions with a not fixed TTL to avoid network flooding.
The next Figure shows briefly the execution of the inspired BFS algorithm:
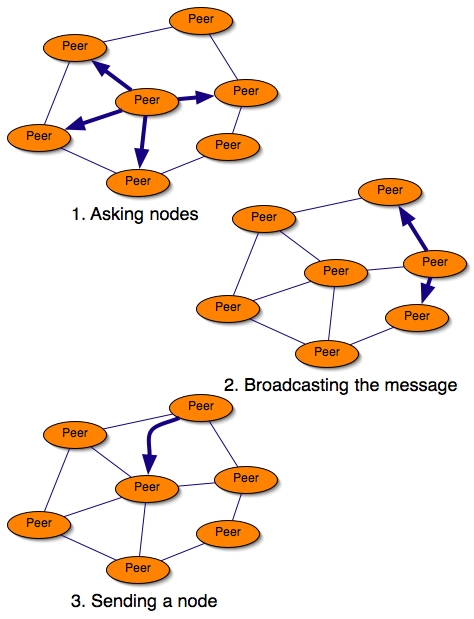
The P2P infrastructure is implemented with ProActive. Thus the shared resource is not a JVMs but a ProActive node, nodes are like a container which receives work.
The P2P infrastructure is not directly implemented in the ProActive core at the ProActive runtime level because we choose to be above communication protocols, such as RMI, HTTP, Ibis, etc. Therefore, the P2P infrastructure can use RMI or HTTP as communication layer. Hence, the P2P infrastructure is implemented with classic ProActive active objects and especially with ProActive typed group for broadcasting communications between peers due to your inspired BFS.
Using active objects for the implementation is a good mapping with the idea of a peer which is an independent entities that works as a server with a FIFO request queue. The peer is also a client which sends requests to other peers.
The list of P2P active objects:
P2PService: is the main active object. It serves all register requests or resource queries, such as nodes or acquaintances.
P2PNodeManager: works together with the P2PService, this active object manages one or several shared nodes. It handles the booking node system, see Section 35.3.3, “Sharing Node Mechanism” for more details.
P2PAcquaintanceManager: manages the list of acquaintances and provides group communication, see Section 35.3.2, “ Dynamic Shared ProActive Group”.
P2PNodeLookup: works as a broker when the P2PService asks nodes. All the asking node protocol is inside it. This broker can migrate to a different node to be closer to the deployed application.
FirstContact: it's the bootstrapping object (see Section 35.2.2.1, “Bootstrapping: First Contact”).
The Figure below shows the connection between all active objects:
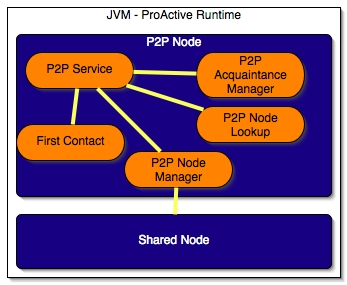
All communications between peers use Group communication but for sending a response to a request message, it's a point-to-point communication. Though ProActive communications are asynchronous, it's not really messages which are sent between peers. Nevertheless, it's not a real problem; ProActive is implemented above Java RMI which is RPC and RPC is synchronous. However, ProActive uses future mechanism and Rendez-vous method to turn RPC methods to asynchronous. That means ProActive is asynchronous RPC. Rendez-vous is interesting in your case because it guarantees the method is successfully received by the receiver. With the Heart beat message which is sent a Java exception when an acquaintance is down.
The P2PAcquaintanceManager manages the list of acquaintances, this list is represented by a ProActive typed group of P2PService. This is the point of the next section.
ProActive typed group does not allow access to group elements and make calls from different active objects to the same group is not possible, i.e. a group can not be shared. However, the point of the P2P infrastructure is to broadcast messages to all members on the acquaintance list, ProActive typed group is perfect for doing that. A typed group of P2PService is a good implementation of the acquaintance list design.
But a typed group does not support to be shared by many active objects, especially for making group method calls from different objects, adding / removing / etc. members in the group. For the P2P infrastructure the P2PAcquaintanceManager (PAM) was designed.
The PAM is a standard active object, at its initialization it constructs an empty P2PService group. The PAM provides an access to few group methods, such as removing, adding and group size methods. All other active objects, such as P2PService or P2PNodeLookup, have to use PAM methods to access the group. The PAM works as a server with an FIFO queue behind the group.
That solves the problem of group members accessing but not how other active objects can call methods on the group. The ProActive group API provides a method to active a group that is made possible to get ProActive reference on the group. The PAM actives the group after its creation. P2PService, P2PNodeLookup and all get the group reference from a PAM's getter.
The PAM, during its activity, frequently sends heart beats to remove unavailable peers. The P2PService adds, via the PAM, new discovered acquaintances (P2PService) and the P2PNodeLookup calls group methods to ask nodes to the group reference. The P2PService does also group method calls.
In short, this can be seen in the next Figure:
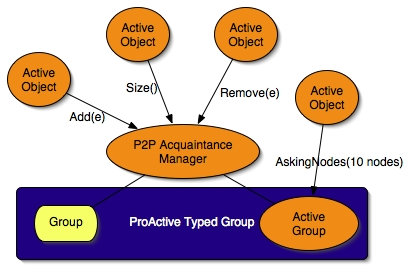
We just explained how to share a typed group between active objects but that is not solve all the problems. For the moment, the BFS implementation with broadcasting to all acquaintances each time is not perfect due to the message which is always send back to the previous sender. We are working to add member exclusion in a group method call.
The sharing node mechanism is an independent activity from the P2P service. Nodes are the sharing resource of this P2P network. This activity is handled by the P2PNodeManager active object.
At the initialization of the P2PNodeManager (PNM), it has to instantiate the shared resource. By default, it's 1 ProActive nodes by CPUs, for example on a single processor machine the PNM starts 1 node and on a bi-processors machine it starts 2 nodes. It's possible to choose to share only a single node. An another way is to share nodes from an XML deployment descriptor file by specifing the descriptor to the PNM which actives the deployment and gets nodes ready to share.
When the P2P service receives a node request, the request is forwarded (after the BFS broadcast) to the PNM which checks for a free node. In the case of at least 1 free node, the PNM must book the node and send back a reference to the the node to the original request sender. However, the booking remains valid for a predetermined time, this time expires after a configurable timeout. The PNM knows if the node is used or not by testing the active object presence inside the node. Consequently, at the end of the booking time, the PNM kills the node, the node is no longer usable. Though, some applications need empty nodes for a long time before using them, thereby there is a pseudo expand booking time system: creating 'Dummy' active objects in booked nodes for later use. This system is allowed by the P2PNodeLookup.
The P2PNodeLookup could receive more nodes than it needs, for all additional nodes, the P2PNodeLookup sends a message to all PNMs' nodes to cancel its booking on the node.
The deployed applications have to leave nodes after use. Therefore, the PNM offers a leaving node mechanism that is the application sent a leaving message for a specified node to the PNM which kills all node's active objects by terminating their bodies and kills the node. After that, the PNM creates a new node which is ready for sharing. However, if nodes are deployed by an XML descriptor the PNM does't kill the node, it just terminates all its active objects and re-shares the same node.
The asking node mechanism is allowed by the P2PNodeLookup, this object is active by the P2PService when it receives an asking node request from an application. The P2PNodeLookup (PNL) works as a broker, it could migrate to another place (node, machine, etc.) to be near the application.
The PNL aims to find the number of nodes requested by the application. It uses the BFS to frequently flood the network until it gets all nodes or until the timeout is reached. However, the application can ask to the maximum number of nodes, in that case the PNL asks to nodes until the end of the application. The PNL provides a listener / producer event mechanism which is great for the application which wants to know when a node is found.
Finally, the application kills nodes by the PNL which is in charge of contacting all the PNMs of each node and asks them to leave nodes. The PNMs leave nodes with the same mechanism of the booking timeout.
Lastly, the asking nodes mechanism with the PNL is fully integrated to the ProActive XML deployment descriptor.
IC2D hides all P2P internal object by default, in order to monitor the infrastructure itself we invite you to check the IC2D documentation Chapter 42, IC2D: Interactive Control and Debugging of Distribution and Eclipse plugin to set the right option.
A screen shot made with IC2D. You can see 3 P2P services which are sharing 2 nodes (bi-processors machines). Inside the nodes there are some active Domain objects from the nBody application which is deployed on this small P2P infrastructure.
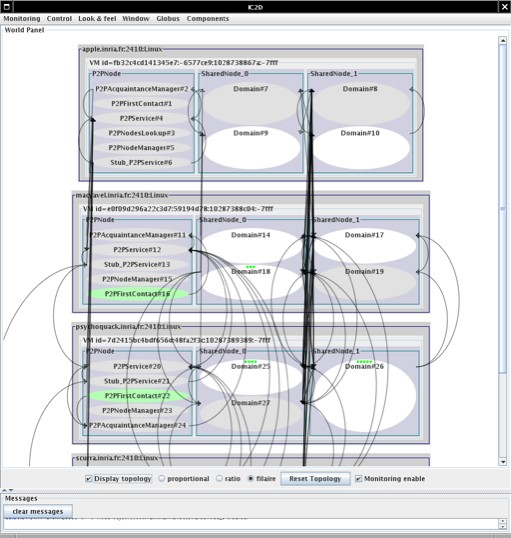
The P2P infrastructure is self-organized and configurable. When the infrastructure is running you have nothing to do to keep it up. There are 3 main parameters to configure:
Time To Update (TTU): each peer checks if its known peers are available when TTU expires. By default, its value is 1 minute.
Number Of Acquaintances (NOA): is the minimal number of peers one peer needs to know to keep up the infrastructure. By default, its value is 10 peers.
Time To Live (TTL): in hops for JVMs (node) depth search (acquisition). By default, its value is 5 hops.
All parameter descriptions and the way to change their default values are explained in Section 20.4.3, “ Peer-to-Peer properties ”. Next section shows how to configure the infrastructure when starting the P2P Service with the command line.
The bootstrapping or first contact problem is how a new peer can join the p2p infrastructure. We solved this problem by just specifying one or several addresses of supposed peers which are running in the p2p infrastructure. Next, we will explain how and where you can specify this list of peers.
Now, you just have to start peers. There are two ways to do so:
This method explains how to rapidly launch a simple P2P Service on one host.
ProActive provides a very simple script to start a P2P Service on your local host. The name of this script is startP2PService.
UNIX, GNU/Linux, BSD and MacOsX systems: the script is located in ProActive/scripts/unix/p2p/startP2PService.sh file.
Microsoft Windows system: the script is located in ProActive/p2p/scripts/windows/p2p/startP2PService.bat file.
Before launching this script, you have to specify some parameters to this command:
startP2PService [-acq acquisitionMethod] [-port portNumber] [-s Peer ...] [-f PeersListFile]
-acq acquisitionMethod the ProActive Runtime communication protocol used. Examples: rmi, http, ibis, ... By default it is rmi.
-port portNumber is the port number where the P2P Service will listen. By default it is 2410
-s Peer ... specify addresses of peers which are used to join the P2P infrastructure. Example:
rmi://applepie.proactive.org:8080
-f PeersListFile same of -s but peers are specified in file ServerListFile. One per line.
More options:
-noa NOA in number of host. NOA is the minimal number of peers one peer needs to know to keep up the infrastructure. By default, its value is 10 peers.
-ttu TTU is in minutes. Each peer sends a heart beat to its acquaintances. By default, its value is 1 minute.
-ttl TTL is in hop. TTL represents live time messages in hops of JVMs (node). By default, its value is 5 hops.
-capacity Number_of_Messages is the maximum memory size to stock message UUID. Default value is 1000 messages UUID.
-exploring Percentage is the percentage of agree response when a peer is looking for acquaintances. By default, its value is 66%.
-booking Time in ms it takes while booking a shared node. It's the maximum time in milliseconds to create at least an active object in the shared node. After this time, and if no active objects are created, the shared node will leave and the peer which gets this shared node will be no longer be able to use it. Default is 3 minutes.
-node_acq Time in milliseconds which is the timeout for node acquisition. The default value is 3 minutes.
-lookup Time is the lookup frequency in milliseconds for re-asking nodes. By default, it's value is 30 seconds.
-no_multi_proc_nodes to share only a node. Otherwise, 1 node by CPU that means the p2p service which is running on a bi-pro will share 2 nodes. By default, 1 shared node for 1 CPU.
-xml_path to share nodes from a XML deployment descriptor file. This option takes a file path. By default, no descriptors are specified. That means the P2P Service shares only one local node or one local node by CPUs.
All arguments are optional.
Comment: With the UNIX version of the startP2PService script, the P2P service is persistent and runs like a UNIX nice process. If the JVMs that are running the P2P service stop (for a Java exception) the script re-starts a new one.
In this illustration, we will explain how to start a first peer and then how new peers can create a P2P network with the first one.
Start the first peer with rmi protocol and listening on port 2410:
first.peer.host$startP2PService.sh -acq rmi -port 2410
Now, start new peers and connect them to the first peer to create a tiny P2P network:
second.peer.host$startP2PService.sh -acq rmi -port 2410 -s rmi://first.peer.host third.peer.host$startP2PService.sh -acq rmi -port 2602 -s rmi://first.peer.host
You could specify a different port number for each peer.
Use a file to specify the addresses of peers:
The file hosts.file:
rmi://first.peer.host:2410 rmi://third.peer.host:2602
file.peer.host$startP2PService.sh -acq rmi -port 8989 -f hosts.file
Lastly, a new peer joins the P2P network:
last.peer.host$startP2PService.sh -acq rmi -port 6666 -s rmi://third.peer.host:2410

The daemon aims to use computers in Peer-to-Peer computations. There will be a Java virtual machine sleeping on your computer and waking up at scheduled times to get some work done.
By default, the JVM is scheduled to wake up during the weekend and during the night. Next, we will explain how to change the schedule. The JVM is running with the lowest priority.
UNIX
Go to the directory: ProActive/compile and run this command:
$ ./build daemon
Before compiling you should change some parameters like the daemon user or the port in the file:
ProActive/p2p/src/common/proactivep2p.h
Ask your system administrator to add the daemon in a crontab or init.d. The process to run is located here:
ProActive/p2p/build/proactivep2p
Microsoft Windows
To compile daemon source (in c++), we don't provide any automatic script, you have to do it yourself. All sources for Windows are in the directory: ProActive/p2p/src/windows. If you use Microsoft Visual Studio, you can find in the src directory the Microsoft VS project files.
After that you are ready to install the daemon with Windows, you just have to run this script:
C:>ProActive\scripts\windows\p2p\Service\install.bat
To remove the daemon:
C:>ProActive\scripts\windows\p2p\Service\remove.bat
Comment: By default the port number of the daemon is 9015.
The daemon is configured with XML files in the ProActive/p2p/config/ directory. To find the correct configuration file, the daemon will first try with a host dependent file: config/proactivep2p.${HOST}.xml for example: config/proactivep2p.camel.inria.fr.xml if the daemon is running on the host named camel.inria.fr.
If this host specific file is not found, the daemon will load config/proactivep2p.xml. This mechanism can be useful to setup a default configuration and have a specific configuration for some hosts.
The reference is the XML Schema called proactivep2p.xsd, shown in Example C.34, “P2P configuration: proactivep2p.xsd”. For those not fluent in XML Schema, here is a description of all markup tags
The root element in <configFile> it contains one or many <p2pconfig> . This latter element can start with a <loadconfig path='path/to/xml'/> it will include the designated XML file. After these file inclusions, you can with <host name='name.domain'> specify which hosts are concerned by the configuration. Then there can be a <configForHost> element containing a configuration for the selected hosts and/or a <default> element if no suitable configuration was already found.
Bear in mind that the XML parser sees a lot of configuration and the first that matches is used and the parsing is finished. This means that the elements we have just seen are tightly linked together. For example if an XML file designated by a <loadconfig> contains a <default> element, then after this file no other element will be evaluated. This is because either a configuration was already found so the parsing stops, or no configuration matched and the <default> does, so the parsing ends.
The proper configuration is contained in a <configForHost> or <default> element. It consists of the scheduled times for work and the hosts where we register ourselves. Here is an example:
<periods>
<period>
<start day='monday' hour='18'
minute='0'/>
<end day='tuesday' hour='6'
minute='0'/>
</period>
<period>
<start day='saturday' hour='0'
minute='0'/>
<end day='monday' hour='6'
minute='0'/>
</period>
</periods>
<register>
<registry url='trinidad.inria.fr'/>
<registry url='amda.inria.fr'/>
<registry url='tranquility.inria.fr'/>
<registry url='psychoquack.inria.fr'/>
</register>In this example we clearly see that the JVM will wake up Monday evening and shut down Tuesday morning. It will also work during the weekend. In the <register> part we put the URL in which we will register ourselves, in the example we used the short form which is equivalent to rmi://host:9301.
The following commands only work with UNIX friendly systems.
Stop the JVM: This command will stop the JVM and will restart it at the next scheduled time, which is the day after:
$ProActive/p2p/build/p2pctl stop [hostname]
Kill the daemon:
$ProActive/p2p/build/p2pctl killdaemon [hostname]
Restart the daemon:
$ProActive/p2p/build/p2pctl restart [hostname]
Test the daemon:
$ProActive/p2p/build/p2pctl alive [hostname]
Flush the daemon logs:
$ProActive/p2p/build/p2pctl flush [hostname]
hostname is the name of the remote host which the daemon command is sent to. This parameter is optional, if the host name is not specified the command is executed on the local host.
Under Windows you could use some littles scripts in ProActive//script/windows/p2p/JVM to do that.
All daemon logs are written in a file. All logs are available in:
ProActive/p2p/build/logs/hostname
You can customize some P2P settings such as:
nodesAsked is the number of nodes you want from the P2P infrastructure. Setting MAX as value is equivalent to an infinite number of nodes. This attribute is required.
acq is the communication protocol that's used to communicate with this P2P Service. All ProActive communication protocols are supported: rmi, http, etc. Default is rmi.
port represents the port number on which to start the P2P Service. Default is 2410. The port is used by the communication protocol.
The NOA Number Of Acquaintances is the minimal number of peers one peer needs to know to keep up the infrastructure. By default, its value is 10 peers.
The TTU Time To Update each peer sends a heart beat to its acquaintances. By default, its value is 1 minute.
The TTL Time To Live represents messages live time in hops of JVMs (node). By default, its value is 5 hops.
multi_proc_nodes is a boolean (use true or false) attribute. When its value is true the P2P service will share 1 node by CPU, if not only one node is shared. By default, its value is true, i.e. 1 node / CPU.
xml_path is used with a XML deployment descriptor path. The P2P Service shares nodes which are deployed by the descriptor. No default nodes are shared.
booking_nodes is a boolean value (true or false). During asking nodes processs there is a timeout, booking timeout is used for obtaining nodes. That means if no active objects are created before the end of the timeout, the node will be free and no longer shared. To avoid the booking timeout, put this attribute at true, obtained nodes will be permanently booked for you. By default, its value is false. See below, for more information about the booking timeout.
With elements acq and port, if a P2P Service is already running with this configuration the descriptor will use this one, if not a new one is started.
In order to get nodes, the peerSet tag will allow you to specify entry point of your P2P Infrastructure.
You can get nodes from the P2P Infrastructure using the ProActive Deployment Descriptor as described above.
In fact you will ask for a certain number of nodes and ProActive will notify a 'listener' (one of your class), every time a new node is available.
ProActiveDescriptor pad = ProActive.getProactiveDescriptor('myP2PXmlDescriptor.xml');
// getting virtual node 'p2pvn' defined in the ProActive Deployement Descriptor
VirtualNode vn = pad.getVirtualNode('p2pvn');
// adding 'this' or anyother class has a listener of the 'NodeCreationEvent'
((VirtualNodeImpl) vn).addNodeCreationEventListener(this);
//activate that virtual node
vn.activate();
As you can see, the class executing this code must implement an interface in order to be notified when a new node is available from the P2P infrastructure.
Basically you will have to implement the interface NodeCreationEventListener that can be found in package org.objectweb.proactive.core.event. For example, this method will be called every time a new host is acquired:
public void nodeCreated(NodeCreationEvent event) { // get the node Node newNode = event.getNode(); // now you can create an active object on your node. }
You should carefully notice that you can be notified at any time, whatever the code you are executing, once you have activated the virtual node.
A short preview of a XML descriptor:
<infrastructure>
<services>
<serviceDefinition id='p2pservice'>
<P2PService nodesAsked='2' acq='rmi'
port='2410' NOA='10' TTU='60000'
TTL='10'>
<peerSet>
<peer>rmi://localhost:3000</peer>
</peerSet>
</P2PService>
</serviceDefinition>
</services>
</infrastructure>
A complete example of file is available, see Example C.35, “P2P configuration: sample_p2p.xml” .
The next figure shows a P2P Service started with a XML deployment descriptor (xml_path attribute). Six nodes are shared on different hosts:
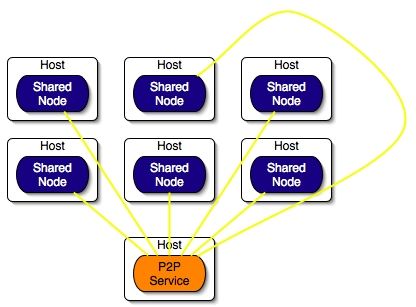
For more information about ProActive XML Deployment Descriptor see the descriptor java doc .
The next little sample of code explains how, from an application, you can start a P2P Service and get nodes:
import org.objectweb.proactive.ProActive; import org.objectweb.proactive.core.ProActiveException; import org.objectweb.proactive.core.mop.ClassNotReifiableException; import org.objectweb.proactive.core.node.Node; import org.objectweb.proactive.core.node.NodeException; import org.objectweb.proactive.core.node.NodeFactory; import org.objectweb.proactive.core.runtime.ProActiveRuntime; import org.objectweb.proactive.core.runtime.RuntimeFactory; import org.objectweb.proactive.p2p.service.P2PService; import org.objectweb.proactive.p2p.service.StartP2PService; import org.objectweb.proactive.p2p.service.node.P2PNodeLookup; ... // This constructor uses a file with address of peers // See the Javadoc to choose different parameters StartP2PService startServiceP2P = new StartP2PService(p2pFile) // Start the P2P Service on the local host startServiceP2P.start(); // Get the reference on the P2P Service P2PService serviceP2P = startServiceP2P.getP2PService(); // By the application's P2P Service ask to the P2P infrastructure // for getting nodes. P2PNodeLookup p2pNodeLookup = p2pService.getNodes(nNodes, virtualNodeName, JobID); // You can migrate the P2P node lookup from the p2p service // to an another node: p2pNodeLookup.moveTo('//localhost/localNode'); // Use method from p2pNodeLookup to get nodes // such as while (! p2pNodeLookup.allArrived()) { Vector arrivedNodes = p2pNodeLookup.getAndRemoveNodes(); // Do something with nodes ... } // Your application ... // End of your program // Free shared nodes p2pNodeLookup.killAllNodes();
Plug technical services (Chapter 26, Technical Service), such as Fault-tolerance schemes or Load Balancing, for each application at the deployment time.
The seminal paper [ CCMPARCO07 ] .
Further research information is available at http://www-sop.inria.fr/oasis/Alexandre.Di_Costanzo/.
Load balancing is the process of distributing load among a set of processors in a smart way for exploiting the parallelism and minimize the response time. There are two main approaches to distributed load balancing: work sharing, in which processors try to equalize the load among them, and work stealing, in which idle processor request extra work.
The load balancing uses the migration to move objects from a node to an other : ProActive.migrateTo(object,node,false). (see Chapter 16, Active Object Migration for more details).
The load balancing need metrics to evaluate each node and so to take a decision. You can define your own Metrics (CPU Load, number of active objects, communication between active objects ...).
You must implement two classes : MetricFactory and Metric (package org.objectweb.proactive.loadbalancing.metrics).
You have to implements the method public Metric getNewMetric( ) which returns a new Metric.
There are two concepts : the rank and the load. The rank is used to compare two nodes without considering the load (ex: CPU mHz). The load can evoluate in time
Three methods have to be implemented :
public void takeDecision(LoadBalancer lb) : this method has to call lb.startBalancing( ) (overload) or lb.stealWork( ) (underload)
public double getRanking() : this method returns the rank of the node.
public double getLoad() : this method returns the load of the node.
There is two ways for using load balancing : manually in the application code or as a technical service.(see Chapter 26, Technical Service for more details).
In order to ease the use of the load balancing, we provide static
methods on the LoadBalancing class. First of all, you
need to initialize the load balancing with the
MetricFactory as described in the previous paragraph. You can specify a
list of nodes at the initialization or later.
Node[] nodes; Node node; //... initialisation of nodes LoadBalancing.activateOn(nodes, new MyMetricFactory()); // or LoadBalancing.activate(new MyMetricFactory()); // to add a node LoadBalancing.addNode(node);
In your deployment descriptor, you have to define the load balancing technical service as following :
<technical-service id="LoadBalancingService" class= "org.objectweb.proactive.loadbalancing.LoadBalancingTS"> <arg name="MetricFactory" value="myPackage.myMetricFactory" /> </technical-service>This service has to be applied on a Virtual Node :
<virtualNode name="Workers" property="multiple" technicalServiceId="LoadBalancingService"/>
Sometimes, active objects can't migrate : non-serializable attributes ...; in that case, you have to specify that these objects have to be ignored by the load balancing mechanism.
So, these objects have to implement the interface org.objectweb.proactive.loadbalancing.NotLoadBalanceableObject
In order to use the Proactive Security features, you have to installthe Java(TM) Cryptography Extension (JCE) Unlimited Strength Jurisdiction Policy Files available at Sun's website. Extract the file and copy jar files to your <jre_home>/lib/security.
Usually, applications and security are developed for a specific use. We propose here a security framework that allows dynamic deployment of applications and security configuration according to this deployment.
ProActive security mechanism provides a set of security features from basic ones like communications authentication, integrity, and confidentiality to more high-level features including secure object migration, hierarchical security policies, and dynamically negotiated policies. All these features are expressed at the ProActive middleware level and used transparently by applications.
It is possible to attach security policies to Runtimes, Virtual Nodes, Nodes and Active Objects. Policies are expressed inside an XML descriptor.
A distributed or concurrent application built using ProActive is composed of a number of medium-grained entities called active objects. Each active object has one distinguished element, the root, which is the only entry point to the active object; all other objects inside the active object are called passive objects and cannot be referenced directly from objects which are outside this active object (see following figure); the absence of sharing is important with respect to security.

The security is based on Public Key Infrastructure. Each entity owns a certificate and an private key generated from the certificate of a user.
Certificates are generated automatically by the security mechanism. The validity of a certificate is checked by validating its certificate chain. As shown in the next figure, before validating the certificate of an active object, the application certificate and user certificate will be checked. If a valid path is found then the object certificate is validated.
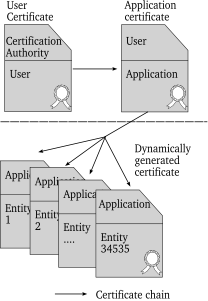
Security is expressed at different levels, according to who wants to set policy:
Administrators set policy at domain level. It contains general security rules.
Resource provider set policy for resource. People who have access to a cluster and wants to offer cpu time under some restrictions. The runtime loads its policy file at launch time.
Application level policy is set when an application is deployed through an XML descriptor.
The ProActive middleware will enforce the security policy of all entites interacting within the system, ensuring that all policies are adhered to.
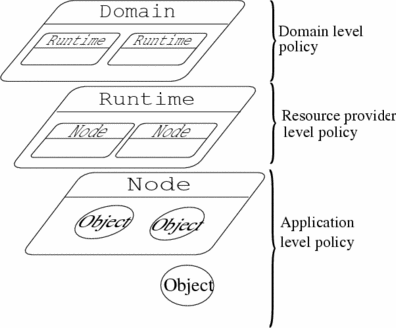
The security architecture relies on two related abstractions for deploying Grid applications: Node and Virtual Node. A node gathers several objects in a logical entity. It provides an abstraction for the physical location of a set of activities. Objects are bound to a node at creation or after migration. In order to have a flexible deployment (eliminating from the source code machine names, creation protocols), the system relies on Virtual Nodes (VNs). A VN is identified as a name (a simple string), used in a program source, defined and configured in an descriptor. The user can attach policy to these virtual nodes. Virtual Nodes are used within application code to structure it. By example, an object which will be used as a server will be set inside a virtual node named "Server_VN", client objects will be set inside "Client_VN". The user expresses policy between server and client object inside a descriptor file. The mapping between Virtual Nodes and Nodes is done when the application starts.
Grid programming is about deploying processes (activities) on various machines. The final security policy that must be set for those processes depends upon many factors: primarily, this is dictated by the application's policy, but the machine locations, the security policies of their administrative domain, and the network being used to reach those machines must also be considered.
The previous section defined the notions of Virtual Nodes, and Nodes. Virtual Nodes are application abstractions, and nodes are only a run-time entity resulting from the deployment: a mapping of Virtual Nodes to processes and hosts. A first decisive feature allows the definition of application-level security on those abstractions:

As such, virtual nodes are the foundation for intrinsic application level security. If, at design time, it appears that a process always requires a specific level of security (e.g. authenticated and encrypted communications at all time), then that process should be attached to a virtual node on which those security features are imposed. It is the designer responsibility to structure his/her application or components into virtual node abstractions compatible with the required security. Whatever deployment occurs, those security features will be maintained. We expect this case to occur infrequently, for instance in very sensitive applications where even an intranet deployment calls for encrypted communications.
The second decisive feature deals with a major Grid aspect: deployment-specific security. The issue is actually twofold:
allowing organizations (security domains) to specify general security policies,
allowing application security to be specifically adapted to a given deployment environment.
Domains are a standard way to structure (virtual) organizations involved in a Grid infrastructure; they are organized in a hierarchical manner. They are the logical concept which allow the expression of security policies in a hierarchical way.

This principle deals with the two issues mentioned above:
(1) the administrator of a domain can define specific policy rules that must be obeyed by the applications running within the domain. However, a general rule expressed inside a domain may prevent the deployment of a specific application. To solve this issue, a policy rule can allow a well-defined entity to weaken it. As we are in a hierarchical organization, allowing an entity to weaken a rule means allowing all entities included to weaken the rule. The entity can be identified by its certificate;
(2) a Grid user can, at the time he runs an application, specify additional security based on the domains being deployed onto.
The Grid user can specify additional rules directly in his deployment descriptor for the domains he deploys onto. Note that those domains are actually dynamic as they can be obtained through external allocators, or even Web Services in an OGSA infrastructure (see [FKTT98]). Catch-all rules might be important in that case to cover all cases, and to provide a conservative security strategy for unforseen deployments.
Finally, as active objects are active and mobile entities, there is a need to specify security at the level of such entities.

In open applications, e.g. several principals interacting in a collaborative Grid application, a JVM (a process) launched by a given principal can actually host an activity executing under another principal. The above principle specific security privileges to be retained in such a case. Moreover, it can also serve as a basis to offer, in a secure manner, hosting environments for mobile agents.
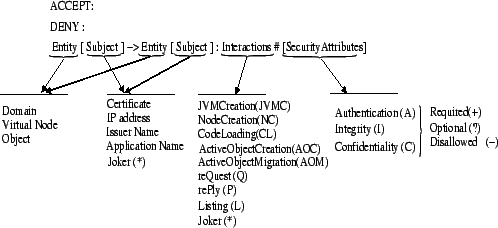
Prior to an application starting on a grid, a user needs to acquire some resources (CPU time, disk storage, bandwidth) from the grid. A resource provider is an individual, a research institute, an organization who wants to offer some resources under a certain security policy to a restricted set of peoples. According to our definition, the resource provider will set up one or more runtimes where clients will be able to perform computation. Each runtime is set with its own policy. Theses runtimes could be globally distributed.
Security policies are able to control all the interactions that can occur when deploying and executing a multi-principals Grid application. With this goal in mind, interactions span the creation of processes, to the monitoring of activities (Objects) within processes, including of course the communications. Here is a brief description of those interactions:
RuntimeCreation (RC): creation of a new Runtime process
NodeCreation (NC): creation of a new Node within a Runtime (as the result of Virtual Node mapping)
CodeLoading (CL): loading of bytecode within a Node, used in presence of object migration.
ObjectCreation (OC): creation of a new activity (active object) within a Node
ObjectMigration (OM): migration of an existing activity object to a Node
Request (Q), Reply (P): communications, method calls and replies to method calls
Listing (L): list the content of an entity; for Domain/Node provides the list of Node/Objects, for an Object allows to monitor its activity.
For instance, a domain is able to specify that it accepts downloading of code from a given set of domains, provided the transfers are authenticated and guaranteed not to be tampered with. As a policy might allow un-authenticated communications, or because a domain (or even country) policy may specify that all communications are un-encrypted, the three security attributes Authentication (A), Integrity (I) and Confidentiality (C) can be specified in three modes: Required (+), Optional (?), Disallowed (-)
For example, the tuple [+A,?I,-C] means that authentication is required, integrity is accepted but not required, and confidentiality is not allowed.
As grids are decentralized, without a central administrator controlling the correctness of all security policies, these policies must be combined, checked, and negotiated dynamically. The next two sections discuss how this is done.
As the proposed infrastructure takes into account different actors of the grid (e.g. domain administrator, grid user), even for a single-principal single-domain application, there are potentially several security policies in effect. This section deals with the combination of those policies to obtain the final security tuples of a single entity. An important principle being that a sub-domain cannot weaken the rules of its super-domains.
During execution, each activity (Active Object) is always included in a Node (due to the Virtual Node mapping) and at least in one Domain, the one used to launch a JVM (D0). Figure 37.5, “Hierarchical Security Levels” hierarchically represents the security rules that can be activated at execution: from the top, hierarchical domains (D1 to D0), the virtual node policy (VN), and the Active Object (AO) policy. Of course, such policies can be inconsistent, and there must be clear principles to combine the various sets of rules.
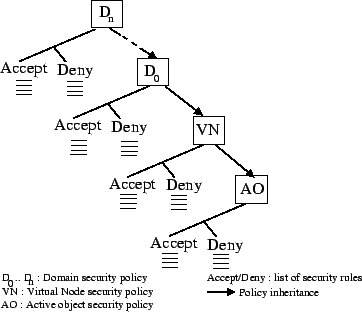
There are three main principles: (1) choosing the most specific rules within a given domain (as a single grid actor is responsible for it), (2) an interaction is valid only if all levels accept it (absence of weakening of authorizations), (3) the security attributes retained are the most constrained based on a partial order (absence of weakening of security). Consider the following example, where the catch-all rule specifies that all Requests (Q) and Replies (P) must be authenticated, integrity checked, and confidential, however within the specific "CardPlus" domain integrity and confidentiality will be optional.
Domain[*] -> Domain[*]: Q,P: [+A,+I,+C]
Domain[CardPlus] -> Domain[CardPlus]: Q,P: [+A,?I,?C] This means that any activity taking place within the CardPlus domain the second rule will be chosen (integrity and confidentiality will be optional), as the catch-all rule is less-specific than the "CardPlus" domain rule, and there is no hierarchical domain relationship between the two rules. Of course, comparison of rules is only a partial order, and several incompatible most specific rules can exist within a single level (e.g. both ACCEPT and DENY most specific rules for the same interaction, or both +A and -A).
Between levels, an incompatibility can also occur, especially if a sub-level attempts to weaken the policy on a given interaction (e.g. a domain prohibits confidentiality [-C] while a sub-domain or the Virtual Node requires it [+C], a domain Di prohibits loading of code while Dj (j <= i) authorizes it). In all incompatible cases, the interaction is not authorized and an error is reported.
During execution, entities interact in a pairwise fashion. Each entity, for each interaction (JVM creation, communication, migration, ...), will want to apply a security policy based on the resolution presented in the previous section. Before starting an interaction, a negotiation occurs between the two entities involved. Table 37.1, “Result of security negotiations” shows the result of such negotiation. For example, if for a given interaction, entity A's policy is [+A,?I,?C], and B's policy is [+A,?I,-C], the negotiated policy will be [A,?I,-C]. If both policies specify an attribute as optional, the attribute is not activated.
The other case which leads to an error is when an attribute is required by one, and disallowed by the other. In such cases, the interaction is not authorized and an error is reported. If the two entities security policies agree, then the interaction can occur. In the case that the agreed security policy includes confidentiality, the two entities negotiate a session key.
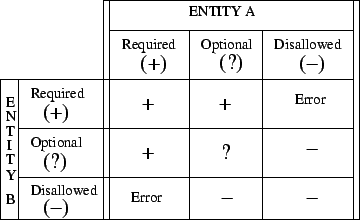
In large scale grid applications, migration of activities is an important issue. The migration of Active Objects must not weaken the security policy being applied.
When an active object migrates to a new location, three scenarios are possible:
the object migrates to a node belonging to the same virtual node and included in the same domain. In this case, all negotiated sessions remain valid.
the object migrates to a known node (created during the deployment step) but which belongs to another virtual node. In this case, all current negotiated sessions become invalid. This kind of migration requires reestablishing the object security policy, and if it changes, renegotiating with interacting entities.
The object migrates to an unknown node (not known at the deployment step). In this case, the object migrates with a copy of the application security policy. When a secured interaction takes place, the security system retrieves not only the object's application policy but also policies rules attached to the node on which the object is to compute the policy.
Within the deployment descriptor, the tag <security> is used to specify the policy for the deployed application. It will be the policy for all Nodes and Active Objects that will be created. Below is a fragment of a sample deployment descriptor:
2:<ProActiveDescriptor xmlns:xsi='http://www.w3.org/2001/XMLSchema-instance' xsi:noNamespaceSchemaLocation='DescriptorSchema.xsd'>
3: <security file='../../descriptors/security/applicationPolicy.xml'></security>
4: <componentDefinition>
5: <virtualNodesDefinition>
6: <virtualNode name='Locale' property='unique'/>
7: <virtualNode name='vm1' property='unique'/>
8: <virtualNode name='vm2' property='unique'/>
9: </virtualNodesDefinition>
10:</componentDefinition>
11: ....
50:<infrastructure>
51: <processes>
52: <processDefinition id='linuxJVM'>
53: <jvmProcess
class='org.objectweb.proactive.core.process.JVMNodeProcess'>
54: <classpath>
....
74: </classpath>
75: <jvmParameters>
<parameter value='-Dproactive.runtime.security=/.../descriptors/security/jvm1-sec.xml'/>
82: </jvmParameters>
83: </jvmProcess>
84: </processDefinition>
....Inside the policy file, you can express policy between entities (domain, runtime, node, active object).
The entity tag can be used to:
express policies on entities described inside the descriptor (lines 13, 15)
express policies on existing entities by specifying theirs certificates (line 32).
A policy file must begin with:
2:<Policy>
next, application specific information is given.
3: <ApplicationName>Garden</ApplicationName>
<ApplicationName> sets the application name. This allows easy identification of which application an entity belongs to.
4: <Certificate>/.../appli.cert</Certificate> 5: <PrivateKey>/.../appli.key</PrivateKey>
<Certificate> is the X509 certificate of the application, generated from a user certificate, and
<PrivateKey> the private key associated to the certificate.
6: <CertificationAuthority> 7: <Certificate>/.../ca.cert</Certificate> 8: </CertificationAuthority>
<CertificationAuthority> contains all trusted certificate authority certificates.
10: <Rules>
Then we can define policy rules. All rules are located within the <Rules>
A <Rule> is constructed according the following syntax:
11: <Rule>
<From> tag contains all entities from which the interaction is made (source). It is possible to specify many entities in order to match a specific fine-grained policy.
12: <From> 13: <Entity type='VN' name='vm2'/> 14: </From>
<Entity> is used to define an entity. the 'type' parameter can be 'VN', 'certificate', or 'DefaultVirtualNode'.
'VN' (Virtual Node) referrers to virtual nodes defined inside the deployment descriptor.
'DefaultVirtualNode' is a special tag. This is taken as the default policy. The "name" attribute is ignored.
'certificate' requires that the path to the certificate is set inside the 'name' parameters.
<To> tag contains all entities onto which the interaction is made (targets). As with the <From> tag, many entities can be specified.
15: <To> 16: <Entity type='VN' name='Locale'/> 17: </To>
The <Communication> tag defines security policies to apply to requests and replies.
18: <Communication>
<Request> sets the policy associated with a request. The 'value' parameter can be:
'authorized' means a request is authorized.
'denied' means a request is denied.
Each <Attribute> (authentication,integrity, confidentiality) can be required, optional or denied.
19: <Request value='authorized'> 20: <Attributes authentication='required' integrity='optional' confidentiality='optional'/> 21: </Request>
<Reply> tag has the same parameters that <Request>
22:<Reply value='authorized'> 23: <Attributes authentication='required' integrity='required' confidentiality='required'/> 24:</Reply> 25:</Communication>
<Migration> controls migration between <From> and <To> entities. Values can be 'denied' or 'authorized'.
26: <Migration>denied</Migration>
<OACreation> controls creation of active objects by <From> entities onto <To> entities.
Values can be 'denied' or 'authorized'.
27: <OACreation>denied</OACreation>
The following shows the complete security policy.
2: <Policy>
3: <ApplicationName>Garden</ApplicationName>
4: <Certificate>/net/home/acontes/certif/appli.cert</Certificate>
5: <PrivateKey>/net/home/acontes/certif/appli.key</PrivateKey>
6: <CertificationAuthority>
7: <Certificate>...</Certificate>
8: </CertificationAuthority>
9:
10: <Rules>
11: <Rule>
12: <From>
13: <Entity type='VN' name='vm2'/>
14: </From>
15: <To>
16: <Entity type='VN' name='Locale'/>
17: </To>
18: <Communication>
19: <Request value='authorized'>
20: <Attributes authentication='required'
integrity='required'
confidentiality='required'/>
21: </Request>
22: <Reply value='authorized'>
23: <Attributes authentication='required'
integrity='required'
confidentiality='required'/>
24: </Reply>
25: </Communication>
26: <Migration>denied</Migration>
27: <OACreation>denied</OACreation>
29: </Rule>
30: <Rule>
31: <From>
32: <Entity type='certificate' name='certificateRuntime1.cert'/>
33: </From>
34: <To>
35: <Entity type='VN' name='Locale'/>
36: </To>
37: <Communication>
38: <Request value='authorized'>
39: <Attributes authentication='required'
integrity='required'
confidentiality='required'/>
40: </Request>
41: <Reply value='authorized'>
42: <Attributes authentication='required'
integrity='required'
confidentiality='required'/>
43: </Reply>
44: </Communication>
45: <Migration>denied</Migration>
46: <OACreation>denied</OACreation>
48: </Rule>
...
90: <Rule>
91: <From>
92: <Entity type='DefaultVirtualNode' name='*'/>
93: </From>
94: <To>
95: <Entity type='DefaultVirtualNode' name='*'/>
96: </To>
97: <Communication>
98: <Request value='denied'>
99: <Attributes authentication='optional'
integrity='optional'
confidentiality='optional'/>
100: </Request>
101: <Reply value='denied'>
102: <Attributes authentication='optional'
integrity='optional'
confidentiality='optional'/>
103:
104: </Reply>
105: </Communication>
106: <Migration>denied</Migration>
107: <OACreation>authorized</OACreation>
109: </Rule>
110:
111: </Rules>
112:</Policy>Note that the JVM that reads the deployment descriptor should be started with a security policy. In order to start a secure JVM, you need to use the property proactive.runtime.security and give a path a security file descriptor.
Here is an example:
java -Dproactive.runtime.security=descriptors/security/jvmlocal.xml TestSecureDeployment secureDeployment.xml
A GUI has been created to facilitate certificate generation.
The first screenshot presents a root certificate. Notice that the certificate chain table is empty.
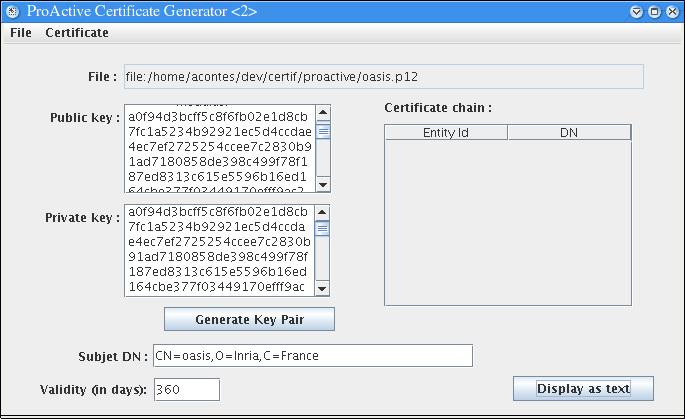
The second screenshot presents a certificate generated from the previous one using menu entry 'Certificate -> generate a sub-certificate'.
Notice that the certification table contains one entry and Distinguished Name of the Entity ID 1 is the same as the subject DN of the certificate
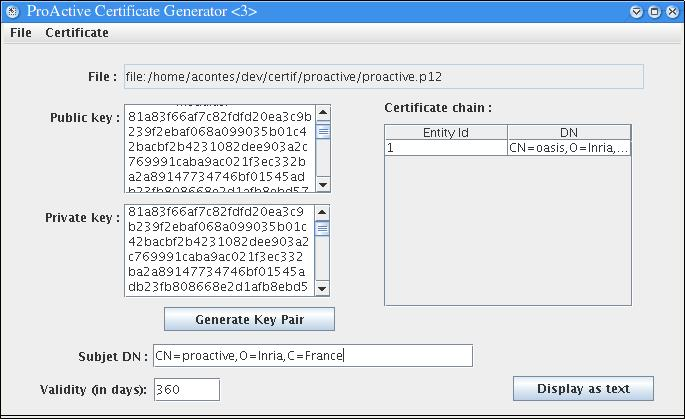
Using this GUI, a user is able to generate a certificate and if needed a certificate chain.
Certificates are saved under a PKCS12 format (extension .p12). This format is natively supported by the ProActive Security mechanism.
This feature allows the call and monitoring of active objects and ProActive components from any client written in any foreign language.
Indeed, applications written in C#, for example, cannot communicate with ProActive applications. We choose the web services technology that enable interoperability because they are based on XML and HTTP. Thus, any active object or component can be accessible from any enabled web service language.
A web service is a software entity, providing one or several functionnalities, that can be exposed, discovered and accessed over the network. Moreover, web services technology allows heterogenous applications to communicate and exchange data in a remotely way. In our case, the usefull elements, of web services are:
The SOAP Message
The SOAP message is used to exchange XML based data over the internet. It can be sent via HTTP and provides a serialization format for communicating over a network.
The HTTP Server
HTTP is the standard web protocol generally used over the 80 port. In order to receive SOAP messages you need to install an HTTP server that will be responsible of the data transfer. This server is not sufficient to treat a SOAP request.
The SOAP Engine
A SOAP Engine is the mechanism responsible of making transparent the unmarshalling of the request and the marshalling of the response. Thus, the service developer doesn't have to worry with SOAP. In our case, we use Apache SOAP which is installed on a Jakarta Tomcat web server. Moreover, Apache SOAP contains a web based administration tool that permit to list, deploy and undeploy services.
The client
Client's role is to consume a web service. It is the producer of the SOAP message. The client developer doesn't have to worry about how the service is implemented.
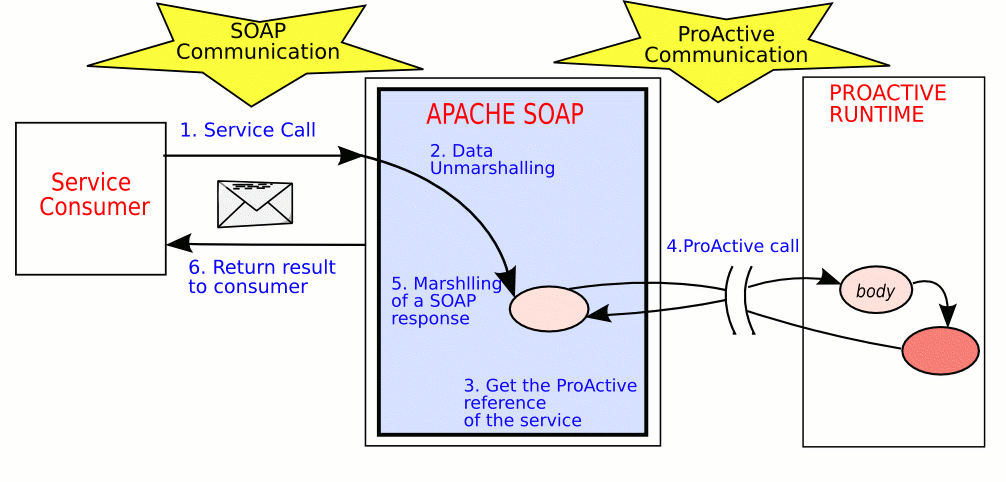
First of all, you need to install the Jakarta Tomcat web server here and install it. You can find some documentation about it here .
You don't really have to do a lot of installation. Just uncompress the archive.
To start and stop the server, launch the start and the shutdown scripts in the bin directory.
We also use a SOAP engine which is the Apache SOAP engine, available here . This SOAP engine will be responsible of locating and calling the service.
To install Apache SOAP refer to the server-side instructions.
The SOAP Engine is now installed ! You can verify, after starting the server that you access to the welcome page of Apache SOAP at: http://localhost:8080/soap/index.html.
Now we have to install ProActive into this SOAP engine. For that, follow these steps:
Copy the ProActive.jar file into the $APACHE-SOAP/WEB-INF/lib/
Replace the $TOMCAT/webapps/soap/WEB-INF/web.xml by the one found in Example C.36, “SOAP configuration: webservices/web.xml”.
The steps for exporting and using an active object as a web service are the following:
Write your active object or your component in a classic way; for example:
A a = (A)ProActive.newActive("A", new Object [] {});
Once the element is created and activated, deploy it onto a web server by using:
For an active object:
ProActive.exposeAsWebService(Object o, String url, String urn, String [] methods);where:
o is the active object
url is the url of the web server; typically http://localhost:8080.
urn is the service name which identify the active object on the server.
methods a String array containing the methods name you want to make accessible. If this parameter is null, all the public methods will be exposed.
For a component:
Proactive.exposeComponentAsWebService(Component component, String url, String componentName);where:
component is the component whose interfaces will be exposed as web services
url is the url of the web server; typically http://localhost:8080.
componentName is the name of the component. Each service available in this way will get a name composed by the component name followed by the interface name: componentName_interfaceName
To undeploy an active object as a service, use the ProActive static method:
ProActive.unExposeAsWebService ( String urn, String url );
where:
urn is the service name
url the url of the server where the service is deployed
To undeploy a component you have to specify the component name and the component( needed to know the interfaces to undeploy):
ProActive.unExposeAsWebService ( String componentName , String url, Component component);
Once the active object or the interfaces component are deployed, you can access it via any web service enabled client (such as C#).
First of all, the client will get the WSDL file matching this active object. This WSDL file is the 'identity card' of the service. It contains the web service public interfaces and its location. Generally, WSDL files are used to generate a proxy to the service. For example, for a given service, say 'compute', you can get the WSDL document at http://localhost:8080/servlet/wsdl?id=compute.
Now that this client knows what and where to call the service, it will send a SOAP message to the web server, the web server looks into the message and perform the right call then returns the reply into another SOAP message to the client.
Apache Soap supports all defined types in the SOAP 1.1
specification. All Java primitive types are supported but it is not always
the case for complex types. For Java Bean Objects, ProActive register them
in the Apache SOAP mapping registry, in order to use a specific
(de)serializer when such objects are exchanged. All is done automatically,
you don't have to matter about the registering of the type mapping.
However, if the methods attributes types or return types are Java Beans,
you have to copy the beans classes you wrote into the
$APACHE_SOAP_HOME/WEB_INF/classes.
Let's start with a simple example, an Hello world active object exposed as a web service:
public class HelloWorld implements Serializable { public HelloWorld () {} public String helloWorld (String name) { return "Hello world !"; } public static void main (String [] args) { try { HelloWorld hw = (HelloWorld)ProActive.newActive("HelloWorld", new Object []{}); ProActive.exposeAsWebService(hw, "helloWorld","http://localhost:8080", new String [] { "helloWorld" }); } catch (ActiveObjectCreationException e) { e.printStackTrace(); } catch (NodeException e) { e.printStackTrace(); } } }
The active object hw has been deployed as a web
service on the web server located at
"http://localhost:8080" . The accessible service
method is helloWorld.
Now that the server-side Web service is deployed, we can create a new client application in Visual Studio .NET.
In your new Visual Studio Project:
In the Solution Explorer window, right-click References and click Add Web Reference.
In the address box enter the WSDL service address, for example: http://localhost:8080/soap/servlet/wsdl?id=helloWorld .When clicking the 'add reference' button, this will get the service's WSDL and creates the specific proxy to the service.
Once the web reference is added, you can use the helloWorld service as an object and perform calls on it:
... localhost.helloWorld hw = new localhost.helloWorld(); string s = hw.helloWorld (); ...
C3D is a Java benchmark application that measures the performance of a 3D raytracer renderer distributed over several Java virtual machines using ProActive. C3D is composed of several parts: the distributed engine (renderers) and the dispatcher that is an active objet. This dispactcher permits users to see the 3D scene and to collaborate. Users can send messages and render command to this dispatcher. This enhancement of C3D is to send commands to the dispatcher from any language. To perform such an enhancement, the Dispatcher object must be exposed as a web service in order to a C# client for example controls it. Only one instruction has been added in the main method:
ProActive.exposeAsWebService (dispatcher, "C3DDispatcher", "http://localhost:8080", new String [] { "rotateRight", "getPicture", "rotateLeft", "rotateUp", "rotateDown", "getPixels", "getPixelMax", "waitForImage", "spinClock", "spinUnclock", "addRandomSphere", "resetScene", "registerWSUser", "unregisterWSUser" });
Once the dispatcher is deployed as a web service, we have a WSDL url: http://localhost:8080/soap/servlet/id=C3DDispactcher. It will be usefull to construct the dispatcher client.
First of all, we have to generate the service proxy following the steps described for the hello world access.
All the SOAP calls will be managed by the generated proxy
localhost.C3DDispatcher.
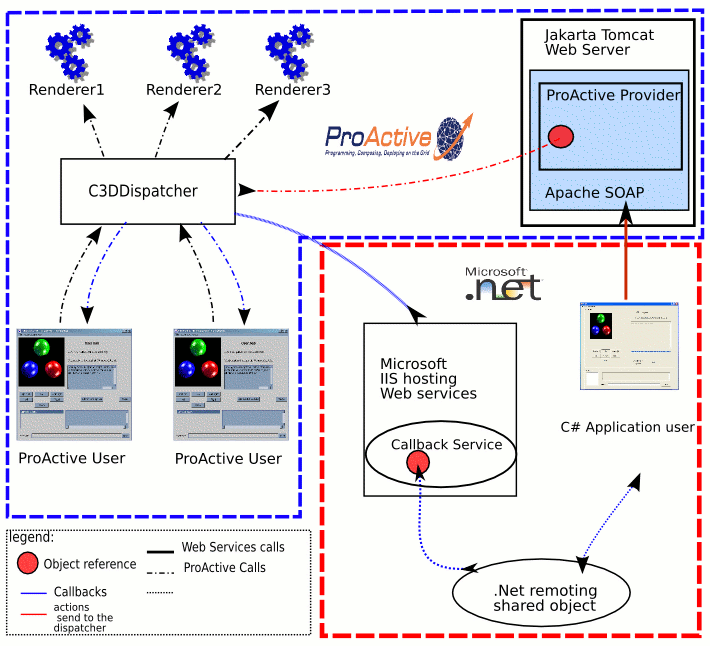
C# client registers to the C3D dispatcher and then can send commands. C3D is a collaborative application. Indeed, when a client performs a call, all others users must be advised by the dispatcher. Although dispatcher can contact ProActive applications, it cannot communicate with other applications (it cannot initiate the communication). In other words, the dispacher must communicate remotely with an application witten in another language.
The answer to this problem is to use .Net web service on the C# user machine. Such a web service is waiting for callback requests that come from dispatcher. When receiving a request, the service sends it to the client via a .Net Remoting shared objet. Thus, when the .Net web service receives a callback request, the C# client is updated thanks to propagated events.
Here are screenshots of the user application:

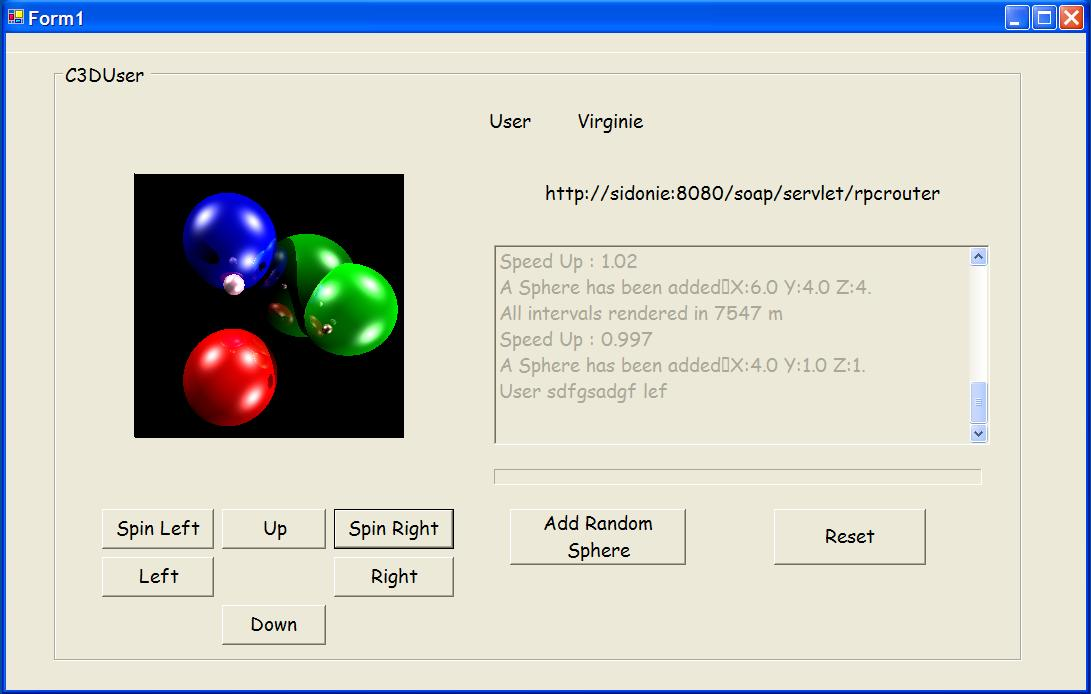
You can find here the whole C# Visual Studio .Net project. N.B: In order to run this project, you must install the Microsoft IIS server.
OSGi is a corporation that works on the definition and promotion of open specifications. These specifications are mainly aimed to packaging and delivering services among all kinds of networks.
OSGi Framework
The OSGi specification define a framework that allows to a diversity of services to be executed in a service gateway, by this way, many applications can share a single JVM .
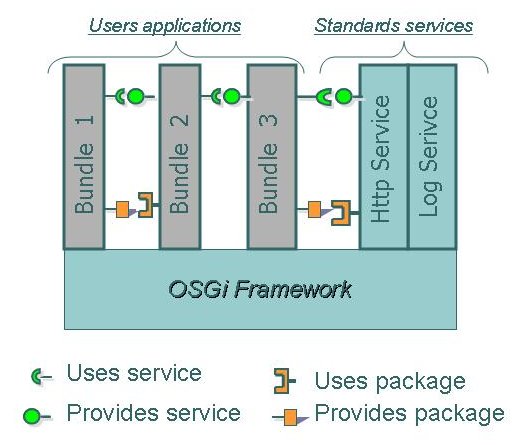
Bundles
In order to be delivered and deployed on OSGi, each piece of code is packaged into bundles. Bundles are functionnal entities offering services and packages. They can be delivered dynamically to the framework. Concretely a bundle is a Java jar file containing:
The application classes, including the so called bundle Activator
The Manifest file that specifies properties about the application, for instance, which is the bundle Activator, whick packages are required by the application
Other resources the application could need ( images, native libraries, or data files ... ) .
Bundles can be plugged dynamically and their so called lifecycle can be managed through the framework ( start, stop, update, ...).
Manifest file
This important file contains crucial parameters for the bundle file. It specifies which Activator (entry point) the bundle has to use, the bundle classpath, the imported and exported packages, ...
Services
Bundles communicates with each other thanks to services and packages sharing. A service is an object registered into the framework in order to be used by other applications. The definition of a service is specified in a Java interface. OSGi specify a set of standard services like Http Service, Log Service ...
We currently use the OSCAR objectweb implementation. For more information on OSGi, please visit the OSGi website .
In order to use ProActive on top of OSGi, we have developped the ProActive Bundle that contains all classes required to launch a ProActive runtime.
The ProActive bundle offers a service , the ProActiveService that have almost the same interface that the ProActive static classe. When installed, the ProActive bundle starts a new runtime, and clients that use the ProActive Service will be able to create active object on this runtime.
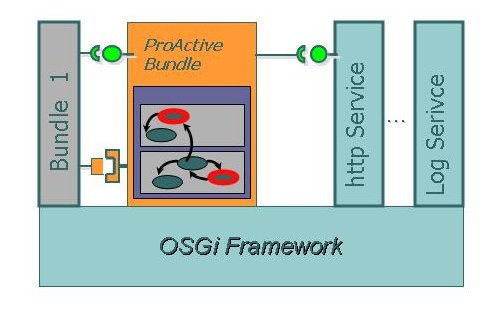
The active object will be accessible remotely from any java application, or any other OSGi gateway. The communication can be either rmi or http; in case of using http, the ProActive bundle requires the installation of the Http Service that will handle http communications through a Servlet. We show in the example section how to use the ProActive service.
The example above is a simple hello world that uses ProActive Service . It creates an Hello active Object and register it as a service. We use the hello basic service in the ProActive example. We have to write a bundle Activator that will create the active object and register it as a OSGi service.
The HelloActivator has to implements the BundleActivator interface.
public class HelloActivator implements BundleActivator { ... }
The start () method is the one executed when the
bundle starts. When the hello bundle start we need to get the reference on
the ProActive service and use it. Once we have the reference, we can
create our active object thanks to the
ProActiveService.newActive() method. Finally, we
register our new service in the framework.
public void start(BundleContext context) throws Exception { this.context = context; /* gets the ProActive Service */ ServiceReference sr = this.context.getServiceReference(ProActiveService.class.getName()); this.proActiveService = (ProActiveService) this.context.getService(sr); Hello h = (Hello)this.proActiveService.newActive( 'org.objectweb.proactive.examples.hello.Hello', new Object [] {}); /* Register the service */ Properties props = new Properties(); props.put('name', 'helloWorld'); reg = this.context.registerService( 'org.objectweb.proactive.osgi.ProActiveService', h, props); }
Now that we created the hello active service, we have to package the application into a bundle. First of all, we have to write a Manifest File where we specify:
The name of the bundle:
Hello World ProActive ServiceThe class of the Activator:
org.objectweb.proactive.HelloActivatorThe packages our application requires:
org.objectweb.proactive....The packages our application exports: org.objectweb.proactive.examples.osgi.hello
We can specify others informations like author, ...
Here is what the Manifest looks like:
Bundle-Name: ProActive Hello World Bundle Bundle-Description: Bundle containing Hello World ProActive example Bundle-Vendor: OASIS - INRIA Sophia Antipolis Bundle-version: 1.0.0 Export-Package: org.objectweb.proactive.examples.hello DynamicImport-Package: org.objectweb.proactive ... Bundle-Activator: org.objectweb.proactive.examples.osgi.hello.HelloActivator
Installing the ProActive Bundle and the Hello Bundle.
In order to run the example you need to install an OSGi framework. You can download and install one from the OSCAR website. Install the required services on the OSCAR framework:
--> obr start 'Http Service'
Generation of the ProActive Bundle
To generate the proActiveBundle you have to run the build script with the
proActiveBundletarget.> cd $PROACTIVE_DIR/compile > ./build proActiveBundleThe bundle jar file will be generated in the
$PROACTIVE_DIR/dist/ProActive/bundle/directory. We need now to install and start it into the OSGi Framework:--> start file:///$PROACTIVE_DIR/dist/ProActive/bundle/proActiveBundle.jar
This command will install and start the proActive bundle on the gateway. Users can now deploy application that uses the ProActiveService.
Generation of the Hello World example bundle
To generate the Hello World bundle you have to run the build script with the
helloWorldBundletarget.> cd $PROACTIVE_DIR/compile > ./build helloWorldBundleThe bundle jar file will be generated in the
$PROACTIVE_DIR/dist/ProActive/bundle/directory. We need now to install and start it into the OSGi Framework:--> start file:///$PROACTIVE_DIR/dist/ProActive/bundle/helloWorldBundle.jar
The command will install and start the Hello active service. The hello service is now an OSGi service and can be accessed remotely.
We are working on a management application that remotely monitors and manages a large number of OSGi gateways. It uses standard Management API such as JMX ( Java Management eXtension). We are writing a ProActive Connector in order to access these JMX enabled gateways and uses Group Communications to handle large scale. Moreover, this application will be graphically written as an Eclipse plugin.
We plan to deploy remotely active objects and fractal components on OSGi gateways.
JMX Java Management Extensions is a Java technology providing tools and APIs for managing and monitoring Java applications and their resources. Resources are represented by objects called MBeans (for Managed Bean).
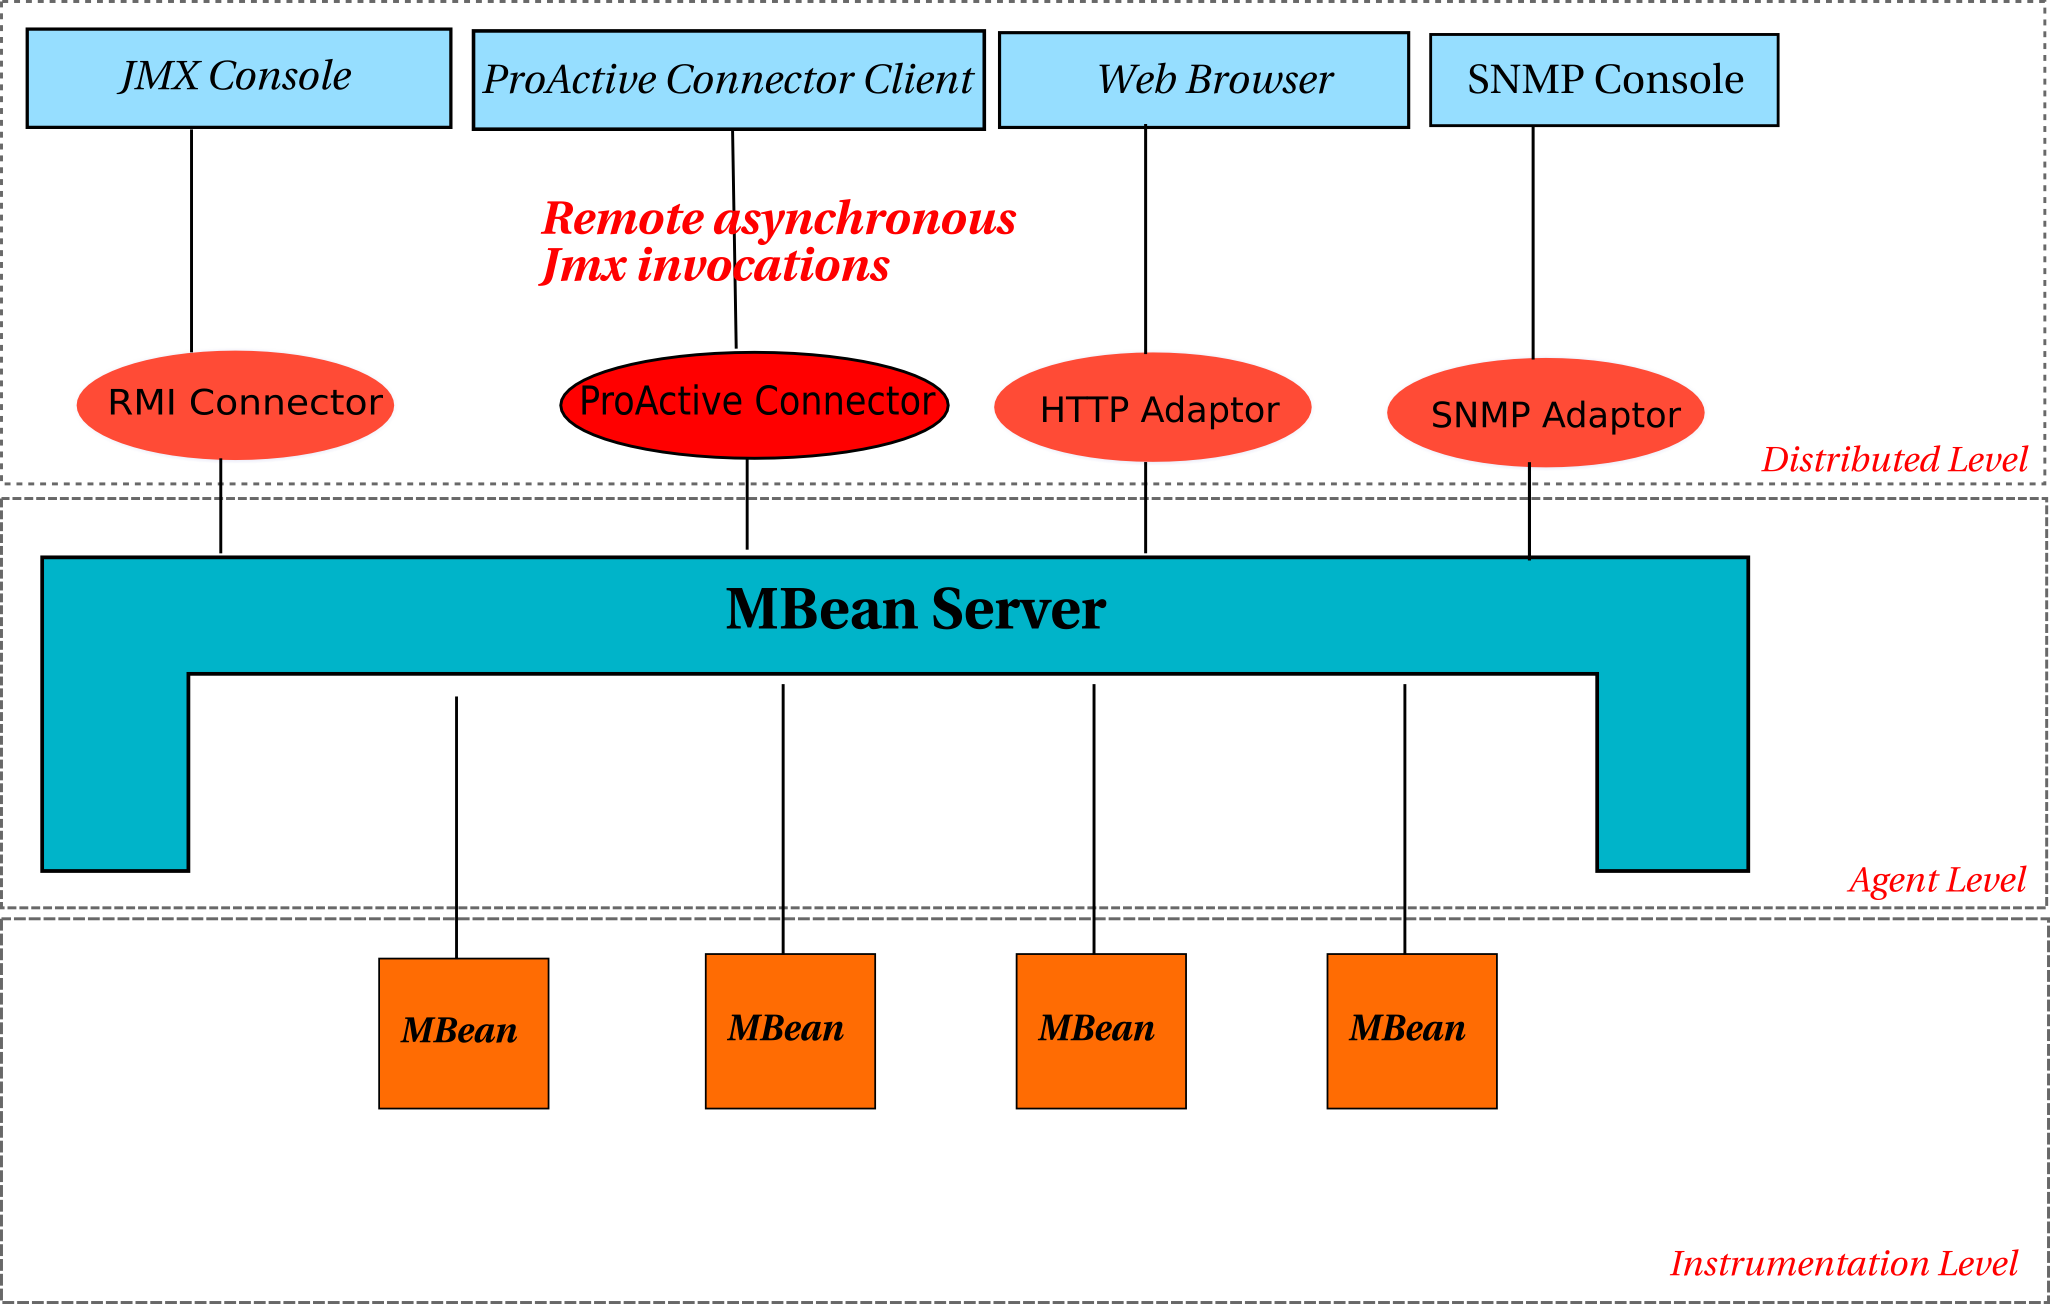
Figure 40.1. This figure shows the JMX 3 levels architecture and the integration of the ProActive JMX Connector.
JMX defines a 3 layers management architecture :
The instrumentation level contains MBeans and their manageable resources. A Mbean is a Java Object implementing a specific interface and pattern. They contain and define the manageable attributes, the management operations that can be performed onto resources and the notifications that can be emitted by the resources.
The Agent Level The agent acts as a MBeans containers (the MBeanServer) and controls them. This level represents the main part in the JMX specification : because it give access to the managed resources to the clients, the agent is the architecture central point.
The Distributed Level The distributed Level enables the remote management of Java applications. In order to access remotely to managed application, JMX specification defines two type of remote access : protocol adaptors and protocol connectors. Connectors allow a manager to perform method calls onto a distant agent's MBeanServer (for example RMI). Adaptors are components that ensure binding between a specific protocol (for example for SNMP or Http) and thre managed resources. Indeed, they enable Mbeans to be accessed by existing approches.
The JMX technology defines a connector based on RMI. The RMI connector allows the manager to connect to an MBean in a MBeanServer from a remote location and performs operations on it.
We defined a ProActive Connector according to the JMX Remote API JSR 160 that enables asynchronous remote access to a JMX Agent thanks to ProActive. This connector is based on a call via an active object. When invoking the standard API specification methods, the access to the managed application is synchronous, because the JMX remote API provides non-reifiable methods. For example, the method invoke that allow to invoke a Mbean's method throws exceptions :
public Object invoke(ObjectName name, String operationName, Object[] params, String[] signature) throws InstanceNotFoundException, MBeanException, ReflectionException, IOException;
We extended the API in order to provide asynchronous acces thanks to additionnal reifiable methods. The additional invoke method looks like :
public GenericTypeWrapper invokeAsynchronous(ObjectName name, String operationName, Object[] params, String[] signature) (method names connector ( non reifiable methods ).
Thus, all requests sent to the MBean are put in the active object requests queue and a future object is returned to the client.
The ProActive connector allows you yo connect to an MBean in an MBean server to a remote location, and perform operations on it, exactly as if the operations were being performed locally.
To perform such a call, you have first to enable the server connector on the application you wish to manage. This is simply done by adding one line of code in the application to be managed :
org.objectweb.proactive.jmx.server.ServerConnector
connector = new
org.objectweb.proactive.jmx.server.ServerConnector ();
Once the connector server part launched, any ProActive JMX
connector client can connect to it and manage the
application thanks to the ClientConnector class.
org.objectweb.proactive.jmx.client.ClientConnector clientConnector = new org.objectweb.proactive.jmx.client.ClientConnector (String serverUrl);To perform remote operations on a given MBean, you have to get the reference of the current MBeanServerConnection, which is actually a ProActiveConnection :
ProActiveConnection connection = clientConnector.getConnection(); //invoke the performAction method on the MBean named beanName with the parameter param1 wich type is typeParam1 ObjectName beanName = new ObjectName ("myDomain:name=beanName"); GenericTypeWrapper return = connection.invokeAsynchronous( beanName, "performAction", new Object[] { param1 } , new String [] {typeOfParam1});
The JMX specification defines a notification mechanism,based on java events, that allows alerts to be sent to client management applications. To use JMX Notifications, one has to use a listener object that is registered within the MBean server. On the server side, the MBean has to implement the NotificationBroadcaster interface. As we work in a distributed environment, listeners are located remotely and thus, have to be joined remotely. Hence, the listener must be a serializable active object and added as a NotificationListener :
/*creates an active listener MyNotificationListener */ MyNotificationListener listener = (MyNotificationListener)ProActive.newActive(MyNotificationListener.class.getName(), new Object[] { connection}); /*adds the listener to the Mbean server where we are connected to*/ connection.addNotificationListener( beanName, listener, null, handback);
| Note |
|---|---|
More informations on JMX on : Getting Started with Java Management Extensions (JMX): Developing Management and Monitoring Solutions |
The example available in the ProActive examples directory, is a simple textual tool to connect to a remote MBeanServer and list available domains and mbeans registered in this server.
To launch the connector server side, execute the jmx/connector script. To connect this server, execute the jmx/simpleJmx script and specify the machine name where is hosted the Mbean server. For example:
--- JMC Test client connector--------------------------------------------- Enter the url of the JMX MBean Server : localhost
The console shows the domains list, for example :
Registered Domains : [ 0 ] java.util.logging [ 1 ] JMImplementation [ 2 ] java.lang
By choosing a specific domain, the console will show the Mbeans registered in this domain.
The console shows the domains list, for example :
[ 0 ] java.lang:type=Memory [ 1 ] java.lang:type=GarbageCollector,name=Copy [ 2 ] java.lang:type=MemoryPool,name=Tenured Gen [ 3 ] java.lang:type=MemoryPool,name=Eden Space [ 4 ] java.lang:type=MemoryPool,name=Code Cache [ 5 ] java.lang:type=Threading [ 6 ] java.lang:type=OperatingSystem ... Type the mbean number to see its properties :If you wish to get informations about Memory, choose 0, and the console will show the whole information about this MBean.
The Message Passing Interface (MPI) is a widely adopted communication library for parallel and distributed computing. This work has been designed to make it easier to wrap, deploy and couple several MPI legacy codes, especially on the Grid.
On one hand, we propose a simple wrapping method designed to automatically deploy MPI applications on clusters or desktop Grid through the use of deployment descriptor, allowing an MPI application to be deployed using most protocols and schedulers (LSF, PBS, SSH, SunGRID, etc) . The proposed wrapping also permits programmers to develop conventional stand-alone Java applications using some MPI legacy codes.
On the other hand, we propose a wrapping method with control designed to let SPMD processes associated with one code communicate with the SPMD processors associated with another simulation code. This feature adds the parallel capability of MPI on the Grid with the support of ProActive for inter-process communication between MPI processes at different Grid points. A special feature of the proposed wrapping is the support of "MPI to/from Java application" communications which permit users to exchange data between the two worlds.
The API is organized in the package org.objectweb.proactive.mpi, with the class org.objectweb.proactive.mpi.MPI gathering static methods and the class org.objectweb.proactive.mpi.MPISpmd whose, instances represent and allow to control a given deployed MPI code.
In sum, the following features are proposed:
Simple Wrapping and deployment of MPI code (without changing source)
Wrapping with control:
Deploying an Active Object for control MPI process,
MPI to ProActive Communications,
ProActive to MPI Communications,
MPI to MPI Communication through ProActive.
This work is mainly intended to deploy automatically and transparently MPI parallel applications on clusters. Transparency means that the deployer does not know what particular resources provide computer power. So the deployer should have to finalize the deployment descriptor file and to get back the result of the application without worrying about resources selections, resource locations and types, or mapping processes on resources.
One of the main principle is to specify and wrap the MPI code in an XML descriptor.
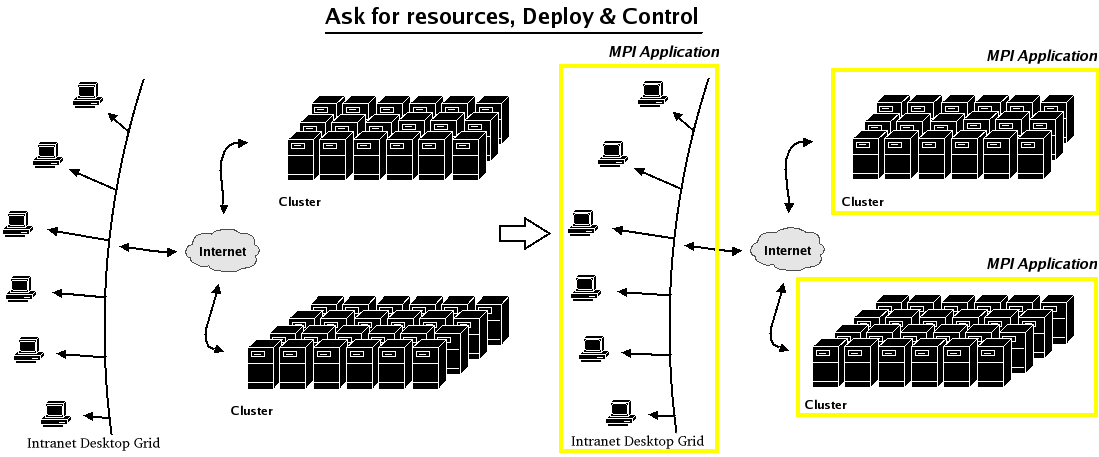
Main Features for Deployment:
File Transfer [using XML deployment descriptor]
The primary objective is to provide deployer an automatic deployment of his application through an XML deployment descriptor. In fact, ProActive provides support for File Transfer. In this way, deployer can transfer MPI application input data and/or MPI application code to the remote host. The File Transfer happens before the deployer launches his application. For more details about File Transfer see Section 23.1, “Introduction and Concepts”.
Asking for resources [using XML deployment descriptor]
Deployer describes MPI job requirements in the file deployment descriptor using one or several Virtual Node. He gets back a set of Nodes corresponding to the remote available hosts for the MPI Job execution. For more details (or usage example) about resources booking, have a look at Section 41.1.4, “Using the Infrastructure” .
Control MPI process [using ProActive API]
After deployment, deployer obtains the Virtual Node containing resources required for the MPI job, that is a set of Nodes. The MPI API provides programmer with the ability to create a stateful MPISpmd object from the Virtual Node obtained. To this end the programmer is able to control the MPI program, that is: trigger the job execution, kill the job, synchronize the job, get the object status/result etc..). This API is detailed in the next chapter.
What is an MPISpmd object ?
An MPISpmd object is regarded as an MPI code wrapper. It has the following features :
it holds a state (which can take different value, and reflects the MPI code status)
it can be controlled through an API (presented in the next section)
MPISpmd object creation methods
import org.objectweb.proactive.mpi; /** * creates an MPISpmd object from a Virtual Node which represents the deployment of an MPI code. * Activates the virtual node (i.e activates all the Nodes mapped to this VirtualNode * in the XML Descriptor) if not already activated, and returns an object representing * the MPI deployment process. * The MPI code being deployed is specified in the XML descriptor where the Virtual Node is defined. */ static public MPISpmd MPI.newMPISpmd(VirtualNode virtualNode);
MPISpmd object control methods
/** * Triggers the process execution represented by the MPISpmd object on the resources previously * allocated. This method call is an asynchronous request, thus the call does not * block until the result (MPI result) is used or explicit synchronization is required. The method * immediately returns a future object, more specially a future on an MPIResult object. * As a consequence, the application can go on with executing its code, as long as it doesn't need * to invoke methods on this MPIResult returned object, in which case the calling thread is * automatically blocked if the result of the method invocation is not yet available, i.e. * In practice, mpirun is also called */ public MPIResult startMPI();
/** * Restarts the process represented by the MPISpmd object on the same resources. This process has * to previously been started once with the start method, otherwise the method throws an * IllegalMPIStateException. If current state is Running, the * process is killed and a new independent computation is triggered, * and a new MPIResult object is created. It is also an asynchronous method which returns a future * on an MPIResult object. */ public MPIResult reStartMPI();
/** * Kills the process and OS MPI processes represented by the MPISpmd object. * It returns true if the process was running when it has been killed, false otherwise. */ public boolean killMPI();
/** * Returns the current status of the MPISpmd object. The different status are listed below. */ public String getStatus();
/** * Add or modify the MPI command parameters. It allows programmers to specify arguments to the MPI code. * This method has to be called before startMPI or reStartMPI. */ public void setCommandArguments(String arguments);
MPIResult object
An MPIResult object is obtained with the startMPI/reStartMPI methods call. Rather, these methods return a future on an MPIResult object that does not block application as long as no method is called on this MPIResult object. On the contrary, when a MPIResult object is used, the application is blocked until the MPIResult object is updated, meaning that the MPI program is terminated. The following method gets the exit value of the MPI program.
import org.objectweb.proactive.mpi.MPIResult; /** * Returns the exit value of the MPI program. * By usual convention, the value 0 indicates normal termination. */ public int getReturnValue();
MPISpmd object status
import org.objectweb.proactive.mpi; MPIConstants.MPI_UNSTARTED; // default status - MPISpmd object creation (newMPISpmd) MPIConstants.MPI_RUNNING; // MPISpmd object has been started or restarted MPIConstants.MPI_FINISHED; // MPISpmd object has finished MPIConstants.MPI_KILLED; // MPISpmd object has been killed
Each status defines the current state of the MPISpmd object. It provides the guarantee of application consistency and a better control of the application in case of multiple MPISpmd objects.
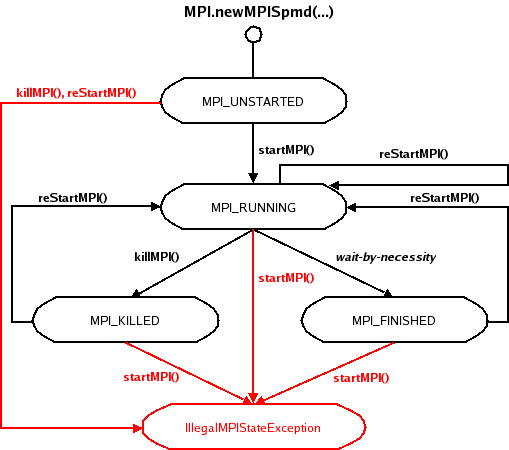
First finalize the xml file descriptor to specify the MPI code, and files that have to be transfered on the remote hosts and resources requirement as it is explained at Section 41.1.4, “Using the Infrastructure”. Then, in a Java file import the package org.objectweb.proactive.mpi. In an attempt to keep application consistency, the MPISpmd object makes use of status. It guarantees that either a method called on object is coherent or an exception is thrown. Especially the exception IllegalMPIStateException signals a method that has been called at an illegal or inappropriate time. In other words, an application is not in an appropriate state for the requested operation.
An application does not require to declare in its throws clause because IllegalMPIStateException is a subclass of RuntimeException. The graph above presents a kind of finite state machine or finite automaton, that is a model of behavior composed of states (status of the MPISpmd object) and transition actions (methods of the API). Once the MPISpmd object is created (newMPISpmd), the object enters in the initial state: ProActiveMPIConstants.MPI_UNSTARTED.
Sample of code (available in the release) These few lines show how to execute the MPI executive jacobi, and show how to get its return value once finished. No modification have to be made to the source code.
import org.objectweb.proactive.mpi.*; ... // load the file descriptor ProActiveDescriptor pad = ProActive.getProactiveDescriptor('file:descriptor.xml'); // get the Virtual Node that references the jacobi MPI code you want to execute VirtualNode jacobiVN = pad.getVirtualNode('JACOBIVN'); // activate Virtual Node (it's not mandatory because the MPI.newMPISpmd method does // it automatically if it has not been already done) jacobiVN.activate(); // create the MPISpmd object with the Virtual Node MPISpmd jacobiSpmd = MPI.newMPISpmd(jacobiVN); // trigger jacobi mpi code execution and get a future on the MPIResult MPIResult jacobiResult = jacobiSpmd.startMPI(); // print current status logger.info("Current status: "+jacobiSpmd.getStatus()); // get return value (block the thread until the jacobiResult is available) logger.info("Return value: "+jacobiResult.getReturnValue()); // print the MPISpmd object caracteristics (name, current status, processes number ...) logger.info(jacobiSpmd); ...
Resources booking and MPI code are specified using ProActive Descriptors. We have explained the operation with an example included in the release. The deployment goes through sh, then PBS, before launching the MPI code on 16 nodes of a cluster. The entire file is available in Example C.37, “MPI Wrapping: mpi_files/MPIRemote-descriptor.xml”.
File Transfer: specify all the files which have to be transferred on the remote host like binary code and input data. In the following example, jacobi is the binary of the MPI program. For further details about File Transfer see Section 23.1, “Introduction and Concepts”.
<componentDefinition> <virtualNodesDefinition> <virtualNode name="JACOBIVN" /> </virtualNodesDefinition> </componentDefinition> <deployment> ... </deployment> <fileTransferDefinitions> <fileTransfer id="jacobiCodeTransfer"> <file src="jacobi" dest="jacobi" /> </fileTransfer> </fileTransferDefinitions>
Resource allocation: define processes for resource reservation. See Section 21.7, “Infrastructure and processes” for more details on processes.
SSHProcess: first define the process used to contact the remote host on which resources will be reserved. Link the reference ID of the file transfer with the FileTransfer previously defined, and link the reference ID to the DependentProcessSequence process explained below.
<processDefinition id="sshProcess"> <sshProcess class="org.objectweb.proactive.core.process.ssh.SSHProcess" hostname="nef.inria.fr" username="user"> <processReference refid="jacobiDependentProcess" /> <fileTransferDeploy refid="jacobiCodeTransfer"> <copyProtocol>scp</copyProtocol> <sourceInfo prefix= "/user/user/home/ProActive/src/org/objectweb/proactive/examples/mpi" /> <destinationInfo prefix="/home/user/MyApp"/> </fileTransferDeploy> </sshProcess> </processDefinition>
DependentProcessSequence: This process is used when a process is dependent on another process. The first process of the list can be any process of the infrastructure of processes in ProActive, but the second has to be imperatively a DependentProcess, that is to implement the org.objectweb.proactive.core.process.DependentProcess interface. The following lines express that the mpiProcess is dependent on the resources allocated by the pbsProcess.
<processDefinition id="jacobiDependentProcess"> <dependentProcessSequence class="org.objectweb.proactive.core.process.DependentListProcess"> <processReference refid="jacobiPBSProcess"/> <processReference refid="jacobiMPIProcess"/> </dependentProcessSequence> </processDefinition>
PBS Process: note that you can use any services defined in ProActive to allocate resources instead of the PBS one.
<processDefinition id="jacobiPBSProcess"> <pbsProcess class="org.objectweb.proactive.core.process.pbs.PBSSubProcess"> <processReference refid="jvmProcess" /> <commandPath value="/opt/torque/bin/qsub" /> <pbsOption> <hostsNumber>16</hostsNumber> <processorPerNode>1</processorPerNode> <bookingDuration>00:02:00</bookingDuration> <scriptPath> <absolutePath value="/home/smariani/pbsStartRuntime.sh" /> </scriptPath> </pbsOption> </pbsProcess> </processDefinition>
MPI process: defines the MPI actual code to be deployed (executable) and its attributes. It is possible to pass a command option to mpirun by filling the attribute mpiCommandOptions. Specify the number of hosts you wish the application to be deployed on, and at least the MPI code local path. The local path is the path from which you start the application.
<processDefinition id="jacobiMPIProcess"> <mpiProcess class="org.objectweb.proactive.core.process.mpi.MPIDependentProcess" mpiFileName="jacobi" mpiCommandOptions="input_file.dat output_file.dat"> <commandPath value="/usr/src/redhat/BUILD/mpich-1.2.6/bin/mpirun" /> <mpiOptions> <processNumber>16</processNumber> <localRelativePath> <relativePath origin="user.home" value="/ProActive/scripts/unix"/> </localRelativePath> <remoteAbsolutePath> <absolutePath value="/home/smariani/MyApp"/> </remoteAbsolutePath> </mpiOptions> </mpiProcess> </processDefinition>
Let's assume we want to interconnect together several modules (VibroToAcous, AcousToVibro, Vibro, Acous, CheckConvergency) which are each a parallel MPI binary code.
import org.objectweb.proactive.ProActive; import org.objectweb.proactive.core.ProActiveException; import org.objectweb.proactive.core.config.ProActiveConfiguration; import org.objectweb.proactive.core.descriptor.data.ProActiveDescriptor; import org.objectweb.proactive.core.descriptor.data.VirtualNode; ... // load the file descriptor ProActiveDescriptor pad = ProActive.getProactiveDescriptor('file:descriptor.xml'); // get the Virtual Nodes which references all the MPI code we want to use VirtualNode VibToAc = pad.getVirtualNode("VibToAc"); VirtualNode AcToVib = pad.getVirtualNode("AcToVib"); VirtualNode Vibro = pad.getVirtualNode("Vibro"); VirtualNode Acous = pad.getVirtualNode("Acous"); VirtualNode CheckConvergency = pad.getVirtualNode("CheckConvergency"); // it's not necessary to activate manually each Virtual Node because it's done // when creating the MPISpmd object with the Virtual Node // create MPISpmd objects from Virtual Nodes MPISpmd vibToAc = MPI.newMPISpmd(VibToAc); MPISpmd acToVib = MPI.newMPISpmd(AcToVib); MPISpmd vibro = MPI.newMPISpmd(Vibro); MPISpmd acous = MPI.newMPISpmd(Acous); // create two different MPISpmd objects from a single Virtual Node MPISpmd checkVibro = MPI.newMPISpmd(CheckConvergency); MPISpmd checkAcous = MPI.newMPISpmd(CheckConvergency); // create MPIResult object for each MPISpmd object MPIResult vibToAcRes, acToVibRes, vibroRes, acousRes, checkVibroRes, checkAcousRes; boolean convergence = false; boolean firstLoop = true; While (!convergence) { // trigger execution of vibToAc and acToVib MPISpmd object if (firstLoop){ vibToAcRes = vibToAc.startMPI(); acToVibRes = acToVib.startMPI(); }else{ vibToAcRes = vibToAc.reStartMPI(); acToVibRes = acToVib.reStartMPI(); } // good termination? if (( vibToACRes.getReturnValue() < 0 ) || ( acToVibRes.getReturnValue() < 0 )) System.exit(-1); // trigger execution of vibro and acous MPISpmd object if (firstLoop){ vibroRes = vibro.startMPI(); acousRes = acous.startMPI(); }else{ vibroRes = vibro.reStartMPI(); acousRes = acous.reStartMPI(); } // good termination? if (( vibroRes.getReturnValue() < 0 ) || ( acousRes.getReturnValue() < 0 )) System.exit(-1); // Check convergency of acoustic part and structure part if (firstLoop){ // modify argument checkVibro.setCommandArguments("oldVibro.res newVibro.res"); checkAcous.setCommandArguments("oldAcous.res newAcous.res"); checkVibroRes = checkVibro.startMPI(); checkAcousRes = checkAcous.startMPI(); }else{ checkVibroRes = checkVibro.reStartMPI(); checkAcousRes = checkAcous.reStartMPI(); } // Convergency? if (( checkVibroRes.getReturnValue() == 0 ) || ( checkAcousRes.getReturnValue() == 0 )) { convergence = true; } firstLoop = false; } // free resources VibToAc.killAll(false); AcToVib.killAll(false); Vibro.killAll(false); Acous.killAll(false); CheckConvergency.killAll(false);
Some MPI applications may decompose naturally into components that are better suited to execute on different plateforms, e.g., a simulation component and a visualization component; other applications may be too large to fit on one system. If each subsystem is a parallel system, then MPI is likely to be used for "intra-system" communication, in order to achieve better performance thanks to MPI vendor MPI libraries, as compared to the generic TCP/IP implementations.
ProActive makes it possible to deploy at once a set of MPI applications on a set of clusters or desktop machines. Moreover, this section will also demonstrate how to deploy at the same time a set of ProActive JVMs, to be used mainly for the sake of two aspects:
communicating between the different codes,
controlling, and synchronizing the execution of several (coupled) MPI codes.
"Inter-system" message passing is implemented by ProActive asynchronous remote method invocations. An MPI process may participate both in intra-system communication, using the native MPI implementation, and in inter-system communication, with ProActive through JNI (Java Native Interface) layered on top of IPC system V.
This wrapping defines a cross implementation protocol for MPI that enables MPI implementations to run very efficiently on each subsystem, and ProActive to allow interoperability between each subsystem. A parallel computation will be able to span multiple systems both using the native vendor message passing library and ProActive on each system. New ProActive specific MPI API are supporting these features. The goal is to support some point-to-point communication functions for communication across systems, as well as some collectives. This binding assume that inter-system communication uses ProActive between each pair of communicating systems, while intra-system communication uses proprietary protocols, at the discretion of each vendor MPI implementation.
The API for the wrapping with control is organized in the package org.objectweb.proactive.mpi.control, with the class org.objectweb.proactive.mpi.control.ProActiveMPI gathering static method for deployment.
First the principle to wrap MPI code is similar to the Simple Wrapping method: deployer describes MPI job requirements in the file deployment descriptor using a Virtual Node and gets back a set of Nodes corresponding to the remote available hosts for the MPI Job execution. After deployment, deployer obtains the Virtual Node containing a set of Nodes on which the whole MPI processes will be mapped.
Further, to ensure control, an Active Object is deployed on each Node where an MPI process resides. The Active Object has a role of wrapper/proxy, redirecting respectively local MPI process output messages to the remote recipient(s) and incoming messages to the local MPI process. For more details, please refer to Section 41.2.4, “MPI to MPI Communications through ProActive”.
This approach provides programmer with the ability to deploy some instances of his own classes on any Node(s) using the API defined below. It permits programmer to capture output messages of MPI process towards his own classes, and to send new messages towards any MPI process of the whole application. For more details, please refer to Section 41.2.2, “MPI to ProActive Communications” and Section 41.2.3, “ProActive to MPI Communications”. The deployment of Java Active Objects takes place after all MPI processes have started and once the ProActiveMPI_Init() function has been called. That way the implementation can ensure that, when an SPMD group of Active Objects is created by calling the newActiveSpmd function on an MPISpmd object, then programmer SPMD instance ranks will match with the MPI process ones.
MPISpmd object methods
For more details about MPISpmd object creation, please refer to Section 41.1.2, “API For Deploying MPI Codes”.
import org.objectweb.proactive.mpi; /** * Builds (and deploys) an 'SPMD' group of Active objects with all references between them * to communicate. This method creates objects of type class on the same nodes on which * this MPISpmd object has deployed the MPI application, with no parameters. * There's a bijection between mpi process rank of the application deployed by this * MPISpmd object and the rank of each active object of the 'SPMD' group. */ public void newActiveSpmd(String class);
import org.objectweb.proactive.mpi; /** * Builds (and deploys) an 'SPMD' group of Active objects class on the same nodes on which * this MPISpmd object has deployed the MPI application. * Params contains the parameters used to build the group's member. * There's a bijection between mpi process rank of the application deployed by this * MPISpmd object and the rank of each active object of the 'SPMD' group */ public void newActiveSpmd(String class, Object[] params);
import org.objectweb.proactive.mpi; /** * Builds (and deploys) an 'SPMD' group of Active objects of type class on the same * nodes on which this MPISpmd object has deployed the MPI application. * Params contains the parameters used to build the group's member. * There's a bijection between mpi process rank of the application deployed by this * MPISpmd object and the rank of each active object of the 'SPMD' group */ public void newActiveSpmd(String class, Object[][] params);
import org.objectweb.proactive.mpi; /** * Builds (and deploys) an Active object of type class on the same node where the mpi process * of the application deployed with this MPISpmd object has rank rank. * Params contains the parameters used to build the active object */ public void newActive(String class, Object[] params, int rank); throws ArrayIndexOutOfBoundsException - if the specified rank is greater than number of nodes
Deployment method
The MPI API in the package org.objectweb.proactive.mpi provides programmer with the ability to create an MPISpmd object from the Virtual Node obtained. The following static method is used to achieve MPI processes registration and job number attribution. Each MPI process belongs to a global job, which permits to make difference between two MPI processes with same rank in the whole application. For instance, it would exist a first root process which belongs to job 0 (the first MPI application) and a second root process which belongs to job 1 (the second MPI application). The JobID of an MPI code is directly given by the rank of the MPISpmd Object in the ArrayList at deployment time.
import org.objectweb.proactive.mpi; /** * Deploys and starts (startMPI() being called) all MPISpmd objects contained in the list mpiSpmdObjectList. */ static public void ProActiveMPI.deploy(ArrayList mpiSpmdObjectList);
The following piece of code is an example of a java main program which shows how to use the wrapping with control feature with two codes. The xml file descriptor is finalized exactly in the same manner that for the Simple Wrapping. For more details about writing a file descriptor, please refer to Section 41.1.4, “Using the Infrastructure”.
import org.objectweb.proactive.mpi.*; ... // load the file descriptor ProActiveDescriptor pad = ProActive.getProactiveDescriptor('file:descriptor.xml'); // get the Virtual Nodes which reference the different MPI codes VirtualNode vnA = pad.getVirtualNode("CLUSTER_A"); VirtualNode vnB = pad.getVirtualNode("CLUSTER_B"); // create the MPISpmd objects with the Virtual Nodes MPISpmd spmdA = MPI.newMPISpmd(vnA); MPISpmd spmdB = MPI.newMPISpmd(vnB); Object[][] params = new Object[][]{{param_on_node_1},{param_on_node_2}, {param_on_node_3}}; // deploy "MyClass" as an 'SPMD' group on same nodes that spmdA object, with the list of parameters // defined above spmdA.newActiveSpmd("MyClass", params); // deploy "AnotherClass" on the node where the mpi process of the application is rank 0, // with no parameters spmdB.newActiveSpmd("AnotherClass", new Object[]{}, 0); // create the list of MPISpmd objects (First MPI job is job with value 0, second is job with value 1 etc... ) ArrayList spmdList = new ArrayList(); spmdList.add(spmdA); spmdList.add(spmdB); // deploy and start the listed MPISpmd objects ProActiveMPI.deploy(spmdList); ...
The wrapping with control allows the programmer to send messages from MPI to Java Objects. Of course these classes have to be previously deployed using the API seen above. This feature could be useful for example if a simulation code is an MPI computation and the visualization component is a java code. All MPI Code that need to be controled or communicate through ProActive needs to call the ProActiveMPI_Init() function detailed in the Section 41.2.4, “MPI to MPI Communications through ProActive”
ProActiveSend Performs a basic send from mpi side to a ProActive java class Synopsis #include "ProActiveMPI.h" int ProActiveSend(void* buf, int count, MPI_Datatype datatype, int dest, char* className, char* methodName, int jobID, ...); Input Parameters buf initial address of send buffer count number of elements in send buffer (nonnegative integer) datatype datatype of each send buffer element dest rank of destination(integer) classNamename of class methodNamename of the method to be called jobID remote or local job (integer) variable arguments string parameters to be passed to the method
The ProActiveMPIData class belongs to the package org.objectweb.proactive.mpi.control. While a message is sent from MPI side, a corresponding object ProActiveMPIData is created on java side and is passed as parameter to the method which name is specified in the ProActiveSend method, called by MPI. The ProActiveMPIData object contains severals fields that can be useful to the programmer. The following methods are available:
import org.objectweb.proactive.mpi.control; /** * return the rank of the MPI process that sent this message */ public int getSrc();
/** * return the sender job ID */ public int getJobID();
/** * return the type of elements in the buffer data contained in the message. * The type can be compared with the constants defined in the class ProActiveMPIConstants * in the same package. */ public int getDatatype();
/** * return the parameters as an array of String specified in the ProActiveSend method call. */ public String [] getParameters();
/** * return the data buffer as an array of primitive type byte. */ public byte [] getData();
/** * return the number of elements in the buffer. */ public int getCount();
The ProActiveMPIUtil class in the package org.objectweb.proactive.mpi.control.util brings together a set of static function for conversion. In fact, the programmer may use the following functions to convert an array of bytes into an array of elements with a different type:
/* Given a byte array, restore it as an int * param bytes the byte array * param startIndex the starting index of the place the int is stored */ public static int bytesToInt(byte[] bytes, int startIndex);
/* Given a byte array, restore it as a float * param bytes the byte array * param startIndex the starting index of the place the float is stored */ public static float bytesToFloat(byte[] bytes, int startIndex);
/* Given a byte array, restore it as a short * param bytes the byte array * param startIndex the starting index of the place the short is stored */ public static short bytesToShort(byte[] bytes, int startIndex);
/* * Given a byte array, restore a String out of it. * the first cell stores the length of the String * param bytes the byte array * param startIndex the starting index where the string is stored, * the first cell stores the length * ret the string out of the byte array. */ public static String bytesToString(byte[] bytes, int startIndex);
/* Given a byte array, restore it as a long * param bytes the byte array * param startIndex the starting index of the place the long is stored */ public static long bytesToLong(byte[] bytes, int startIndex);
/* Given a byte array, restore it as a double * param bytes the byte array * param startIndex the starting index of the place the double is stored */ public static double bytesToDouble(byte[] bytes, int startIndex);
Main program [ProActive deployment part]
import org.objectweb.proactive.mpi.*; ... // load the file descriptor ProActiveDescriptor pad = ProActive.getProactiveDescriptor('file:descriptor.xml'); // get the Virtual Nodes which reference the different MPI codes VirtualNode vnA = pad.getVirtualNode("CLUSTER_A"); // create the MPISpmd object with the Virtual Node MPISpmd spmdA = MPI.newMPISpmd(vnA); // deploy "MyClass" on same node that mpi process #3 spmdA.newActive("MyClass", new Object[]{}, 3); // create the list of MPISpmd objects ArrayList spmdList = new ArrayList(); spmdList.add(spmdA); // deploy and start the listed MPISpmd objects ProActiveMPI.deploy(spmdList); ...
Programmer class definition
public class MyClass{ public MyClass() { } // create a method with a ProActiveMPIData parameter which will be called by the MPI part public void foo(ProActiveMPIData data){ int icnt = m_r.getCount(); for (int start = 0; start < data.getData().length; start = start + 8) { // print the buffer received by converting the bytes array to an array of doubles System.out.print(" buf["+(icnt++)+"]= " + ProActiveMPIUtil.bytesToDouble(data.getData(), start)); } } }
MPI Side
#include <stdio.h> #include "mpi.h" #include "ProActiveMPI.h" // variables declaration ... // initialize MPI environment MPI_Init( &argc, &argv ); MPI_Comm_rank( MPI_COMM_WORLD, &rank ); MPI_Comm_size( MPI_COMM_WORLD, &size); // initialize MPI with ProActive environment ProActiveMPI_Init(rank); // get this process job number ProActiveMPI_Job(&myjob); // send a buffer of maxn doubles to MyClass"Active Object, located on the same // host that mpi process #3 of job #0, by calling method "foo" with some parameters. if ((rank == 0) && (myjob == 0)){ error = ProActiveSend(xlocal[0], maxn, MPI_DOUBLE, 3, "MyClass", "foo", 0, "params1", "params2", NULL ); if (error < 0){ printf("!!! Error Method call ProActiveSend \n"); } } ProActiveMPI_Finalize(); MPI_Finalize( ); return 0; }
Snapshot of this example
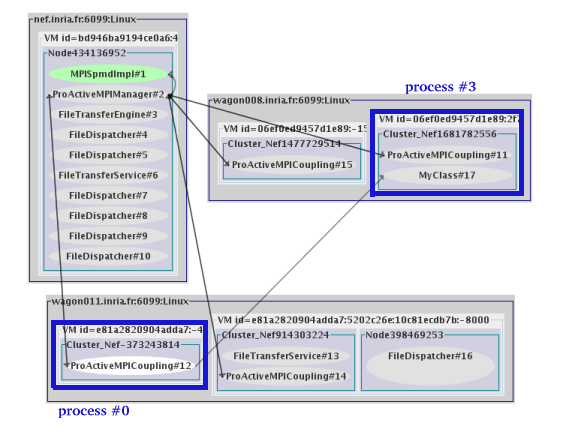
The wrapping with control allows programmer to pass some messages from his own classes to the MPI computation. Of course these classes have to be previously deployed using the API seen at Section 41.2.1.1, “Java API”. This feature could be useful for example if the programmer want to control the MPI code by sending some "start" or "stop" messages during computation.
Send Function
import org.objectweb.proactive.mpi.control; /** * Sends a buffer of bytes containing count elements of type datatype * to destination dest of job jobID * The datatypes are listed below */ static public void ProActiveMPICoupling.MPISend(byte[] buf, int count, int datatype, int dest, int tag, int jobID);
Datatypes
The following constants have to be used with the ProActiveMPICoupling.MPISend method to fill the datatype parameter.
import org.objectweb.proactive.mpi.control; MPIConstants.MPI_CHAR; eMPIConstants.MPI_UNSIGNED_CHAR; MPIConstants.MPI_BYTE; MPIConstants.MPI_SHORT; MPIConstants.MPI_UNSIGNED_SHORT; MPIConstants.MPI_INT; MPIConstants.MPI_UNSIGNED; MPIConstants.MPI_LONG; MPIConstants.MPI_UNSIGNED_LONG; MPIConstants.MPI_FLOAT; MPIConstants.MPI_DOUBLE; MPIConstants.MPI_LONG_DOUBLE; MPIConstants.MPI_LONG_LONG_INT;
ProActiveRecv Performs a blocking receive from mpi side to receive data from a ProActive java class Synopsis #include "ProActiveMPI.h" int ProActiveRecv(void *buf, int count, MPI_Datatype datatype, int src, int tag, int jobID); Output Parameters buf initial address of receive buffer Input Parameters count number of elements in send buffer (nonnegative integer) datatype datatype of each recv buffer element src rank of source (integer) tag message tag (integer) jobID remote job (integer)
ProActiveIRecv Performs a non blocking receive from mpi side to receive data from a ProActive java class Synopsis #include "ProActiveMPI.h" int ProActiveIRecv(void *buf, int count, MPI_Datatype datatype, int src, int tag, int jobID, ProActiveMPI_Request *request); Output Parameters request communication request (handle) Input Parameters buf initial address of receive buffer count number of elements in send buffer (nonnegative integer) datatype datatype of each recv buffer element src rank of source (integer) tag message tag (integer) jobID remote job (integer)
ProActiveTest Tests for the completion of receive from a ProActive java class Synopsis #include "ProActiveMPI.h" int ProActiveTest(ProActiveMPI_Request *request, int *flag); Output Parameters flag true if operation completed (logical) Input Parameters request communication request (handle)
ProActiveWait Waits for an MPI receive from a ProActive java class to complete Synopsis #include "ProActiveMPI.h" int ProActiveWait(ProActiveMPI_Request *request); Input Parameters request communication request (handle)
The following example shows how to send some messages from a ProActive class to his MPI computation.
Main program [ProActive deployment part]
import org.objectweb.proactive.mpi.*; ... // load the file descriptor ProActiveDescriptor pad = ProActive.getProactiveDescriptor('file:descriptor.xml'); // get the Virtual Nodes which reference the different MPI codes VirtualNode vnA = pad.getVirtualNode("CLUSTER_A"); // create the MPISpmd object with the Virtual Node MPISpmd spmdA = MPI.newMPISpmd(vnA); // deploy "MyClass" on same node that mpi process #3 spmdA.newActive("MyClass", new Object[]{}, 3); // create the list of MPISpmd objects ArrayList spmdList = new ArrayList(); spmdList.add(spmdA); // deploy and start the listed MPISpmd objects ProActiveMPI.deploy(spmdList); ...
Programmer class definition
Assume for example the "postTreatmentForVisualization" method. It is called at each iteration from MPI part, gets the current array of doubles generated by the MPI computation and makes a java post treatment in order to visualize them in a java viewer. If the java computation fails, the method sends a message to MPI side to abort the computation.
import org.objectweb.proactive.mpi.control; public class MyClass{ public MyClass() { } // create a method with a ProActiveMPIData parameter public void postTreatmentForVisualization(ProActiveMPIData data){ int icnt = m_r.getCount(); double [] buf = new double [icnt]; int error = 0; for (int start = 0; start < data.getData().length; start = start + 8) { // save double in a buffer buf[start/8]=ProActiveMPIUtil.bytesToDouble(data.getData(), start); } // make data post-treatment for visualization ... if (error == -1){ // convert int to double byte [] byteArray = new byte [4]; ProActiveMPIUtil.intToBytes(error, byteArray, 0); // send message to the local MPI process to Abort computation ProActiveMPICoupling.MPISend(byteArray, 1, ProActiveMPIConstants.MPI_INT, 3, 0, 0); } }
MPI Side
#include <stdio.h> #include "mpi.h" #include "ProActiveMPI.h" // variables declaration short buf; ProActiveMPI_Request request; int flag; // initialize MPI environment MPI_Init( &argc, &argv ); MPI_Comm_rank( MPI_COMM_WORLD, &rank ); MPI_Comm_size( MPI_COMM_WORLD, &size); // initialize MPI with ProActive environment ProActiveMPI_Init(rank); // get this process job number ProActiveMPI_Job(&myjob); // computation for (itcnt=0; itcnt<10000; itcnt++){ // call the "postTreatmentForVisualization" method in "MyClass" Active Object, // located on the same host that root process of job #0 and send the current data // generated by the computation if ((rank == 0) && (myjob == 0)){ error = ProActiveSend(xlocal[0], 1, MPI_DOUBLE, 3, "MyClass", "postTreatmentForVisualization", 0,NULL ); if (error < 0){ printf("!!! Error Method call ProActiveSend \n"); } } // perform a non-blocking recv if ((rank == 3) && (myjob == 0)){ error = ProActiveIRecv(&buf, 1 , MPI_INT, 3, 0, 0, &request); if (error < 0){ printf("!!! Error Method call ProActiveIRecv \n"); } } // do computation ... // check if a message arrived from ProActive side if ((rank == 3) && (myjob == 0)){ error = ProActiveTest(&request, &flag); if (error < 0){ printf("!!! Error Method call ProActiveTest \n"); } // if a message is captured, flag is true and buf contains message // it is not mandatory to check the value of the buffer because we know that // the reception of a message is due to a failure of java side computation. if (flag == 1){ MPI_Abort(MPI_COMM_WORLD, 1); } } } ProActiveMPI_Finalize(); MPI_Finalize( ); return 0; }
Snapshot of this example
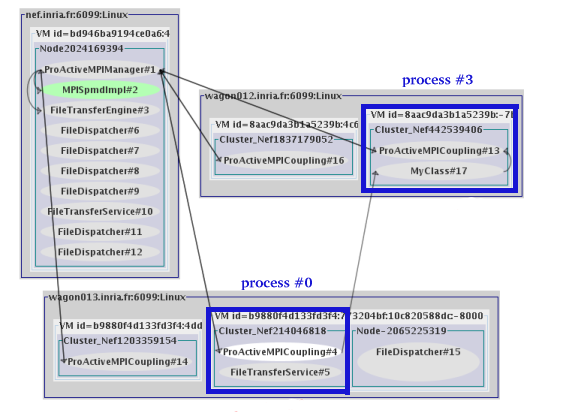
The ProActiveMPI features handles the details of starting and shutting down processes on different system and coordinating execution. However passing data between the processes is explicitly specified by the programmer in the source code, depending on whether messages are being passed between local or remote systems, programmer would choose respectively either the MPI API or the ProActiveMPI API defined below.
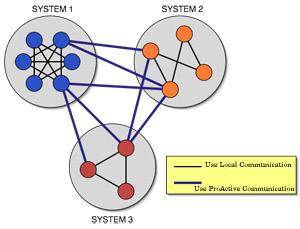
ProActiveMPI_Init Initializes the MPI with ProActive execution environment Synopsis #include "ProActiveMPI.h" int ProActiveMPI_Init(int rank); Input Parameters rank the rank of the mpi process previously well initialized with MPI_Init
ProActiveMPI_Job Initializes the job environment variable Synopsis #include "ProActiveMPI.h" int ProActiveMPI_Job(int *job); Output Parameters job job the mpi process belongs to
ProActiveMPI_Finalize Terminates MPI with ProActive execution environment Synopsis #include "ProActiveMPI.h" int ProActiveMPI_Finalize();
ProActiveMPI_Send Performs a basic send Synopsis #include "ProActiveMPI.h" int ProActiveMPI_Send(void *buf, int count, MPI_Datatype datatype, int dest, int tag, int jobID ); Input Parameters buf initial address of send buffer count number of elements in send buffer (nonnegative integer) datatype datatype of each send buffer element dest rank of destination (integer) tag message tag (integer) jobID remote job (integer)
ProActiveMPI_Recv Performs a basic Recv Synopsis #include "ProActiveMPI.h" int ProActiveMPI_Recv(void *buf, int count, MPI_Datatype datatype, int src, int tag, int jobID); Output Parameters buf initial address of receive buffer (choice) Input Parameters count number of elements in recv buffer (nonnegative integer) datatype datatype of each recv buffer element src rank of source (integer) tag message tag (integer) jobID remote job (integer)
ProActiveMPI_IRecv Performs a non blocking receive Synopsis #include "ProActiveMPI.h" int ProActiveMPI_IRecv(void *buf, int count, MPI_Datatype datatype, int src, int tag, int jobID, ProActiveMPI_Request *request); Output Parameters request communication request (handle) Input Parameters buf initial address of receive buffer count number of elements in send buffer (nonnegative integer) datatype datatype of each recv buffer element src rank of source (integer) tag message tag (integer) jobID remote job (integer)
ProActiveMPI_Test Tests for the completion of receive Synopsis #include "ProActiveMPI.h" int ProActiveMPI_Test(ProActiveMPI_Request *request, int *flag); Output Parameters flag true if operation completed (logical) Input Parameters request communication request (handle)
ProActiveMPI_Wait Waits for an MPI receive to complete Synopsis #include "ProActiveMPI.h" int ProActiveMPI_Wait(ProActiveMPI_Request *request); Input Parameters request communication request (handle)
ProActiveMPI_AllSend Performs a basic send to all processes of a remote job Synopsis #include "ProActiveMPI.h" int ProActiveMPI_AllSend(void *buf, int count, MPI_Datatype datatype, int tag, int jobID); Input Parameters buf initial address of send buffer count number of elements in send buffer (nonnegative integer) datatype datatype of each recv buffer element tag message tag (integer) jobID remote job (integer)
ProActiveMPI_Barrier Blocks until all process of the specified job have reached this routine No synchronization is enforced if jobID is different from current jobID, and -1 is returned. Synopsis #include "ProActiveMPI.h" int ProActiveMPI_Barrier(int jobID); Input Parameters jobID jobID for which the caller is blocked until all members have entered the call.
#include <stdio.h> #include "mpi.h" #include "ProActiveMPI.h" // variables declaration ... // initialize MPI environment MPI_Init( &argc, &argv ); MPI_Comm_rank( MPI_COMM_WORLD, &rank ); MPI_Comm_size( MPI_COMM_WORLD, &size); // initialize MPI with ProActive environment ProActiveMPI_Init(rank); // get this process job number ProActiveMPI_Job(&myjob); // send from process (#size, #0) to (#0, #1) [#num_process, #num_job] if ((rank == size-1) && (myjob==0)){ error = ProActiveMPI_Send(xlocal[maxn/size], maxn, MPI_DOUBLE, 0, 0, 1); if (error < 0){ printf(" Error while sending from #%d-%d \n", rank, myjob);} } // recv (#0, #1) from (#size, #0) if ((rank == 0) && (myjob==1)) { error = ProActiveMPI_Recv(xlocal[0], maxn, MPI_DOUBLE, size-1, 0, 0); if (error < 0){ printf(" Error while recving with #%d-%d \n", rank, myjob);} } ProActiveMPI_Finalize(); MPI_Finalize( ); return 0; }
The Jacobi relaxation method for solving the Poisson equation has become a classic example of applying domain decomposition to parallelize a problem. Briefly, the original domain is divided into sub-domains. Figure below illustrates dividing a 12x12 domain into two domains with two 12x3 sub-domains (one-dimensional decomposition). Each sub-domain is associated with a single cpu of a cluster, but one can divide the original domain into as many domains as there are clusters and as many sub-domains as there are cpu's. The iteration in the interior (green) cells can proceed independently of each other. Only the perimeter (red) cells need information from the neighbouring sub-domains. Thus, the values of the solution in the perimeter must be sent to the "ghost" (blue) cells of the neighbours, as indicated by the arrows. The amount of data that must be transferred between cells (and the corresponding nodes) is proportional to the number of cells in one dimension, N.
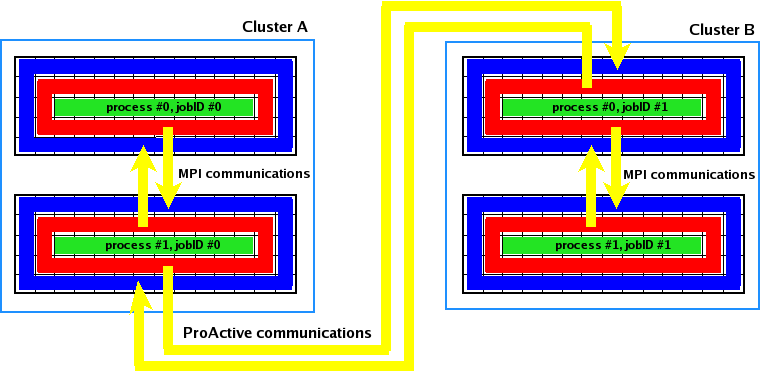
In example below, the domain decomposition is applied on two clusters. The domain is a 1680x1680 mesh divided in 16 sub-domains of 1680x280 on each cluster.
To compile the ProActiveMPI package, you may enter the ProActive/compile directory and type:
linux> build clean ProActiveMPI
| Note |
|---|---|
The compilation requires an implementation of MPI installed on your machine otherwise it leads an error. |
If build is successful, it will:
compile recursively all java classes in the org.objectweb.proactive.mpi package.
generate the native library that all wrapper/proxy Active Objects will load in their JVM.
execute the configure script in directory org/objectweb/proactive/mpi/control/config. The script -configure- generates a Makefile in same directory. The Makefile permits to compile MPI source code which contains the ProActiveMPI functions.
For more details about writing a file descriptor, please refer to Section 41.1.4, “Using the Infrastructure”.
<?xml version="1.0" encoding="UTF-8"?>
<ProActiveDescriptor xmlns:xsi="http://www.w3.org/2001/XMLSchema-instance"
xsi:noNamespaceSchemaLocation=
"http://www-sop.inria.fr/oasis/proactive/schema/3.2/DescriptorSchema.xsd">
<variables>
<descriptorVariable name="PROACTIVE_HOME" value="ProActive"/>
<descriptorVariable name="LOCAL_HOME" value="/home/smariani"/>
<descriptorVariable name="REMOTE_HOME_NEF" value="/home/smariani"/>
<descriptorVariable name="REMOTE_HOME_NINA" value="/user/smariani/home"/>
<descriptorVariable name="MPIRUN_PATH_NEF" value=
"/usr/src/redhat/BUILD/mpich-1.2.6/bin/mpirun"/>
<descriptorVariable name="MPIRUN_PATH_NINA" value=
"/user/smariani/home/mpich-1.2.6/bin/mpirun"/>
<descriptorVariable name="QSUB_PATH" value="/opt/torque/bin/qsub"/>
</variables>
<componentDefinition>
<virtualNodesDefinition>
<virtualNode name="Cluster_Nef" />
<virtualNode name="Cluster_Nina" />
</virtualNodesDefinition>
</componentDefinition>
<deployment>
<mapping>
<map virtualNode="Cluster_Nef">
<jvmSet>
<vmName value="Jvm1" />
</jvmSet>
</map>
<map virtualNode="Cluster_Nina">
<jvmSet>
<vmName value="Jvm2" />
</jvmSet>
</map>
</mapping>
<jvms>
<jvm name="Jvm1">
<creation>
<processReference refid="sshProcess_nef" />
</creation>
</jvm>
<jvm name="Jvm2">
<creation>
<processReference refid="sshProcess_nina" />
</creation>
</jvm>
</jvms>
</deployment>
<fileTransferDefinitions>
<fileTransfer id="JACOBI">
<!-- Transfer mpi program on remote hosts -->
<file src="jacobi" dest="jacobi" />
</fileTransfer>
</fileTransferDefinitions>
<infrastructure>
<processes>
<processDefinition id="localJVM_NEF">
<jvmProcess class="org.objectweb.proactive.core.process.JVMNodeProcess">
<classpath>
<absolutePath value="${REMOTE_HOME_NEF}/${PROACTIVE_HOME}/lib/ProActive.jar" />
<absolutePath value="${REMOTE_HOME_NEF}/${PROACTIVE_HOME}/lib/asm.jar" />
<absolutePath value="${REMOTE_HOME_NEF}/${PROACTIVE_HOME}/lib/log4j.jar" />
<absolutePath value=
"${REMOTE_HOME_NEF}/${PROACTIVE_HOME}/lib/components/fractal.jar" />
<absolutePath value="${REMOTE_HOME_NEF}/${PROACTIVE_HOME}/lib/xercesImpl.jar" />
<absolutePath value="${REMOTE_HOME_NEF}/${PROACTIVE_HOME}/lib/bouncycastle.jar" />
<absolutePath value="${REMOTE_HOME_NEF}/${PROACTIVE_HOME}/lib/jsch.jar" />
<absolutePath value="${REMOTE_HOME_NEF}/${PROACTIVE_HOME}/lib/javassist.jar" />
<absolutePath value="${REMOTE_HOME_NEF}/${PROACTIVE_HOME}/classes" />
</classpath>
<javaPath>
<absolutePath value="${REMOTE_HOME_NEF}/jdk1.5.0_05/bin/java" />
</javaPath>
<policyFile>
<absolutePath value="${REMOTE_HOME_NEF}/proactive.java.policy" />
</policyFile>
<log4jpropertiesFile>
<absolutePath value="${REMOTE_HOME_NEF}/${PROACTIVE_HOME}/compile/proactive-log4j"
/>
</log4jpropertiesFile>
<jvmParameters>
<parameter value="-Dproactive.useIPaddress=true" />
<parameter value="-Dproactive.rmi.port=6099" />
<!-- DO NOT FORGET TO SET THE java.library.path VARIABLE to the remote directory
path of the application -->
<parameter value="-Djava.library.path=${REMOTE_HOME_NEF}/MyApp" />
</jvmParameters>
</jvmProcess>
</processDefinition>
<processDefinition id="localJVM_NINA">
<jvmProcess class="org.objectweb.proactive.core.process.JVMNodeProcess">
<classpath>
<absolutePath value="${REMOTE_HOME_NINA}/${PROACTIVE_HOME}/lib/ProActive.jar" />
<absolutePath value="${REMOTE_HOME_NINA}/${PROACTIVE_HOME}/lib/asm.jar" />
<absolutePath value="${REMOTE_HOME_NINA}/${PROACTIVE_HOME}/lib/log4j.jar" />
<absolutePath value=
"${REMOTE_HOME_NINA}/${PROACTIVE_HOME}/lib/components/fractal.jar" />
<absolutePath value="${REMOTE_HOME_NINA}/${PROACTIVE_HOME}/lib/xercesImpl.jar" />
<absolutePath value="${REMOTE_HOME_NINA}/${PROACTIVE_HOME}/lib/bouncycastle.jar" />
<absolutePath value="${REMOTE_HOME_NINA}/${PROACTIVE_HOME}/lib/jsch.jar" />
<absolutePath value="${REMOTE_HOME_NINA}/${PROACTIVE_HOME}/lib/javassist.jar" />
<absolutePath value="${REMOTE_HOME_NINA}/${PROACTIVE_HOME}/classes" />
</classpath>
<javaPath>
<absolutePath value="/user/smariani/home/NOSAVE/jdk1.5.0_05/bin/java"/>
</javaPath>
<policyFile>
<absolutePath value="${REMOTE_HOME_NINA}/proactive.java.policy"/>
</policyFile>
<log4jpropertiesFile>
<absolutePath value="${REMOTE_HOME_NINA}/${PROACTIVE_HOME}/compile/proactive-log4j"
/>
</log4jpropertiesFile>
<jvmParameters>
<parameter value="-Dproactive.useIPaddress=true" />
<parameter value="-Dproactive.rmi.port=6099" />
<!-- DO NOT FORGET TO SET THE java.library.path VARIABLE to the remote directory
path of the application -->
<parameter value="-Djava.library.path=${REMOTE_HOME_NINA}/MyApp" />
</jvmParameters>
</jvmProcess>
</processDefinition>
<!-- pbs Process -->
<processDefinition id="pbsProcess">
<pbsProcess class="org.objectweb.proactive.core.process.pbs.PBSSubProcess">
<processReference refid="localJVM_NEF" />
<commandPath value="${QSUB_PATH}" />
<pbsOption>
<!-- ask for 16 nodes on cluster nef (8 hosts, 2 nodes per machine)-->
<hostsNumber>8</hostsNumber>
<processorPerNode>2</processorPerNode>
<bookingDuration>01:00:00</bookingDuration>
<scriptPath>
<absolutePath value="${REMOTE_HOME_NEF}/pbsStartRuntime.sh" />
</scriptPath>
</pbsOption>
</pbsProcess>
</processDefinition>
<processDefinition id="lsfProcess">
<bsubProcess class="org.objectweb.proactive.core.process.lsf.LSFBSubProcess">
<processReference refid="localJVM_NINA"/>
<bsubOption>
<!-- ask for 16 nodes on cluster nina (8 hosts, 2 nodes per machine)-->
<processor>16</processor>
<resourceRequirement value="span[ptile=2]"/>
<scriptPath>
<absolutePath value="${REMOTE_HOME_NINA}/startRuntime.sh"/>
</scriptPath>
</bsubOption>
</bsubProcess>
</processDefinition>
<!-- mpi Process -->
<processDefinition id="mpiProcess_nef">
<mpiProcess class="org.objectweb.proactive.core.process.mpi.MPIDependentProcess"
mpiFileName="jacobi" >
<commandPath value="${MPIRUN_PATH_NEF}" />
<mpiOptions>
<processNumber>16</processNumber>
<localRelativePath>
<relativePath origin="user.home" value="Test" />
</localRelativePath>
<remoteAbsolutePath>
<absolutePath value="${REMOTE_HOME_NEF}/MyApp" />
</remoteAbsolutePath>
</mpiOptions>
</mpiProcess>
</processDefinition>
<!-- mpi Process -->
<processDefinition id="mpiProcess_nina">
<mpiProcess class="org.objectweb.proactive.core.process.mpi.MPIDependentProcess"
mpiFileName="jacobi" >
<commandPath value="${MPIRUN_PATH_NINA}" />
<mpiOptions>
<processNumber>16</processNumber>
<localRelativePath>
<relativePath origin="user.home" value="Test" />
</localRelativePath>
<remoteAbsolutePath>
<absolutePath value="${REMOTE_HOME_NINA}/MyApp" />
</remoteAbsolutePath>
</mpiOptions>
</mpiProcess>
</processDefinition>
<!-- dependent process -->
<processDefinition id="dpsProcess_nef">
<dependentProcessSequence class=
"org.objectweb.proactive.core.process.DependentListProcess">
<processReference refid="pbsProcess" />
<processReference refid="mpiProcess_nef" />
</dependentProcessSequence>
</processDefinition>
<!-- dependent process -->
<processDefinition id="dpsProcess_nina">
<dependentProcessSequence class=
"org.objectweb.proactive.core.process.DependentListProcess">
<processReference refid="lsfProcess" />
<processReference refid="mpiProcess_nina" />
</dependentProcessSequence>
</processDefinition>
<!-- ssh process -->
<processDefinition id="sshProcess_nef">
<sshProcess class="org.objectweb.proactive.core.process.ssh.SSHProcess" hostname=
"nef.inria.fr" username="smariani">
<processReference refid="dpsProcess_nef" />
<fileTransferDeploy refid="JACOBI">
<copyProtocol>processDefault, scp, rcp</copyProtocol>
<!-- local host path -->
<sourceInfo prefix=
"${PROACTIVE_HOME}/src/org/objectweb/proactive/mpi/control/config/bin" />
<!-- remote host path -->
<destinationInfo prefix="${REMOTE_HOME_NEF}/MyApp" />
</fileTransferDeploy>
</sshProcess>
</processDefinition>
<!-- ssh process -->
<processDefinition id="sshProcess_nina">
<sshProcess class="org.objectweb.proactive.core.process.ssh.SSHProcess" hostname=
"cluster.inria.fr" username="smariani">
<processReference refid="dpsProcess_nina" />
<fileTransferDeploy refid="JACOBI">
<copyProtocol>scp</copyProtocol>
<!-- local host path -->
<sourceInfo prefix=
"${PROACTIVE_HOME}/src/org/objectweb/proactive/mpi/control/config/bin" />
<!-- remote host path -->
<destinationInfo prefix="${REMOTE_HOME_NINA}/MyApp" />
</fileTransferDeploy>
</sshProcess>
</processDefinition>
</processes>
</infrastructure>
</ProActiveDescriptor>
| Note |
|---|---|
To be interfaced with some native code, each wrapper/proxy loads a library in their JVM context. Then, it is necessary that the value of the java.library.path variable for each JVM is set to the remote directory path. To be done, use the following tag in each jvmProcess definition: |
<parameter value="-Djava.library.path=${REMOTE_HOME_NEF}/MyApp" />
Place the source file in org/objectweb/proactive/mpi/control/config/src directory
#include <stdio.h>
#include "mpi.h"
#include "ProActiveMPI.h"
#include <time.h>
/* This example handles a 1680x1680 mesh, on 2 clusters with 16 nodes (2 ppn) for each */
#define maxn 1680
#define size 840
#define JOB_ZERO 0
#define JOB_ONE 1
#define NB_ITER 10000
int main( argc, argv )
int argc;
char **argv;
{
int rank, initValue, i, j, itcnt, idjob, nb_proc, error;
int i_first, i_last;
double xlocal[(size/3)+2][maxn];
double xnew[(size/3)+3][maxn];
char processor_name[MPI_MAX_PROCESSOR_NAME];
int namelen;
// MPI initialization
MPI_Init( &argc, &argv );
MPI_Comm_rank( MPI_COMM_WORLD, &rank );
MPI_Comm_size( MPI_COMM_WORLD, &nb_proc );
MPI_Get_processor_name(processor_name,&namelen);
// ProActive with MPI initialization
error = ProActiveMPI_Init(rank);
if (error < 0){
printf("[MPI] !!! Error ProActiveMPI init \n");
MPI_Abort( MPI_COMM_WORLD, 1 );
}
// get this process job ID
ProActiveMPI_Job(&idjob);
if (nb_proc != 16) MPI_Abort( MPI_COMM_WORLD, 1 );
/* xlocal[][0] is lower ghostpoints, xlocal[][size+2] is upper */
/*
* Note that top and bottom processes have one less row of interior points
*/
i_first = 1;
i_last = size/nb_proc;
if ((rank == 0) && (idjob == JOB_ZERO)) i_first++;
if ((rank == nb_proc - 1) && (idjob == JOB_ONE)) i_last--;
// matrix initialization
if (idjob==JOB_ZERO) initValue=rank;
else {initValue = nb_proc+rank;}
/* Fill the data as specified */
for (i=1; i<=size/nb_proc; i++)
for (j=0; j<maxn; j++)
xlocal[i][j] = initValue;
for (j=0; j<maxn; j++) {
xlocal[i_first-1][j] = -1;
xlocal[i_last+1][j] = -1;
}
itcnt = 0;
do {
/*----+----+----+----+----+----+ MPI COMMS +----+----+----+----+----+----+*/
/* Send up unless I'm at the top, then receive from below */
/* Note the use of xlocal[i] for &xlocal[i][0] */
if (rank < nb_proc - 1)
MPI_Send( xlocal[size/nb_proc], maxn, MPI_DOUBLE, rank + 1, 0,
MPI_COMM_WORLD );
if (rank > 0)
MPI_Recv( xlocal[0], maxn, MPI_DOUBLE, rank - 1, 0,
MPI_COMM_WORLD, &status );
/*----+----+----+----+----+----+ PROACTIVE COMMS +----+----+----+----+----+----+*/
if ((rank == nb_proc - 1) && (idjob == JOB_ZERO)){
error = ProActiveMPI_Send(xlocal[size/nb_proc], maxn, MPI_DOUBLE, 0, 0, JOB_ONE);
if (error < 0){
printf("[MPI] !!! Error ProActiveMPI send #15/0 -> #0/1 \n");}
}
if ((rank == 0) && (idjob==JOB_ONE)) {
error = ProActiveMPI_Recv(xlocal[0], maxn, MPI_DOUBLE, nb_proc - 1, 0, JOB_ZERO);
if (error < 0){
printf("[MPI] !!! Error ProActiveMPI recv #0/1 <- #15/0 \n");}
}
/*----+----+----+----+----+----+ MPI COMMS +----+----+----+----+----+----+*/
/* Send down unless I'm at the bottom */
if (rank > 0)
MPI_Send( xlocal[1], maxn, MPI_DOUBLE, rank - 1, 1,
MPI_COMM_WORLD );
if (rank < nb_proc - 1)
MPI_Recv( xlocal[size/nb_proc+1], maxn, MPI_DOUBLE, rank + 1, 1,
MPI_COMM_WORLD, &status );
/*----+----+----+----+----+----+ PROACTIVE COMMS +----+----+----+----+----+----+*/
if ((rank == 0) && (idjob==JOB_ONE)){
error = ProActiveMPI_Send(xlocal[1], maxn, MPI_DOUBLE, nb_proc - 1, 1, JOB_ZERO);
if (error < 0){
printf("[MPI] !!! Error ProActiveMPI send #0/1 -> #15/0 \n");}
}
if ((rank == nb_proc - 1) && (idjob==JOB_ZERO)) {
t_00 = MPI_Wtime();
error = ProActiveMPI_Recv(xlocal[size/nb_proc+1], maxn, MPI_DOUBLE, 0, 1, JOB_ONE);
t_01 = MPI_Wtime();
if (error < 0){
printf("[MPI] !!! Error ProActiveMPI recv #15/0 <- #0/1 \n");}
waitForRecv += t_01 - t_00;
}
/*----+----+----+----+----+----+ COMPUTATION +----+----+----+----+----+----+*/
/* Compute new values (but not on boundary) */
itcnt ++;
diffnorm = 0.0;
for (i=i_first; i<=i_last; i++)
for (j=1; j<maxn-1; j++) {
xnew[i][j] = (xlocal[i][j+1] + xlocal[i][j-1] +
xlocal[i+1][j] + xlocal[i-1][j]) / 4.0;
diffnorm += (xnew[i][j] - xlocal[i][j]) *
(xnew[i][j] - xlocal[i][j]);
}
/* Only transfer the interior points */
for (i=i_first; i<=i_last; i++)
for (j=1; j<maxn-1; j++)
xlocal[i][j] = xnew[i][j];
if (rank == 0) printf( "[MPI] At iteration %d, job %d \n", itcnt, idjob );
} while (itcnt < NB_ITER);
// print this process buffer
printf("[MPI] Rank: %d Job: %d \n",rank, idjob );
for (i=1; i<(size/16); i++){
printf("[");
for (j=0; j<maxn; j++)
printf( "%f ",xlocal[i][j]);
printf("] \n");
}
// clean environment
ProActiveMPI_Finalize();
MPI_Finalize( );
return 0;
}
To compile the MPI code with the added features for wrapping, you may enter the org/objectweb/proactive/mpi/control/config directory and type:
linux> make clean linux> make mpicode=jacobi
| Note |
|---|---|
The mpicode value is the name of the source file without its extension. The Makefile generates a binary with the same name in /bin directory. |
import org.apache.log4j.Logger;
import org.objectweb.proactive.ProActive;
import org.objectweb.proactive.core.ProActiveException;
import org.objectweb.proactive.core.config.ProActiveConfiguration;
import org.objectweb.proactive.core.descriptor.data.ProActiveDescriptor;
import org.objectweb.proactive.core.descriptor.data.VirtualNode;
import org.objectweb.proactive.core.node.Node;
import org.objectweb.proactive.core.util.log.Loggers;
import org.objectweb.proactive.core.util.log.ProActiveLogger;
import org.objectweb.proactive.mpi.MPI;
import org.objectweb.proactive.mpi.MPISpmd;
import org.objectweb.proactive.mpi.control.ProActiveMPI;
import java.util.ArrayList;
import java.util.Vector;
public class Main {
public static void main(String[] args) {
Logger logger = ProActiveLogger.getLogger(Loggers.EXAMPLES);
if (args.length != 1) {
logger.error("Usage: java " + Main.class.getName() +
" <deployment file>");
System.exit(0);
}
ProActiveConfiguration.load();
VirtualNode jacobiOnNina;
VirtualNode jacobiOnNef;
ProActiveDescriptor pad = null;
try {
pad = ProActive.getProactiveDescriptor("file:" + args[0]);
// gets virtual node
jacobiOnNef = pad.getVirtualNode("Cluster_Nef");
jacobiOnNina = pad.getVirtualNode("Cluster_Nina");
MPISpmd nefMPISpmd = MPI.newMPISpmd(jacobiOnNef);
MPISpmd ninaMPISpmd = MPI.newMPISpmd(jacobiOnNina);
ArrayList my_jobs = new ArrayList();
my_jobs.add(nefMPISpmd);
my_jobs.add(ninaMPISpmd);
ProActiveMPI.deploy(my_jobs);
} catch (ProActiveException e) {
e.printStackTrace();
logger.error("Pb when reading descriptor");
}
}
}
Deploy the ProActive main program above like any another ProActive application using a script like the following one:
#!/bin/sh echo --- ProActive/MPI JACOBI example --------------------------------------------- workingDir=`dirname $0` . $workingDir/env.sh XMLDESCRIPTOR=/user/smariani/home/Test/MPI-Jacobi-nina-nef.xml $JAVACMD -classpath $CLASSPATH -Djava.security.policy=$PROACTIVE/compile/proactive.java.policy -Dproactive.rmi.port=6099 -Dlog4j.configuration=file:$PROACTIVE/compile/proactive-log4j Main $XMLDESCRIPTOR
Reading of the file descriptor and return of 16 nodes from the first cluster Nef and 16 nodes from the second cluster Nina
************* Reading deployment descriptor: file:/user/smariani/home/TestLoadLib/MPI-Jacobi-nina-nef.xml ******************** created VirtualNode name=Cluster_Nef created VirtualNode name=Cluster_Nina ... **** Mapping VirtualNode Cluster_Nef with Node: //193.51.209.75:6099/Cluster_Nef932675317 done **** Mapping VirtualNode Cluster_Nef with Node: //193.51.209.76:6099/Cluster_Nef1864357984 done **** Mapping VirtualNode Cluster_Nef with Node: //193.51.209.70:6099/Cluster_Nef1158912343 done ... **** Mapping VirtualNode Cluster_Nina with Node: //193.51.209.47:6099/Cluster_Nina1755746262 done **** Mapping VirtualNode Cluster_Nina with Node: //193.51.209.47:6099/Cluster_Nina-1139061904 done **** Mapping VirtualNode Cluster_Nina with Node: //193.51.209.45:6099/Cluster_Nina-941377986 done ...
Deployment of proxies on remote nodes and environment initialization
[MANAGER] Create SPMD Proxy for jobID: 0 [MANAGER] Initialize remote environments [MANAGER] Activate remote thread for communication [MANAGER] Create SPMD Proxy for jobID: 1 [MANAGER] Initialize remote environments [MANAGER] Activate remote thread for communication
Processes registration
[MANAGER] JobID #0 register mpi process #12 [MANAGER] JobID #0 register mpi process #3 [MANAGER] JobID #0 register mpi process #1 [MANAGER] JobID #0 register mpi process #15 [MANAGER] JobID #0 register mpi process #4 [MANAGER] JobID #0 register mpi process #7 [MANAGER] JobID #0 register mpi process #0 [MANAGER] JobID #0 register mpi process #9 [MANAGER] JobID #0 register mpi process #2 [MANAGER] JobID #0 register mpi process #13 [MANAGER] JobID #0 register mpi process #10 [MANAGER] JobID #0 register mpi process #5 [MANAGER] JobID #0 register mpi process #11 [MANAGER] JobID #0 register mpi process #14 [MANAGER] JobID #0 register mpi process #6 [MANAGER] JobID #0 register mpi process #8 [MANAGER] JobID #1 register mpi process #10 [MANAGER] JobID #1 register mpi process #13 [MANAGER] JobID #1 register mpi process #6 [MANAGER] JobID #1 register mpi process #3 [MANAGER] JobID #1 register mpi process #7 [MANAGER] JobID #1 register mpi process #8 [MANAGER] JobID #1 register mpi process #15 [MANAGER] JobID #1 register mpi process #9 [MANAGER] JobID #1 register mpi process #4 [MANAGER] JobID #1 register mpi process #1 [MANAGER] JobID #1 register mpi process #0 [MANAGER] JobID #1 register mpi process #11 [MANAGER] JobID #1 register mpi process #2 [MANAGER] JobID #1 register mpi process #5 [MANAGER] JobID #1 register mpi process #12 [MANAGER] JobID #1 register mpi process #14
Starting computation
[MPI] At iteration 1, job 1 [MPI] At iteration 2, job 1 [MPI] At iteration 3, job 1 [MPI] At iteration 4, job 1 [MPI] At iteration 5, job 1 ... [MPI] At iteration 1, job 0 [MPI] At iteration 2, job 0 [MPI] At iteration 3, job 0 [MPI] At iteration 4, job 0 [MPI] At iteration 5, job 0 [MPI] At iteration 6, job 0 ... [MPI] At iteration 9996, job 1 [MPI] At iteration 9997, job 1 [MPI] At iteration 9998, job 1 [MPI] At iteration 9999, job 1 [MPI] At iteration 10000, job 1 ... [MPI] At iteration 9996, job 0 [MPI] At iteration 9997, job 0 [MPI] At iteration 9998, job 0 [MPI] At iteration 9999, job 0 [MPI] At iteration 10000, job 0
Displaying each process result, for example
[MPI] Rank: 15 Job: 1 [31.000000 27.482592 24.514056 ... 24.514056 27.482592 31.000000 ] [31.000000 26.484765 22.663677 ... 22.663677 26.484765 31.000000 ] [31.000000 24.765592 19.900617 ... 19.900617 24.765592 31.000000 ]
All processes unregistration
[MANAGER] JobID #1 unregister mpi process #15 [MANAGER] JobID #1 unregister mpi process #14 [MANAGER] JobID #0 unregister mpi process #0 [MANAGER] JobID #1 unregister mpi process #13 [MANAGER] JobID #0 unregister mpi process #1 [MANAGER] JobID #1 unregister mpi process #12 [MANAGER] JobID #0 unregister mpi process #2 ...
The following snapshot shows the 32 Nodes required, distributed on 16 hosts (two processes per host, and 8 hosts on each cluster). Each Node contains its local wrapper, a ProActiveMPICoupling Active Object. One can notice the ProActive communication between two MPI processes trough the communication between two proxies which belongs to two Nodes residing on different clusters.
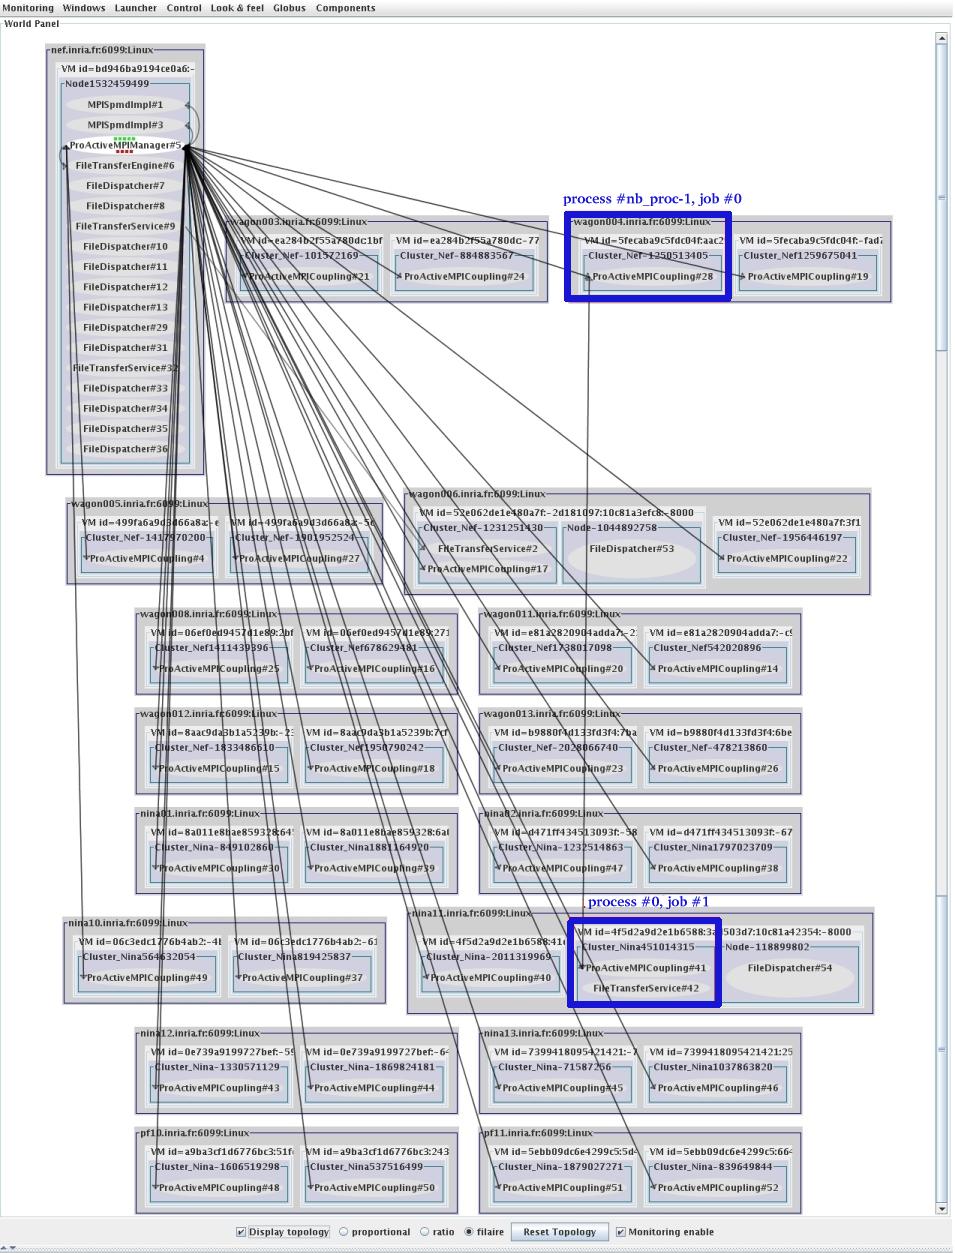

The proxy has the role of a smart reference that performs additional actions when the MPISpmdImpl Active Object is accessed. Especially the proxy forwards requests to the Active Object if the current status of this Active Object is in an appropriate state, otherwise an IllegalMPIStateException is thrown.
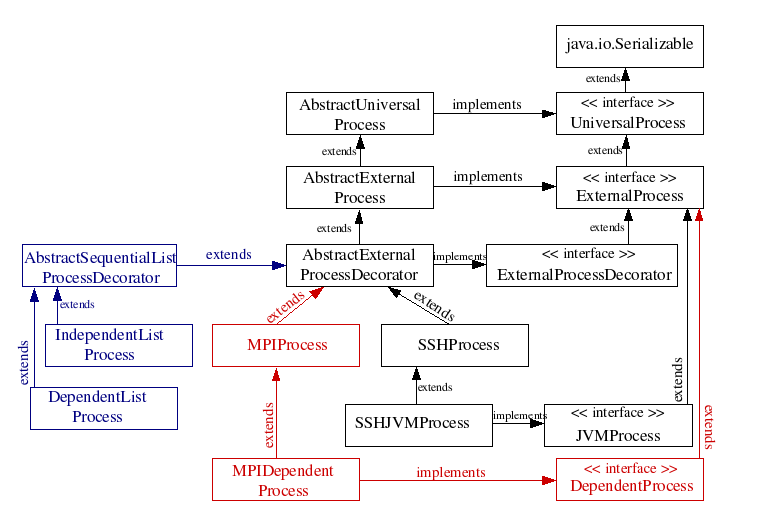
DependentListProcess and IndependentListProcess (left part on the picture)
The SequentialListProcess relative classes are defined in the org.objectweb.proactive.core.process package. The two classes share the same characteristics: both contain a list of processes which have to be executed sequentially. This dependent constraint has been integrated in order to satisfy the MPI process requirement. Indeed, the DependentListProcess class specifies a list of processes which have to extend the DependentProcess interface, unless the header process which is a simple allocation resources process. It provides deployer to be sure that the dependent process will be executed if and only if this dependent process gets back parameters from which it is dependent.
MPIDependentProcess (right part on the picture)
The MPI relative classes are defined in the org.objectweb.proactive.core.process.mpi package. MPI process preliminary requires a list of hosts for job execution. Thus, this process has to implement the Dependent Process interface. See section 11.7. Infrastructure and processes (part III) for more details on processes.
org.objectweb.proactive.mpi | ||
public class MPI | ||
static MPISpmd | newMPISpmd(VirtualNode virtualNode) throws IllegalMPIStateException | Creates an MPISpmd object from an existing VirtualNode |
public class MPISpmd | ||
MPIResult | startMPI() throws IllegalMPIStateException | Triggers MPI code execution and returns a future on an MPIResult object |
MPIResult | reStartMPI() throws IllegalMPIStateException | Restarts MPI code execution and returns a new future on an MPIResult object |
boolean | killMPI() throws IllegalMPIStateException | Kills the MPI code execution |
String | getStatus() | Returns the current status of MPI code execution |
void | setCommandArguments(String arguments) | Adds or modifies the MPI command parameters |
public class MPIResult | ||
int | getReturnValue() | Returns the exit value of the MPI code |
public class MPIConstants | ||
static final String | MPI_UNSTARTED | MPISpmd object status after creation |
static final String | MPI_RUNNING | MPISpmd object has been started or restarted |
static final String | MPI_KILLED | MPISpmd object has been killed |
static final String | MPI_FINISHED | MPISpmd object has finished |
Table 41.1. Simple Wrapping of MPI Code
org.objectweb.proactive.mpi | ||
public class MPISpmd | ||
void | newActiveSpmd(String class) | Deploys an SPMD group of Active Objects on each MPISpmd Nodes |
void | newActiveSpmd(String class, Object[] params) | Deploys an SPMD group of Active Objects with specific constructor parameters on each MPISpmd Nodes |
void | newActiveSpmd(String class, Object[][] params) | Deploys an SPMD group of Active Objects with specific constructor parameters on each MPISpmd Nodes |
void | newActive(String class, Object[] params, int rank) throws ArrayIndexOutOfBoundsException | Deploys an Active object with specific constructor parameters on a single node specified with rank |
org.objectweb.proactive.mpi.control | ||
public class ProActiveMPI | ||
void | deploy(ArrayList mpiSpmdList) | Deploys and starts all MPISpmd objects in the list |
Table 41.2. API for creating one Active Object per MPI process
int | ProActiveSend(void* buf, int count, MPI_Datatype datatype, int dest, char* className, char* methodName, int jobID, ...) | Performs a basic send from mpi side to a ProActive java class |
Table 41.3. MPI to ProActive Communications API
org.objectweb.proactive.mpi.control | ||
public class ProActiveMPIData | ||
int | getSrc() | Returns the rank of mpi process sender |
int | getJobID() | Returns jobID of mpi process sender |
int | getDataType() | Returns type of data |
String [] | getParameters() | Returns the parameters passed in the ProActiveSend method call |
byte [] | getData() | Returns the data as a byte array |
int | getCount() | Returns the number of elements in data array |
org.objectweb.proactive.mpi.control.util | ||
public class ProActiveMPIUtil | ||
static int | bytesToInt(byte[] bytes, int startIndex) | Given a byte array, restores it as an int |
static float | bytesToFloat(byte[] bytes, int startIndex) | Given a byte array, restores it as a float |
static short | bytesToShort(byte[] bytes, int startIndex) | Given a byte array, restores it as a short |
static long | bytesToLong(byte[] bytes, int startIndex) | Given a byte array, restores it as a long |
static double | bytesToDouble(byte[] bytes, int startIndex) | Given a byte array, restores it as a double |
static String | bytesToString(byte[] bytes, int startIndex) | Given a byte array, restores a string out of it |
static int | intTobytes(int num, byte[] bytes, int startIndex) | Translates int into bytes, stored in byte array |
static int | floatToByte(float num, byte[] bytes, int startIndex) | Translates float into bytes, stored in byte array |
static int | shortToBytes(short num, byte[] bytes, int startIndex) | Translates short into bytes, stored in byte array |
static int | stringToBytes(String str, byte[] bytes, int startIndex) | Gives a String less than 255 bytes, store it as byte array |
static int | longToBytes(long num, byte[] bytes, int startIndex) | Translates long into bytes, stored in byte array |
static int | doubleToBytes(double num, byte[] bytes, int startIndex) | Translates double into bytes, stored in byte array |
Table 41.4. Java API for MPI message conversion
org.objectweb.proactive.mpi.control | ||
public class ProActiveMPICoupling | ||
static void | MPISend(byte[] buf, int count, int datatype, int dest, int tag, int jobID) | Sends a buffer of bytes to the specified MPI process |
org.objectweb.proactive.mpi.control | ||
public class ProActiveMPIConstants | ||
static final int | MPI_CHAR | char |
static final int | MPI_UNSIGNED_CHAR | unsigned char |
static final int | MPI_BYTE | byte |
static final int | MPI_SHORT | short |
static final int | MPI_UNSIGNED_SHORT | unsigned short |
static final int | MPI_INT | int |
static final int | MPI_UNSIGNED | unsigned int |
static final int | MPI_LONG | long |
static final int | MPI_UNSIGNED_LONG | unsigned long |
static final int | MPI_FLOAT | float |
static final int | MPI_DOUBLE | double |
static final int | MPI_LONG_DOUBLE | long double |
static final int | MPI_LONG_LONG_INT | long long int |
Table 41.5. ProActiveMPI API for sending messages to MPI
int | ProActiveRecv(void *buf, int count, MPI_Datatype datatype, int src, int tag, int jobID) | Performs a blocking receive from MPI side to receive data from a ProActive java class |
int | ProActiveIRecv(void *buf, int count, MPI_Datatype datatype, int src, int tag, int jobID, ProActiveMPI_Request *request) | Performs a non blocking receive from MPI side to receive data from a ProActive java class |
int | ProActiveTest(ProActiveMPI_Request *request, int *flag) | Tests for the completion of receive from a ProActive java class |
int | ProActiveWait(ProActiveMPI_Request *request) | Waits for an MPI receive from a ProActive java class to complete |
Table 41.6. MPI message reception from ProActive
int | ProActiveMPI_Init(int rank) | Initializes the MPI with ProActive execution environment |
int | ProActiveMPI_Job(int *job) | Initializes the variable with the JOBID |
int | ProActiveMPI_Finalize() | Terminates MPI with ProActive execution environment |
int | ProActiveMPI_Send(void *buf, int count, MPI_Datatype datatype, int dest, int tag, int jobID) | Performs a basic send |
int | ProActiveMPI_Recv(void *buf, int count, MPI_Datatype datatype, int src, int tag, int jobID) | Performs a basic Recv |
int | ProActiveMPI_IRecv(void *buf, int count, MPI_Datatype datatype, int src, int tag, int jobID, ProActiveMPI_Request *request) | Performs a non blocking receive |
int | ProActiveMPI_Test(ProActiveMPI_Request *request, int *flag) | Tests for the completion of receive |
int | ProActiveMPI_Wait(ProActiveMPI_Request *request) | Waits for an MPI receive to complete |
int | ProActiveMPI_AllSend(void *buf, int count, MPI_Datatype datatype, int tag, int jobID) | Performs a basic send to all processes of a remote job |
int | ProActiveMPI_Barrier(int jobID) | Blocks until all process of the specified job have reached this routine |
Table 41.7. MPI to MPI through ProActive C API
Datatypes: MPI_CHAR, MPI_UNSIGNED_CHAR, MPI_BYTE, MPI_SHORT, MPI_UNSIGNED_SHORT, MPI_INT, MPI_UNSIGNED, MPI_LONG, MPI_UNSIGNED_LONG, MPI_FLOAT, MPI_DOUBLE, MPI_LONG_DOUBLE, MPI_LONG_LONG_INT
Call | PROACTIVEMPI_INIT(rank, err) integer :: rank, err | Initializes the MPI with ProActive execution environment |
Call | PROACTIVEMPI_JOB(job, err) integer :: job, err | Initializes the job environment variable |
Call | PROACTIVEMPI_FINALIZE(err) integer :: err | Terminates MPI with ProActive execution environment |
Call | PROACTIVEMPI_SEND(buf, count, datatype, dest, tag, jobID, err) < type >, dimension(*) :: buf integer :: count, datatype, dest, tag, jobID, err | Performs a basic send |
Call | PROACTIVEMPI_RECV(buf, count, datatype, src, tag, jobID, err) < type >, dimension(*) :: buf integer :: count, datatype, src, tag, jobID, err | Performs a basic Recv |
Call | PROACTIVEMPI_ALLSEND(buf, count, datatype, tag, jobID, err) < type >, dimension(*) :: buf integer :: count, datatype, tag, jobID, err | Performs a basic send to all processes of a remote job |
Call | PROACTIVEMPI_BARRIER(jobID, err) integer :: jobID, err | Blocks until all process of the specified job have reached this routine |
Table 41.8. MPI to MPI through ProActive Fortran API
Datatypes: MPI_CHARACTER, MPI_BYTE, MPI_INTEGER, MPI_DOUBLE
IC2D is a graphical environment for remote monitoring and steering of distributed and grid applications. IC2D is built on top of ProActive that provides asynchronous calls and migration.
IC2D is available in two forms :
A Java standalone application based on Eclipse Rich Client Platform (RCP), available for any platform (Windows, Linux, Mac OSX,Solaris, ...)
A set of Eclipse plugins: with all the functionnalities within the standalone application, enhanced with a tool that makes easier the development of Grid Applications, including:
ProActive Editor (error highlighting, ...)
ProActive Wizards
Cheat Sheets for ProActive (Guided Tour)
IC2D is based on a plugin architecture and provides 2 plugins in relation to the monitoring and the control of ProActive applications:
The Monitoring plugin which provides a graphical visualisation for hosts, Java Virtual Machines, and active objects, including the topology and the volume of communications
The Job Monitoring plugin which provides a tree representation of all these objects.
The Monitoring plugin provides the Monitoring perspective displayed in the Figure 42.1, “The Monitoring Perspective”.
This perspective defines the following set of views:
The Monitoring view: contains the graphical visualisation for ProActive objects
The Legend view: contains the legend corresponding to the Monitoring view's content
The Console view: contains log corresponding to the Monitoring view's events
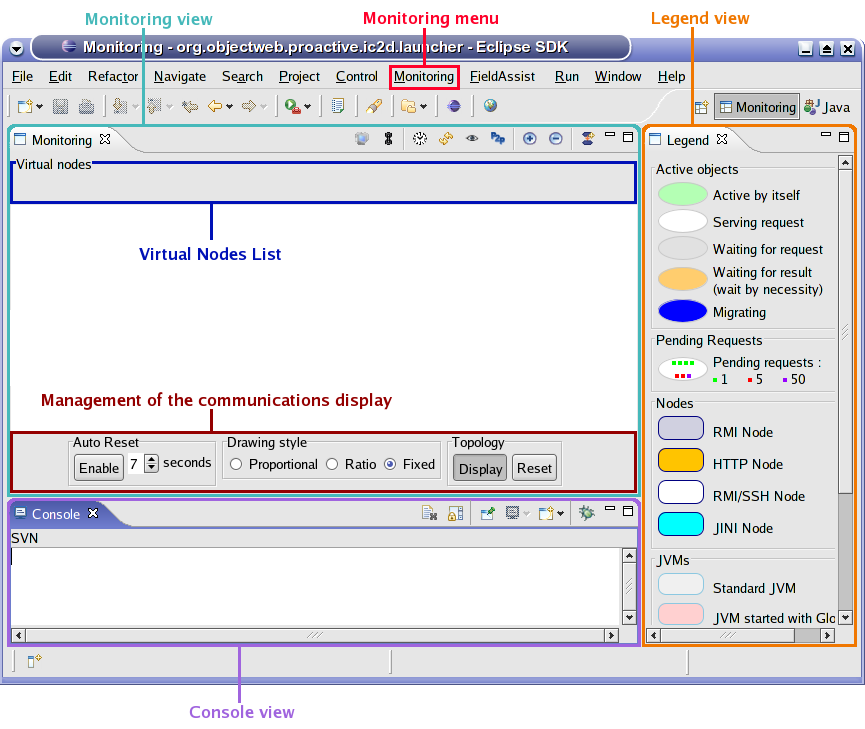
In order to monitor a new host:
open the Monitoring Perspective: Window->Open Perspective->Other...->Monitoring (in the standalone IC2D, it should be already opened because it is the default perspective)
select Monitoring->Monitor a new host..., it opens the "Monitor a new Host" dialog displayed in the Figure 42.2, “Monitor New Host Dialog”
enter informations required about the host to monitor, and click OK
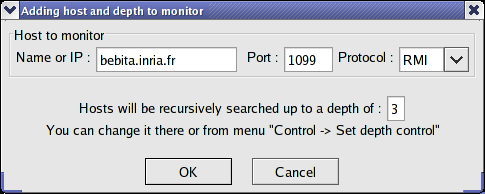
Here the buttons proposed in the monitoring view:

Display the "Monitor a new host" dialog in order to monitor a new host.

Display the "Set Depth Control" dialog in order to change the depth variable. For example: We have 3 hosts: 'A' 'B' and 'C'. And on A there is an active object 'aoA' which communicates with another active object 'aoB' which is on B. This one communicates with an active object 'aoC' on C, and aoA don't communicate with aoC. Then if we monitor A, and if the depth is 1, we will not see aoC.

Display the "Set Time to Refresh" dialog in order to change the time to refresh the model. And find the new added objects.

Refreh the model.

When the eye is opened the monitoring is activated.

Allows to see or not the P2P objects.


Open a new Monitoring view. This button can be used in any perspective. The new created view will be named 'Monitoring#number_of_this_view'
At the top of the Monitoring View, one can find the Virtual Nodes list. When some nodes are monirored, their virtual nodes are added to this list. And when a virtual node is checked, all its nodes are highlighted.

At the bottom of the Monitoring view, one can find a set of buttons used to manage the communications display:
Auto Reset: Automatic reset of communications, you can specify the auto reset time
Display topology: show/hide communications
Proportional: arrows thickness is proportional to the number of requests
Ratio: arrows thickness uses a ratio of the number of requests
Fixed: arrows always have the same thickness whatever the number of communications
Topology: show/hide communications, and erase all communications
Monitoring enable: listen or not communications between active objects
The Figure 42.16, “Monitoring of 2 applications” shows an example where 3 hosts are monitored. The applications running are philosophers and C3D (Section 5.2, “C3D: a parallel, distributed and collaborative 3D renderer”).
To look at the tree representation of the monitored objects, one have to open the Job Monitoring view.
For that, select Window->Show view->Other...->Job Monitoring->Job Monitoring.
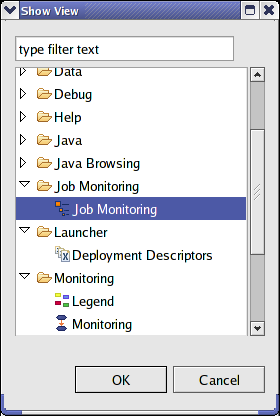
Then, select the model that you want to monitor. Each name corresponds to a monitoring view. You can also monitor a new host.
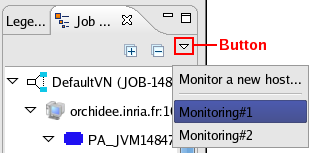

One can see in the Figure 42.16, “Monitoring of 2 applications” an example of a tree representation of some monitored objects.
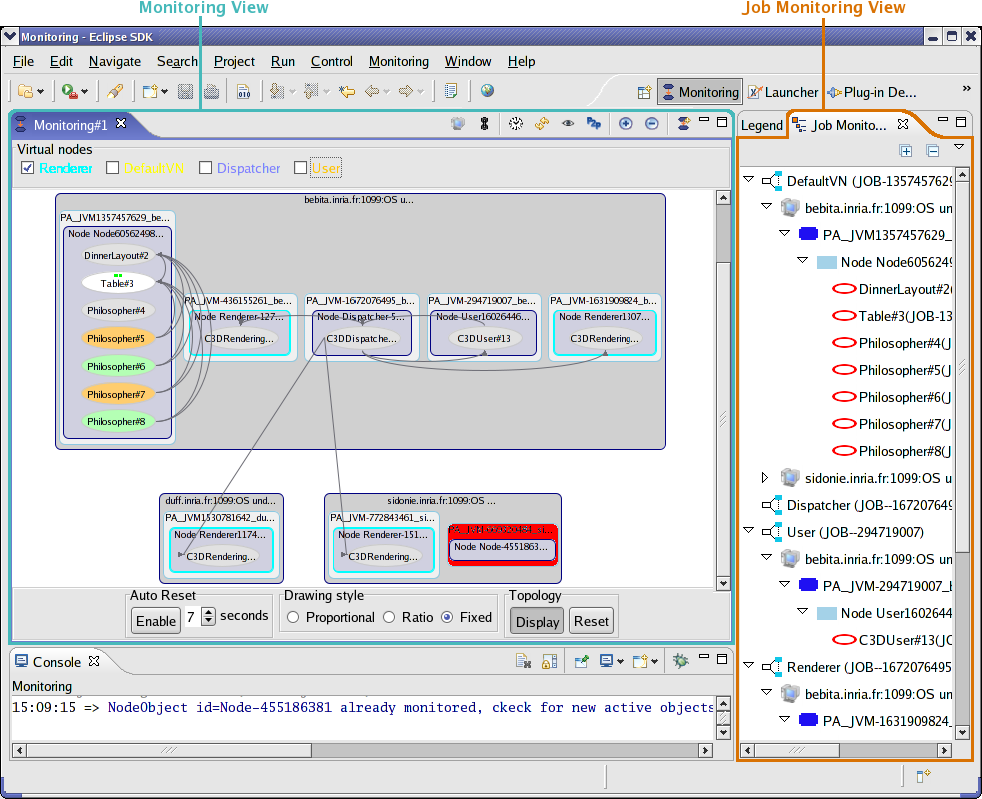
In order to launch a deployment descriptor , you must open your file with the IC2D XML Editor .
To use this editor, you have two possibilities:
Open the Launcher perspective . Select: Window > Open perspective > Other... > Launcher
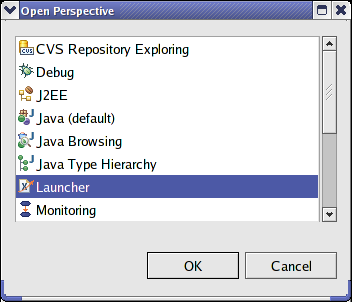
Then select: File > Open File... and open your deployment descriptor, it will be opened with the IC2D XML editor. And its name will appear in the Deployment descriptors list.
In the Navigator view, or another similar, a right click on the XML file allows you to open your file with the IC2D XML editor .
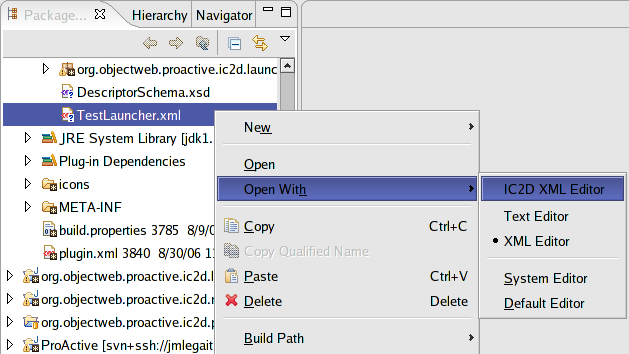
The Figure 42.19, “The Launcher perspective” represents the Launcher perspective containing an XML editor , a console , and the list of deployment descriptors .
To launch an application, select your file in the deployment descriptors list, and click on the launch icon.
You can kill the applications launched from a popup-menu in the "Deployment descriptors" list.
To see your application running, open the "Monitoring perspective" and monitor the corresponding host.
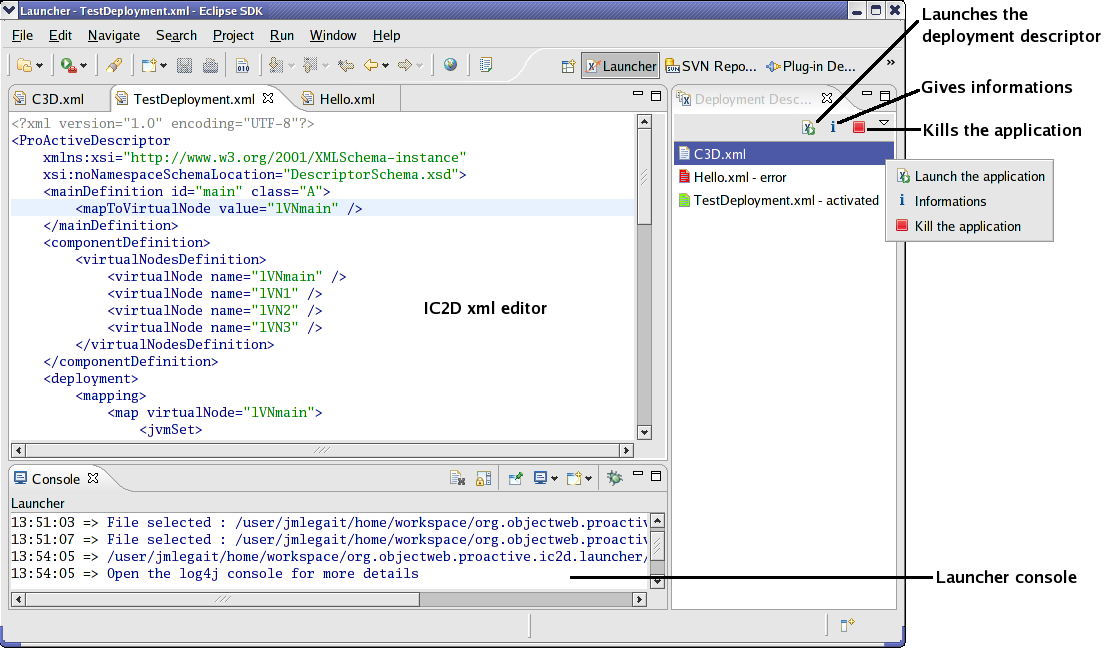
These wizards will guide developpers to make complex operations with ProActive, such as installation, integration, configuration, or execution :
a ProActive installation wizard
a wizard that create applications using ProActive
an active object creation wizard
a configuration and execution wizard
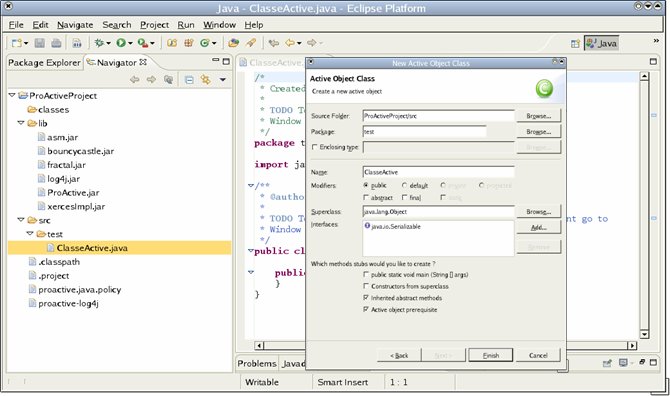
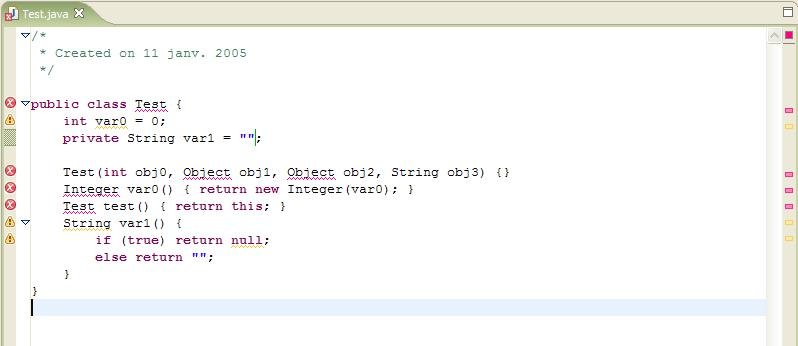
The aim of the guided tour is to provide a step by step explanation to the ProActive beginners.
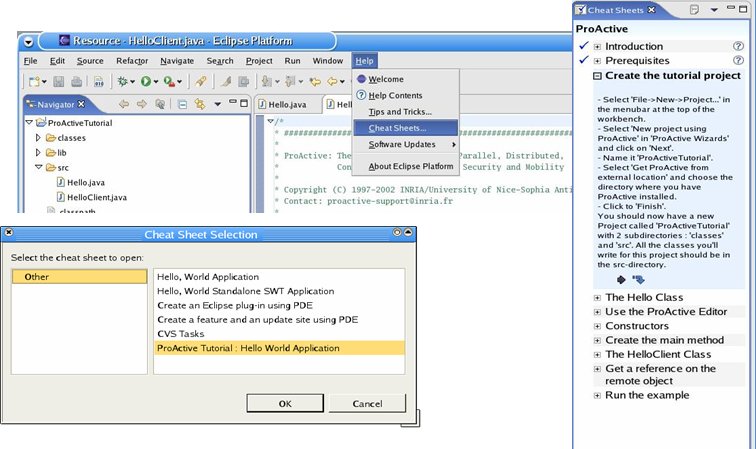
This guided tour (that is actually eclipse cheat sheet) purposes:
To Explain ProActive to beginners
To make interactions with the user with simple situations
To Show the important points
Scilab is a scientific software for numerical computations. Developped since 1990 by researchers from INRIA and ENPC, it is now maintained and developed by Scilab Consortium since its creation in May 2003. Scilab includes hundreds of mathematical functions with the possibility to add interactively programs from various languages (C, Fortran...). It has sophisticated data structures (including lists, polynomials, rational functions, linear systems...), an interpreter and a high level programming language. Scilab works on most Unix systems (including GNU/Linux) and Windows (9X/2000/XP).
The goal of the ProActive Interface is to equip Scilab with a generic interface to Grid computing. This extension has to allow the deployment of Scilab instances on several nodes of the grid (and to use these instances like computing engines) and the submital of Scilab tasks over the grid. These Scilab engines are monitored by a central ProActive API. A natural condition is to deploy an application (based on this interface) strictly on hosts where the Scilab software is intsalled. To install Scilab and find some documentation about it on the scilab website. This ProActive interface supports the release 4.0 and manipulates the following types: Double, String, Double Matrix, String Matrix.
The interface architecture is based on the Master-Slaves model. In this communication model, the master entity monitors the slaves entities. In our case:
The role of the master is to deploy the topology of scilab instances (slaves) and to distribute tasks (between the different engines);
The role of the slave is to perform the submitted tasks (by the master).
There are four classes which are intented for the user:
The Class ScilabService implememts all
functionnalities to deploy engines, to distribute tasks, and to retrieve
results (of computed tasks).
The depoyment is made thank to a ProActive descriptor. This deployment descriptor describes the different nodes of the grid taking part at the computation. One of particularities of this descriptor is the declaration of specific scilab environment variables for each node. The deployment is achieved by a call of the method "deployEngine". This method takes in parameters the VirtualNode id, the descriptor path, and the number of engines to create.
The distribution of a Scilab task is made thanks to the call of the method "sendTask". After the call, the task is set in pending queue. This queue is managed like a FIFO with priority. The task is in head of the queue is sent when a engine is available.
After the compution of a task, the scilab engine returns the result. To retrieve this result, it is necessary to listen the event "SciEventTask" thank to the method "addEnventListenerTask".
This class offers also the possibilities to cancel a pending task, to kill a running task , and to restart a engine.
The Class SciTaskInfo contains all informations
about a Scilab task. Among these informations, there are:
The state of the tasks:
WAIT: The task is in the pending queue
RUN: The task is computing by a scilab engine
SUCCES: The computation of the task is terminated with success
ABORT: The computation of the task was avorted
KILL: The task was killed by the user during the computation
CANCEL: The Task was cancelled by the user before its computation
The global and execution time
The priority of the task (LOW, NORMAL, HIGH)
The task itself
The result of the assiciated task ( It is available when the state is ABORT or SUCCESS)
The class SciTask describes a scilab task. It
defines In and Out data, the job and the job initialization. A job is a
scilab script (*.sce), it contains all instructions executed by a remote
engine. In data and the job initialization allow to customize the
execution and Out data define the values to return after the
execution.
The class SciResult describes a scilab result.
A result is the list of return values (defining in the task).
The following example Example 43.1, “Example: Interface Scilab” presents how to
compute a basic task and to display the result. In our case the task
initializes the variable "n" and increments it. The
next example shows a possibly deployment descriptor Example 43.2, “Descriptor deployment”.
public class SciTest { SciTask task; ScilabService scilab; public void displayResult(SciTaskInfo scitaskInfo){ // scilab result SciResult sciResult = scitaskInfo.getSciResult(); // list of retrun values ArrayList listResult = sciResult.getList(); for (int i = 0; i < listResult.size(); i++) { SciData result = (SciData) listResult.get(i); System.out.println(result.toString()); } scilab.exit(); } public SciTest(String idVN, String pathVN) throws Exception{ // a new scilab task SciTask task = new SciTask("id"); task.setJobInit("n = 10;"); task.addDataOut(new SciData("n")); task.setJob("n = n+1;"); //a new scilab service ScilabService scilab = new ScilabService(); //add task event listener scilab.addEventListenerTask( new SciEventListener(){ public void actionPerformed(SciEvent evt){ SciTaskInfo sciTaskInfo = (SciTaskInfo) evt.getSource(); if(sciTaskInfo.getState() == SciTaskInfo.SUCCESS){ displayResult(sciTaskInfo); return; } } }); // deploy engine scilab.deployEngine( idVN, pathVN, new String[]{"Scilab"}); // send task scilab.sendTask(task); } public static void main(String[] args) throws Exception { new SciTest(args[0], args[1]); } }
Example 43.1. Example: Interface Scilab
<?xml version="1.0" encoding="UTF-8"?> <ProActiveDescriptor xmlns:xsi="http://www.w3.org/2001/XMLSchema-instance" xsi:noNamespaceSchemaLocation= "http://www-sop.inria.fr/oasis/proactive/schema/3.2/DescriptorSchema.xsd"> <variables> <descriptorVariable name="PROACTIVE_HOME" value="****"/> <descriptorVariable name="REMOTE_HOME" value="****"/> <descriptorVariable name="SCILAB_HOME" value="****"/> </variables> <componentDefinition> <virtualNodesDefinition> <virtualNode name="ScilabVN" property="multiple"/> </virtualNodesDefinition> </componentDefinition> <deployment> <mapping> <map virtualNode="ScilabVN"> <jvmSet> <vmName value="Jvm0"/> <vmName value="Jvm1"/> <vmName value="Jvm2"/> <vmName value="Jvm3"/> </jvmSet> </map> </mapping> <jvms> </jvm> <jvm name="Jvm1"> <creation> <processReference refid="rsh_predadab"/> </creation> </jvm> <jvm name="Jvm2"> <creation> <processReference refid="rsh_trinidad"/> </creation> </jvm> <jvm name="Jvm3"> <creation> <processReference refid="rsh_apple"/> </creation> </jvm> </jvms> </deployment> <infrastructure> <processes> <processDefinition id="localJVM"> <jvmProcess class="org.objectweb.proactive.core.process.JVMNodeProcess"> <classpath> <absolutePath value="${REMOTE_HOME}/${PROACTIVE_HOME}/lib/ProActive.jar" /> <absolutePath value="${REMOTE_HOME}/${PROACTIVE_HOME}/lib/asm.jar" /> <absolutePath value="${REMOTE_HOME}/${PROACTIVE_HOME}/lib/log4j.jar" /> <absolutePath value="${REMOTE_HOME}/${PROACTIVE_HOME}/lib/components/fractal.jar" /> <absolutePath value="${REMOTE_HOME}/${PROACTIVE_HOME}/lib/xercesImpl.jar" /> <absolutePath value="${REMOTE_HOME}/${PROACTIVE_HOME}/lib/bouncycastle.jar" /> <absolutePath value="${REMOTE_HOME}/${PROACTIVE_HOME}/lib/jsch.jar" /> <absolutePath value="${REMOTE_HOME}/${PROACTIVE_HOME}/lib/javassist.jar" /> <absolutePath value="${REMOTE_HOME}/${PROACTIVE_HOME}/classes" /> <absolutePath value="${REMOTE_HOME}/${SCILAB_HOME}/bin/javasci.jar" /> </classpath> <javaPath> <absolutePath value="****" /> </javaPath> <policyFile> <absolutePath value="${REMOTE_HOME}/${PROACTIVE_HOME}/scripts/proactive.java.policy" /> </policyFile> <log4jpropertiesFile> <absolutePath value="${REMOTE_HOME}/${PROACTIVE_HOME}/scripts/proactive-log4j" /> </log4jpropertiesFile> </processDefinition> <processDefinition id="rsh_predadab"> <rshProcess class="org.objectweb.proactive.core.process.rsh.RSHProcess" hostname= "predadab"> <environment> <variable name="SCIDIR" value="${REMOTE_HOME}/${SCILAB_HOME}"/> <variable name="SCI" value="${REMOTE_HOME}/${SCILAB_HOME}"/> <variable name="LD_LIBRARY_PATH" value="${REMOTE_HOME}/${SCILAB_HOME}/bin"/> </environment> <processReference refid="localJVM"/> </rshProcess> </processDefinition> <processDefinition id="rsh_trinidad"> <rshProcess class="org.objectweb.proactive.core.process.rsh.RSHProcess" hostname= "trinidad"> <environment> <variable name="SCIDIR" value="${REMOTE_HOME}/${SCILAB_HOME}"/> <variable name="SCI" value="${REMOTE_HOME}/${SCILAB_HOME}"/> <variable name="LD_LIBRARY_PATH" value="${REMOTE_HOME}/${SCILAB_HOME}/bin"/> </environment> <processReference refid="localJVM"/> </rshProcess> </processDefinition> <processDefinition id="rsh_apple"> <rshProcess class="org.objectweb.proactive.core.process.rsh.RSHProcess" hostname="apple" > <environment> <variable name="SCIDIR" value="${REMOTE_HOME}/${SCILAB_HOME}"/> <variable name="SCI" value="${REMOTE_HOME}/${SCILAB_HOME}"/> <variable name="LD_LIBRARY_PATH" value="${REMOTE_HOME}/${SCILAB_HOME}/bin"/> </environment> <processReference refid="localJVM"/> </rshProcess> </processDefinition> </processes> </infrastructure> </ProActiveDescriptor>
Example 43.2. Descriptor deployment
This interface allows to manipulate the functionnalities of the API in a user friendly way.
To launch the application, you have to execute the script:
On Unix:
cd scripts/unix scilab.sh
On Windows:
cd scripts\windows scilab.bat
if you use a local version of Scilab, you must declare the environment variables in the file:
scripts/[unix|windows]/scilab_env.[sh|bat]
Once the application is started, the main frame is displayed. This frame is composed in three parts:
The tree of Scilab engines .
The ltables of pending, running, and terminated tasks.
The text area to display the log of user operations.
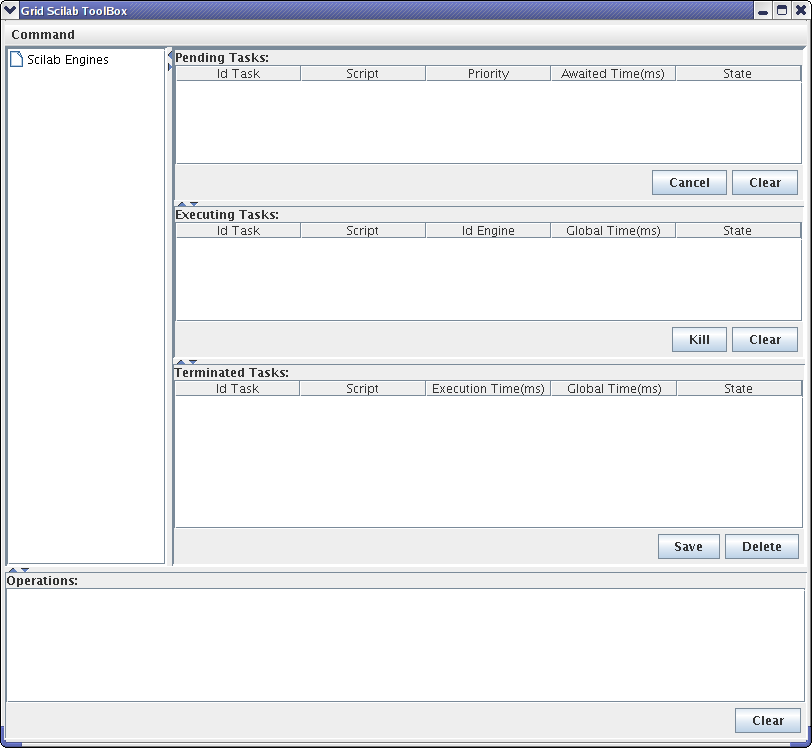
The first step is to deploy the topology of the application. A dialog enables to choice the descriptor and to select the virtual node. The button "deploy" launches the deployment of scilab engine over the nodes.

The next step is the task launching. A dialog enables to select the script and possibly to define the script initialization, the return values, and the task priority. The button start creates and sends the task.

The last step is the display of results. A double click on a task in the table of terminated tasks sets visible a dialog. This dialog displays the tasks properties and the result (with the possibility to save it in a file)
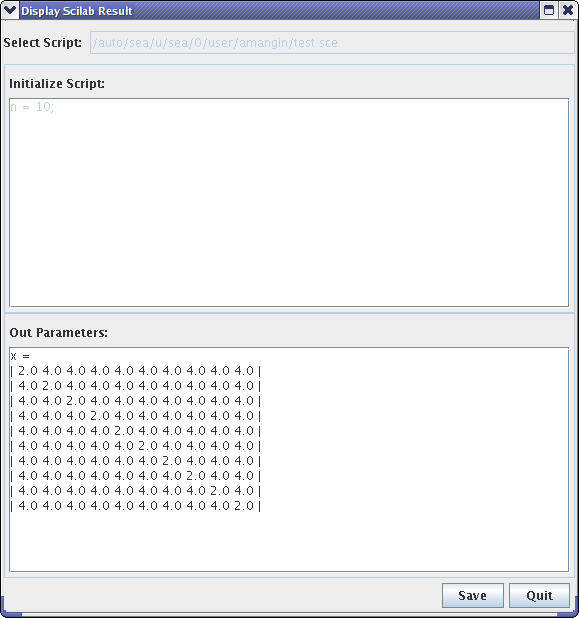
In the main frame, several tables of tasks (pending, executing , terminated) allow to monitor the application. These tables allows to show just for each task the relevant informations. A double click on a task in these tables sets visible a dialog. This dialog displays the tasks properties (path, script initialization, results).
The table of pending tasks enables to cancel selected tasks and to clear all cancelled tasks
The table of executing tasks enables to kill selected tasks and to clear all killed tasks
The table of terminated tasks enables to get the status of tasks (SUCCESS or ABORT), to save the first selected task in file the result, to remove selected tasks.
In the main frame, a tree describes all nodes used by the application. Over the execution of the application, if a task is aborted, the engine of this task may be unstable ( this one is displayed with a red foreground). A rigth-click on it show a popup menu to restart it.
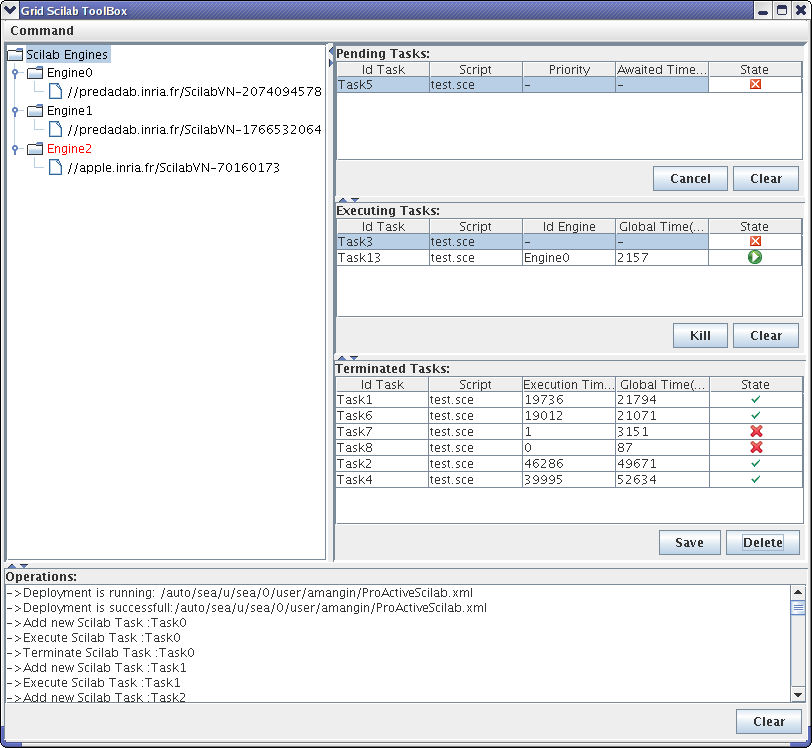
TimIt offer a complete solution to benchmark an application. It is an API which provide some advanced timing and event observing services. Benchmarking your ProActive application will permit you to enhance performance of it. Thanks to generated statistics charts, you will be able to determine critical points of your application.
Different kind of statistics can be done. You can setup different timers with hierarchical capabilities and see them in charts. Event observers can be placed to study, for example, communication pattern between your application's workers.
TimIt generate charts and results XML file, with exact timing and event observers values. Here are some examples of charts and XML files generated by TimIt :
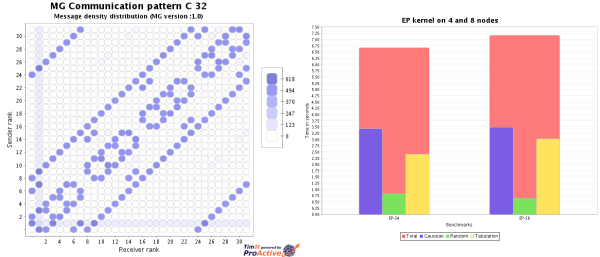
<timit> <FinalStatistics name="Example2 4" runs="10" timeoutErrors="0" date="2006-11-05 10:46:56.742"> <timers> <timer name="total" min="2095.0" avg="2191.250" max="2357.0" dev="1.603" sum="2187.750"> <timer name="work" min="1453.0" avg="1466.000" max="1473.0" dev="0.951" sum="0.000" /> <timer name="init" min="147.0" avg="175.250" max="205.0" dev="2.932" sum="0.000" /> <timer name="end" min="467.0" avg="546.500" max="679.0" dev="1.439" sum="0.000" /> </timer> </timers> <events> <event name="nbComms" min="92.000" avg="92.000" max="92.000" dev="0.000" /> <event name="commPattern" value="Too complex value, first run shown">. 10 0 13 0 0 13 0 10 13 0 10 0 0 10 0 13 </event> <event name="densityPattern" value="Too complex value, first run shown">. 20 0 2080 0 0 2080 0 20 2080 0 20 0 0 20 0 2080 </event> </events> <informations> <deployer jvm="Java HotSpot(TM) Client VM 1.5.0_06-64 - Version 1.5.0_06" os="ppc Mac OS X 10.4.8" processors="1" /> </informations> </FinalStatistics> </timit>
Configuring TimIt is done through an XML configuration file which is axed around four major tags :
This part set variables which can be used both inside this file as you can see in next parts, but also in ProActive descriptor file.
TimIt offer a nice tool to deal with variables and redundancy : the sequences variables
These variables are very useful to reduce your configuration file size and its management.
A sequence is a list of values for a variable. In our example, NP is a sequence variable which have values 4 and 8 and the benchmark tag will be expanded into two benchmark tags : one with NP value set to 4 and the other with NP value set to 8.
If sequence variables are used in a Serie's attribute, you will expand this Serie into as tags as you have values in your sequence.
For example, these two examples are equivalents :
<timit> <globalVariables> <descriptorVariable name="ALGO" value="Algo1,Algo2"/> <descriptorVariable name="NP" value="4,8"/> <descriptorVariable name="TEST" value="#1"/> </globalVariables> <serie (...) result="${ALGO}"> <benchmarks> <benchmark name="Test ${TEST} : algo ${ALGO} on ${NP} nodes" (...)/> </benchmarks> </serie> </timit>
<timit> <globalVariables> <descriptorVariable name="TEST" value="#1"/> </globalVariables> <serie (...) result="Algo1"> <benchmarks> <benchmark name="Test #1 : algo Algo1 on 4 nodes" (...)/> <benchmark name="Test #1 : algo Algo1 on 8 nodes" (...)/> </benchmarks> </serie> <serie (...) result="Algo2"> <benchmarks> <benchmark name="Test #1 : algo Algo2 on 4 nodes" (...)/> <benchmark name="Test #1 : algo Algo2 on 8 nodes" (...)/> </benchmarks> </serie> </timit>
Important :
Sequences variables are not handled by ProActive descriptor files, so do not use same names for ProActive descriptor and sequence variable names to avoid bad overwriting. To do it, you should prefer overwriting in benchmark tag like this :
<benchmark name="Test ${TEST} : algo ${ALGO} on ${NP} nodes" (...) > <descriptorVariable name="NBNODES" value="${NP} /> </benchmark>
Note :
You can use sequences without using
variables with #{...} pattern :
<benchmark name="Test ${TEST} : algo #{Algo1,Algo2} on ${NP} nodes" (...) > <descriptorVariable name="NBNODES" value="${NP} /> </benchmark>
A Serie represent a suite of benchmarks. For example, if you want to benchmark two algorithms with different parameters each, you can specify two Series (one for each algorithm) and then specify different benchmarks for all parameters.
Description of the attributes :
[CAN] descriptorBase : the file containing the base ProActive deployment descriptor
[MUST] class : the class of your application which is Startable (see section 2.2)
[MUST] result : the output file for writing final results
[CAN] errorFile : if an error occur (recoverable), logs will be outputed into this file
Here you specify parameters for the charts. Those charts will be generated thanks to benchmark results.
Description of the attributes :
Other attributes are chart's type specific :
[MUST] type : the type of chart you want to create
[MUST] title : your chart title
[MUST] subtitle : your chart subtitle
[MUST] xaxislabel : the X axis label
[MUST] yaxislabel : the Y axis label
[CAN] width : the width of the output chart
[CAN] height : the height of the output chart
[MUST] filename : the chart output filename (will produce both a .PNG and .SVG files)
Other attributes are chart's type specific :
[CAN] filter : the name of the counter (event) you want to involve in this chart. All activated counters (events) are involved if not specified (available only for
HierarchicalBarChartandLine2dChart)[MUST] tag : the tag to deal with (
timersorevents) must be associated with attribute (available only forLine2dChart)[MUST] attribute : the attribute value (
min,average,maxordeviation) to use for the chart (available only forLine2dchart)[CAN] legendFormatMode : the format of the legend (
Default,None,K1000,K1024) to show value in legent as standard, power of 2 or power of 10 numbers (available only forMatrixChart)[CAN] scaleMode : the scale mode (
Default,Linear,Logarithmic) for che chart (available only for MatrixChart)
Define the suite of tests with different parameters. Each test will generate a result file and an entry in chart.
Description of the attributes :
[MUST] name : the name of this benchmark. Will be set in result file.
[MUST] run : the number of runs you want to perform. Final result will give the min/average/max/deviation between these runs.
[CAN] warmup : the number of "untimed" runs you want to perform before starting the real runs.
[CAN] timeout : the time in seconds before restarting a run (with a maximum of 3 restarts per benchmark).
[CAN] descriptorGenerated : the ouput file where TimIt but the ProActive deployment descriptor.
[CAN] removeExtremums : if
true, max and min values between all runs will be removed.[CAN] note : the text entered here will be copied into result file. Useful for specifying launch environnement.
[MUST] parameters : the parameters to launch your application.
[MUST] output : result of all runs will be outputted into this output file.
In addition to these attributes, you can specify descriptorVariable tags which will be copied into generated ProActive deployment descriptor file.
Here is a complete example of a configuration file :
<?xml version="1.0" encoding="UTF-8"?> <timit> <!-- GLOBAL VARIABLES DEFINITION Will replace those in ProActive deployment descriptor --> <globalVariables> <descriptorVariable name="VMARGS" value="-Xmx32M -Xms32M" /> <descriptorVariable name="CLASS_PREFIX" value="org.objectweb.proactive.examples.timit" /> <descriptorVariable name="NP" value="4,8" /> <descriptorVariable name="RUN" value="1" /> <descriptorVariable name="WARMUP" value="0" /> </globalVariables> <!-- Running example2 suite and generate different charts --> <serie descriptorBase="${PROJECT_PATH}/descriptors/TimIt.xml" result="${PROJECT_PATH}/results/example2.4-8.xml" class="${CLASS_PREFIX}.example2.Launcher"> <charts> <chart type="HierarchicalBarChart" filter="total,init,foo" title="Example2 on 4 and 8 nodes" subtitle="Timing values" width="800" height="600" xaxislabel="Benchmarks" yaxislabel="Time in seconds" filename="${PROJECT_PATH}/results/example2.Timing" /> <chart type="MatrixChart" eventName="commPattern" title="Example2" subtitle="Communications pattern" xaxislabel="Receiver rank" yaxislabel="Sender rank" scalemode="logarithmic" legendFormatMode="pow2" filename="${PROJECT_PATH}/results/example2.Pattern" /> <chart type="Line2dChart" tag="events" filter="nbComms" attribute="avg" title="Example2" subtitle="Total number of communications" xaxislabel="Benchmarks" yaxislabel="Nb communications" filename="${PROJECT_PATH}/results/example2.nbComms" /> </charts> <benchmarks> <benchmark name="Example2 ${NP}" run="${RUN}" warmup="${WARMUP}" timeout="100" descriptorGenerated="${PROJECT_PATH}/descriptors/generated.xml" removeExtremums="true" note="My first test" parameters="${PROJECT_PATH}/descriptors/generated.xml ${NP}" output="${PROJECT_PATH}/results/example2-${NP}.xml"> <descriptorVariable name="NODES" value="${NP}" /> <descriptorVariable name="TIMIT_ACTIVATE" value="total,init,work,end,foo,densityPattern,commPattern,nbComms"/> </benchmark> </benchmarks> </serie> </timit>
Main class have to implement Startable interface
public class Example implements Startable { /** TimIt needs a noarg constructor (can be implicit) **/ public Example() {} /** The main method is not used by TimIt **/ public static void main( String[] args ) { new Example().start(args); } /** Invoked by TimIt to start your application **/ public void start( String[] args ) { // Creation of the Timed object(s) // It can be by example : // - a classic java object // - an active object // - a group of objects Worker workers = ProSPMD.newSPMDGroup(...); // You have to create an instance of TimItManager and // give to it the Timed objects TimItManager tManager = TimItManager.getInstance(); // Timed objects start their job workers.start(); // At the and of you application, you must invoke // the getBenchmarkStatistics to retrieve the results // from the Timed objects BenchmarkStatistics bStats = tManager.getBenchmarkStatistics(); // Then, you can modify or print out the results System.out.println(bStats); } }
Analyzed class have to extend Timed
public class Worker extends Timed { /** Declaration of all TimerCounters and EventObservers **/ private TimerCounter T_TOTAL, T_INIT, T_WORK, T_COMM; private EventObserver E_COMM, E_MFLOPS; public void start() { // Register the TimerCounters and EventObservers T_TOTAL = TimIt.add(new HierarchicalTimerCounter("total")); T_INIT = TimIt.add(new HierarchicalTimerCounter("init")); T_WORK = TimIt.add(new HierarchicalTimerCounter("work")); T_COMM = TimIt.add(new HierarchicalTimerCounter("comms")); E_MFLOPS = TimIt.add(new DefaultEventObserver("mdlops")); E_COMM = TimIt.add(new CommEventObserver( "communicationPattern", groupSize, timedID)); // You must activate TimIt before using your counters and observers // According to the 'proactive.timit.activation' property value, it // will activate or not concerned TimerCounters (EventObservers) TimIt.activation(); // The you can use your counters and observers // (better examples of usage in next section) T_TOTAL.start(); for( int destID=0; destID<nbTimeds; destID++ ) { TimIt.notifyObservers(new CommEvent(E_COMM,destID,1)); } T_TOTAL.stop(); TimIt.notifyObservers(new Event(E_MFLOPS,mflops)); // At the end, you have invoke finalization method to return results // to the startable object TimIt.finalization(timedID,"Worker "+timedID+" OK"); } }
TimIt provide different kind of services. By combinig them, you will be able to measure many parameters of your application. TimIt package contains few examples for using these services in your application.
It will help you to time some piece of code in your application. For example you can get total, initialization, working and communication time. These counters are hierarchicals. It means that time values will be defined by counter dependances.
Example of hierarchy :
Total time = 60 seconds
Initialization time = 10 seconds
Communication time = 4 seconds
Working time = 50 seconds
Communication time = 17 seconds
Here you can see communication part both in initialization and working time.
The code associated to this example is :
T_TOTAL.start();
T_INIT.start();
// Initialization part...
T_COMM.start();
// Communications...
T_COMM.stop();
T_INIT.stop();
T_WORK.start();
// Working part...
T_COMM.start();
// Communications...
T_COMM.stop();
T_WORK.stop();
T_TOTAL.stop();
It will help you to keep an eye on different events that occur in your application.
There is two types of events :
Default event
This event manage a single value (a double). It can be useful to compute mflops or total number of performed communications.
Example of usage :
// Initialization int collapseOperation = DefaultEventData.SUM; int notifyOperation = DefaultEventData.SUM; EventObserver E_NBCOMMS = TimIt.add( new DefaultEventObserver("nbComms", collapseOperation, notifyOperation));
Value of notifyOperation determine what operation to perform between notifications.
Value of collapseOperation determine what operation to perform between Timed objects.
// Utilization for( int i=0; i<10; i++ ) { TimIt.notifyObservers( new Event(E_NBCOMMS, 1) ); }
For each Timed object, nbComms value will be 10, and final value would be 30 if we had 3 Timed objects.
Communication event
This event were designed for communications. It manage a square matrix which can be used by example to determine topology of communications between Timed objects.
Example of usage :
// Initialization EventObserver E_COMM = TimIt.add( new CommEventObserver("mflops", groupSize, timedID);
Value of groupSize represent the number of Timed objects which are involved in these communications.
Value of timedID represent an identification number which represent the current Timed object (like the rank).
// Utilization int destID = (timedID + 1) % groupSize; TimIt.notifyObservers( new CommEvent(E_COMM, destID, 1) );
Between each notification an addition with the old value will be performed. Then the collapsing operation between the Timed objects will be an sum. In this case, we will obtain a matrix showing the toplogy of our application.
In line we have the sender, and in column with have the receiver. Here we obtain a ring topology :
1 0 0 0 0 0 0 1 0 0 1 0 0 1 0 0
TimIt package can be found in org.objectweb.proactive.benchmarks.timit. We try to make easy as possible the way to add a new feature to this application. To do so, TimIt is organized in 5 major points which can be extended :
The subpackage timit.config contains all classes related to the configuration file management.
ConfigReader
This class read the configuration file. It deal with globalVariable and serie tags.
Tag
All created tags (except globalVariable) have to extend this class. It makes easier the way to read tag's attributes. If you want to create a new tag, extend this class and take example on a new tag, like Benchmark, which is a good example.
Example :
Suppose you want to add attribute myOption to the Benchmark tag where the default value is 1.
// Add these lines in the get method of Benchmark class if (name.equals("myOption")) { return "1"; }
Then, you will be able to use it like this it TimIt class:
String result = bench.get("myOption"); // ... and do whatever you want with it...
The subpackage timit.util.timing contains all classes related to the timing management.
HierarchicalTimer
This class will contain values of all timer counters. Here is all the "intelligency" of the timer. For example, if you want to use nanoseconds instead of milliseconds, you should extend this class and overwrite
getCurrentTime()method.
The subpackage timit.util.observing contains all classes related to the event observers management. Existant event observers are default and communication specific. Default (DefaultEventObserver) is base on a single value, while the communication specific (CommEventObserver) is based on 2D square matrix.
Event observers are based on observer/observaSuble design pattern.
EventObserver
This interface must be implemented by all kind of event observers. These implementations will have to deal with an EventData.
Event
Each kind of event should have its own Event implementation. An instance of this event will be passed at each notification.
EventData
Like HierarchicalTimer for the timing service, EventData is the "intelligence" of event observing. It will contain all data values for a particular Timed object. It also contain a
collapseWith()method which will be used to merge data values from all Timed objects.EventObservable
For performance purpose, there is to implementations of this interface. A FakeEventObservable and a RealEventObservable.
EventDataBag
This class contains data values from all Timed objects. You are able to get it through an EventStatistics.
EventStatistics
When a benchmark run is done, you can get a BenchmarkStatistics which contains both timer and event statistics.
Example :
Suppose you want to create a new kind of Event which work with a 3D matrix instead of 2D matrix like CommEventObserver.
You will have to implement 2 or 3 classes :
MyEventObserver which implements EventObserver
It will receive notifications and transmit them to your EventData.
MyEventData which implements EventData
It will contain your 3D matrix computed from your notifications.
MyEvent which implements Event
It will be passed at each notification of your observer and will contain necessary data to update your 3D matrix.
Notice that you can reuse an other Event implementation if existing ones are sufficient.
The subpackage timit.util.charts contains all classes related to charts generation. This service is based on JFreeChart API (http://www.jfree.org/jfreechart/). Three major type of charts are proposed with TimIt :
HierarchicalBarChart, used to represent a serie of hierarchical timing statistics.
Line2dChart, used to represent a serie of single values.
MatrixChart, used to represent communications specific event observer.
Remember that in configuration file, choosing your chart type is
done through the type attribute of
chart tag. Actually, it represent the classname used
to handle your chart creation.
By the way, to create an new kind of chart, you just have to implement the Chart interface. So, you will have access to XML results file, full BenchmarkStatistics and all chart parameters given in configuration file (see section 4.1 to add new attributes).
If you need a very complex rendering chart method, you can implement your own renderer like we did for HierarchicalBarChart. Take example on this class, and see JFreeChart documentation.
This chapter is meant to help you as a reference for writing ProActive-directed documentation. If you have added a new feature and want to help its uptake by documenting it, you should be reading this chapter.
The examples sections (Section 45.3, “Example use of tags”) describes the use of the main tags you will use (eventually, all the ProActive-allowed docbook tags should be described). The limitations (Section 45.4, “DocBok limitations imposed”) section describes what is allowed in our docbook style, and why we restrict ourselves to a subset of docbook.
First off, all the documentation is written in
docbook. You
can find all the documentation source files in the
ProActive/doc-src/
directory.
Here are the instrtuctions to follow to start well & fast writing documentation for the ProActive middleware:
Get a working copy of the XMLMind XML Editor (XXE)
If you want a new chapter of your own, copy one of the existing files. (
ProActive/doc-src/WSDoc.xmlfor example)Reference your file in the root element of the doc (it is currently called PA_index.xml)
Open your file with XXE (it should not complain)
REMEMBER: YOU ARE EDITING AN XML FILE - you can always edit it with vi if you dare
Use generously the icons at the top, they have the essential tags you will use
Use the list of tags, just under the icons, to select the item you want to edit
Use the column on the right to add tags, when you know their names
When you're done, there is a spellchecker intergated, as well as a DocBook validator. Please use these tools!
Make sure your new additions make a nice new document. Run the ant target
build manualHtml, and you should have an html copy of the doc. If you want to generate all the possible output formats, callbuild manual. You can also see what the results seem to be without compiling! Try to open one of the docbook xml files in a browser (mozilla/firefox do it) and you have a preview of what it might look like. Those who dislike XXE should be more than happy of it...Commit your changes to the svn repository
These are the basic rules to follow to use docbook tags. This document
is made up of the files in the docBookTutorial directory, and
you may find it with the other manual files in the 'doc-src' directory.
The main tags/structures you should be using are:
<figure> When you want an image
<example> when you want an example with a title (should contain a <screen> or <programlisting>). You can also use <literal> inside paragraphs.
<screen> or <programlisting> for the code/text/descriptor examples
<para> to start a paragraph, <sectX>, with X=1..4 to have headings, and <emphasis> when you want some particular bit to stick out.
<itemizedlist> followed by several <listitem> when you want bullets
<xref> when you want to reference another section/chapter/part
<ulink> when you want to reference a web url
<table> when you want a table
| Note |
|---|---|
BUT, you should always be using the XXE icons. They have all you need (except for EXAMPLE/SCREEN)! You can also cut n paste! |
This is the figure example. Please use the TITLE tag
Use ITEMIZEDLIST followed by as many 'LISTITEM's as you want!
Provide an implementation for the required server-side functionalities
Provide an empty, no-arg constructor
Write a method in order to instantiate one server object.
Code sources should be written between PROGRAMLISTING tags (possiblibly lang="java" or "xml" ). You don't have to write valid code, as the highlighting (done by LanguageToDocBook classes) is based on regular expression replacement, and not on language grammars. If you want to show some program output, you can use SCREEN instead of PROGRAMLISTING. In any case, watch out, because spaces count (and produce your own indentation)! You can also use the EXAMPLE TAG around your PROGRAMLISTING or SCREEN tags, to give a title, and be referenced in the table of examples.
You can also insert directly sources from their original files, or type the code in the docbook. When you are typing the code inside the docbook file, you can even highlight yourself some bits of the code you want to emphasis. This is shown in the last example. But beware, as you are inside docbook you have to escape the "&" and the "<" signs. If you don't want to, hide everything in a CDATA block.
Within normal text, for instance in a paragraph, you can also just use
the LITERAL tag to highlight the main methods.
public class TinyHello implements java.io.Serializable {
static Logger logger = ProActiveLogger.getLogger(Loggers.EXAMPLES);
private final String message = "Hello World!";
/** ProActive compulsory no-args constructor */
public TinyHello() {
}
/** The Active Object creates and returns information on its location
* @return a StringWrapper which is a Serialized version, for asynchrony */
public StringMutableWrapper sayHello() {
return new StringMutableWrapper(
this.message + "\n from " + getHostName() + "\n at " +
new java.text.SimpleDateFormat("dd/MM/yyyy HH:mm:ss").format(new java.util.Date()));
}
/** finds the name of the local machine */
static String getHostName() {
try {
return java.net.InetAddress.getLocalHost().toString();
} catch (UnknownHostException e) {
return "unknown";
}
}
/** The call that starts the Acive Objects, and displays results.
* @param args must contain the name of an xml descriptor */
public static void main(String[] args)
throws Exception {
// Creates an active instance of class Tiny on the local node
TinyHello tiny = (TinyHello) ProActive.newActive(
TinyHello.class.getName(), // the class to deploy
null // the arguments to pass to the constructor, here none
); // which jvm should be used to hold the Active Object
// get and display a value
StringMutableWrapper received = tiny.sayHello(); // possibly remote call
logger.info("On " + getHostName() + ", a message was received: " + received); // potential
wait-by-necessity
// quitting
ProActive.exitSuccess();
}
}
Example 45.1. JAVA program listing with file inclusion
<?xml version="1.0" encoding="ISO-8859-1" ?>
<!DOCTYPE definition PUBLIC "-//objectweb.org//DTD Fractal ADL 2.0//EN"
"classpath://org/objectweb/proactive/core/component/adl/xml/proactive.dtd">
<!-- A user component. It has an interface to the dispatcher. -->
<definition name="org.objectweb.proactive.examples.components.c3d.adl.UserImpl">
<!-- The interfaces the component defines -->
<interface signature="org.objectweb.proactive.examples.c3d.Dispatcher" role="client" name=
"user2dispatcher"/>
<!-- The implementation of the component -->
<content class="org.objectweb.proactive.examples.components.c3d.UserImpl"/>
<controller desc="primitive"/>
<!-- deploy this component only on 'User' VirtualNodes (which must be found in the deploy.
descr.) -->
<virtual-node name="User" cardinality="single"/>
</definition>
Example 45.2. XML program listing with file inclusion
A screen example, for instance some code inside a unix shell:
linux > start.sh &
Here is some java code directly included in the docbook (you can use CDATA to escape & and <):
package util; import java.io.IOException; /** Just a dummy class. */ public class Dummy { /** Just the method description * @param fileToConvert the name of the file to convert * @return a String created */ String convert(String fileToConvert) throws IOException { if (a > b && c < d ) { // can use "this" for 'NodeCreationEvent' VirtualNode vn = pad.getVirtualNode("p2pvn"); vn.start(); } return "Hello World"; } }
Here is an example of deployment descriptor that deploys 3 virtual nodes .
<!-- Deploying 3 virtual Nodes --> <ProActiveDescriptor> <componentDefinition> <virtualNodesDefinition> <virtualNode name="NonFT-Workers" property="multiple"/> <virtualNode name="FT-Workers" property="multiple" ftServiceId="appli"/> <virtualNode name="Failed" property="multiple" ftServiceId="resource"/> </virtualNodesDefinition> </componentDefinition> <deployment> <mapping> <map virtualNode="NonFT-Workers"> <jvmSet> <vmName value="Jvm1"/> </jvmSet> </map> <map virtualNode="FT-Workers"> <jvmSet> <vmName value="Jvm2"/> </jvmSet> </map> ....
Use XREF tags to point to the Figures id (Section 45.3.2, “Figures”) which is in the doc above. The LINKEND attribute points to the id which is referenced, for example, in a SECT1 tag. The ENDTERM tag (example with the biblio) is used to customize the string which will be used to point to the reference.
You can also use XREF to include files which are in the html hierararchy already.
This goes for java files, and deployment descriptors. You have a few examples in
Descriptor.xml. (technical note: including files is done through the java
files in util. This may be done in pure xsl, but I gave up! The pdf and html look different
thanks to profiling)
Use ULINK tags to point to web references (ProActive for instance). Use freely, it sticks out nicely in pdf too!
Use CITATION followed by an XREF for citations. For example, see
[BBC02] to learn on
groups. All the biblio entries should be put in biblio.xml.
You should consider using the bibdb tool to convert from bibtex
(http://charybde.homeunix.org/~schmitz/code/bibdb/).
Here is described what is allowed in our docbook style. We restrict ourselves to a subset of docbook, because we want a uniform doc style, and want maintainable doc. To achieve this goal, we require minimum learning investment from our PA developers, who are meant to be coding, not spend their time writing doc. So you still want to add a fancy feature? Well, you can, as long as you describe how to use this new tag in this howto, and be extra careful with the pdf output.
There is a schema specifying which are the allowed tags. You can only use the tags which this dtd allows. If you want more freedom, refer to Section 45.5.6, “DocBook subset: the dtd”. For now, you can use the following tags:
part, appendix, chapter, sect[1-5], title, para, emphasis, xref, ulink
table, figure, caption, informalfigure, informaltable
itemizedlist and orderedlist, listitem
example, programlisting, screen, and literal
The others that you might come along, albeit less frequently, are citation, email, indexterm, inlinemediaobject, note, answer, question, subscript, superscript
Ok, now you're nearly a docbook guru? You want to get right down to the entrails of the machinery? OK, hop on and enjoy the ride! Here are a few notes on how you should go about customizing the output. That means, changing how the pdf and html are written.
The files for configuration are the following:
common.xsl This is where all the common specifications are made, ie those that go and in pdf and in html.
pdf.xsl This is where all the pdf specific customizations are made
html.xsl This is where most html specific customizations are made.
onehtml.xsl and chunkedhtml.xsl, specifics for html, the former on one page, "chunked", one file per chapter, for the latter.
ProActive.css Which is yet another extra layer on top of the html output.
Basically, in the customization layers, you have full control (just do what you want). The only thing is that each block (template, variable...) should be described by a comment. That will help later users. As customization can get cryptic, make a special effort!
The book you want to have with you is the following: "DocBook XSL: The Complete Guide", Third Edition, by Bob Stayton, online version at http://www.sagehill.net.
Have a look at the index if you just want to change a little something in the customization. Parse through it at least once if you intend to do some heavy editing. I have found everything I needed in this book, but sometimes in unexpected sections.
If you want to write some stuff that should go in pdf but not html, or vice-versa, you want to do some "profiling". This is very easy to do, as it was needed and tuned for the processing stages. Add an "os" attribute to the sections you want to exclude, specifying the wanted output format in which it should only appear.
<para os="pdf"> This paragraph only appears in pdf output! </para>
(Comment) Using the "os" attribute to specify the output is not elegant. Agreed. But in docbook there is no default attribute intended to express the expected output file format, and using the "role" attribute is discouraged.
If you are editing the xsl stylesheets, and are having a hard time figuring out what's happening, don't panic! Use many messages to find out what the values of the variables are at a given time:
<xsl:message>
<xsl:text> OK, in question.toc, id is </xsl:text> <xsl:copy-of select="$id" />
</xsl:message>
<xsl:for-each select="./@*">
<xsl:message>
<xsl:text> Attribute <xsl:value-of select="name(.)"/> = <xsl:value-of select="."/> </xsl:text>
</xsl:message>
</xsl:for-each >
You will very soon find that you still have to dig deeper into the templates, and they certainly are not easy to follow. Here's a little helper:
java -cp $CLASSPATH org.apache.xalan.xslt.Process -TT -xsl ... -in ... -out ...This uses the specified templates with the xsl file specified, but tracing every template called. Useful when you're wondering what's being called. I'm sorry but I have not found a way to trace the call tree of a method, ie knowing exactly where it comes from. Have to do without!
The dtd is the file detailling which are the allowed tags in our
DocBook subset. Some tags have been removed, to make it easier to
manage. Please refer to the file called
ProActive/doc-src/ProActiveManual.dtd to know how much
freedom you have been granted.
When you run the manual generation through the ant tasks, the xml is checked for validity. The message you should see is
XML is VALID and complies to dtd in ../docs/tmp/PA_index.xml
If you happen to modify the dtd, you should put also copy it on
the web, on /proj/oasis/www/proactive/doc/dtd/$version/ or else
the previous version one will always be used.
IC2D is composed of several plugins:
org.objectweb.proactive.ic2d : This plugin is the "frame" which contains the other plugins. It is only needed in the standalone version.
org.objectweb.proactive.ic2d.monitoring : provides graphical representation of hosts, runtimes, virtual nodes and active objects topology, also displaying communications between active objects.
org.objectweb.proactive.ic2d.jobmonitoring : provides tree-based representation of hosts, runtimes , virtual nodes and active objects.
org.objectweb.proactive.ic2d.launcher : initiates application deployment using deployment descriptors
org.objectweb.proactive.ic2d.lib : provides Java archives (jar) required by the other plugins which are not provided by the Eclipse like ProActive.jar, log4j.jar, etc.
org.objectweb.proactive.ic2d.console : provides logging capability through the Eclipse console.
The aim of this plugin is to provide the essential features for monitoring of ProActive applications. Monitorable entities are
Figure 46.1, “Graphical representation of the data” shows the graphical representation of hosts, virtual nodes, runtimes (ProActive JVM), nodes, and active objects.
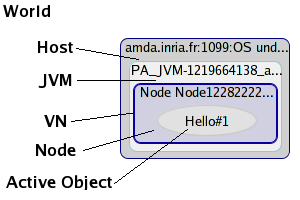
The diagram Figure 46.2, “Class diagram” describes relationships between Java classes:
The AOObject class represents an Active Object.
The NodeObject class represents a node. Nodes contain Active Objects.
The VMObject represents a runtime. Runtimes contain nodes
The VNObject class represents a virtual node. The virtual node is a logical entity which has no real existence at runtime. When using Deployment Descriptors, it is the mapping of a virtual node on a runtime that leads to the creation of one or more nodes on this runtime. Virtual nodes can be mapped on more than one runtime, thus as shown in the figure, a node is bound to both a runtime and a virtual node.
The HostObject class represents the hardware that hosts the runtime, it is possible to coallocate several runtimes on the same host
The WorldObject class is a "special" object that allows to gather hosts and virtual nodes under a common root.
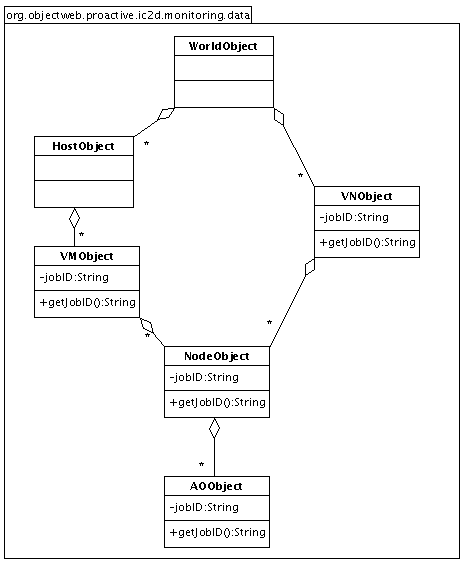
When IC2D is used to monitor a host, it looks for any available runtimes on the host, then enumerates any nodes, virtual nodes and active objects contained within each runtime.
In order to do this, it grabs the URL entered by the user, then creates a new HostObject and add it to the WorldObject. Next, a thread starts and regularly queries the WorldObject to explore itself. The following sequence diagram explains how a WorldObject explores itself for the first time (Figure 46.3, “The world exploring itself for the first time”).
The WorldObject queries its HostObjects to explore themselves
Each HostObject looks for ProActive Runtimes on the current host then creates VMObject s corresponding to the newly discovered runtimes
Each VMObject explores itself, looking for Nodes contained within its ProActiveRuntime. Each Node is mapped into a NodeObject
Each NodeObject looks for contained active objects asking it to the ProActiveRuntime of its parent (VMObject) and creates the corresponding AOObject s.

Now all objects are found. And these operation will be regularly repeated until the user stops monitoring.
The Graphical Editing Framework (GEF) allows developers to take an existing application model and quickly create a rich graphical interface.
GEF employs an MVC (Model View Controller) architecture which enables simple changes to be applied to the model from the view.
This section introduces the needed to the comprehension of GEF. For more details about GEF go to the Section 46.1.1.4, “Links” .
We describe here the implementation of the MVC pattern used within IC2D:
The Models ( Figure 46.4, “The Models” )
The Controllers = In GEF the controllers are subclasses of EditPart ( Figure 46.5, “The Controllers and the factory” )
The Views = The Figure s ( Figure 46.6, “The Views” )
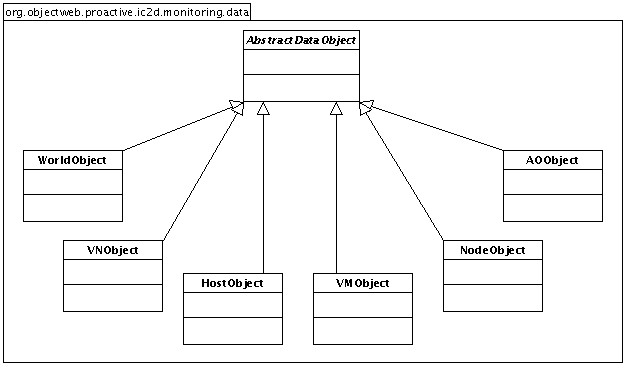

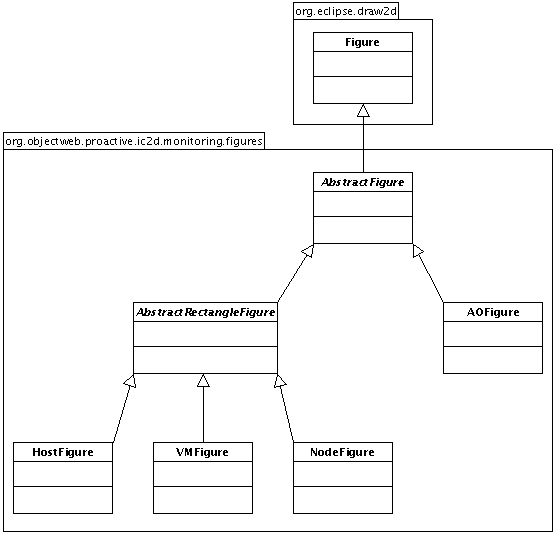
Three things to not forget
The data must be organized in a tree structure. . See Figure 46.7, “ The data strucure of the monitoring plugin ”
In GEF the controllers are subclasses of EditPart
A factory (implementing EditPartFactory ) allows GEF to create the controller corresponding to the model.
In blue, the data which we use with GEF. As you can see it, they are organized in a tree structure.
Description of the creation of the controllers and the figures step by step :
We indicate to GEF the root element of the tree, and the factory.
GEF queries the factory to create the controller corresponding to the root.
GEF queries the obtained controller to create the figure corresponding to the model.
GEF queries the root to provide it its sons.
On each one of these children, GEF do the same process.
GEF queries the factory to create the controller corresponding to the first child.
GEF queries the obtained controller to create the figure corresponding to the model.
GEF queries the model to provide it its sons.
etc...
The official site of GEF: http://www.eclipse.org/gef/
A web page referring a lot of very interesting links about GEF: http://eclipsewiki.editme.com/GEF
A detailed description of GEF : http://eclipse-wiki.info/GEFDescription
A tutorial : 'Building a GEF-based Eclipse editor' : Part 0 , Part 1 , Part 2 , Part 3 .
Somes GEF examples : http://eclipse-wiki.info/GEFExamples
The pattern Observer/Observable is used to update the figures when the model changes.
In the Figure 46.8, “Observable objects” you can see all the observable objects with methods which can call notifyObservers .
In the Figure 46.9, “Observer objects” , you can see all the observer objects and where the method update is overriden.
In the Table 46.1, “Observable and Observer objects” , you can see each observable with their observers.
In the following diagram, you can see all classes necessary to the espionage of the active objects.
When a node is found for the first time, IC2D put a spy in the node.
Once the spy is in the node, it regularly asks to the SpyEventManager to provide all the events. The next step is explained in the Figure 46.11, “Active Objects' events management”.
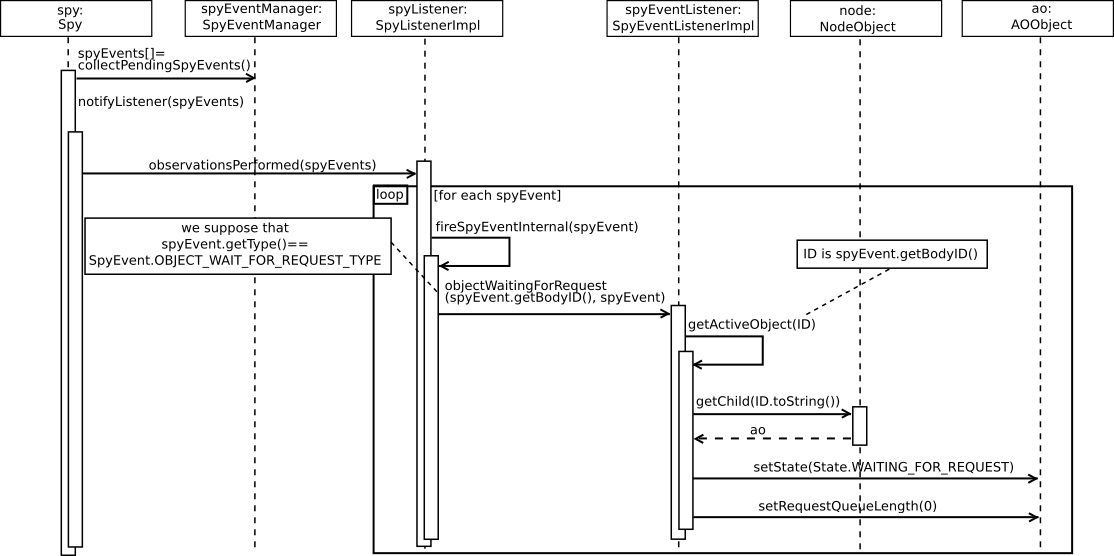
Then the Spy transmits all these events to the SpyListener .
For the each event, the SpyListener calls the corresponding method on SpyEventListener
The SpyEventListener searches the AOObject concerned with this event (thanks to the Node attribut of his class). And it modifies the state of this object.
The AOObject notify its observers.
The AOEditPart , which is an AOObject observer, update the view of this Active Object.
The NodeObject calls its "addSpy()" method :
This method creates a SpyEventListener with the NodeObject in parameter.
It creates also a SpyListener with the SpyEventListener in parameter.
Next,it turns active the previous SpyListener.
And creates a new Active Object (with the ProActive.newActive method) which is the spy with 2 parameters : the turned active object (SpyListener) , and the node . (This node is given in parameter at the constructor of the NodeObject)
When an active object is found for the first time, we ask to the NodeObject to provide us the spy.
We call the ' addMessageEventListener ' method on the Spy .
The Spy calls on its SpyEventManager the ' addMessageEventListener ' method.
The SpyEventManager adds a MessageEvent listener to the body of the active object.
In some cases, you may want to hide some objects to the users, i.e. don't monitor some internal objects. For example, spy objects used by IC2D for monitoring JVMs. That's why we introduce the concept of filtering in the monitoring plugin.
The package org.objectweb.proactive.monitoring.filters contains:
Filter : an abstract class, which has to be extended by all filter classes. This class provides the method filter (AbstractDataObject) that returns true if it matches the filter, otherwise false.
FilterProcess : provides the method filter (AbstractDataObject object).This is the first method called when a new object is discovered. It applies all filters on the object and if at least one filter returns true the object is not monitored.
This plugin provides several methods to log in the console :
log (String message)
warn (String message)
err (String message)
logException (Throwable e)
debug (String message)
debug (Throwable e)
You can have several different consoles. For example, the plugin monitoring logs in a console named "Monitoring", all the log4j messages are logged in the console "Log4j", ...
If you want to add your own console, you must choose a unique name. and call the method Console. getInstance (String yourUniqueName) to obtain the console (if it didn't exist it is created). Then you can call the methods above on your console.
This plugin contains all jar (which are not provided by Eclipse) necessary to the other plugins (like ProActive.jar, log4j.jar, ...). So if you modify the code and need a new jar, you have to add it to the plugin lib. And if you create a new plugin which needs a jar which is in the plugin lib, it must be dependent of this plugin.
Here is the IC2D SVN repository : svn://scm.gforge.inria.fr/svn/proactive/branches/proactive_newIC2D
You have to checkout :
org.objectweb.proactive.ic2d
org.objectweb.proactive.ic2d.monitoring
org.objectweb.proactive.ic2d.lib
org.objectweb.proactive.ic2d.console
org.objectweb.proactive.ic2d.launcher
If you are using Eclipse and its plugin Subclipse , open the SVN Repository perspective and checkout all those folders as new Java projects .
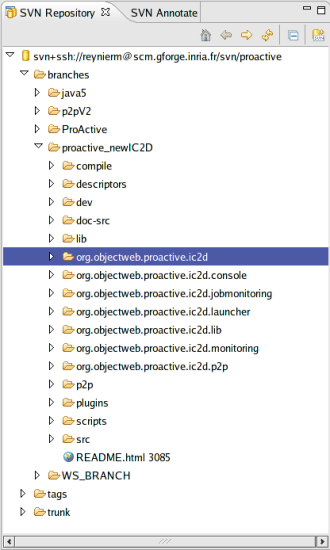
You'll maybe have to replace the proactive.jar file in the plugin org.objectweb.proactive.ic2d.lib, it depends on your ProActive version.
Now, you can run IC2D clicking on the link Launch the product in ic2d.product in the org.objectweb.proactive.ic2d project.

IC2D is a Rich Client Platform (RCP) based on the familiar Eclipse plug-in architecture .
If you want to create a plug-in for IC2D, you have to use the Eclipse's Plug-in Development Environment (PDE) . This is a complete environment that Eclipse provides for plug-in development. The PDE adds a new perspective and several views and wizards that help you create, maintain, and publish plug-ins. The PDE creates boilerplate starter code that you can use to build your plug-in. This section explains how to use the plug-in project wizard to create your plug-in.
Select File > New > Project from the menu bar to open the new project wizard.
Select Plug-in Project in Plug-in Development .
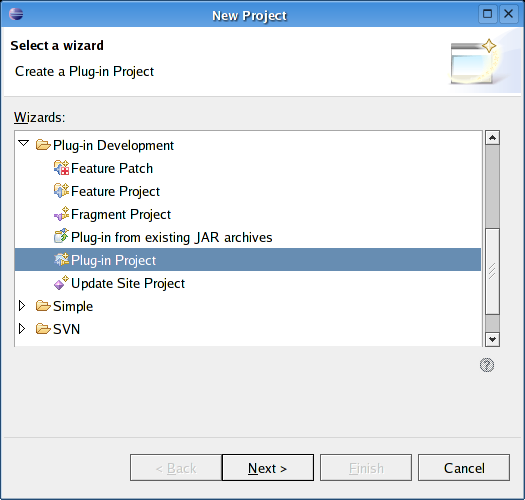
Click Next .
In the Project name field, enter a name for the plug-in. For example, we chose org.objectweb.proactive.ic2d.example. You must use the fully-qualified name to ensure its uniqueness.
In the Project contents pane, accept the default directory value.
Make sure the Create a Java project option is selected since we want our project to contain Java files. Accept the default values of the other options.
Beginning in Eclipse 3.1 you will get best results by using the OSGi bundle manifest . In contrast to previous versions, this is now the default.
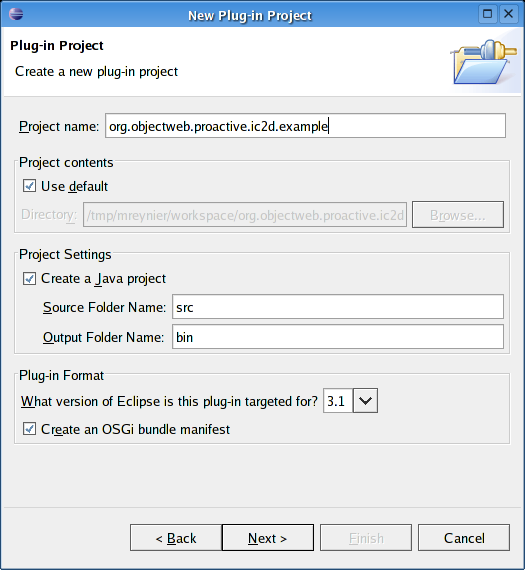
Click Next .
Now enter the fully qualified ID of the plug-in . By default it is the same as its project name.
Accept the default values of the other options.
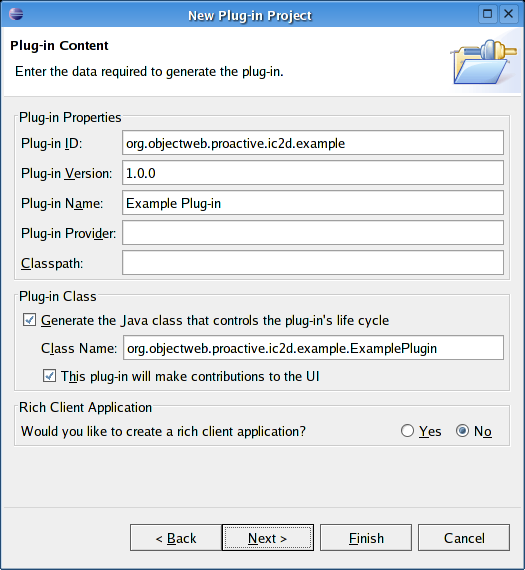
Click Finish .
The plug-in project has the file structure illustrated in the followed figure.
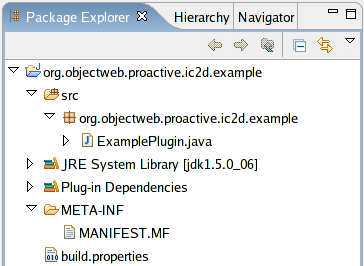
The plug-in manifest ties all the code and resources together. When you first create a plug-in, Eclipse will create and open the manifest for you automatically. The manifest is split into two files: MANIFEST.MF and plugin.xml . PDE provides a fancy editor to modify the options stored in these files (see Figure 46.18, “ Interface for editing the manifest and related files. ” ) but also allows you to edit the source directly.
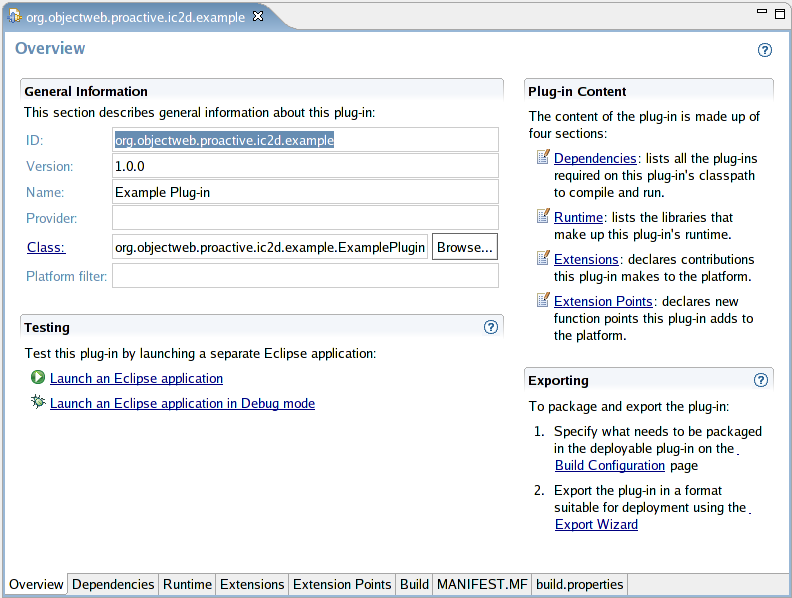
MANIFEST.MF
The OSGi bundle manifest is stored in MANIFEST.MF. OSGi is the name of a standard that Eclipse uses for dynamically loading plug-ins. Example 46.1, “MANIFEST.MF” shows the OSGi bundle manifest generated by the plug-in wizard. Everything in this file can be edited by the Manifest editor, so there should be no need to edit it by hand . However if you need to, just double-click it in the Package Explorer to bring up the Manifest editor, then click on the MANIFEST.MF tab in the editor to see and modify the source.
Manifest-Version: 1.0 Bundle-ManifestVersion: 2 Bundle-Name: Example Plug-in Bundle-SymbolicName: org.objectweb.proactive.ic2d.example Bundle-Version: 1.0.0 Bundle-Activator: org.objectweb.proactive.ic2d.example.ExamplePlugin Bundle-Localization: plugin Require-Bundle: org.eclipse.ui, org.eclipse.core.runtime Eclipse-AutoStart: true
Example 46.1. MANIFEST.MF
plugin.xml
The Eclipse extension manifest is called plugin.xml. It's used for defining and using Eclipse extension points , so if you're not using extension points then this file may be omitted. Extension points are the fundamental way that Eclipse plug-ins are tied together. This new plug-in is not yet using extension points so the plug-in wizard didn't generate the plugin.xml file.
The plug-in class is an optional singleton class that can be used to store global information for the plug-in. It's also a convenient place to put a few static utility functions used by other classes in the plug-in. See the listing Example 46.2, “ExamplePlugin.java” for the plug-in class that was created for us by the plug-in wizard.
package org.objectweb.proactive.ic2d.example; import org.eclipse.ui.plugin.*; import org.eclipse.jface.resource.ImageDescriptor; import org.osgi.framework.BundleContext; /** * The main plugin class to be used in the desktop. */ public class ExamplePlugin extends AbstractUIPlugin { //The shared instance. private static ExamplePlugin plugin; /** * The constructor. */ public ExamplePlugin() { plugin = this; } /** * This method is called upon plug-in activation */ public void start(BundleContext context) throws Exception { super.start(context); } /** * This method is called when the plug-in is stopped */ public void stop(BundleContext context) throws Exception { super.stop(context); plugin = null; } /** * Returns the shared instance. */ public static ExamplePlugin getDefault() { return plugin; } /** * Returns an image descriptor for the image file at the given * plug-in relative path. * * @param path the path * @return the image descriptor */ public static ImageDescriptor getImageDescriptor(String path) { return AbstractUIPlugin.imageDescriptorFromPlugin("org.objectweb.proactive.ic2d.example", path); } }
Example 46.2. ExamplePlugin.java
The build.properties file (see Example 46.3, “build.properties” ) will be needed when exporting the application for others to use . In particular if your application needs any resources like icons they should be listed here in the bin.includes section. The Plug-in Manifest editor provides a convenient interface to modify this file that is less error-prone than modifying it by hand.
In the project org.objectweb.proactive.ic2d , open ic2d.product . In the Configuration tab, click Add .
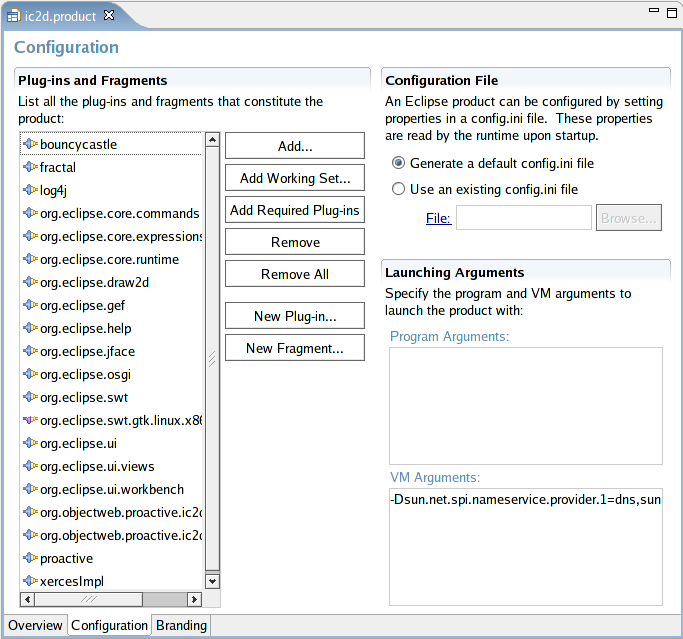
Then select your plug-in.
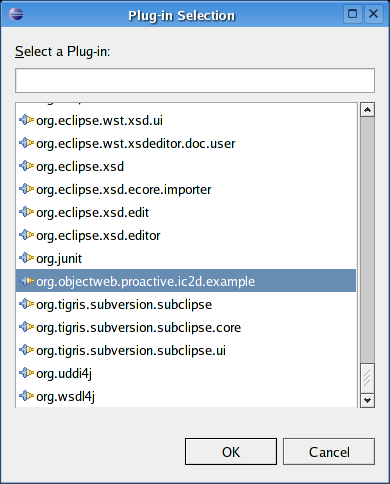
Now, click Add Required Plug-ins .
Return to the Overview tab and click Synchronize . Now launch ic2d by clicking Launch the product .
You can verify that your plug-in is integrated : in the IC2D frame, go to Help > About product > Plug-in Details .
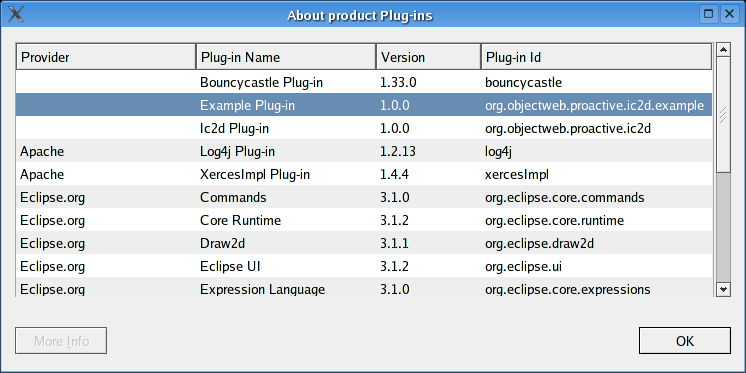
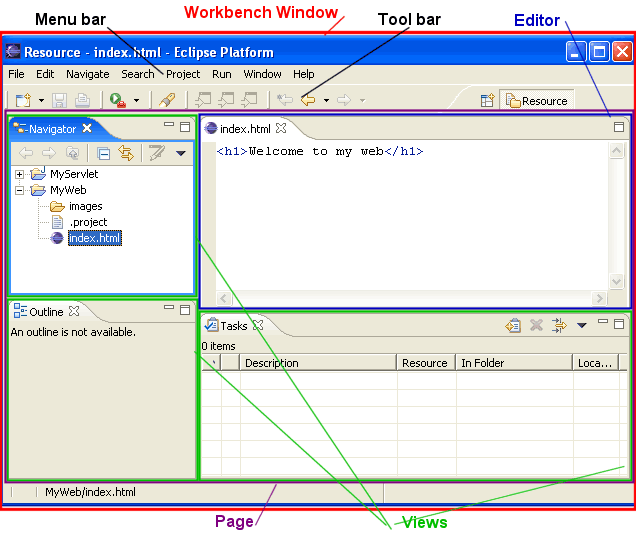
Perspectives provide an additional layer of organization inside the workbench page. A perspective defines an appropriate collection of views , their layout, and applicable actions for a given user task. Users can switch between perspectives as they move across tasks. From an implementation point of view, the user's active perspective controls which views are shown on the workbench page and their positions and sizes. Editors are not affected by a change in perspective.
A new perspective is added to the workbench using a simple two step process :
Add a perspective extension to the plugin.xml file.
Define a perspective class for the extension within the plug-in.
Step 1 : Add a Perspective Extension to the plugin.xml file
Open MANIFEST.MF with the Plug-in Manifest Editor
Open the Extensions tab
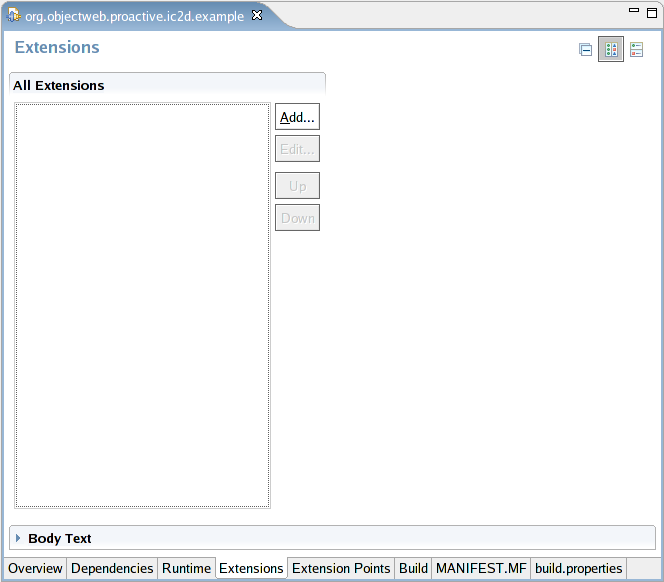
Click Add
In the Extensions Points tab, select org.eclipse.ui.perspectives
Ajouter un screenshot
Click Finish
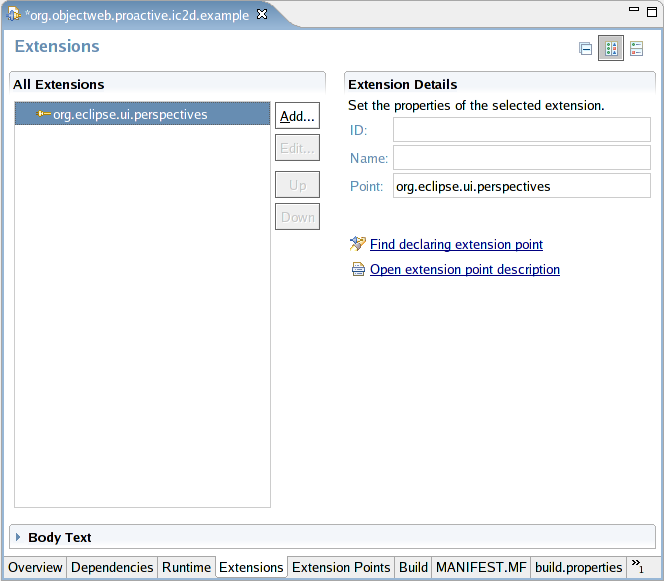
Right click the new extension : New > perspective
Now, enter the ID , the name and the class corresponding to the perspective.

If the plugin.xml file didn't exist, it is now created. Example 46.4, “plugin.xml” shows the plugin.xml file that was created.
<?xml version="1.0" encoding="UTF-8"?> <?eclipse version="3.0"?> <plugin> <extension point="org.eclipse.ui.perspectives"> <perspective class="org.objectweb.proactive.ic2d.example.ExamplePerspective" id="org.objectweb.proactive.ic2d.example.ExamplePerspective" name="Example"/> </extension> </plugin>
Example 46.4. plugin.xml
Step 2 : Define a Perspective Class for the Extension within the Plug-in
Now we need to define the perspective class which must implements the IPerspectiveFactory interface :
package org.objectweb.proactive.ic2d.example; import org.eclipse.ui.IPageLayout; import org.eclipse.ui.IPerspectiveFactory; public class ExamplePerspective implements IPerspectiveFactory { public static final String ID="org.objectweb.proactive.ic2d.example.ExamplePerspective"; public void createInitialLayout(IPageLayout layout) { // TODO Auto-generated method stub } }
Example 46.5. ExamplePlugin.java
You have created your first perspective !
A view is typically used to navigate a hierarchy of information, open an editor, or display properties for the active editor.
Create a view looks like create a perspective. You have to add a perspective extension to the plugin.xml file and to define a view class for the extension within the plug-in .
Step 1 : Add a View Extension to the plugin.xml file
Add an extension : org.eclipse.ui.views, then add a view and configure it.
An editor is a visual component within a workbench page. It is used to interact with the primary focus of attention, which may be a document, data object, or person. The primary focus of attention is a reflection of the primary task.
The ProActive code is currently using log4j as logging service. The purpose of this chapter is to assist developers for adding a valuable logging system in their codes. Furthermore, this page aims to fix logging conventions as rules. The main goal is to have an undifferentiated and powerful logging service for a useful using of log messages that's why everybody must apply these rules.
The interface
org.objectweb.proactive.core.util.Loggers contains
all loggers' name as constants (public static final String). All
loggers' name must start with proactive. It is the
root logger. Therefore all loggers are hierarchic.
/** Root logger for ProActive P2P. **/ public static final String P2P = "proactive.p2p"; /** Sub logger for starting P2P service. */ public static final String P2P_STARTSERVICE = P2P + ".startservice"; /** Sub logger for P2P acquaintances managing. */ public static final String P2P_ACQUAINTANCES = P2P + ".acquaintances"; /** Sub logger for P2P first contact step. */ public static final String P2P_FIRST_CONTACT = P2P + ".first_contact";
Example 47.1. declaring P2P loggers in the interface org.objectweb.proactive.core.util.Loggers
Firstly, import good classes:
import org.objectweb.proactive.core.util.log.ProActiveLogger; import org.objectweb.proactive.core.util.log.Loggers;
Secondly, get the logger or loggers:
private static final ProActiveLogger logger_acq = ProActiveLogger.getLogger(Loggers.P2P_ACQUAINTANCES);
Thirdly, log your code:
if (logger.isDeubugEnable()) { logger_acq.debug("message log debug level for P2P acquaintances managing"); }
Override logging methods in ProActiveLogger. Use this class to add some specific treatments to log messages.
Using hierarchic loggers is realy helpful to choose which logging level for what is logged. In the log4j configuration file, typicaly proactive-log4j, set level of loggers, such as:
# All logger at debug level log4j.logger.proactive = DEBUG # and P2P logger only info level is needed log4j.logger.proactive.p2p = INFO #For P2P first contact step needs only fatal messages log4j.logger.proactive.p2p..first_contact = FATAL
Enabling the name of the category using for instance [%c] facilitates the understanding of the logging output.
[proactive.p2p.service] DEBUG [P2PService on //trinidad.inria.fr:3000/P2PNode]: Heart-beat message received
Here we can clearly see:
a p2p.service log,
at debugging level,
received from the thread P2PService on trinidad/P2PNode,
and the log message.
Add your test in nonregressiontest package and run all
tests before committing with compile/build.sh
runTestsLocal.
You need to do several things:
Get a recent PA version :
svn co svn+ssh://my_login@scm.gforge.inria.fr/svn/proactive/trunk ProActive(use your login)Clean up your version : run the command 'build clean all format' this should compile with no errors and will also format the files with the OASIS formatting rules
Make sure you have integrated the latest modifications of others. For that, you may try
with eclipse, a team -> synchronize. This view shows conflicts.
with the shell, svn update -dP changes files if there is no conflict, and tells you which files are conflicting.
Commit the files, making bunches for functionalities. If, to add the functionality "foo", you've modified files A, B, and C.java, your commit should be of these 3 files, and should contain a description of "foo"
This tour is a practical introduction to create, run and manage tests or benchmarks.
First you will get an API's description with its features.
Second, you will be guided through some examples of tests and benchmarks.
Benchmarks on ProActive
Functional Tests framework
Interlinked Tests
Automatic results generation
A Test runs successfully of:
Its Pre-Conditions are verified
Its action method runs with no Java Exception
Its Post-Conditions are also verified
First, we specify parents Tests.
To do this, just overload Action method with needed inputs and outputs, after, with the Java reflection mechanism we found the first good Action method to execute the Test.
Mechanism in details
In standalone mode the test runs with this method:
void action() throws Exception;
In interlinked mode, the developer must to add a similar method in his code Test:
A action(B toto, C tutu, …) throws Exception;
Where toto is the result output of the first parent of this test and tutu the result output of second parent, … A is the type of result output of this Test.
Reflection code
Find the first action method:
Method[] methods = getClass().getMethods();
Method actionWithParams = null;
for (int i = 0; i < methods.length; i++) {
if ((methods[i].getName().compareTo('action') == 0) &&
(methods[i].getReturnType().getName().compareTo('void') != 0)) {
actionWithParams = methods[i];
break;
}
}
Array of params type:
if (actionWithParams != null) { Object[] args = null; if (tests != null) { args = new Object[tests.length]; for (int i = 0; i < tests.length; i++) args[i] = tests[i].getOut(); } else { args = new Object[1]; args[0] = null; }
Call the method:
out = actionWithParams.invoke(this, args);
What is a Group of Tests?
Collection of Tests
What is the role of a Group?
Initialise and cleanup all Tests
Collect Results
Add, remove, … Tests like a Java Collection
What is a Manager in Testsuite API?
Collection of Groups
What is the role of a Manager?
Initialise and launch all Tests
Collect and format Results
We have different types of Manager to better manage of specialised Tests or Benchmarks:
BenchmarkManager
ProActiveBenchManager
FunctionalTestManager
ProActiveFuncTestManager
In this API, it is the benchmark programmer who make the measure, he
can simply use: System.currentTimeMillis() of Java.
This method is in the wrong !
If you want to change the method to make measure you must to modify the code of all your Benchmarks.
To solve this problem, we have chosen an interface:
Timeable
package testsuite.timer; public interface Timeable { // Start the timer public void start(); // Stop the timer public void stop(); // Get the total time, measured public long getCumulatedTime(); // To print the time unit public String getUnit(); }
By default the API provides two timer which of implement this interface:
To make measure in milliseconds: testsuite.timer.ms.MsTimer
To make measure in microseconds: testsuite.timer.micro.MicroTimer
By implementing the interface you can easily create new timer for more performents for you needs.
Use this.timer like this:
public long action() throws Exception { String className = ReifiableObject.class.getName(); Node node = getNode(); this.timer.start(); object = (ReifiableObject) ProActive.newActive(className, null, node); this.timer.stop(); return this.timer.getCumulatedTime(); }
This section describes, how to format the Results of the tests.
In this API, the result concept is two things:
A real result: the test successes or fails, the benchmark runs in 2.0ms
Like a logger to log error, message, ...
The problem with a real logger (like log4J) is we don't have the notion of results.
In the TestSuite APi we decide to split logs of the program and results.
There is a super-class abstract: AbstractResult where there is the bare essentials to specify a Result:
The type of the result, in order of increase importance:
INFO: an information message to debug
MSG: a message to debbug
RESULT: a none important result, typically a middle result
IMP_MSG: an important message
GLOBAL_RESULT: an important result, typically a group result
ERROR: typically an error in out Test method, for example: can't init a group
A message to describe the result
An exception to show the stack trace of an error
Time of creation of the result
There are two classes which implements this abstract class:
AbstractResult is only abstract to make generic formating, so TestResult can print itself like a Java String and a XML node.
BenchmarkResult add a time result to print.
In TestSuite API, the results are stocked in ResultsCollection, there are two classes who contains a ResultCollection:
Manager
Group
These classes implements the ResultsExporter interface. After the execution of your Manager you can choose where and how to print results:
yourManager.toXXX();
Where toXXX() is:
String toString(): return all results, if
yourManager.setVerbatim(true), as a String else only results who the level >= IMP_MSGvoid toPrintWriter(PrintWriter out): return all results, if
yourManager.setVerbatim(true), in out else only results who the level >= IMP_MSGvoid toOutPutStream(OutputStream out): return all results, if
yourManager.setVerbatim(true), in out else only results who the level >= IM_MSGDocument toXML(): return all results, in a DOM tree, it is useful to transform, to format, to operate, ... results like you want.
void toHTML(File location): return all results, in location file like an HTML document. To do this the API export the results in a DOM tree, with the precedent method, and transform the XML with XSLT into a HTML file.
In Manager you can modify this by:
yourManager.setVerbatim(true/false)
If Verbatim value is:
true: All results types could be show.
false: Only results with a level >= IMP_MSG could be show. In concrete terms, on your output you have only the messages from the Manager, final result of group and th errors.
By default Verbatim is at false
This option has no effect on XML and HTML exports.
To see the value of Verbatim:
yourManager.isVerbatim()
See Section 48.5, “Configuration File” for more detail to configure result output through the file descriptor.
TestSuite API offers to tests developers a log system, to tace or debug their tests.
As in ProActive API we choose Jakarta Log4J like logger.
A static logger is create in Manager, all Groups and Tests who are added in the Manager have a reference to this logger.
By default all logs are written in a simple text file: $HOME/tests.log
With this file, it very easy to debug your test. You can also, with Log4J, specify a different place and different format for your logs. For more details see the next part.
To add logs in your Test code it is very easy: you can directly use the variable logger or the getter getLogger(). This is a org.apache.log4j.Logger
In your Test code just add logs like this:
if (logger.isDebugEnabled())
logger.debug('A debug message ...');
For more information about use logger see the log4J manual.
By default all logs with a level higher than INFO are written in $HOME/tests.log.
But you can configure the format and plac where you want to get logs.
The log4j environment is fully configurable programmatically. However, it is far more flexible to configure log4j using configuration files. Currently, configuration files can be written in XML or in Java properties (key=value) format.
You can also configure the logger by the Section 48.5, “Configuration File”.
Use default configuration of log4J. Add this code Manager constructor:
// Set up a simple configuration that logs on the console.
BasicConfigurator.configure();
An another example to write logs in an HTML file:
public YourManager() { super('Function calls', 'Alpha version'); HTMLLayout layout = new HTMLLayout(); WriterAppender appender = null; try { FileOutputStream output = new FileOutputStream( '/net/home/adicosta/output2.html'); appender = new WriterAppender(layout, output); } catch (Exception e) { } logger.addAppender(appender); logger.setLevel(Level.DEBUG); }
For more information about logger configuration see the log4J manual.
You can have just no file.
One file to configure the Manager.
One file for the Manager and all its Tests (recommended).
One file for the Manager and one file for each Tests.
No file for the Manager and one file for each Tests.
With this file you can configure Manager's properties and Tests properties. You can have just one file for the Manager and all Tests or just one for the Manager and one file for each Tests.
By default the name of this file is the class name of the Manager or the Test which it is associated with .prop as file extention. For example:
ManagerToto.class <-> ManagerToto.prop
It is very simple to use it. Just do like this example:
You have a private variable in your Manager or Test:
private int packetSize = 1024;
First add a setter of which it take a String in input:
public void setPacketSize(String value){ this.packetSize = Integer.parseInt(value); }
Next, int the prop file:
PacketSize=2048
Warning: the key in the prop file must be the same of the setter name without the prefix set.
Now, to load the prop file:
// Level: Manager
// At the execution load properties
manager.execute(yes);
// To load properties from differents types of sources
manager.loadAttributes();
manager.loadAttributes(java.io.File propFile);
manager.loadAttributes(java.util.Properties javaProp);
// Level: Test
// To load properties from differents types of sources
test.loadAttributes();
test.loadAttributes(java.io.File propFile);
test.loadAttributes(java.util.Properties javaProp);To configure all from just one file.
Like a simple prop file this one must be have the same name of the Manager class:
YourManager <-> YourManager.xml
<Manager> <name>A Manager </name> <description>Try XML descriptor file. </description> <!-- by default nbRuns is 1, but for benchmarks you can change it --> <nbRuns>100 </nbRuns> </Manager>
<simpleGroup name="A simple Group" description="just for test."> <unitTest class="test.objectcreation.TestNewActive"/> <unitTest class="test.groupmigration.TestGroupCreation"/> <unitTest class="test.groupmigration.TestGroupCreation"/> <unitTest class="test.objectcreation.TestNewActive"/> </simpleGroup>
You have created a group with 4 tests.
<packageGroup name="A Package Group"
description="Construct Group from package."
dir="/net/home/adicosta/workspace/ProActive/classes"
packageName="nonregressiontest" >
</packageGroup>You have created a group with all Tests was found in the package nonregressiontest
With this method you don't have any order on Tests, but you can specify some order:
<packageGroup name="A Package Group" description="Construct Group from package." dir="/net/home/adicosta/workspace/ProActive/classes" packageName="nonregressiontest" > <unitTest class="nonregressiontest.runtime.defaultruntime.Test" /> <unitTest class="nonregressiontest.node.nodefactory.Test" /> <unitTest class="nonregressiontest.stub.stubgeneration.Test" /> <unitTest class="nonregressiontest.stub.stubinterface.Test" /> <unitTest class="nonregressiontest.activeobject.creation.local.newactive.Test" /> <unitTest class="nonregressiontest.activeobject.creation.local.turnactive.Test" /> <unitTest class="nonregressiontest.activeobject.creation.remote.newactive.Test" /> <unitTest class="nonregressiontest.activeobject.creation.remote.turnactive.Test" /> </packageGroup>
All classes in package nonregressiontest are added, only the specified tests are sorted.
<interLinkedGroup name="Group with interlinked tests" description="Construct a Group with interlinked tests"> <!-- Declare the tests in the execution order --> <idTest class="test.groupmigration.TestGroupCreation" id="1"/> <idTest class="test.groupmigration.TestGroupMigration" id="2"/> <idTest class="test.groupmigration.TestGroupMessage" id="3"/> <interLinks> <link id="3"> <parent id="1"/> <parent id="2"/> </link> </interLinks> </interLinkedGroup>
TestGroupMessage depends from TestGroupCreation and TestGroupMigration.
<log4j> /net/home/adicosta/log4j/config/file/path/log4j-file-config </log4j>
Results in a text file:
<result type="text" file="/net/home/adicosta/tmp/results.txt" />
Results in a HTML file:
<result type="html" file="/net/home/adicosta/tmp/results.html" />
Results in the console:
<result type="console" />
Results in a XML file:
<result type="xml" file="/net/home/adicosta/tmp/results.xml"/>
To execute all with the XML file configuration:
Manager manager = new Manager(java.io.File xmlConfigFile); manager.execute();
Thanks to the structure of the API, with many Interfaces and Abstracts classes, you can easily extends the API for you needs.
For more details about this, you can the class: ProActiveManager, ProActiveFuncTest or ProActiveBenchmark which they are extends the API.
The choice of XML to export results can to help you with XSLT to export and format results for you needs.
The logger log4j is also configurable like you want.
This section describes how to write simple test and execute it.
For this example, we choose to test the object creation in ProActive API with newActive() method. This test aims to perform object creation on the same JVM, on an other local JVM and on a remote JVM.
Create a new class who extends testsuite.test.ProActiveFunctionalTest, it is an abstract class.
See this template code:
import testsuite.test.ProActiveFunctionalTest; import org.objectweb.proactive.core.node.Node; public class TestNewActive extends ProActiveFunctionalTest { public TestNewActive() { super(); setName('newActive'); setDescription('Test object creation with newActive in a node.'); } public TestNewActive(Node node, String name) { super(node,name, 'Test object creation with newActive in a node.'); } public void initTest() throws Exception { } public void action() throws Exception { } public void endTest() throws Exception { } }
We also override two methods from the super-super class: testsuite.test.FunctionalTest, to check if post and pre-conditions are verified:
public boolean postConditions() throws Exception { } public boolean preConditions() throws Exception { }
In this example both methods are empty, but they could be overridden in order to initialize and finalyze the test.
We will simply verify if the node is created:
public boolean preConditions() throws Exception { return getNode() != null; }
This method is the test, we will create an active object:
private ReifiableObject active = null; public void action() throws Exception { active = (ReifiableObject) ProActive.newActive(ReifiableObject.class.getName(), null, getNode()); }
Remarks: The ReifiableObject class is a simple class who just extends java.lang.Object, implements java.io.Serilizable and has an empty constructor with no argument.
We will check if active is different of null and if the node contains active:
public boolean postConditions() throws Exception { Object[] activeObjects = getNode().getActiveObjects(); return (active != null) && (activeObjects != null) && (activeObjects.length == 1) && activeObjects[0].equals(active); }
import org.objectweb.proactive.ProActive; import org.objectweb.proactive.core.node.Node; import testsuite.test.ProActiveFunctionalTest; public class TestNewActive extends ProActiveFunctionalTest { private ReifiableObject active = null; public TestNewActive() { super(); setName('newActive'); setDescription('Test object creation with newActive in a node.'); } public TestNewActive(Node node, String name) { super(node, name, 'Test object creation with newActive in a node.'); } public void initTest() throws Exception { // nothing to do } public boolean preConditions() throws Exception { return getNode() != null; } public void action() throws Exception { active = (ReifiableObject) ProActive.newActive(ReifiableObject.class.getName(), null, getNode()); } public boolean postConditions() throws Exception { Object[] activeObjects = getNode().getActiveObjects(); return (active != null) && (activeObjects != null) && (activeObjects.length == 1) && activeObjects[0].equals(active); } public void endTest() throws Exception { // nothing to do } }
Tips: if you want to make a trace in your test or in all classes who extends a testsuite class, you have access to a log4j logger by: getLogger()
Now, we will write a Manager to execute our test.
For this example it is very simple, you have just to extends testsuite.manager.ProActiveFuncTestManager:
import testsuite.manager.ProActiveFuncTestManager; public class ObjectCreationManager extends ProActiveFuncTestManager { public ObjectCreationManager() { super('Object Creation','Manage objects creation tests.'); } }
Normaly, you have nothing to do to initialize the manager. In this example, we choose to create tests and group in this method , but you can do this in the same place where you create the manager.
Create group by the initManager():
import testsuite.group.Group; public void initManager() throws Exception { Group testGroup = new Group('Test Group', 'no description.'); // adding a test in same VM testGroup.add(new TestNewActive(getSameVMNode(),'NewActive same VM')); // adding a test in local VM testGroup.add(new TestNewActive(getLocalVMNode(),'NewActive local VM')); // adding a test in remote VM testGroup.add(new TestNewActive(getRemoteVMNode(),'NewActive remote VM')); // adding the group add(testGroup); }
Create group in the same place of the manager:
ObjectCreationManager manager = new ObjectCreationManager(); Group testGroup = new Group('Test Group', 'no description.'); // adding a test in same VM testGroup.add(new TestNewActive(getSameVMNode(),'NewActive same VM')); // adding a test in local VM testGroup.add(new TestNewActive(getLocalVMNode(),'NewActive local VM')); // adding a test in remote VM testGroup.add(new TestNewActive(getRemoteVMNode(),'NewActive remote VM')); // adding the group manager.add(testGroup);
Warning: if you override endManager() method in a ProActiveManager you must to add in this code:
super.endManager()
The reason is to delete the ProActive nodes create at the beginning.
Our manager is a ProActiveManager, so an attibutes file is mandatory.
Create a file ObjectCreationManager.prop in the same directory of the manager. This file must contains the name (or URL) of the remote host, like this:
RemoteHostname=owenii
Warning: respect the upper an lower cases.
Tips: you can use this file to
specify attributes for your tests classes. You can also use a
different file, in this case you must specify its path in the
execute() method of the manager.
Add this code in your main method:
ObjectCreationManager manager = new ObjectCreationManager(); // the argument must have true value, because it is a ProActiveManager // and the attributes file is obligatory manager.execute(true);
Warning: when you use a ProActiveManager you must had System.exit(0) at the end of the main method. If you don't do that, the manager can't stop properly.
System.out.println(manager.getResults());
If you want all details:
manager.setVerbatim(true);
You can also have the results in a HTML or XML file or in a stream, in Section 48.3, “Results”, look for: testssuite.result.ResultsExporter
8/22/03 13:48:10.450 [MESSAGE] Local hostname: amda.inria.fr 8/22/03 13:48:10.450 [MESSAGE] Remote hostname: owenii 8/22/03 13:48:10.452 [MESSAGE] Starting ... 8/22/03 13:48:10.458 [MESSAGE] Init Manager with success 8/22/03 13:48:10.749 [RESULT] NewActive same VM: Test run with success [SUCCESS] 8/22/03 13:48:11.141 [RESULT] NewActive local VM: Test run with success [SUCCESS] 8/22/03 13:48:12.195 [RESULT] NewActive remote VM: Test run with success [SUCCESS] 8/22/03 13:48:12.195 [RESULT] Group: Test Group Runs: 3 Errors: 0 [SUCCESS] 8/22/03 13:48:12.195 [MESSAGE] ... Finish
TestNewActive.java
import org.objectweb.proactive.ProActive; import org.objectweb.proactive.core.node.Node; import testsuite.test.ProActiveFunctionalTest; public class TestNewActive extends ProActiveFunctionalTest { private ReifiableObject active = null; public TestNewActive() { super(); setName('newActive'); setDescription('Test object creation with newActive in a node.'); } public TestNewActive(Node node, String name) { super(node, name, 'Test object creation with newActive in a node.'); } public void initTest() throws Exception { // nothing to do } public boolean preConditions() throws Exception { return getNode() != null; } public void action() throws Exception { active = (ReifiableObject) ProActive.newActive(ReifiableObject.class.getName(), null, getNode()); } public boolean postConditions() throws Exception { Object[] activeObjects = getNode().getActiveObjects(); return (active != null) && (activeObjects != null) && (activeObjects.length == 1) && activeObjects[0].equals(active); } public void endTest() throws Exception { // nothing to do } }
ReaifiableObject.java
import java.io.Serializable;
public class ReifiableObject implements Serializable {
public ReifiableObject() {
}
} ObjectCreationManager.prop
RemoteHostname=owenii
ObjectCreationManager.java
import testsuite.group.Group; import testsuite.manager.ProActiveFuncTestManager; public class ObjectCreationManager extends ProActiveFuncTestManager { public ObjectCreationManager() { super('Object Creation', 'Manage objects creation tests.'); } public void initManager() throws Exception { Group testGroup = new Group('Test Group', 'no description.'); // adding a test in same VM testGroup.add(new TestNewActive(getSameVMNode(),'NewActive same VM')); // adding a test in local VM testGroup.add(new TestNewActive(getLocalVMNode(),'NewActive local VM')); // adding a test in remote VM testGroup.add(new TestNewActive(getRemoteVMNode(),'NewActive remote VM')); // adding the group add(testGroup); } public static void main(String[] args) { ObjectCreationManager manager = new ObjectCreationManager(); // the argument must have true value, because it is a ProActiveManager // and the attributes file is obligatory manager.execute(true); manager.setVerbatim(true); System.out.println(manager.getResults()); // for exit, also ProActive don't stop the application System.exit(0); } }
This section describes how to write and execute a simple Benchmark.
For this example, we choose to measure the time of an object creation with ProActive.newActive(). This benchmark aims to perform object creation on the same JVM, on an other local JVM and on a remote JVM.
Create new class who extends testsuite.test.ProActiveBenchmark, it is an abstract class.
See this template code:
import org.objectweb.proactive.ProActive; import org.objectweb.proactive.core.node.Node; import testsuite.test.ProActiveBenchmark; public class BenchNewActive extends ProActiveBenchmark { public BenchNewActive() { super(null, 'Object Creation with newActive', 'Measure time to create an active object with newActive.'); } public BenchNewActive(Node node) { super(node, 'Object Creation with newActive', 'Measure time to create an active object with newActive.'); } public long action() throws Exception { } public void initTest() throws Exception { } public void endTest() throws Exception { } }
We also override two methods from the super-class: testsuite.test.Benchmark, to check if post and pre-conditions are verified:
public boolean postConditions() throws Exception { }
public boolean preConditions() throws Exception { }In this exampple both methods are empty, but they could be overridden in order to initialize and finalyze the benchmark.
We will simply verify if the node is created:
public boolean preConditions() throws Exception {
return getNode() != null;
}This method measures the time of a creation of an Object with ProActive.newActive() on a specified node:
private ReifiableObject object = null; public long action() throws Exception { ReifiableObject object; String className = ReifiableObject.class.getName(); Node node = getNode(); this.timer.start(); object = (ReifiableObject) ProActive.newActive(className, null, node); this.timer.stop(); return this.timer.getCumulatedTime(); }
| Note |
|---|---|
It is the benchmark's programmer who measure the time of the action with a configurable timer, see the Section 48.2, “Timer for the Benchmarks” for more details. |
The ReifiableObject class is a simple class who just extends java.lang.Object, implements java.io.Serilizable and has an empty constructor with no argument.
We will check if object is different of null and if the node contains object:
public boolean postConditions() throws Exception { Object[] activeObjects = getNode().getActiveObjects(); return (object != null) && (activeObjects != null) && (activeObjects.length == 1) && activeObjects[0].equals(object); }
Tips: if you want to make a trace in your benchmark , you have access to a log4j logger by: getLogger() or by the variable logger
Now, we will write a Manager to execute ou test.
For this example it is very simple, you have just to extends testsuite.manager.ProActiveBenchManager:
import testsuite.manager.ProActiveBenchManager; public class Manager extends ProActiveBenchManager { public Manager() { super('Manager','To manage ProActive Benchmarks.'); } }
Normaly, you have nothing to do to initialize the manager. In this example, we choose to create benchmarks and group in this method , but you can do this in the same place where you create the manager.
Create group by initManager():
import testsuite.group.Group; public void initManager() throwsException { Group benchGroup = new Group('Bnechmark Group','no description.'); // adding bench in same VM benchGroup.add(new BenchNewActive(getSameVMNode())); // adding bench in local VM benchGroup.add(new BenchNewActive(getLocalVMNode())); // adding bench in remote VM benchGroup.add(new BenchNewActive(getRemoteVMNode())); // adding the group add(benchGroup); }
Create group int the same place of the manager:
// ... Manager manager = new Manager(); Group benchGroup = new Group('Bnechmark Group','no description.'); // adding bench in same VM benchGroup.add(new BenchNewActive(getSameVMNode())); // adding bench in local VM benchGroup.add(new BenchNewActive(getLocalVMNode())); // adding bench in remote VM benchGroup.add(new BenchNewActive(getRemoteVMNode())); manager.add(benchGroup); // ...
Warning: if you override endManager() method in a ProActiveManager you must to add in this code:
super.endManager()
The reason is to delete the ProActive nodes create at the beginning.
Our manager is a ProActiveManager, so an attibutes file is mandatory.
Create a file Manager.prop in the same directory of the manager. This file must contains the name (or URL) of the remote host, like this:
RemoteHostname=owenii
Warning: respect the upper an lower cases.
Tips: you can use this file to
specify attributes for your tests classes. You can also use a
different file, in this case you must specify its path in the
execute() method of the manager.
Add this code in your main method:
Manager manager = new Manager();
// the argument must have true value, because it is a ProActiveManager
// and the attributes file is obligatory
manager.execute(true);Warning: when you use a ProActiveManager you must to had System.exit(0) at the end of the main method. If don't do that, the manager can't properly.
Results in your console:
System.out.println(manager);
If you want all details:
manager.setVerbatim(true);
For benchmarks it is more interesting to export results in a HTML file. Indeed, you have average, min, max, STDEV and charts to help you to analyse all results
Object Creation Object Creation with newActive and turnActive. Messages of Object Creation: 9/18/2003 at 13:0:32.527 [RESULT] Object Creation with newActive -- Same VM: no message [SUCCESS] See the chart Max=113ms Moy=24.0ms STDEV=24.64ms --> Min1ms 9/18/2003 at 13:0:36.693 [RESULT] Object Creation with turnActive -- Same VM: no message [SUCCESS]See the chart Max=98ms Moy=41.0ms STDEV=32.20ms --> Min1ms 9/18/2003 at 13:0:43.425 [RESULT] Object Creation with newActive -- Local VM: no message [SUCCESS]See the chart Max=376ms Moy=67.03ms STDEV=83.73ms --> Min6ms 9/18/2003 at 13:0:50.434 [RESULT] Object Creation with turnActive -- Local VM: no message [SUCCESS]See the chart Max=326ms Moy=69.82ms STDEV=86.15ms --> Min6ms 9/18/2003 at 13:0:53.297 [RESULT] Object Creation with newActive -- Remote VM: no message [SUCCESS]See the chart Max=290ms Moy=28.03ms STDEV=50.79ms --> Min5ms 9/18/2003 at 13:0:55.980 [RESULT] Object Creation with turnActive -- Remote VM: no message [SUCCESS]See the chart Max=250ms Moy=26.32ms STDEV=53.46ms --> Min5ms 9/18/2003 at 13:0:55.982 [RESULT]: Group: Object Creation, Moy in 42.7ms Runs: 600 Errors: 0 To see all results of this group in a BarChart.
Example 48.1. Example of HTML results
BenchnewActive.java
import org.objectweb.proactive.ProActive; import org.objectweb.proactive.core.node.Node; import testsuite.test.ProActiveBenchmark; import util.ReifiableObject; public class BenchNewActive extends ProActiveBenchmark { private ReifiableObject object = null; public BenchNewActive() { super(null, 'Object Creation with newActive', 'Measure time to create an active object with newActive.'); } public BenchNewActive(Node node) { super(node, 'Object Creation with newActive', 'Measure time to create an active object with newActive.'); } public long action() throws Exception { String className = ReifiableObject.class.getName(); Node node = getNode(); this.timer.start(); object = (ReifiableObject) ProActive.newActive(className, null, node); this.timer.stop(); return this.timer.getCumulatedTime(); } public void initTest() throws Exception { // nothing to do } public void endTest() throws Exception { // nothing to do } public boolean preConditions() throws Exception { return getNode() != null; } public boolean postConditions() throws Exception { Object[] activeObjects = getNode().getActiveObjects(); return (object != null) && (activeObjects != null) && (activeObjects.length == 1) && activeObjects[0].equals(object); } }
ReifiableObject.java
import java.io.Serializable; public class ReifiableObject implements Serializable { public ReifiableObject() { } }
Manager.prop
RemoteHostname=owenii
Manager.java
import org.apache.log4j.BasicConfigurator; import org.apache.log4j.HTMLLayout; import org.apache.log4j.Level; import org.apache.log4j.Logger; import org.apache.log4j.WriterAppender; import testsuite.group.Group; import testsuite.manager.ProActiveBenchManager; import java.io.File; public class Manager extends ProActiveBenchManager { private Logger logger = Logger.getLogger(Test1.class); public Manager() { super('Manager','To manage ProActive Benchmarks.'); // Log in a HTML file HTMLLayout layout = new HTMLLayout(); WriterAppender appender = null; try { FileOutputStream output = new FileOutputStream( '/net/home/adicosta/output2.html'); appender = new WriterAppender(layout, output); } catch (Exception e) { } logger.addAppender(appender); BasicConfigurator.configure(); logger.setLevel(Level.DEBUG); } public void initManager() throws Exception { Group benchGroup = new Group('Bnechmark Group','no description.'); // adding bench in same VM benchGroup.add(new BenchNewActive(getSameVMNode())); // adding bench in local VM benchGroup.add(new BenchNewActive(getLocalVMNode())); // adding bench in remote VM benchGroup.add(new BenchNewActive(getRemoteVMNode())); // adding the group add(benchGroup); } public static void main(String[] args) { Manager manager = new Manager(); // To run all benchmarks 100 times manager.setNbRuns(100); // Execute all benchmarks manager.execute(true); //Write results in a HTML file try { File file = new File(System.getProperty('user.home') + File.separatorChar + 'results.html'); manager.toHTML(file); } catch (Exception e) { e.printStackTrace(); } System.exit(0); } }
In this part we will not explain how to write a simple test, for this see Section 48.7, “Your first Test” .
In first step, we will test a ProActive Group creation with 3 Agents, and after this creation we will test the Agents migration by a group communication.
Create a new class who extends testsuite.test.ProActiveFunctionalTest, it is an abstract class.
See this template code:
import org.objectweb.proactive.core.node.Node; import testsuite.test.ProActiveFunctionalTest; import java.io.Serializable; public class TestGroupCreation extends ProActiveFunctionalTest implements Serializable { public TestGroupCreation() { super(null, 'Group Creation', 'Create a Group of active object in specify node.'); } public TestGroupCreation(Node node) { super(node, 'Group Creation', 'Create a Group of active object in specify node.'); } public void action() throws Exception { } public boolean postConditions() throws Exception { } public boolean preConditions() throws Exception { } public void initTest() throws Exception { // nothing to do } public void endTest() throws Exception { // nothing to do } }
Next we will simply test in preconditions if the node exists (different of null):
public boolean preConditions() throws Exception { return getNode() != null; }
Now we will implement the action method to create a ProActive Group with 3 Agent (see the Agent code at the end of this section - Example 48.2, “Agent class”):
import org.objectweb.proactive.core.group.Group; import org.objectweb.proactive.core.group.ProActiveGroup; public class TestGroupCreation extends ProActiveFunctionalTest implements Serializable { private Agent group = null; // ... public void action() throws Exception { createGroupAgent(); } private void createGroupAgent() throws Exception { Object[][] params = { { 'Agent0' }, { 'Agent1' }, { 'Agent2' } }; Node node = getNode(); Node[] nodes = { node }; group = (Agent) ProActiveGroup.newGroup(Agent.class.getName(), params, nodes); } // ... }
Remarks: We use an external method to create the group is for the simple reason of we use this code after in another method.
Remarks: We don't explain the Agent code because it is a ProActive example.
For the postconditions we will test if the group containts 3 elements and they are in the good node:
public boolean postConditions() throws Exception { if (group == null) { return false; } else { Group agentGroup = ProActiveGroup.getGroup(group); if (agentGroup.size() != 3) { return false; } else { Agent agent0 = (Agent) agentGroup.get(0); Agent agent1 = (Agent) agentGroup.get(1); Agent agent2 = (Agent) agentGroup.get(2); String nodeURL = getNode().getNodeInformation().getURL() .toUpperCase(); return (agent0.getNodeName().compareTo(nodeURL) == 0) && (agent1.getNodeName().compareTo(nodeURL) == 0) && (agent2.getNodeName().compareTo(nodeURL) == 0); } } }
This class is now readi for a standalone use.
Now, we will add a new action method who return a ProActive Group:
public Agent action(Object o) throws Exception { createGroupAgent(); return this.group; }
This method return an Agent (who is the group) and have one argument: o. This argument will not use , we must to put this argument is for have a different method signature from action().
Our test for group creation is now ready.
All the code is the same of the precedant class unexcepted for the actions methods and for the method to create group of course.
In this test we can't run this method in a standalone test, but for other maybe you can. It is just for this test.
public void action() throws Exception { throw new Exception('This test doesn't work in standalone mode'); }
The result of the precedent test is an Agent, so the argument will be an Agent. This test have no result but we must to return an Object here it is null because the API use the reflection mechanism of Java.
public Object action(Agent group) throws Exception { this.group = group; this.group.moveTo(getNode().getNodeInformation().getURL()); return null; }
Create a simple ProActiveFuncTestManager with a main:
import testsuite.manager.ProActiveFuncTestManager; public class Manager extends ProActiveFuncTestManager { public Manager(String name, String description) { super(name, description); } public static void main(String[] args) { Manager manager = new Manager('Migration Tests', 'Create a group and migrate its objects.'); } }
Create a new Group (testsuite.group.Group) in our main:
import testsuite.group.Group; // ... Group group = new Group('Group Migration', 'Migration on an active group objects.'); // ...
Create and add the 2 precends tests in the group:
// ... TestGroupCreation creation = new TestGroupCreation(manager.getLocalVMNode()); group.add(creation); TestGroupMigration migration = new TestGroupMigration(manager.getRemoteVMNode()); group.add(migration); // ...
Specify the ancestor test of migration is creation:
// ... FunctionalTest[] params = { creation }; migration.setTests(params); // ...
You can see in the Section 48.5, “Configuration File” how to do this by a configuration file.
Warning: Don't forget to write a prop file with the name of the remote host.
Add the group and launch the test:
// ... manager.add(group); manager.execute(group, migration, true); // ...
Warning: when you use a ProActiveManager you must to had System.exit(0) at the end of the main method. If don't do that, the manager can't properly.
8/26/03 12:40:47.407 [MESSAGE] Local hostname: amda.inria.fr 8/26/03 12:40:47.408 [MESSAGE] Remote hostname: owenii 8/26/03 12:40:47.498 [MESSAGE] Starting with interlinked Tests ... 8/26/03 12:40:47.498 [MESSAGE] Init Manager with success 8/26/03 12:40:48.547 [RESULT] Group Creation: Test run with success [SUCCESS] 8/26/03 12:40:50.149 [RESULT] Group Migration: Test run with success [SUCCESS] 8/26/03 12:40:50.149 [RESULT] Group: Group Migration Runs: 2 Errors: 0 [SUCCESS] 8/26/03 12:40:50.243 [MESSAGE] ... Finish
Manager.prop
RemoteHostname=owenii
Manager.java
import testsuite.group.Group; import testsuite.manager.ProActiveFuncTestManager; public class Manager extends ProActiveFuncTestManager { public Manager(String name, String description) { super(name, description); } public static void main(String[] args) { Manager manager = new Manager('Migration Tests', 'Create a group and migrate its objects.'); Group group = new Group('Group Migration', 'Migration on an active group objects.'); TestGroupCreation creation = new TestGroupCreation(manager.getLocalVMNode()); group.add(creation); TestGroupMigration migration = new TestGroupMigration(manager.getRemoteVMNode()); group.add(migration); FunctionalTest[] params = { creation }; migration.setTests(params); manager.add(group); manager.execute(group, migration, true); manager.setVerbatim(true); manager.getResults().toOutPutStream(System.out); System.exit(0); } }
TestGroupMigration.java
import java.io.Serializable; import org.objectweb.proactive.core.group.Group; import org.objectweb.proactive.core.group.ProActiveGroup; import org.objectweb.proactive.core.node.Node; import testsuite.test.ProActiveFunctionalTest; public class TestGroupMigration extends ProActiveFunctionalTest implements Serializable { private Agent group = null; public TestGroupMigration() { super(null, 'Group Migration', 'Migrate all Group Element in a specified node.'); } public TestGroupMigration(Node node) { super(node, 'Group Migration', 'Migrate all Group Element in a specified node.'); } public boolean postConditions() throws Exception { if (group == null) { return false; } else { Group agentGroup = ProActiveGroup.getGroup(group); if (agentGroup.size() != 3) { return false; } else { Agent agent0 = (Agent) agentGroup.get(0); Agent agent1 = (Agent) agentGroup.get(1); Agent agent2 = (Agent) agentGroup.get(2); String nodeURL = getNode().getNodeInformation().getURL() .toUpperCase(); return (agent0.getNodeName().compareTo(nodeURL) == 0) && (agent1.getNodeName().compareTo(nodeURL) == 0) && (agent2.getNodeName().compareTo(nodeURL) == 0); } } } public boolean preConditions() throws Exception { return getNode() != null; } public void action() throws Exception { throw new Exception('This test doesn't work in standalone mode'); } public Object action(Agent group) throws Exception { this.group = group; this.group.moveTo(getNode().getNodeInformation().getURL()); return null; } public void initTest() throws Exception { // nothing to do } public void endTest() throws Exception { // nothing to do } }
TestGroupCreation.java
import org.objectweb.proactive.core.group.Group; import org.objectweb.proactive.core.group.ProActiveGroup; import org.objectweb.proactive.core.node.Node; import testsuite.test.ProActiveFunctionalTest; import java.io.Serializable; public class TestGroupCreation extends ProActiveFunctionalTest implements Serializable { private Agent group = null; public TestGroupCreation() { super(null, 'Group Creation', 'Create a Group of active object in specify node.'); } public TestGroupCreation(Node node) { super(node, 'Group Creation', 'Create a Group of active object in specify node.'); } // Default action method public void action() throws Exception { createGroupAgent(); } // For interlinked tests action method public Agent action(Object o) throws Exception { createGroupAgent(); return this.group; } private void createGroupAgent() throws Exception { Object[][] params = { { 'Agent0' }, { 'Agent1' }, { 'Agent2' } }; Node node = getNode(); Node[] nodes = { node }; group = (Agent) ProActiveGroup.newGroup(Agent.class.getName(), params, nodes); } public boolean postConditions() throws Exception { if (group == null) { return false; } else { Group agentGroup = ProActiveGroup.getGroup(group); if (agentGroup.size() != 3) { return false; } else { Agent agent0 = (Agent) agentGroup.get(0); Agent agent1 = (Agent) agentGroup.get(1); Agent agent2 = (Agent) agentGroup.get(2); String nodeURL = getNode().getNodeInformation().getURL() .toUpperCase(); return (agent0.getNodeName().compareTo(nodeURL) == 0) && (agent1.getNodeName().compareTo(nodeURL) == 0) && (agent2.getNodeName().compareTo(nodeURL) == 0); } } } public boolean preConditions() throws Exception { return getNode() != null; } public void initTest() throws Exception { // nothing to do } public void endTest() throws Exception { // nothing to do } }
Agent.java
import org.objectweb.proactive.Body; import org.objectweb.proactive.EndActive; import org.objectweb.proactive.InitActive; import org.objectweb.proactive.ProActive; import org.objectweb.proactive.RunActive; public class Agent implements InitActive, RunActive, EndActive, java.io.Serializable { private String name; private String nodename; private String hostname; public Agent() { } public Agent(String name) { this.name = name; } public String getName() { try { //return the name of the Host return java.net.InetAddress.getLocalHost().getHostName() .toUpperCase(); } catch (Exception e) { e.printStackTrace(); return 'getName failed'; } } public String getNodeName() { try { //return the name of the Node return ProActive.getBodyOnThis().getNodeURL().toUpperCase(); } catch (Exception e) { e.printStackTrace(); return 'getNodeName failed'; } } public void moveTo(String nodeURL) { try { System.out.println(' I am going to migate'); ProActive.migrateTo(nodeURL); System.out.println('migration done'); } catch (Exception e) { e.printStackTrace(); } } public void endBodyActivity() { ProActive.getBodyOnThis().terminate(); } public void initActivity(Body body) { System.out.println('Initialization of the Activity'); } public void runActivity(Body body) { org.objectweb.proactive.Service service = new org.objectweb.proactive.Service(body); while (body.isActive()) { // The synchro policy is FIFO service.blockingServeOldest(); } } public void endActivity(Body body) { System.out.println('End of the activity of this Active Object'); } }
Example 48.2. Agent class
This tour was intented to guide you through an overview of ProActive TestSuite API.
You can now easily use it for testing and benchmarking your ProActive's applications.
Thanks to its extending mechanism, you can also use it for non-ProActive's applications. Which means that use it for all Java programs.
Your suggestions are welcome.
ProActive support several deployment protocols. This protocols can be configured through an XML Descriptor file in the process section. From time to time, new protocols are added. This documentation describes how to add a new deployment protocol (process) to ProActive.
Adding a new process can be divided into two related tasks:
Java Process Class
In this section, a java class that handles the specific protocol must be implemented. This java class must have certain properties discussed later on.
XML Descriptor
Since each new protocol requieres different configuration parameteres, the DescriptorSchema.xsd and related parsing code must be modified to handle the new process and it's specific parameteres.
Both of this tasks are closely related because the Java Process Class is used when parsing the Descriptor XML.
The Java Process Classes are defined in the org.objectweb.proactive.core.process package.
Most implementations extend the class AbstractExternalProcessDecorator.

In this figure, OARSubProcess and SSHProcess both extend from AbstractExternalProcessDecorator. Notice, that in the case of SSH, more than one class maybe required to succesfully implement the protocol. This is why, every protocol is implemented within it's on directory in the process package:
ProActive/src/org/objectweb/proactive/core/process/newprocessdir/
Sometimes, implementeing a specific process requiers external libraries, possibly from the original protocol client. The correct place to put this external .jar libraries is in:
ProActive/lib/newprocessdir/*.jar
Before executing a deployment using this new process, don't forget to add this libraries to the $CLASSPATH envirorment variable.
Usualy the new java process class will have a name such as: ProtocolNameProcess.java. The ProtocolNameProcess class will extend from AbstractExternalProcessDecorator. Therefore, at least the following inherited methods must be implemented:
public ProtocolNameProcess();
public ProtocolNameProcess(ExternalProcess targetProcess);
public String getProcessId();
public int getNodeNumber();
public UniversalProcess getFinalProcess();
protected String internalBuildCommand();
protected void internalStartProcess(String commandToExecute) throws java.io.IOException;
On certain clusters, a starting script might be required. Sometimes, this script will be static and receive parameteres at deployment time (globus, pbs, ...), and in other cases it will have to be generated at deployment time (oar, oargrid). In either case, the proper place to put these scipts is:
ProActive/scripts/unix/cluster/
The schema file is located at: ProActive/descriptors/DescriptorSchema.xsd. This file contains the valid tags allowed in an XML descriptor file.
processDefinition Childs
The first thing to do, is add the new process tag in:
<xs:complexType name="ProcessDefinitionType"> <xs:choice> <xs:element name="jvmProcess" type="JvmProcessType"/> <xs:element name="rshProcess" type="RshProcessType"/> <xs:element name="maprshProcess" type="MapRshProcessType"/> <xs:element name="sshProcess" type="SshProcessType"/> <xs:element name="processList" type="ProcessListType"/> <xs:element name="processListbyHost" type="ProcessListbyHostType"/> <xs:element name="rloginProcess" type="RloginProcessType"/> <xs:element name="bsubProcess" type="BsubProcessType"/> <xs:element name="pbsProcess" type="PbsProcessType"/> <xs:element name="oarProcess" type="oarProcessType"/> <xs:element name="oarGridProcess" type="oarGridProcessType"/> <xs:element name="globusProcess" type="GlobusProcessType"/> <xs:element name="prunProcess" type="prunProcessType"/> <xs:element name="gridEngineProcess" type="sgeProcessType"/> </xs:choice> <xs:attribute name="id" type="xs:string" use="required"/> </xs:complexType>Specific Process Tag
Afterwards, all the tag attributes and subtags need to be defined. In this example, we show the OARGRID tag:
<!--oarGridProcess--> <xs:complexType name="oarGridProcessType"> <xs:sequence> <xs:element ref="processReference"/> <xs:element ref="commandPath" minOccurs="0"/> <xs:element name="oarGridOption" type="OarGridOptionType"/> </xs:sequence> <xs:attribute name="class" type="xs:string" use="required" fixed="org.objectweb.proactive.core.process.oar.OARGRIDSubProcess"/> <xs:attribute name="queue" type="xs:string" use="optional"/> <xs:attribute name="bookedNodesAccess" use="optional"> <xs:simpleType> <xs:restriction base="xs:string"> <xs:enumeration value="rsh"/> <xs:enumeration value="ssh"/> </xs:restriction> </xs:simpleType> </xs:attribute> <xs:attribute name="closeStream" type="CloseStreamType" use="optional"/> </xs:complexType> <!--oarGridOption--> <xs:complexType name="OarGridOptionType"> <xs:sequence> <xs:element name="resources" type="xs:string"/> <xs:element name="walltime" type="xs:string" minOccurs="0"/> <xs:element name="scriptPath" type="FilePathType" minOccurs="0"/> </xs:sequence> </xs:complexType>
This file is located in org.objectweb.proactive.core.descriptor.xml package. It contains the tag names used within XML descriptor files. When adding a new process, new tags should be registered in this file.
Located in: org.objectweb.proactive.core.descriptor.xml, this file is the XML handler for the process descriptor section.
New XML handler innerclass
This class will parse all the process specific tags and attributes. It is an innerclass in the ProcessDefinitinonHandler.java file. Sometimes, this class will have a subclass in charge of parsing a subsection of the process tag.
protected class OARGRIDProcessHandler extends ProcessHandler { public OARGRIDProcessHandler(ProActiveDescriptor proActiveDescriptor) { super(proActiveDescriptor); this.addHandler(OARGRID_OPTIONS_TAG, new OARGRIDOptionHandler()); } public void startContextElement(String name, Attributes attributes) throws org.xml.sax.SAXException { super.startContextElement(name, attributes); String queueName = (attributes.getValue("queue")); if (checkNonEmpty(queueName)) { ((OARGRIDSubProcess) targetProcess).setQueueName(queueName); } String accessProtocol = (attributes.getValue("bookedNodesAccess")); if (checkNonEmpty(accessProtocol)) { ((OARGRIDSubProcess) targetProcess).setAccessProtocol(accessProtocol); } } protected class OARGRIDOptionHandler extends PassiveCompositeUnmarshaller { public OARGRIDOptionHandler() { UnmarshallerHandler pathHandler = new PathHandler(); this.addHandler(OAR_RESOURCE_TAG, new SingleValueUnmarshaller()); this.addHandler(OARGRID_WALLTIME_TAG, new SingleValueUnmarshaller()); BasicUnmarshallerDecorator bch = new BasicUnmarshallerDecorator(); bch.addHandler(ABS_PATH_TAG, pathHandler); bch.addHandler(REL_PATH_TAG, pathHandler); this.addHandler(SCRIPT_PATH_TAG, bch); } public void startContextElement(String name, Attributes attributes) throws org.xml.sax.SAXException { } protected void notifyEndActiveHandler(String name, UnmarshallerHandler activeHandler) throws org.xml.sax.SAXException { OARGRIDSubProcess oarGridSubProcess = (OARGRIDSubProcess) targetProcess; if (name.equals(OAR_RESOURCE_TAG)) { oarGridSubProcess.setResources((String) activeHandler.getResultObject()); } else if(name.equals(OARGRID_WALLTIME_TAG)){ oarGridSubProcess.setWallTime((String) activeHandler.getResultObject()); } else if (name.equals(SCRIPT_PATH_TAG)) { oarGridSubProcess.setScriptLocation((String) activeHandler.getResultObject()); } else { super.notifyEndActiveHandler(name, activeHandler); } } } }Registering the new XML handler innerclass
The new XML handler innerclass must be registered to handle the parsing of the newprocess tag. This is donde in the constructor:
public ProcessDefinitionHandler(ProActiveDescriptor proActiveDescriptor){...}
FileTransfer protocols can be of two types: external or internal. Examples of external protocols are: scp and rcp. While examples of internal protocols are Unicore and Globus.
Usually external FileTransfer happens before the deployment of the process. On the other hand, internal FileTransfer happens at the same time of the process deployment, because the specific tools provided by the process are used. This implies that internal FileTransfer protocols can not be used with other process (ex: unicore file transfer can not be used when deploying with ssh), but the other way around is valid (ex: scp can be used when deploying with unicore).
Implement the protocol class. This is done inside the package: org.objectweb.proactive.core.process.filetransfer; by extending the abstract class AbstractCopyProtocol.
FileTransferWorkshop: Add the name of the protocol to array ALLOWED_COPY_PROTOCOLS[]
FileTransferWorkshop: Add the object named based creation to factory method: copyProtocolFactory(String name){...}
Note: Choosing the correct name for the protocol is simple, but must be done carefully. All names already in the array ALLOWED_COPY_PROTOCOLS are forbidden. This includes the name 'processDefault', which is also forbidden. In some cases 'processDefault' will correspond to an external FileTransfer protocol (ex: ssh with scp), and in some cases to an internal protocol (ex: unicore with unicore)
Implement the method protected boolean internalFileTransferDefaultProtocol() inside the process class. Note that this method will be called if the processDefault keyword is specified in the XML Descriptor Process Section. Therefore, this method usually must return true, so no other FileTransfer protocols will be tried.
FileTransferWorkshop: Add the name of the protocol to array ALLOWED_COPY_PROTOCOLS[]
Note: When adding an internal FileTransfer protocol, nothing must be modified or added to the copyProtocolFactory(){} method.
This documentation is a quick overview of how to add a new fault-tolerance protocol within
ProActive. A more complete version should be released with the version 3.3. If you wish to get
more informations, please feel free to send a mail to <proactive@objectweb.org>.
Fault-tolerance mechanism in ProActive is mainly based on the org.objectweb.proactive.core.body.ft.protocols.FTManager class. This class contains
several hooks that are called before and after the main actions of an active object, e.g. sending
or receiving a message, serving a request, etc.
For example, with the Pessimistic Message Logging protocol (PML), messages are logged just before the delivery of the message to the active object. Main methods for the FTManager of the PML protocol are then:
/**
* Message must be synchronously logged before being delivered.
* The LatestRcvdIndex table is updated
* @see org.objectweb.proactive.core.body.ft.protocols.FTManager#onDeli\
verReply(org.objectweb.proactive.core.body.reply.Reply)
*/
public int onDeliverReply(Reply reply) {
// if the ao is recovering, message are not logged
if (!this.isRecovering) {
try {
// log the message
this.storage.storeReply(this.ownerID, reply);
// update latestIndex table
this.updateLatestRvdIndexTable(reply);
} catch (RemoteException e) {
e.printStackTrace();
}
}
return 0;
}
/**
* Message must be synchronously logged before being delivered.
* The LatestRcvdIndex table is updated
* @see org.objectweb.proactive.core.body.ft.protocols.FTManager#onRece\
iveRequest(org.objectweb.proactive.core.body.request.Request)
*/
public int onDeliverRequest(Request request) {
// if the ao is recovering, message are not logged
if (!this.isRecovering) {
try {
// log the message
this.storage.storeRequest(this.ownerID, request);
// update latestIndex table
this.updateLatestRvdIndexTable(request);
} catch (RemoteException e) {
e.printStackTrace();
}
}
return 0;
}
The local variable this.storage is remote reference to the checkpoint server. The
FTManager class contains a reference to each fault-tolerance server: fault-detector, checkpoint
storage and localization server. Those reference are initialized during the creation of the
active object.
A FTManager must define also a beforeRestartAfterRecovery() method, which is
called when an active object is recovered. This method usually restore the state of the active
object so as to be consistent with the others active objects of the application.
For example, with the PML protocol, all the messages logged before the failure must be delivered
to the active object. The method beforeRestartAfterRecovery() thus looks like:
/**
* Message logs are contained in the checkpoint info structure.
*/
public int beforeRestartAfterRecovery(CheckpointInfo ci, int inc) {
// recovery mode: received message no longer logged
this.isRecovering = true;
//get messages
List replies = ci.getReplyLog();
List request = ci.getRequestLog();
// add messages in the body context
Iterator itRequest = request.iterator();
BlockingRequestQueue queue = owner.getRequestQueue();
// requests
while (itRequest.hasNext()) {
queue.add((Request) (itRequest.next()));
}
// replies
Iterator itReplies = replies.iterator();
FuturePool fp = owner.getFuturePool();
try {
while (itReplies.hasNext()) {
Reply current = (Reply) (itReplies.next());
fp.receiveFutureValue(current.getSequenceNumber(),
current.getSourceBodyID(), current.getResult(), current\
);
}
} catch (IOException e) {
e.printStackTrace();
}
// normal mode
this.isRecovering = false;
// enable communication
this.owner.acceptCommunication();
try {
// update servers
this.location.updateLocation(ownerID, owner.getRemoteAdapter())\
;
this.recovery.updateState(ownerID, RecoveryProcess.RUNNING);
} catch (RemoteException e) {
logger.error('Unable to connect with location server');
e.printStackTrace();
}
return 0;
}
The parameter ci is a org.objectweb.proactive.core.body.ft.checkpointing.CheckpointInfo. This object
contains all the informations linked to the checkpoint used for recovering the active object, and
is used to restore its state. The programmer might defines his own class implementing CheckpointInfo, to add needed informations, depending on the protocol.
ProActive include a global server that provide fault detection, active object localization,
resource service and checkpoint storage. For developing a new fault-tolerance protocol, the
programmer might specify the behavior of the checkpoint storage by extending the class org.objectweb.proactive.core.body.ft.servers.storage.CheckpointServerImpl. For
example, only for the PML protocol and not for the CIC protocol, the checkpoint server must be
able to log synchronously messages. The other parts of the server can be used directly.
To specify the recovery algorithm, the programmer must extends the org.objectweb.proactive.core.body.ft.servers.recovery.RecoveryProcessImpl. In the
case of the CIC protocol, all the active object of the application must recover after one
failure, while only the faulty process must restart with the PML protocol; this specific behavior
is coded in the recovery process.
ProActive is built on top of a metaobject protocol (MOP) that permits reification of method invocation and constructor call. As this MOP is not limited to the implementation of our transparent remote objects library, it also provides an open framework for implementing powerful libraries for the Java language.
As for any other element of ProActive, this MOP is entirely written in Java and does not require any modification or extension to the Java Virtual Machine, as opposed to other metaobject protocols for Java {Kleinoeder96}. It makes extensive use of the Java Reflection API, thus requiring JDK 1.1 or higher. JDK 1.2 is required in order to suppress default Java language access control checks when executing reified non-public method or constructor calls.
If the programmer wants to implement a new metabehavior using our metaobject protocol, he or she has to write both a concrete (as opposed to abstract) class and an interface. The concrete class provides an implementation for the metabehavior he or she wants to achieve while the interface contains its declarative part.
The concrete class implements interface Proxy and provides an implementation for the given behavior through the method reify:
public Object reify (MethodCall c) throws Throwable;
This method takes a reified call as a parameter and returns the value returned by the execution of this reified call. Automatic wrapping and unwrapping of primitive types is provided. If the execution of the call completes abruptly by throwing an exception, it is propagated to the calling method, just as if the call had not been reified.
The interface that holds the declarative part of the metabehavior
has to be a subinterface of Reflect (the root interface
for all metabehaviors implemented using ProActive). The purpose of this
interface is to declare the name of the proxy class that implements the
given behavior. Then, any instance of a class implementing this interface
will be automatically created with a proxy that implements this behavior,
provided that this instance is not created using the standard
new keyword but through a special static method:
MOP.newInstance. This is the only required modification
to the application code. Another static method,
MOP.newWrapper, adds a proxy to an already-existing
object; the turnActive function of ProActive, for
example, is implemented through this feature.
Here's the implementation of a very simple yet useful metabehavior: for each reified call, the name of the invoked method is printed out on the standard output stream and the call is then executed. This may be a starting point for building debugging or profiling environments.
class EchoProxy extends Object implements Proxy { // here are constructor and variables declaration // [...] public Object reify (MethodCall c) throws Throwable { System.out.println (c.getMethodName()); return c.execute (targetObject); } } interface Echo extends Reflect { public String PROXY_CLASS= 'EchoProxy'; }
Instantiating an object of any class with this metabehavior can be
done in three different ways: instantiation-based, class-based or
object-based. Let's say we want to instantiate a
Vector object with an Echo
behavior.
Standard Java code would be:
Vector v = new Vector(3);ProActive code, with instantiation-based declaration of the metabehavior (the last parameter is
nullbecause we do not have any additional parameter to pass to the proxy):Object[] params = {new Integer (3)}; Vector v = (Vector) MOP.newInstance('Vector', params, 'EchoProxy', null);
with class-based declaration:
public class MyVector extends Vector implements Echo {} Object[] params = {new Integer (3)} ; Vector v = (Vector) MOP.newInstance('Vector', params, null);
with object-based declaration:
Vector v = new Vector (3); v=(Vector) MOP.newWrapper('EchoProxy',v);This is the only way to give a metabehavior to an object that is created in a place where we cannot edit source code. A typical example could be an object returned by a method that is part of an API distributed as a JAR file, without source code. Please note that, when using
newWrapper, the invocation of the constructor of the classVectoris not reified.
All the interfaces used for declaring
metabehaviors inherit directly or indirectly from
Reflect. This leads to a hierarchy of metabehaviors
such as shown in the figure below.
Reflect Interface and sub-interfaces diagram
Note that ImplicitActive inherits from
Active to highlight the fact that implicit
synchronization somewhere always relies on some hidden explicit mechanism.
Interfaces inheriting from Reflect can thus be
logically grouped and assembled using multiple inheritance in order to
build new metabehaviors out of existing ones.
Due to its commitment to be a 100% Java library, the MOP has a few limitations:
Calls sent to instances of final classes (which includes all arrays) cannot be reified.
Primitive types cannot be reified because they are not instance of a standard class.
Final classes (which includes all arrays) cannot be reified because they cannot be subclassed.
Note: This FAQ is under construction.
If one of your question is not answered here, just send it at
<proactive@objectweb.org> and we'll update the FAQ.
- A.1. Running ProActive
- A.2. General Concepts
- A.2.1. How does the node creation happen?
- A.2.2. How does the RMI Registry creation happen?
- A.2.3. What is the class server, why do we need it?
- A.2.4. What is a reifiable object?
- A.2.5. What is the body of an active object? What are its local and remote representations?
- A.2.6. What is a ProActive stub?
- A.2.7. Are the call to an Active Object always asynchronous?
- A.3. Exceptions
- A.3.1. Why do I get an exception java.lang.NoClassDefFoundError about asm?
- A.3.2. Why do I get an exception java.lang.NoClassDefFoundError about bcel?
- A.3.3. Why do I get an exception java.security.AccessControlException access denied?
- A.3.4. Why do I get an exception when using Jini?
- A.3.5. Why do I get a java.rmi.ConnectException: Connection refused to host: 127.0.0.1 ?
- A.4. Writing ProActive-oriented code
- A.4.1. Why aren't my object's properties updated?
- A.4.2. How can I pass a reference on an active object or the difference between this and ProActive.getStubOnThis()?
- A.4.3. How can I create an active object?
- A.4.4. What are the differences between instantiation based and object based active objects creation?
- A.4.5. Why do I have to write a no-args constructor?
- A.4.6. How do I control the activity of an active object?
- A.4.7. What happened to the former live() method and Active interface?
- A.4.8. Why should I avoid to return null in methods body?
- A.4.9. How can I use Jini in ProActive?
- A.4.10. How do I make a Component version out of an Active Object version?
- A.4.11. How can I use Jini in ProActive?
- A.4.12. Why is my call not asynchronous?
- A.5. Deployment Descriptors
- A.5.1. What is the difference between passing parameters in Deployment Descriptor and setting properties in ProActive Configuration file?
- A.5.2. Why do I get the following message when parsing my xml deployment file: ERROR: file:~/ProActive/descriptor.xml Line:2 Message:cvc-elt.1: Cannot find the declaration of element 'ProActiveDescriptor'
A.1. Running ProActive | |
| A.1.1. | How do I build ProActive from the distribution? |
ProActive uses
Ant for its build.
Assuming that the environment variable
If you want only to compile only parts of ProActive,
you should try /home/bob/ProActive/compile/$ build
Buildfile: ./proactive.xml
Main targets:
all Compile All and build the docs
clean Remove all generated files
compile build the class files
core Compile the ProActive core classes
dist Create the distribution binary
docs Construct the javadoc and the manual
examples Compile all the examples
ibis Everything related to ProActive IBIS
ic2d Compile the IC2D Tool
javadoc Use javadoc to build information on the ProActive classes
manual Build all the different manual version: html, pdf...
manualHtml Make only the html files in the manual
manualPdf Make only the pdf files in the manual
rewrite Rewrite classes to enhance performance with ibis
runBench Run benchmarks
runTests Run all non regression tests
runTestsLocal Run all non regression tests on the current host only
Default target: compile | |
| A.1.2. | Why don't the examples and compilation work under Windows? |
It happens quite often, that the default installation directory under Windows is under Program Files which contains space. Then setting the JAVA_HOME environment variable to the install directory, might be a problem for bat files(all windows examples, and compilation are ran with bat files). To get rid of those problems, the best thing is to install jdk in a directory whose name does not contain spaces such as C:\java\j2sdk.... or D:\java\j2sdk... and then to set the JAVA_HOME environment variable accordingly: set JAVA_HOME=C:\java\j2sdk... Another solution is to do a copy paste of the command defined in the bat file in the DOS window. | |
| A.1.3. | Why do I get a Permission denied when trying to launch examples scripts under Linux? |
According to the tool used to unpackage the ProActive distribution, permissions of newly created files can be based on default UMASK permissions. If you get a permission denied, just run the command: chmod 755 *.sh in the ProActive/scripts/unix directory in order to change the permissions. | |
A.2. General Concepts | |
| A.2.1. | How does the node creation happen? |
An active object is always attached to a node. A node
represents a logical entity deployed onto one JVM. When creating a
new active object you have to provide a URL or a reference to a
node. That node has to exist at the moment you create the active
object. It has to be launched on a local or on a remote JVM. In
order to be accessible from any remote JVM, a node automatically
registers itself in the local RMI Registry on the local machine.
Getting a reference to a remote node ends up doing a lookup into a
RMI registry. The class In order to start a node you can use the script
It is nevertheless possible to create an object on a remote node once it is created. On host X you can use startNode to start a new node startNode.sh ///node1 On host Y you can create an active object on host X org.objectweb.proactive.core.node.Node n = org.objectweb.proactive.core.n\
ode.NodeFactory.getNode('//X/node1');
ProActive.turnActive(myObject, n); You do not need to start any rmiregistry manually as they are started automatically as needed. As we support other ways of registration and discovery (such
as Jini), getting a node can be protocol dependant. For instance,
the url of a node When an active object is created locally without specifying a node, it is automatically attached to a default node. The default node is created automatically by ProActive on the local JVM when a first active object is created without a given node. The name of the default node is generated based on a random number. | |
| A.2.2. | How does the RMI Registry creation happen? |
ProActive relies on the RMI Registry for registering and discovering nodes. For this reason, the existence of a RMI Registry is necessary for ProActive to be used. In order to simplify the deployment of ProActive applications, we have included the creation of the RMI Registry with the creation of nodes. Therefore, if no RMI Registry exists on the local machine, ProActive will automatically create one. If one exists, ProActive will automatically use it. | |
| A.2.3. | What is the class server, why do we need it? |
In the RMI model, a class server is a HTTP Server able to
answer simple HTTP requests for getting class files. It is needed in
the case an object being sent to a remote location where the class
the object belongs to is unknown. In such case, if the property
Because ProActive makes use of on-the-fly, in memory, generated classes (the stubs), a class server is necessary for each JVM using active objects. For this reason, ProActive starts automatically one small class server per JVM. The launching and the use of this class server is transparent to you. | |
| A.2.4. | What is a reifiable object? |
An object is said to be reifiable if it meets certain criterias in order to become an Active Object:
| |
| A.2.5. | What is the body of an active object? What are its local and remote representations? |
When created, an active object is associated with a Body that is the entity managing all the non functional properties of the active object. The body contains the request queue receiving all reified method calls to the reified object (the object from which the active object has been created). It is responsible for storing pending requests and serving them according to a given synchronization policy, which default behavior is FIFO. The body of the active object should be the only object able to access directly the reified object. All other objects accessing the active object do so through the stub-proxy couple that eventually sends a request to the body. The body owns its own thread that represent the activity of the active object. The body has two representations. One is local and given by
the interface Body (see code in Body.java). This is the
local view of the body an object can have when being in the same JVM
as the body. For instance, the implementation of the activity of an
object done through the method | |
| A.2.6. | What is a ProActive stub? |
When you create an active object from a regular object, you
get in return a reference on an automatically generated
ProActive stub.
ProActive uses
ASM to generate the stub on
the fly. Suppose you have a class A a = new A();
A activeA = (A) ProActive.turnActive(a);In the code above, the variable The reified object can be indifferently in the same virtual machine as the active reference or in another one. | |
| A.2.7. | Are the call to an Active Object always asynchronous? |
No. Calls to an Active Object methods are asynchronous under some conditions. This is explained in Section 13.8, “Asynchronous calls and futures”. If for instance the return type of a method call is not reifiable, you can use wrappers to keep asynchronism capabilities: suppose that one of your object has a method int getNumber() calling this method with ProActive is sychronous since the 'int'
type is not reifiable. To keep the asynchronism it is advised to
use the classes given in the
IntWrapper getNumber() Then calling this new | |
A.3. Exceptions | |
| A.3.1. | Why do I get an exception java.lang.NoClassDefFoundError about asm? |
ProActive uses ASM for the on the fly
generation of stub classes. The library Exception in thread 'main' java.lang.NoClassDefFoundError: org/objectweb/asm/Constants
at java.lang.ClassLoader.defineClass0(Native Method)
at java.lang.ClassLoader.defineClass(ClassLoader.java:509)
at java.security.SecureClassLoader.defineClass(SecureClassLoader.java:123)
at java.net.URLClassLoader.defineClass(URLClassLoader.java:246)
at java.net.URLClassLoader.access$100(URLClassLoader.java:54)
at java.net.URLClassLoader$1.run(URLClassLoader.java:193)
at java.security.AccessController.doPrivileged(Native Method)
at java.net.URLClassLoader.findClass(URLClassLoader.java:186)
at java.lang.ClassLoader.loadClass(ClassLoader.java:306)
at sun.misc.Launcher$AppClassLoader.loadClass(Launcher.java:265)
at java.lang.ClassLoader.loadClass(ClassLoader.java:262)
at java.lang.ClassLoader.loadClassInternal(ClassLoader.java:322)
at org.objectweb.proactive.core.mop.MOP.<clinit>(MOP.java:88)
at org.objectweb.proactive.ProActive.createStubObject(ProActive.java:836)
at org.objectweb.proactive.ProActive.createStubObject(ProActive.java:830)
at org.objectweb.proactive.ProActive.newActive(ProActive.java:255)
at org.objectweb.proactive.ProActive.newActive(ProActive.java:180)
at org.objectweb.proactive.examples.binarytree.TreeApplet.main(TreeApplet.java:103)The problem can simply be fixed by adding asm | |
| A.3.2. | Why do I get an exception java.lang.NoClassDefFoundError about bcel? |
ProActive uses BCEL for the on the
fly generation of stub classes. The library
Exception in thread 'main' java.lang.NoClassDefFoundError: org/apache/bcel/generic/Type
at org.objectweb.proactive.core.mop.MOPClassLoader.loadClass(MOPClassLoader.java:129)
at org.objectweb.proactive.core.mop.MOPClassLoader.loadClass(MOPClassLoader.java:109)
at org.objectweb.proactive.core.mop.MOP.createStubClass(MOP.java:341)
at org.objectweb.proactive.core.mop.MOP.findStubConstructor(MOP.java:376)
at org.objectweb.proactive.core.mop.MOP.createStubObject(MOP.java:443)
at org.objectweb.proactive.core.mop.MOP.newInstance(MOP.java:165)
at org.objectweb.proactive.core.mop.MOP.newInstance(MOP.java:137)
at org.objectweb.proactive.ProActive.createStubObject(ProActive.java:590)
at org.objectweb.proactive.ProActive.createStubObject(ProActive.java:585)
at org.objectweb.proactive.ProActive.newActive(ProActive.java:170)
at org.objectweb.proactive.ProActive.newActive(ProActive.java:137)
at DiscoveryManager.main(DiscoveryManager.java:226)The problem can simply be fixed by adding
| |
| A.3.3. | Why do I get an exception java.security.AccessControlException access denied? |
If you don't properly set permissions when launching code using ProActive you may get the following exception or a similar one. java.security.AccessControlException: access denied (java.net.SocketPermission 127.0.0.1:1099 connect,resolve)
at java.security.AccessControlContext.checkPermission(AccessControlContext.java:270)
at java.security.AccessController.checkPermission(AccessController.java:401)
at java.lang.SecurityManager.checkPermission(SecurityManager.java:542)
at java.lang.SecurityManager.checkConnect(SecurityManager.java:1044)
at java.net.Socket.connect(Socket.java:419)
at java.net.Socket.connect(Socket.java:375)
at java.net.Socket.<init>(Socket.java:290)
at java.net.Socket.<init>(Socket.java:118)
at sun.rmi.transport.proxy.RMIDirectSocketFactory.createSocket(RMIDirectSocketFactory.java:22)
at sun.rmi.transport.proxy.RMIMasterSocketFactory.createSocket(RMIMasterSocketFactory.java:122)
at sun.rmi.transport.tcp.TCPEndpoint.newSocket(TCPEndpoint.java:562)
at sun.rmi.transport.tcp.TCPChannel.createConnection(TCPChannel.java:185)
at sun.rmi.transport.tcp.TCPChannel.newConnection(TCPChannel.java:171)
at sun.rmi.server.UnicastRef.newCall(UnicastRef.java:313)
at sun.rmi.registry.RegistryImpl_Stub.lookup(Unknown Source)
at org.objectweb.proactive.core.rmi.RegistryHelper.detectRegistry(RegistryHelper.java:101)
at org.objectweb.proactive.core.rmi.RegistryHelper.getOrCreateRegistry(RegistryHelper.java:114)
at org.objectweb.proactive.core.rmi.RegistryHelper.initializeRegistry(RegistryHelper.java:77)
at org.objectweb.proactive.core.node.rmi.RemoteNodeFactory(RemoteNodeFactory.java:56)
at sun.reflect.NativeConstructorAccessorImpl.newInstance0(Native Method)
at sun.reflect.NativeConstructorAccessorImpl.newInstance(NativeConstructorAccessorImpl.java:39)
at sun.reflect.DelegatingConstructorAccessorImpl.newInstance(DelegatingConstructorAccessorImpl.java:27)
at java.lang.reflect.Constructor.newInstance(Constructor.java:274)
at java.lang.Class.newInstance0(Class.java:296)
at java.lang.Class.newInstance(Class.java:249)
at org.objectweb.proactive.core.node.NodeFactory.createNodeFactory(NodeFactory.java:281)
at org.objectweb.proactive.core.node.NodeFactory.createNodeFactory(NodeFactory.java:298)
at org.objectweb.proactive.core.node.NodeFactory.getFactory(NodeFactory.java:308)
at org.objectweb.proactive.core.node.NodeFactory.createNode(NodeFactory.java:179)
at org.objectweb.proactive.core.node.NodeFactory.createNode(NodeFactory.java:158)
...ProActive uses
RMI as its
underlying transport technology. Moreover it uses code downloading
features to automatically move generated stub classes from one JVM
to another one. For those reasons, ProActive needs to install a
See Permissions in the JavaTM 2 SDK to learn more about Java permissions. As a first approximation, in order to run your code, you can create a simple policy file granting all permissions for all code: grant { permission java.security.AllPermission; }; Then you need to start your Java program using the property
java -Djava.security.policy=my.policy.file MyMainClass | |
| A.3.4. | Why do I get an exception when using Jini? |
In order to get Jini working properly in ProActive, you have to put in your HOME directory a copy of proactive.java.policy located in ProActive/scripts/unix or windows. Indeed the rmid deamon needs this file to start. If you try to use Jini without this policy file, it will not work. Moreover, if you did it once, make sure that there is no file called machine_namejiniLockFile in your working directory. This file is usefull to avoid many Service Lookup to be created by concurrent threads. This file is removed automatically when a Lookup Service is created. If the application failed(for instance because of the policy file) it is possible that this file remains in the directory, in that case if you restart the application it will not work. So checkout if this file is present in your working directory, if so remove it and restart the application | |
| A.3.5. | Why do I get a java.rmi.ConnectException: Connection refused to host: 127.0.0.1 ? |
Sometimes, the hosts files ( -Dsun.net.spi.nameservice.provider.1=dns,sun"This tells java not to look at the hosts file, but rather to ask the DNS for network information. | |
A.4. Writing ProActive-oriented code | |
| A.4.1. | Why aren't my object's properties updated? |
Suppose you have a class public class A {
public int a1;
public static void main(String[] args) {
A a = new A();
A activeA = (A) ProActive.turnActive(a);
a.a1 = 2; // set the attribute a1 of the instance pointed by a to 2
activeA.a1 = 2; // !!! set the attribute a1 of the stub instance to 2
}
}When you reference an active object, you always reference it through its associated stub (see Section 13.7, “Advanced: Role of the elements of an active object” for the definition of Stub). The stub class inheriting from the reified class, it has also all its attributes. But those attributes are totally useless as the only role of the generated stub is to reify every public methods call into a request passed to the associated proxy. Therefore accessing directly the attributes of an active object through its active reference would result in accessing the attributes of the generated stub. This is certainly not the behavior one would expect. The solution to this problem is very simple: active object properties should only be accessed through a public method. Otherwise, you're accessing the local Stub's properties. | |
| A.4.2. | How can I pass a reference on an active object or the difference between this and ProActive.getStubOnThis()? |
Suppose you have a class public class A {
public A getRef() {
return this; // !!!! THIS IS WRONG FOR AN ACTIVE OBJECT
}
}There is indeed a problem in the code above. If an instance of
The solution, if you want to pass a link to the active object
from the code of the reified object, is to use the method
public class A {
public A getRef() {
return ProActive.getStubOnThis(); // returns a reference on the stub
}
} | |
| A.4.3. | How can I create an active object? |
To create an active object you invoke one of the methods
Here is a simple example creating an active object of class
public class A {
private int i;
private String s;
public A() {}
public A(int i, String s) {
this.i = i;
this.s = s;
}
}
// instance based creation
A a;
Object[] params = new Object[] { new Integer (26), 'astring' };
try {
a = (A) ProActive.newActive(A.class.getName(), params);
} catch (ActiveObjectCreationException e) {
// creation of ActiveObject failed
e.printStackTrace();
}
// object based creation
A a = new A(26, 'astring');
try {
a = (A) ProActive.turnActive(a);
} catch (ActiveObjectCreationException e) {
// creation of ActiveObject failed
e.printStackTrace();
} | |
| A.4.4. | What are the differences between instantiation based and object based active objects creation? |
In ProActive there are two
ways to create active objects. One way is to use
When using instantiation based creation, any argument passed
to the constructor of the reified object through
When using object based creation, you create the object that
is going to be reified as an active object before hand. Therefore
there is no serialization involved when you create the object. When
you invoke | |
| A.4.5. | Why do I have to write a no-args constructor? |
ProActive automatically creates a stub/skeleton pair for your active objects. When the stub is instancied on the remote node, its constructor ascends the ancestors chain, thus calling its parent constructor [the active object]. So if you place initialization stuff in your no args constructor, it will be executed on the stub, which can lead to disastrous results! | |
| A.4.6. | |
As explained in Section 13.3, “Specifying the activity of an active object”, there are two ways to define the activity of your active object
Implementing the interfaces directly in the class used to create the active object This is the easiest solution when you do control the class
that you make active. Depending on which phase in the life of the
active object you want to customize, you implement the corresponding
interface (one or more) amongst import org.objectweb.proactive.*;
public class A implements InitActive, RunActive {
private String myName;
public String getName() {
return myName;
}
// -- implements InitActive
public void initActivity(Body body) {
myName = body.getName();
}
// -- implements RunActive for serving request in a LIFO fashion
public void runActivity(Body body) {
Service service = new Service(Body);
while (body.isActive()) {
service.blockingServeYoungest();
}
}
public static void main(String[] args) throws Exception {
A a = (A) ProActive.newActive(A.class.getName,null);
System.out.println('Name = '+a.getName());
}
}Passing an object implementing the interfaces when creating the active object This is the solution to use when you do not control the class
that you make active or when you want to write generic activities
policy and reused them with several active objects. Depending on
which phase in the life of the active object you want to customize,
you implement the corresponding interface (one or more) amongst
Compared to the solution above where interfaces are directly implemented in the reified class, there is one restriction here: you cannot access the internal state of the reified object. Using an external object should therefore be used when the implementation of the activity is generic enough not to have to access the member variables of the reified object. import org.objectweb.proactive.*;
public class LIFOActivity implements RunActive {
// -- implements RunActive for serving request in a LIFO fashion
public void runActivity(Body body) {
Service service = new Service(Body);
while (body.isActive()) {
service.blockingServeYoungest();
}
}
}
import org.objectweb.proactive.*;
public class A implements InitActive {
private String myName;
public String getName() {
return myName;
}
// -- implements InitActive
public void initActivity(Body body) {
myName = body.getName();
}
public static void main(String[] args) throws Exception {
// newActive(classname, constructor parameter (null = none),
// node (null = local), active, MetaObjectFactory (null = d\
efault)
A a = (A) ProActive.newActive(A.class.getName(), null, null, new LIFO\
Activity(), null);
System.out.println('Name = '+a.getName());
}
} | |
| A.4.7. | What happened to the former live() method and Active interface? |
The former Up to ProActive 0.9.3 the
activity of an active object was given by a method
In order to convert the code of an active object containing a
method
| |
| A.4.8. | Why should I avoid to return null in methods body? |
On the caller side the test if(result_from_method == null) has no sense. Indeed result_from_method is a couple Stub-FutureProxy as explained above, so even if the method returns null, result_from_method cannot be null: public class MyObject{
public MyObject(){
//empty constructor with no-args
}
public Object getObject{
if(.....) {
return new Object();
}
else {
return null; --> to avoid in ProActive
}
}
}On the caller side: MyObject o = new MyObject();
Object result_from_method = o.getObject();
if(result_from_method == null){
......
}This test is never true, indeed, result_from_method is Stub-->Proxy-->null if the future is not yet available or the method returns null or Stub-->Proxy-->Object if the future is available, but result_from_method is never null. See Documentation on Futures in Section 13.8.3, “Important Notes: Errors to avoid” for more documentation about common errors to avoid. | |
| A.4.9. | How can I use Jini in ProActive? |
In order to use Jini in ProActive you have to configure properly the deployment descriptor. All informations on how to configure XML deployment descriptor are provided in Chapter 21, XML Deployment Descriptors. | |
| A.4.10. | How do I make a Component version out of an Active Object version? |
There is such an example, in the examples/components/c3d directory. The code for c3d is adapted to use components. There are several steps to cover:
| |
| A.4.11. | How can I use Jini in ProActive? |
In order to use Jini in ProActive you have to configure properly the deployment descriptor. All informations on how to configure XML deployment descriptor are provided in Chapter 21, XML Deployment Descriptors. | |
| A.4.12. | Why is my call not asynchronous? |
ProActive allows to have asynchronous code, in the following cases:
More explanations can be found in Section 13.8, “Asynchronous calls and futures”. | |
A.5. Deployment Descriptors | |
| A.5.1. | What is the difference between passing parameters in Deployment Descriptor and setting properties in ProActive Configuration file? |
Parameters defined in Deployment Descriptor should be only jvm related, whereas properties set in the Configuration file are ProActive properties or user-defined properties. They are used with a different approach: parameters given in descriptors are part of the java command that will create other jvms, whereas properties will be loaded once jvms are created | |
| A.5.2. | Why do I get the following message when parsing my xml deployment file: ERROR: file:~/ProActive/descriptor.xml Line:2 Message:cvc-elt.1: Cannot find the declaration of element 'ProActiveDescriptor' |
This message turns up because the Schema cannot be found. Indeed at the beginning of our XML deployment files we put the line <ProActiveDescriptor xmlns:xsi='http://www.w3.org/2001/XMLSchema-instance'
xsi:noNamespaceSchemaLocation='DescriptorSchema.xsd'>which means, the schema named DescriptorSchema.xsd is expected to be found in the current directory to validate the xml. Be sure you have this file in the same dir than your file, or just change the path to point to the correct schema. | |
ProActive is a Java library for parallel, distributed, and concurrent computing, also featuring mobility and security in a uniform framework. ProActive provides a comprehensive API and a graphical interface. The library is based on an Active Object pattern that is a uniform way to encapsulate:
|
|
ProActive is only made of standard Java classes, and requires no changes to the Java Virtual Machine. Overall, it simplifies the programming of applications distributed over Local Area Network (LAN), Clusters, Intranet or Internet GRIDs.
Active Objects (AO): a remote object, with its own thread, receiving calls on its public methods
FIFO activity: an AO, by default, executes the request it receives one after the other, in the order they were received
No-sharing: standard Java objects cannot be referenced from 2 AOs, ensured by deep-copy of constructor params, method params, and results
Asynchronous Communications: method calls towards AOs are asynchronous
Future: the result of a non-void asynchronous method call
Request: the occurrence of a method call towards an AO
Service: the execution by an AO of a request
Reply: after a service, the method result is sent back to the caller
Wait-by-necessity: automatic wait upon the use of a still awaited future
Automatic Continuation: transmission of futures and replies between AO and JVMs
Migration: an AO moving from one JVM to another, computational weak mobility: the AO decides to migrate and stack is lost
Group: a typed group of objects or AOs. Methods are called in parallel on all group members.
Component: made of AOs, a component defines server and client interfaces
Primitive Component: directly made of Java code and AOs
Composite Component: contains other components (primitives or composites)
Parallel Component: a composite that is using groups to multicast calls to inner components
Security: X.509 Authentication, Integrity, and Confidentiality defined at deployment in an XML file on entities such as communications, migration, dynamic code loading.
Virtual Node (VN): an abstraction (a string) representing where to locate AOs at creation
Deployment descriptor: an XML file where a mapping VN --> JVMs --> Machine is specified.
Node: the result of mapping a VN to a set of JVMs. After activation, a VN contains a set of nodes, living in a set of JVMs.
IC2D: Interactive Control and Debugging of Distribution: a Graphical environment for monitoring and steering Grid applications
A a = (A) ProActive.newActive('A', params, node);
// Create an active Object of type A in the JVM specified by Node
a.foo (param);
// A one way typed asynchronous communication towards the (remote) AO a
// A request is sent to a,
v = a.bar (param);
// A typed asynchronous communication with result.
// v is first an awaited Future, to be transparently filled up after
// service of the request, and reply
...
v.gee (param);
// Use of the result of an asynchronous call.
// If v is still an awaited future, it triggers an automatic
// wait: Wait-by-necessity
boolean isAwaited(Object); // Returns True if the object is still an awaited Future void waitFor(Object); // Blocks until the object is no longer awaited // A request is sent to a, void waitForAll(Vector); // Blocks until all the objects in Vector are no longer awaited int waitForAny(Vector); // Blocks until one of the objects in Vector is no longer awaited. // Returns the index of the available future.
When an AO must implement an activity that is not FIFO, the RunActive interface has to be implemented: it specifies the AO behavior in the method named runActivity():
Interface RunActive void runActivity(Body body) // The activity of the active object instance of the current classExample:
public class A implements RunActive { // Implements RunActive for programming a specific behavior // runActivity() is automatically called when such an AO is created public void runActivity(Body body) { Service service = new Service(body); while ( terminate ) { ... // Do some activity on its own ... ... // Do some services, e.g. a FIFO service on method named foo service.serveOldest('foo'); ... } } }Two other interfaces can also be specified:
Interface InitActive void initActivity(Body body) // Initializes the activity of the active object. // not called in case of restart after migration // Called before runActivity() method, and only once: Interface EndActive void endActivity(Body body) // Finalizes the active object after the activity stops by itself. // Called after the execution of runActivity() method, and only once: // not called before a migration
Even when an AO is busy doing its own work, it can remain reactive to external events (method calls). One just has to program non-blocking services to take into account external inputs.
public class BusyButReactive implements RunActive { public void runActivity(Body body) { Service service = new Service(body); while ( ! hasToTerminate ) { ... // Do some activity on its own ... ... // Non blocking service ... service.serveOldest('changeParameters', 'terminate'); ... } } public void changeParameters () { ...... // change computation parameters } public void terminate (){ hasToTerminate=true; } }
It also allows one to specify explicit termination of AOs (there is currently no Distributed Garbage Collector). Of course, the reactivity is up to the length of going around the loop. Similar techniques can be used to start, suspend, restart, and stop AOs.
Non-blocking services: returns immediately if no matching request is pending
void serveOldest(); // Serves the oldest request in the request queue void serveOldest(String methodName) // Serves the oldest request aimed at a method of name methodName void serveOldest(RequestFilter requestFilter) // Serves the oldest request matching the criteria given be the filter
Blocking services: waits until a matching request can be served
void blockingServeOldest(); // Serves the oldest request in the request queue void blockingServeOldest(String methodName) // Serves the oldest request aimed at a method of name methodName void blockingServeOldest(RequestFilter requestFilter) // Serves the oldest request matching the criteria given be the filter
Blocking timed services: wait a matching request at most a time given in ms
void blockingServeOldest (long timeout) // Serves the oldest request in the request queue. // Returns after timeout (in ms) if no request is available void blockingServeOldest(String methodName, long timeout) // Serves the oldest request aimed at a method of name methodName // Returns after timeout (in ms) if no request is available void blockingServeOldest(RequestFilter requestFilter) // Serves the oldest request matching the criteria given be the filter
Waiting primitives:
void waitForRequest(); // Wait until a request is available or until the body terminates void waitForRequest(String methodName); // Wait until a request is available on the given method name, // or until the body terminates
Others:
void fifoServing(); // Start a FIFO service policy. Call does not return. In case of // a migration, a new runActivity() will be started on the new site void lifoServing() // Invoke a LIFO policy. Call does not return. In case of // a migration, a new runActivity() will be started on the new site void serveYoungest() // Serves the youngest request in the request queue void flushAll() // Removes all requests in the pending queue
Object newActive(String classname, Object[] constructorParameters,Node node); // Creates a new AO of type classname. The AO is located on the given node, // or on a default node in the local JVM if the given node is nul Object newActive(String classname,Object[] constructorParameters,VirtualNode virtualnode); // Creates a new set of AO of type classname. // The AO are located on each JVMs the Virtual Node is mapped onto Object turnActive(Object, Node node); // Copy an existing Java object and turns it into an AO. // The AO is located on the given node, or on a default node in
A ga = (A) ProActiveGroup.newGroup( 'A', params, nodes); // Created at once a group of AO of type 'A' in the JVMs specified // by nodes. ga is a Typed Group of type 'A'. // The number of AO being created matches the number of param arrays. // Nodes can be a Virtual Node defined in an XML descriptor */ ga.foo(...); // A general group communication without result. // A request to foo is sent in parallel to AO in group ga */ V gv = ga.bar(...); // A general group communication with a result. // gv is a typed group of 'V', which is first a group // of awaited Futures, to be filled up asynchronously gv.gee (...); // Use of the result of an asynchronous group call. It is also a // collective operation: gee method is called in parallel on each object\ in group. // Wait-by-necessity occurs when results are awaited */ Group ag = ProActiveGroup.getGroup(ga); // Get the group representation of a typed group ag.add(o); // Add object in the group ag. o can be a standard Java object or an AO, // and in any case must be of a compatible type ag.remove(index) // Removes the object at the specified index A ga2 = (A) ag.getGroupByType(); // Returns to the typed view of a group void setScatterGroup(g); // By default, a group used as a parameter of a group communication // is sent to all as it is (deep copy of the group). // When set to scatter, upon a group call (ga.foo(g)) such a scatter // parameter is dispatched in a round robing fashion to AOs in the // target group, e.g. upon ga.foo(g) */ void unsetScatterGroup(g); // Get back to the default: entire group transmission in all group // communications, e.g. upon ga.foo(g) */
Methods both in Interface Group, and static in class ProActiveGroup
boolean ProActiveGroup.allAwaited (Object); // Returns True if object is a group and all members are still awaited boolean ProActiveGroup.allArrived (Object); // Returns False only if at least one member is still awaited void ProActiveGroup.waitAll (Object); // Wait for all the members in group to arrive (all no longer awaited) void ProActiveGroup.waitN (Object, int nb); // Wait for at least nb members in group to arrive int ProActiveGroup.waitOneAndGetIndex (Object); // Waits for at least one member to arrived, and returns its index
A spmdGroup = (A) ProSPMD.newSPMDGroup('A', params, nodes);
// Creates an SPMD group and creates all members with params on the nodes.
// An SPMD group is a typed group in which every member has a reference to
// the others (the SPMD group itself).
A mySpmdGroup = (A) ProSPMD.getSPMDGroup();
// Returns the SPMD group of the activity.
int rank = ProSPMD.getMyRank();
// Returns the rank of the activity in its SPMD group.
ProSPMD.barrier('barrierID');
// Blocks the activity (after the end of the current service) until all
// other members of the SPMD group invoke the same barrier.
// Three barriers are available: total barrier, neighbors based barrier
// and method based barrier.
Methods both in Interface Group, and static in class ProActiveGroup
void migrateTo(Object o); // Migrate the current AO to the same JVM as the AO void void migrateTo(String nodeURL); // Migrate the current AO to JVM given by the node URL int void migrateTo(Node node); // Migrate the current AO to JVM given by the node
To initiate the migration of an object from outside, define a public method, that upon service will call the static migrateTo primitive:
public void moveTo(Object) { try{ ProActive.migrateTo(t); } catch (Exception e) { e.printStackTrace(); logger.info('Cannot migrate.'); } } void onDeparture(String MethodName); // Specification of a method to execute before migration void onArrival(String MethodName); // Specification of a method to execute after migration, upon the // arrival in a new JVM void setMigrationStrategy(MigrationStrategy); // Specifies a migration itinerary void migrationStrategy.add(Destination); // Adds a JVM destination to an itinerary void migrationStrategy.remove(Destination d) ; // Remove a JVM destination in an itinerary
Components are formed from AOs, a component is linked and communicates with other remote components. A component can be composite, made of other components, and as such itself distributed over several machines. Component systems are defined in XML files (ADL: Architecture Description Language); these files describe the definition, the assembly, and the bindings of components.
Components follow the Fractal hierarchical component model specification and API, see http://fractal.objectweb.org
The following methods are specific to ProActive.
In the class org.objectweb.proactive.ProActive:
Component newActiveComponent('A', params, VirtualNode, ComponentParameters);
// Creates a new ProActive component from the specified class A.
// The component is distributed on JVMs specified by the Virtual Node
// The ComponentParameters defines the configuration of a component:
// name of component, interfaces (server and client), etc.
// Returns a reference to a component, as defined in the Fractal API
In the class org.objectweb.proactive.core.component.Fractive:
ProActiveInterface createCollectiveClientInterface(String itfName, String itfSignature); // This method is used in primitive components. // It generates a client collective interface named itfName, and typed as itfSignature. // This collective interface is a typed ProActive group.
An X.509 Public Key Infrastructure (PKI) allowing communication Authentication, Integrity, and Confidentiality (AIC) to be configured in an XML security file, at deployment, outside any source code. Security is compatible with mobility, allows for hierarchical domain specificationand dynamically negotiated policies.
Example of specification:
<Rule> <From> <Entity type='VN' name='VN1'/> </From> <To> <Entity type='VN' name='VN2'/> </To> <Communication> <Request value='authorized'> <Attributes authentication='required' integrity='required' confidentiality='optional'/> </Request> </Communication> <Migration>denied</Migration> <AOCreation>denied</AOCreation> </Rule>
This rule specifies that: from Virual Node 'VN1' to the VN 'VN2', the communications (requests) are authorized, provided authentication and integrity are being used, while confidentiality is optional. Migration and AO creation are not authorized.
Virtual Nodes (VN) allow one to specify the location where to create AOs. A VN is uniquely identified as a String, is defined in an XML Deployment Descriptor where it is mapped onto JVMs. JVMs are themselves mapped onto physical machines: VN --> JVMs --> Machine. Various protocols can be specified to create JVMs onto machines (ssh, Globus, LSF, PBS, rsh, rlogin, Web Services, etc.). After activation, a VN contains a set of nodes, living in a set of JVMs. Overall, VNs and deployment descriptors allow to abstract away from source code: machines, creation, lookup and registry protocols.
Descriptor example: creates one jvm on the local machine
<ProActiveDescriptor xmlns:xsi='http://www.w3.org/2001/XMLSchema-instance' xsi:noNamespaceSchemaLocation='DescriptorSchema.xsd'> <virtualNodesDefinition> <virtualNode name='Dispatcher'/> <!-- Name of the Virtual Node that will be used in program source --> </virtualNodesDefinition> <componentDefinition/> <deployment> <mapping> <!-- This part contains the mapping VNs -- JVMs --> <map virtualNode='Dispatcher'> <jvmSet> <vmName value='Jvm1'/> <!-- Virtual Node Dispatcher is mapped onto Jvm1 --> </jvmSet> </map> </mapping> <jvms> <jvm name='Jvm1'> <!-- This part defines how the jvm will be obtained: creation or acquisition: creation in this example --> <creation> <processReference refid='creationProcess'/> <!-- Jvm1 will be created using creationProcess defined below --> </creation> </jvm> </jvms> </deployment> <infrastructure> <processes> <processDefinition id='creationProcess'> <!-- Definition of creationProcess referenced above --> <jvmProcess class='org.objectweb.proactive.core.process.JVMNodeProcess'/> <!-- creationProcess is a jvmProcess. The jvm will be created on the local machine using default settings (classpath, java path,...) --> </processDefinition> </processes> </infrastructure> <componentDefinition> </ProActiveDescriptor>
Deployment API
ProActiveDescriptor pad = ProActive.getProActiveDescriptor(String File); // Returns a ProActiveDescriptor object from the xml // descriptor file name pad.activateMapping(String VN); // Activates the given Virtual Node: launches or acquires // all the JVMs the VN is mapped onto pad.activateMappings(); // Activates all VNs defined in the ProActiveDescriptor VirtualNode vn = pad.getVirtualNode(String) // Created at once a group of AO of type 'A' in the JVMs specified // by the given vn. The Virtual Node is automatically activated if not // explicitly done before Node[] n = vn.getNodes(); // Returns all nodes mapped to the target Virtual Node Object[] n[0].getActiveObjects(); // Returns a reference to all AOs deployed on the target Node ProActiveRuntime part = n[0].getProActiveRuntime(); // Returns a reference to the ProActive Runtime (the JVM) where the // node has been created pad.killall(boolean softly); // Kills all the JVMs deployed with the descriptor // not softly: all JVMs are killed abruptely // softly: all JVMs that originated the creation of a rmi registry // wait until registry is empty before dying
Functional exceptions with asynchrony
ProActive.tryWithCatch(MyException.class); // Just before the try try { // Some asynchronous calls with exceptions // One can use ProActive.throwArrivedException() and // ProActive.waitForPotentialException() here ProActive.endTryWithCatch(); // At the end of the try } catch (MyException e) { // ... } finally { ProActive.removeTryWithCatch(); // At the beginning of the finally }
Non-Functional Exceptions
Adding a handler to an active object on its side:
ProActive.addNFEListenerOnAO(myAO, new NFEListener() {
    public boolean handleNFE(NonFunctionalException nfe) {

// Do something with the exception...

// Return true if we were able to handle it

    return true;
    }
});
Handlers can also be added to the client side of an active object with
ProActive.addNFEListenerOnProxy(ao, handler)
or to a JVM with
ProActive.addNFEListenerOnJVM(handler)
These handlers can also be removed with
ProActive.removeNFEListenerOnAO(ao, handler), ProActive.removeNFEListenerOnProxy(ao, handler), ProActive.removeNFEListenerOnJVM(handler)
It's possible to define an handler only for some exception types, for example:
ProActive.addNFEListenerOnJVM(new TypedNFEListener( SendRequestCommunicationException.class, new NFEListener() { public boolean handleNFE(NonFunctionalException e) { // Do something with the SendRequestCommunicationException... // Return true if we were able to handle it return true; } } ));
The behaviour of the default handler (if none could handle the exception) is to throw the exception if it's on the proxy side, or log it if it's on the body side.
ProActive allows active objects exportation as web services. The service is deployed onto a Jakarta Tomcat web server with a given url. It is identified by its urn, an unique id of the service. It is also possible to choose the exported methods of the object.
The WSDL file matching the service will be accesible at http://localhost:8080/servlet/wsdl?id=a for a service which name is 'a' and which id deployed on a web server which location is http://localhost:8080.
A a = (A) ProActive.newActive('A', new Object []{});
// Constructs an active object
String [] methods = new String [] {'foo', 'bar'};
//A String array containing the exported methods
ProActive.exposeAsWebService(a,'http://localhost:8080','a',methods);
//Export the active object as a web service
ProActive.unExposeAsWebService('a', 'http://localhost:8080');
//Undeploy the service 'a' on the web server located at http://localhost:8080
ProActive can provide fault-tolerance capabilities through two differents protocols: a Communication-Induced Checkpointing protocol (CIC) or a pessimistic message logging protocol (PML). Making a ProActive application fault-tolerant is fully transparent; active objects are turned fault-tolerant using Java properties that can be set in the deployment descriptor. The programmer can select at deployment time the most adapted protocol regarding the application and the execution environment.
A Fault-tolerant deployment descriptor
<ProActiveDescriptor> ... <virtualNodesDefinition> <virtualNode name='NonFT-Workers' property='multiple'/> <virtualNode name='FT-Workers' property='multiple' ftServiceId='appli'/> </virtualNodesDefinition> ... <serviceDefinition id='appli'> <faultTolerance> <!-- Protocol selection: cic or pml --> <protocol type='cic' /> <!-- URL of the fault-tolerance server --> <globalServer url='rmi://localhost:1100/FTServer'/> <!-- URL of the resource server; all the nodes mapped on this virtual node will be registred in as resource nodes for recovery --> <resourceServer url='rmi://localhost:1100/FTServer'/> <!-- Average time in seconds between two consecutive checkpoints for each object --> <ttc value='5'/> </faultTolerance> </serviceDefinition> </services> ... </ProActiveDescriptor>
Starting the fault-tolerance server
The global fault-tolerance server can be launched using the ProActive/scripts/[unix|windows]/FT/startGlobalFTServer.[sh|bat] script, with 5 optional parameters:
the protocol:
-proto [cic|pml]. Default value is cic.the server name:
-name [serverName]. Default name is FTServer.the port number:
-port [portNumber]. Default port number is 1100.the fault detection period:
-fdperiod [periodInSec], the time between two consecutive fault detection scanning. Default value is 10 sec.the URL of a p2p service that can be used by the resource server:
-p2p [serviceURL]. No default value.
This aims to help you to create a P2P infrastructure over your desktop workstations network. It is self-organized and configurable. The infrastructure maintains a dynamic JVMs network for deploying computational applications.
Deploying the Infrastructure:
Firstly, you have to start P2P Services on each shared machine:
$ cd ProActive/scripts/unix/p2p
$ ./startP2PService [-acq acquisitionMethod] [-port portNumber] [-s Peer ...]
With that parameters (all are optionals):
-acq is the ProActive Runtime communication protocol used by the peer. Examples: rmi, http, ibis,... By default it is rmi.
-port is the port number where the P2P Service listens. By default it is 2410.
-s specify addresses of peers which are used to join the P2P infrastructure. Example: rmi://applepie.proactive.org:8080
A simple example:
first.peer.host$ ./startP2PService.sh
second.peer.host$ ./startP2PService.sh -s //first.peer.host
third.peer.host$ ./startP2PService.sh -s //second.peer.host
Acquiring Nodes:
Now you have a P2P Infrastructure running, you might want to deploy your ProActive application on it. That is simple, just modify the XML deployment descriptor:
... <jvms> <jvm name='Jvm1'> <acquisition> <serviceReference refid='p2plookup'/> </acquisition> </jvm> ... </jvms> ... <infrastructure> ... <services> <serviceDefinition id='p2plookup'> <P2PService nodesAsked='2' acq='rmi' port='6666'> <peerSet> <peer>//second.peer.host</peer> </peerSet> </P2PService> </serviceDefinition> ... </services> ... </infrastructure> ...
In the nodesAsked argument, a special value MAX is allowed. When it is used, the P2P infrastructure returns the maximun number of nodes avilable, and continue while the application running to return new nodes to the application. To use all the benefit of that feature, you might add a nodes creation event listener to your application.
Usage Example:
// getting the p2p virtual node VirtualNode vn = pad.getVirtualNode('p2pvn'); // adding 'this' as a listener ((VirtualNodeImpl) vn).addNodeCreationEventListener(this); // then activate the virtual node vn.activate();
'this' has to implement the NodeCreationEventListener interface:
public void nodeCreated(NodeCreationEvent event) { // get the node Node newNode = event.getNode(); // now you can create an active object on your node. }
Firstly, create your own task:
import org.objectweb.proactive.branchnbound.core.Task; public class YourTask extends Task { public Result execute() { // Your code here for computing a solution } public Vector split() { // Your code for generating sub-tasks } public Result gather(Result[] results) { // Override optional // Default behavior based on the smallest gave by the compareTo } public void initLowerBound() { // Your code here for computing a lower bound } public void initUpperBound() { // Your code here for computing a lower bound } public int compareTo(Object arg) { // Strongly recommended to override this method // with your behavior } }
How to interact with the framework from inside a task:
Some class variables:
protected Result initLowerBound; // to store your lower bound protected Result initUpperBound; // to store you upper bound protected Object bestKnownSolution; // set by the framework with the best current solution protected Worker worker; // to interact with the framework (see below)
Interact with the framework (inside a Task):
this.worker.setBestCurrentResult(newBestSolution); // the worker will broadcast the solution in all Tasks this.worker.sendSubTasksToTheManager(subTaskList); // send a set of sub-tasks for computation to the framework BooleanWrapper workersAvailable = this.worker.isHungry(); // for a smart split, check for free workers
Secondly, choose your task queue:
BasicQueueImpl: execute task in FIFO order.
LargerQueueIml: execute task in larger order.
Extend TaskQueue: your own one.
Finally, start the compution:
Task task = new YourTask(someArguments); Manager manager = ProActiveBranchNBound.newBnB(task, nodes, LargerQueueImpl.class.getName()); Result futureResult = manager.start(); // this call is asynchronous ...
Keep in mind that is only 'initLower/UpperBound' and 'split' methods are called on the root task. The 'execute' method is called on the root task's splitted task. Here the methods order execution:
rootTask.initLowerBound(); // compute a first lower bound
rootTask.initUpperBound(); // compute a first upper bound
Task splitted = rootTask.split(); // generate a set of tasks
for i in splitted do in parallel
splitted[i].initLowerBound(); splitted[i].initUpperBound(); Result ri = splitted.execute();
Result final = rootTask.gather(Result[] ri); // gathering all result
File Transfer Deployment is a tool for transfering files at deployment time. This files are specified using the ProActive XML Deployment Descriptor in the following way:
<VirtualNode name='exampleVNode' FileTransferDeploy='example'/> .... </deployment> <FileTransferDefinitions> <FileTransfer id='example'> <file src='hello.dat' dest='world.dat'/> <dir src='exampledir' dest='exampledir'/> </FileTransfer> ... </FileTransferDefinitions> <infrastructure> .... <processDefinition id='xyz'> <sshProcess>... <FileTransferDeploy='implicit'> <!-- referenceID or keyword 'implicit' (inherit)--> <copyProtocol>processDefault, scp, rcp</copyProtocol> <sourceInfo prefix='/home/user'/> <destinationInfo prefix='/tmp' hostname='foo.org' username='smith' /> </FileTransferDeploy> </sshProcess> </processDefinition> ...
Example C.1. examples/RSH_Example.xml
Example C.2. examples/SSH_Example.xml
Example C.3. examples/SSHList_example.xml
Example C.4. examples/SSHListbyHost_Example.xml
Example C.5. examples/SSH_LSF_Example.xml
Example C.6. examples/SSH_PBS_Example.xml
Example C.7. examples/SSH_SGE_Example.xml
Example C.8. examples/SSH_OAR_Example.xml
Example C.9. examples/SSH_OARGRID_Example.xml
Example C.10. examples/SSH_PRUN_Example.xml
Example C.11. examples/Globus_Example.xml
Example C.12. examples/Unicore_Example.xml
Example C.13. examples/NorduGrid_Example.xml
Example C.14. examples/SSH_GLite_Example.xml
Example C.15. examples/SSH_MPI_Example.xml
Example C.16. InitActive.java
Example C.17. RunActive.java
Example C.18. EndActive.java
Example C.19. core/body/MetaObjectFactory.java
Example C.20. core/body/ProActiveMetaObjectFactory.java
Example C.21. ProActive.java
Example C.22. core/process/ssh/SSHProcessList.java
Example C.23. core/process/rsh/RSHProcessList.java
Example C.24. core/process/rlogin/RLoginProcessList.java
Example C.25. core/descriptor/data/ProActiveDescriptor.java
Example C.26. Body.java
Example C.27. core/body/UniversalBody.java
The following files illustrate the tutorial. They are the results of the addition of
migration capabilities
init and end activities
import org.objectweb.proactive.Body;
import org.objectweb.proactive.EndActive;
import org.objectweb.proactive.InitActive;
import org.objectweb.proactive.ProActive;
public class InitializedHello extends Hello implements InitActive, EndActive {
/** Constructor for InitializedHello. */
public InitializedHello() {
}
/** Constructor for InitializedHello.
* @param name */
public InitializedHello(String name) {
super(name);
}
/** @see org.objectweb.proactive.InitActive#initActivity(Body)
* This is the place where to make initialization before the object
* starts its activity */
public void initActivity(Body body) {
System.out.println("I am about to start my activity");
}
/** @see org.objectweb.proactive.EndActive#endActivity(Body)
* This is the place where to clean up or terminate things after the
* object has finished its activity */
public void endActivity(Body body) {
System.out.println("I have finished my activity");
}
/** This method will end the activity of the active object */
public void terminate() {
// the termination of the activity is done through a call on the
// terminate method of the body associated to the current active object
ProActive.getBodyOnThis().terminate();
}
public static void main(String[] args) {
// Registers it with an URL
try {
// Creates an active instance of class HelloServer on the local node
InitializedHello hello = (InitializedHello)
org.objectweb.proactive.ProActive.newActive(InitializedHello.class.getName(),
new Object[] { "remote" });
java.net.InetAddress localhost = java.net.InetAddress.getLocalHost();
org.objectweb.proactive.ProActive.register(hello,
"//" + localhost.getHostName() + "/Hello");
} catch (Exception e) {
System.err.println("Error: " + e.getMessage());
e.printStackTrace();
}
}
}
Example C.28. InitializedHello.java
public class InitializedHelloClient {
public static void main(String[] args) {
InitializedHello myServer;
String message;
try {
// checks for the server's URL
if (args.length == 0) {
// There is no url to the server, so create an active server within this VM
myServer = (InitializedHello) org.objectweb.proactive.ProActive.newActive(
InitializedHello.class.getName(),
new Object[] { "local" });
} else {
// Lookups the server object
System.out.println("Using server located on " + args[0]);
myServer = (InitializedHello) org.objectweb.proactive.ProActive.lookupActive(
InitializedHello.class.getName(),
args[0]);
}
// Invokes a remote method on this object to get the message
message = myServer.sayHello();
// Prints out the message
System.out.println("The message is : " + message);
myServer.terminate();
} catch (Exception e) {
System.err.println("Could not reach/create server object");
e.printStackTrace();
System.exit(1);
}
}
}
Example C.29. InitializedHelloClient.java
import org.objectweb.proactive.ActiveObjectCreationException;
import org.objectweb.proactive.ProActive;
import org.objectweb.proactive.core.body.migration.MigrationException;
import org.objectweb.proactive.core.node.NodeException;
import java.io.Serializable;
// the object that will be migrated active has to be Serializable
public class MigratableHello extends InitializedHello implements Serializable {
/** Creates a new MigratableHello object. */
public MigratableHello() {
}
/** Creates a new MigratableHello object.
* @param name the name of the agent */
// ProActive requires the active object to explicitely define (or redefine)
// the constructors, so that they can be reified
public MigratableHello(String name) {
super(name);
}
/** Factory for local creation of the active object
* @param name the name of the agent
* @return an instance of a ProActive active object of type MigratableHello */
public static MigratableHello createMigratableHello(String name) {
try {
return (MigratableHello) ProActive.newActive(MigratableHello.class.getName(),
new Object[] { name });
} catch (ActiveObjectCreationException aoce) {
System.out.println("creation of the active object failed");
aoce.printStackTrace();
return null;
} catch (NodeException ne) {
System.out.println("creation of default node failed");
ne.printStackTrace();
return null;
}
}
/** method for migrating
* @param destination_node destination node */
public void moveTo(String destination_node) {
System.out.println("\n-----------------------------");
System.out.println("starting migration to node : " + destination_node);
System.out.println("...");
try {
// THIS MUST BE THE LAST CALL OF THE METHOD
ProActive.migrateTo(destination_node);
} catch (MigrationException me) {
System.out.println("migration failed : " + me.toString());
}
}
}
Example C.30. MigratableHello.java
public class MigratableHelloClient {
/** entry point for the program
* @param args destination nodes
* for example :
* rmi://localhost/node1 jini://localhost/node2*/
public static void main(String[] args) { // instanciation-based creation of the active object
MigratableHello migratable_hello = MigratableHello.createMigratableHello("agent1");
// check if the migratable_hello has been created
if (migratable_hello != null) {
// say hello
System.out.println(migratable_hello.sayHello());
// start moving the object around
for (int i = 0; i < args.length; i++) {
migratable_hello.moveTo(args[i]);
System.out.println("received message : " +
migratable_hello.sayHello());
}
// possibly terminate the activity of the active object ...
migratable_hello.terminate();
} else {
System.out.println("creation of the active object failed");
}
}
}
Example C.31. MigratableHelloClient.java
package org.objectweb.proactive.examples.hello;
import org.objectweb.proactive.ActiveObjectCreationException;
import org.objectweb.proactive.Body;
import org.objectweb.proactive.ProActive;
import org.objectweb.proactive.core.body.migration.Migratable;
import org.objectweb.proactive.core.node.NodeException;
import org.objectweb.proactive.ext.migration.MigrationStrategyManager;
import org.objectweb.proactive.ext.migration.MigrationStrategyManagerImpl;
/** This class allows the "migration" of a graphical interface. A gui object is attached
* to the current class, and the gui is removed before migration, thanks to the use
* of a MigrationStrategyManager */
public class HelloFrameController extends MigratableHello {
HelloFrame helloFrame;
MigrationStrategyManager migrationStrategyManager;
/**required empty constructor */
public HelloFrameController() {
}
/**constructor */
public HelloFrameController(String name) {
super(name);
}
/** This method attaches a migration strategy manager to the current active object.
* The migration strategy manager will help to define which actions to take before
* and after migrating */
public void initActivity(Body body) {
// add a migration strategy manager on the current active object
migrationStrategyManager = new MigrationStrategyManagerImpl((Migratable)
ProActive.getBodyOnThis());
// specify what to do when the active object is about to migrate
// the specified method is then invoked by reflection
migrationStrategyManager.onDeparture("clean");
}
/** Factory for local creation of the active object
* @param name the name of the agent
* @return an instance of a ProActive active object of type HelloFrameController */
public static HelloFrameController createHelloFrameController(String name) {
try {
// creates (and initialize) the active object
HelloFrameController obj = (HelloFrameController) ProActive.newActive(
HelloFrameController.class.getName(),
new Object[] { name });
return obj;
} catch (ActiveObjectCreationException aoce) {
System.out.println("creation of the active object failed");
aoce.printStackTrace();
return null;
} catch (NodeException ne) {
System.out.println("creation of default node failed");
ne.printStackTrace();
return null;
}
}
public String sayHello() {
if (helloFrame == null) {
helloFrame = new HelloFrame("Hello from " +
ProActive.getBodyOnThis().getNodeURL());
helloFrame.show();
}
return "Hello from " + ProActive.getBodyOnThis().getNodeURL();
}
public void clean() {
System.out.println("killing frame");
helloFrame.dispose();
helloFrame = null;
System.out.println("frame is killed");
}
}
Example C.32. HelloFrameController.java
package org.objectweb.proactive.examples.hello;
/** This class allows the creation of a graphical window
* with a text field */
public class HelloFrame extends javax.swing.JFrame {
private javax.swing.JLabel jLabel1;
/** Creates new form HelloFrame */
public HelloFrame(String text) {
initComponents();
setText(text);
}
/** This method is called from within the constructor to
* initialize the form.
* It will perform the initialization of the frame */
private void initComponents() {
jLabel1 = new javax.swing.JLabel();
addWindowListener(new java.awt.event.WindowAdapter() {
public void windowClosing(java.awt.event.WindowEvent evt) {
exitForm(evt);
}
});
jLabel1.setHorizontalAlignment(javax.swing.SwingConstants.CENTER);
getContentPane().add(jLabel1, java.awt.BorderLayout.CENTER);
}
/** Kill the frame */
private void exitForm(java.awt.event.WindowEvent evt) {
// System.exit(0); would kill the VM !
dispose(); // this way, the active object agentFrameController stays alive
}
/** Sets the text of the label inside the frame */
private void setText(String text) {
jLabel1.setText(text);
}
}
Example C.33. HelloFrame.java
<?xml version="1.0" encoding="UTF-8"?>
<xs:schema xmlns:xs="http://www.w3.org/2001/XMLSchema"
elementFormDefault="qualified" attributeFormDefault="unqualified">
<xs:element name="configFile">
<xs:complexType>
<xs:sequence>
<xs:element name="p2pconfig" type="p2pconfig"
maxOccurs="unbounded"/>
</xs:sequence>
</xs:complexType>
</xs:element>
<xs:complexType name="p2pconfig">
<xs:sequence>
<xs:element name="loadconfig" type="file" minOccurs="0"
maxOccurs="unbounded"/>
<xs:element name="host" type="host" minOccurs="0"
maxOccurs="unbounded"/>
<xs:element name="configForHost" type="config" minOccurs="0"
maxOccurs="1"/>
<xs:element name="default" type="config" minOccurs="0"
maxOccurs="1"/>
</xs:sequence>
</xs:complexType>
<xs:complexType name="file">
<xs:attribute name="path" type="xs:string" use="required"/>
</xs:complexType>
<xs:complexType name="host">
<xs:attribute name="name" type="xs:string" use="required"/>
</xs:complexType>
<xs:complexType name="config">
<xs:sequence>
<xs:element name="periods" type="periods"/>
<xs:element name="register" type="register" minOccurs="0"/>
</xs:sequence>
</xs:complexType>
<xs:complexType name="periods">
<xs:sequence>
<xs:element name="period" type="period" minOccurs="0"
maxOccurs="unbounded"/>
</xs:sequence>
</xs:complexType>
<xs:complexType name="period">
<xs:sequence>
<xs:element name="start" type="moment"/>
<xs:element name="end" type="moment"/>
</xs:sequence>
</xs:complexType>
<xs:complexType name="moment">
<xs:attribute name="day" type="day" use="required"/>
<xs:attribute name="hour" type="hour" use="required"/>
<xs:attribute name="minute" type="minute" use="required"/>
</xs:complexType>
<xs:simpleType name="day">
<xs:restriction base="xs:string">
<xs:enumeration value="monday"/>
<xs:enumeration value="tuesday"/>
<xs:enumeration value="wednesday"/>
<xs:enumeration value="thursday"/>
<xs:enumeration value="friday"/>
<xs:enumeration value="saturday"/>
<xs:enumeration value="sunday"/>
</xs:restriction>
</xs:simpleType>
<xs:simpleType name="hour">
<xs:restriction base="xs:integer">
<xs:minInclusive value="0"/>
<xs:maxInclusive value="23"/>
</xs:restriction>
</xs:simpleType>
<xs:simpleType name="minute">
<xs:restriction base="xs:integer">
<xs:minInclusive value="0"/>
<xs:maxInclusive value="59"/>
</xs:restriction>
</xs:simpleType>
<xs:complexType name="register">
<xs:sequence>
<xs:element name="registry" type="registry" minOccurs="0"
maxOccurs="unbounded"/>
</xs:sequence>
</xs:complexType>
<xs:complexType name="registry">
<xs:attribute type="xs:string" use="required" name="url"/>
</xs:complexType>
</xs:schema>
Example C.34. P2P configuration: proactivep2p.xsd
<?xml version="1.0" encoding="UTF-8"?>
<ProActiveDescriptor xmlns:xsi="http://www.w3.org/2001/XMLSchema-instance"
xsi:noNamespaceSchemaLocation="http://www-sop.inria.fr/oasis/proactive/schema/3.2/DescriptorSchema.
xsd">
<componentDefinition>
<virtualNodesDefinition>
<virtualNode name="p2pvn" property="multiple" />
</virtualNodesDefinition>
</componentDefinition>
<deployment>
<mapping>
<map virtualNode="p2pvn">
<jvmSet>
<vmName value="Jvm1"/>
<vmName value="Jvm2"/>
</jvmSet>
</map>
</mapping>
<jvms>
<jvm name="Jvm1">
<acquisition>
<serviceReference refid="p2plookup"/>
</acquisition>
</jvm>
<jvm name="Jvm2">
<creation>
<processReference refid="localJVM"></processReference>
</creation>
</jvm>
</jvms>
</deployment>
<infrastructure>
<processes>
<processDefinition id="localJVM">
<jvmProcess class="org.objectweb.proactive.core.process.JVMNodeProcess">
</jvmProcess>
</processDefinition>
</processes>
<services>
<serviceDefinition id="p2plookup">
<P2PService nodesAsked="2" acq="rmi" port="2410" NOA="10" TTU="60000" TTL="10">
<peerSet>
<peer>rmi://localhost:3000</peer>
</peerSet>
</P2PService>
</serviceDefinition>
</services>
</infrastructure>
</ProActiveDescriptor>
Example C.35. P2P configuration: sample_p2p.xml
<?xml version="1.0" encoding="ISO-8859-1"?>
<!DOCTYPE web-app
PUBLIC "-//Sun Microsystems, Inc.//DTD Web Application 2.2//EN"
"http://java.sun.com/j2ee/dtds/web-app_2_2.dtd">
<web-app>
<display-name>Apache-SOAP</display-name>
<description>no description</description>
<servlet>
<servlet-name>rpcrouter</servlet-name>
<display-name>Apache-SOAP RPC Router</display-name>
<description>no description</description>
<servlet-class>org.apache.soap.server.http.RPCRouterServlet</servlet-class>
<init-param>
<param-name>faultListener</param-name>
<param-value>org.apache.soap.server.DOMFaultListener</param-value>
</init-param>
</servlet>
<servlet>
<servlet-name>messagerouter</servlet-name>
<display-name>Apache-SOAP Message Router</display-name>
<servlet-class>org.apache.soap.server.http.MessageRouterServlet</servlet-class>
<init-param>
<param-name>faultListener</param-name>
<param-value>org.apache.soap.server.DOMFaultListener</param-value>
</init-param>
</servlet>
<servlet>
<servlet-name>wsdlServlet</servlet-name>
<display-name>ProActive WSDL Servlet</display-name>
<servlet-class>org.objectweb.proactive.ext.webservices.soap.WsdlServlet</servlet-class>
<init-param>
<param-name>faultListener</param-name>
<param-value>org.apache.soap.server.DOMFaultListener</param-value>
</init-param>
</servlet>
<servlet-mapping>
<servlet-name>rpcrouter</servlet-name>
<url-pattern>/servlet/rpcrouter</url-pattern>
</servlet-mapping>
<servlet-mapping>
<servlet-name>messagerouter</servlet-name>
<url-pattern>/servlet/messagerouter</url-pattern>
</servlet-mapping>
<servlet-mapping>
<servlet-name>wsdlServlet</servlet-name>
<url-pattern>/servlet/wsdl</url-pattern>
</servlet-mapping>
</web-app>
Example C.36. SOAP configuration: webservices/web.xml
<?xml version="1.0" encoding="UTF-8"?>
<ProActiveDescriptor xmlns:xsi="http://www.w3.org/2001/XMLSchema-instance"
xsi:noNamespaceSchemaLocation=
"http://www-sop.inria.fr/oasis/proactive/schema/3.2/DescriptorSchema.xsd">
<variables>
<DescriptorVariable name="PROACTIVE_HOME" value="ProActive"/>
<DescriptorVariable name="REMOTE_HOME" value="/home/smariani"/>
<DescriptorVariable name="HOSTS_NUMBER" value="3"/>
<DescriptorVariable name="MPIRUN_PATH" value="/usr/src/redhat/BUILD/mpich-1.2.6/bin/mpirun"
/>
<DescriptorVariable name="QSUB_PATH" value="/opt/torque/bin/qsub"/>
<JavaPropertyVariable name="USER_HOME" value="java.home"/>
</variables>
<componentDefinition>
<virtualNodesDefinition>
<virtualNode name="JACOBIVN" />
</virtualNodesDefinition>
</componentDefinition>
<deployment>
<mapping>
<map virtualNode="JACOBIVN">
<jvmSet>
<vmName value="Jvm1" />
</jvmSet>
</map>
</mapping>
<jvms>
<jvm name="Jvm1">
<creation>
<processReference refid="sshProcess" />
</creation>
</jvm>
</jvms>
</deployment>
<FileTransferDefinitions>
<FileTransfer id="transfer">
<!-- Transfer mpi program on remote host -->
<file src="jacobi" dest="jacobi" />
</FileTransfer>
</FileTransferDefinitions>
<infrastructure>
<processes>
<processDefinition id="localJVM1">
<jvmProcess class="org.objectweb.proactive.core.process.JVMNodeProcess">
<classpath>
<absolutePath value="${REMOTE_HOME}/${PROACTIVE_HOME}/lib/ProActive.jar" />
<absolutePath value="${REMOTE_HOME}/${PROACTIVE_HOME}/lib/asm.jar" />
<absolutePath value="${REMOTE_HOME}/${PROACTIVE_HOME}/lib/log4j.jar" />
<absolutePath value="${REMOTE_HOME}/${PROACTIVE_HOME}/lib/components/fractal.jar" />
<absolutePath value="${REMOTE_HOME}/${PROACTIVE_HOME}/lib/xercesImpl.jar" />
<absolutePath value="${REMOTE_HOME}/${PROACTIVE_HOME}/lib/bouncycastle.jar" />
<absolutePath value="${REMOTE_HOME}/${PROACTIVE_HOME}/lib/jsch.jar" />
<absolutePath value="${REMOTE_HOME}/${PROACTIVE_HOME}/lib/javassist.jar" />
<absolutePath value="${REMOTE_HOME}/${PROACTIVE_HOME}/classes" />
</classpath>
<javaPath>
<absolutePath value="${REMOTE_HOME}/jdk1.5.0_05/bin/java" />
</javaPath>
<policyFile>
<absolutePath value="${REMOTE_HOME}/proactive.java.policy" />
</policyFile>
<log4jpropertiesFile>
<absolutePath value="${REMOTE_HOME}/${PROACTIVE_HOME}/compile/proactive-log4j" />
</log4jpropertiesFile>
<jvmParameters>
<parameter value="-Dproactive.useIPaddress=true" />
<parameter value="-Dproactive.rmi.port=6099" />
</jvmParameters>
</jvmProcess>
</processDefinition>
<!-- remote jvm Process -->
<processDefinition id="jvmProcess">
<jvmProcess class="org.objectweb.proactive.core.process.JVMNodeProcess">
<jvmParameters>
<parameter value="-Dproactive.useIPaddress=true" />
<parameter value="-Dproactive.rmi.port=6099" />
</jvmParameters>
</jvmProcess>
</processDefinition>
<!-- pbs Process -->
<processDefinition id="pbsProcess">
<pbsProcess class="org.objectweb.proactive.core.process.pbs.PBSSubProcess">
<processReference refid="localJVM1" />
<commandPath value=${QSUB_PATH} />
<pbsOption>
<hostsNumber>${HOSTS_NUMBER}</hostsNumber>
<processorPerNode>1</processorPerNode>
<bookingDuration>00:02:00</bookingDuration>
<scriptPath>
<absolutePath value="${REMOTE_HOME}/pbsStartRuntime.sh" />
</scriptPath>
</pbsOption>
</pbsProcess>
</processDefinition>
<!-- mpi Process -->
<processDefinition id="mpiJACOBI">
<mpiProcess class="org.objectweb.proactive.core.process.mpi.MPIDependentProcess"
mpiFileName="jacobi">
<commandPath value=${MPIRUN_PATH} />
<mpiOptions>
<processNumber>${HOSTS_NUMBER}</processNumber>
<localRelativePath>
<relativePath origin="user.home" value="${PROACTIVE_HOME}/scripts/unix" />
</localRelativePath>
<remoteAbsolutePath>
<absolutePath value="${REMOTE_HOME}/MyApp" />
</remoteAbsolutePath>
</mpiOptions>
</mpiProcess>
</processDefinition>
<!-- dependent process -->
<processDefinition id="dpsJACOBI">
<dependentProcessSequence class=
"org.objectweb.proactive.core.process.DependentListProcess">
<processReference refid="pbsProcess" />
<processReference refid="mpiJACOBI" />
</dependentProcessSequence>
</processDefinition>
<!-- ssh process -->
<processDefinition id="sshProcess">
<sshProcess class="org.objectweb.proactive.core.process.ssh.SSHProcess" hostname=
"nef.inria.fr" username="smariani">
<processReference refid="dpsJACOBI" />
<FileTransferDeploy refid="transfer">
<copyProtocol>scp</copyProtocol>
<!-- local host path -->
<sourceInfo prefix=
"${USER_HOME}/${PROACTIVE_HOME}/src/org/objectweb/proactive/examples/mpi" />
<!-- remote host path -->
<destinationInfo prefix="${REMOTE_HOME}/MyApp" />
</FileTransferDeploy>
</sshProcess>
</processDefinition>
</processes>
</infrastructure>
</ProActiveDescriptor>
Example C.37. MPI Wrapping: mpi_files/MPIRemote-descriptor.xml
[ACC05] Deployment-based security for grid applications. The International Conference on Computational Science (ICCS 2005), Atlanta, USA, May 22-25. . LNCS. 2005. Springer Verlag.
[BBC02] Efficient, Flexible, and Typed Group Communications in Java. 28--36. Joint ACM Java Grande - ISCOPE 2002 Conference. Seattle. . 2002. ACM Press. ISBN 1-58113-559-8.
[BBC05] Object-Oriented SPMD. Proceedings of Cluster Computing and Grid. Cardiff, United Kingdom. . May 2005.
[BCDH05] A hybrid message logging-cic protocol for constrained checkpointability. 644--653. Proceedings of EuroPar2005. Lisbon, Portugal. . LNCS. August-September 2005. Springer Verlag.
[BCHV00] Communicating mobile active objects in java. 633--643. http://www-sop.inria.fr/oasis/Julien.Vayssiere/publications/18230633.pdf. Proceedings of HPCN Europe 2000. . LNCS 1823. May 2000. Springer Verlag.
[BCM+02] Interactive and descriptor-based deployment of object-oriented grid applications. 93--102. http://www-sop.inria.fr/oasis/Julien.Vayssiere/publications/hpdc2002vayssiere.pdf. Proceedings of the 11th IEEE International Symposium on High Performance Distributed Computing. Edinburgh, Scotland. . July 2002. IEEE Computer Society.
[BCM03] From distributed objects to hierarchical grid components. http://www-sop.inria.fr/oasis/ProActive/doc/HierarchicalGridComponents.pdf. International Symposium on Distributed Objects and Applications (DOA), Catania, Sicily, Italy, 3-7 November. Springer Verlag. . 2003. Lecture Notes in Computer Science, LNCS. ISBN ??.
[Car93] Toward a method of object-oriented concurrent programming. 90--102. citeseer.nj.nec.com/300829.html. Communications of the ACM. 9. 1993.
[CHS04] Asynchronous and deterministic objects. 123--134. http://doi.acm.org/10.1145/964001.964012. Proceedings of the 31st ACM Symposium on Principles of Programming Languages. . 2004. ACM Press.
[CKV98a] Towards seamless computing and metacomputing in java. 1043--1061. http://www-sop.inria.fr/oasis/proactive/doc/javallCPE.ps. Concurrency Practice and Experience. . Geoffrey C. Fox. September-November 1998. Wiley and Sons, Ltd..
[HCB04] A High Performance Java Middleware with a Real Application. http://www-sop.inria.fr/oasis/proactive/doc/sc2004.pdf. Proceedings of the Supercomputing conference. Pittsburgh, Pensylvania, USA. . November 2004.
[BCDH04] A fault tolerance protocol for asp calculus : Design and proof. http://www-sop.inria.fr/oasis/personnel/Christian.Delbe/publis/rr5246.pdf. Technical ReportRR-5246. INRIA. 2004.
[FKTT98] A security architecture for computational grids. 83--92. citeseer.ist.psu.edu/foster98security.html. ACM Conference on Computer and Communications Security. . 1998.
[CDD06c] Peer-to-Peer and Fault-Tolerance: Towards Deployment Based Technical Services . Second CoreGRID Workshop on Grid and Peer to Peer Systems Architecture . Paris, France. . January 2006.
[CCDMCompFrame06] Dynamically-Fulfilled Application Constraints through Technical Services - Towards Flexible Component Deployments . Proceedings of HPC-GECO/CompFrame 2006, HPC Grid programming Environments and COmponents - Component and Framework Technology in High-Performance and Scientific Computing . Paris, France. . June 2006. IEEE.
A
- Acquaintance
- definition, Bootstrapping: First Contact
- List of, Discovering and Self-Organizing in Continue
- Acquisition
- JVM, Acquisition
- VirtualNode, VirtualNodes Acquisition
- Active Object, Principles
- definition, Main concepts and definitions
- Activity
- definition, Main concepts and definitions
- FIFO, Specifying the activity of an active object
- ADL, Components
- definition, Architecture Description Language
- example, The HelloWorld ADL files
- asynchronous method calls, Principles
- Automatic Continuation, Automatic Continuation in ProActive, Illustration of an Automatic Continuation
- definition, Main concepts and definitions
- proactive.future.ac, Required
B
- Barriers
- definition, Barrier: Introduction
- Binding
- adl, Overview
- Collective, Collective interactions
- controller, From attributes to client interfaces
- Body, Advanced: Customizing the Body of an Active Object
- Bundles
C
- CLASSPATH
- configuration, To develop with ProActive
- deployment descriptor, Local JVMs
- missing, Frequently Asked Questions
- to run ProActive, CLASSPATH to set when writing application using ProActive
- Cluster, Remote JVMs
- Component, Components introduction
- definition, Main concepts and definitions
- Constructor
- empty no-args, Instantiation-Based Creation
- newActive Arguments, Possible ambiguities on the constructor
- CopyProtocol, XML Descriptor File Transfer Tags
D
- Deployment descriptor
- definition, Main concepts and definitions
- Descriptors
- definition, XML Deployment Descriptors
- Descriptor Variables, Descriptor Variables
E
- EndActive
- interface, Algorithms deciding which activity to invoke
- Exceptions, Exception Handling
F
- Fault-Tolerance, Fault-Tolerance
- Flowshop, An Example: FlowShop
- Future, Principles
- definition, Main concepts and definitions
G
- GLITE
- XML Descriptor, Remote JVMs
- Globus
- XML Descriptor, Objectives, Remote JVMs
- GlobusProcess, Remote JVMs
- Group
- Creation, Creation of a Group
- definition, Main concepts and definitions
H
- Http
- port, Other properties
I
- IC2D
- InitActive
- interface, Algorithms deciding which activity to invoke
J
- JINI
K
- Kill
- bundles, Overview of OSGi -- Open Services Gateway initiative
- Nodes, Killing the application
- P2P deamon, Control
L
- Lifeycle
- LoadBalancing, Overview
- LocalJVM, Local JVMs
- Log4j
- command argument, CLASSPATH to set when writing application using ProActive
- configuration, Create a log4j configuration file
M
- Microsoft Windows
- Running ProActive, Frequently Asked Questions
- scripts, To Test ProActive with the examples
- Migration, A simple migration example, Migration Primitive
- definition, Main concepts and definitions
- drag-and-drop, Drag-and-drop migration
- example, Migration of active objects
- security, Interactions, Security Attributes, Migration and Negotiation
N
- newActive, Instantiation-Based Creation
- NOA, Discovering and Self-Organizing in Continue
- Node
- definition, Main concepts and definitions
O
- OOSPMD
- definition, OOSPMD: Introduction
- groups, SPMD Groups
Q
- Queue
- Task Queue, The Model Architecture
R
- Reply
- definition, Main concepts and definitions
- Request
- definition, Main concepts and definitions
- Request Queue, Active objects: Unifying threads and remote objects, Active Objects: creation and advanced concepts, Lifecycle: encapsulation of functional activity in component lifecycle
- RunActive
- interface, Algorithms deciding which activity to invoke
S
- Service
- definition, Main concepts and definitions
- SOAP, Principles
- Stub, Role of the stub
T
- Technical Service, Technical Service
- TimIt, TimIt API
- TTL, Asking Computational Nodes
- TTU, Discovering and Self-Organizing in Continue
V
- Virtual Node
- definition, Main concepts and definitions
W
- Wait-by-necessity
- definition, Main concepts and definitions
- Wrappers
- Asynchronism, Important Notes: Errors to avoid