| Prev | Part VIII. Extending ProActive Chapter 46. Adding Grahical User Interfaces and Eclipse Plugins |  | Next |
| Prev | Part VIII. Extending ProActive Chapter 46. Adding Grahical User Interfaces and Eclipse Plugins | | Next |
IC2D is composed of several plugins:
org.objectweb.proactive.ic2d : This plugin is the "frame" which contains the other plugins. It is only needed in the standalone version.
org.objectweb.proactive.ic2d.monitoring : provides graphical representation of hosts, runtimes, virtual nodes and active objects topology, also displaying communications between active objects.
org.objectweb.proactive.ic2d.jobmonitoring : provides tree-based representation of hosts, runtimes , virtual nodes and active objects.
org.objectweb.proactive.ic2d.launcher : initiates application deployment using deployment descriptors
org.objectweb.proactive.ic2d.lib : provides Java archives (jar) required by the other plugins which are not provided by the Eclipse like ProActive.jar, log4j.jar, etc.
org.objectweb.proactive.ic2d.console : provides logging capability through the Eclipse console.
The aim of this plugin is to provide the essential features for monitoring of ProActive applications. Monitorable entities are
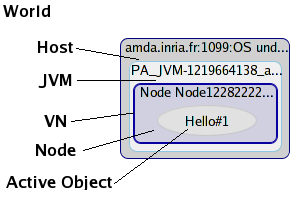
Figure 46.1, “Graphical representation of the data” shows the graphical representation of hosts, virtual nodes, runtimes (ProActive JVM), nodes, and active objects.
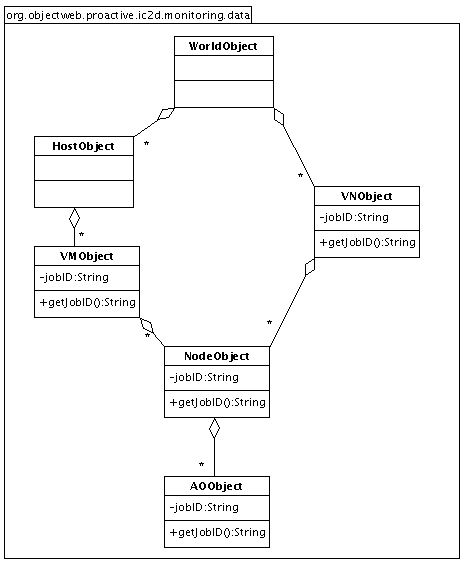
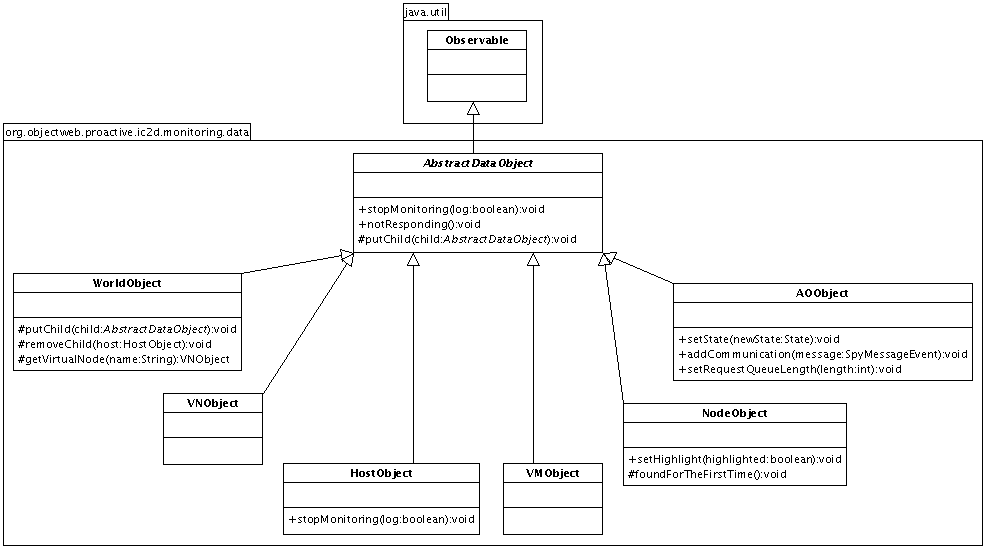
The diagram Figure 46.2, “Class diagram” describes relationships between Java classes:
The AOObject class represents an Active Object.
The NodeObject class represents a node. Nodes contain Active Objects.
The VMObject represents a runtime. Runtimes contain nodes
The VNObject class represents a virtual node. The virtual node is a logical entity which has no real existence at runtime. When using Deployment Descriptors, it is the mapping of a virtual node on a runtime that leads to the creation of one or more nodes on this runtime. Virtual nodes can be mapped on more than one runtime, thus as shown in the figure, a node is bound to both a runtime and a virtual node.
The HostObject class represents the hardware that hosts the runtime, it is possible to coallocate several runtimes on the same host
The WorldObject class is a "special" object that allows to gather hosts and virtual nodes under a common root.
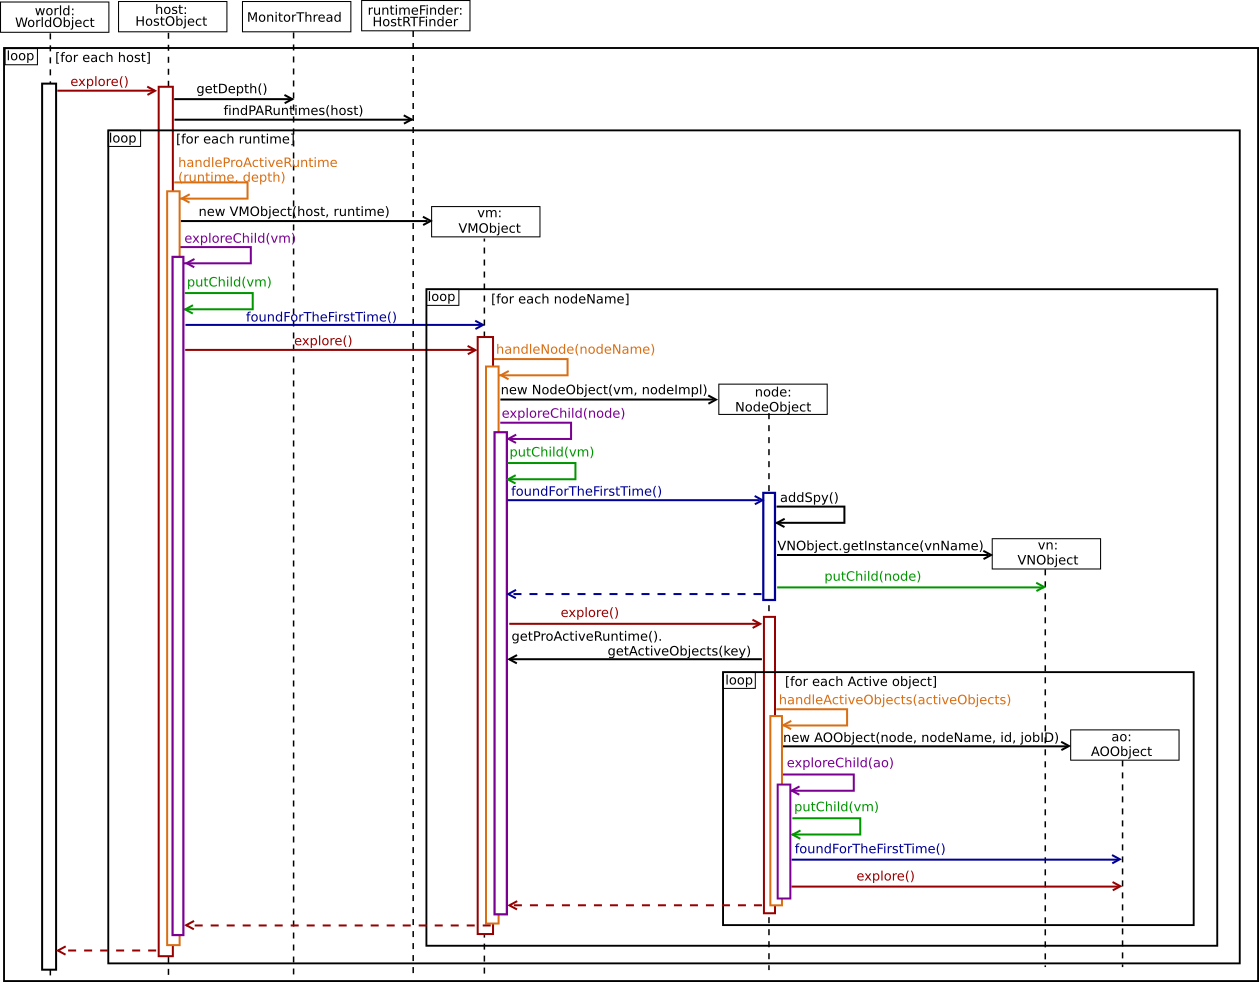
When IC2D is used to monitor a host, it looks for any available runtimes on the host, then enumerates any nodes, virtual nodes and active objects contained within each runtime.
In order to do this, it grabs the URL entered by the user, then creates a new HostObject and add it to the WorldObject. Next, a thread starts and regularly queries the WorldObject to explore itself. The following sequence diagram explains how a WorldObject explores itself for the first time (Figure 46.3, “The world exploring itself for the first time”).
The WorldObject queries its HostObjects to explore themselves
Each HostObject looks for ProActive Runtimes on the current host then creates VMObject s corresponding to the newly discovered runtimes
Each VMObject explores itself, looking for Nodes contained within its ProActiveRuntime. Each Node is mapped into a NodeObject
Each NodeObject looks for contained active objects asking it to the ProActiveRuntime of its parent (VMObject) and creates the corresponding AOObject s.
Now all objects are found. And these operation will be regularly repeated until the user stops monitoring.
The Graphical Editing Framework (GEF) allows developers to take an existing application model and quickly create a rich graphical interface.
GEF employs an MVC (Model View Controller) architecture which enables simple changes to be applied to the model from the view.
This section introduces the needed to the comprehension of GEF. For more details about GEF go to the Section 46.1.1.4, “Links” .
We describe here the implementation of the MVC pattern used within IC2D:
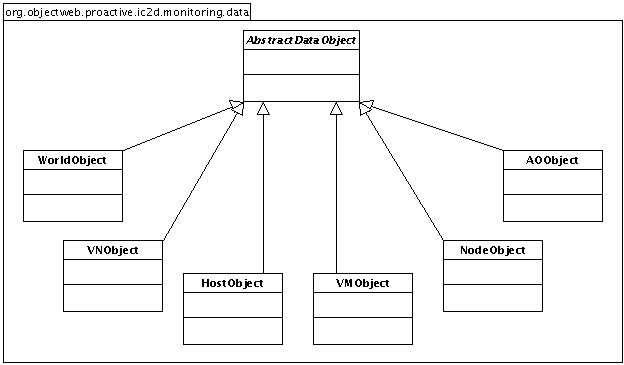
The Models ( Figure 46.4, “The Models” )
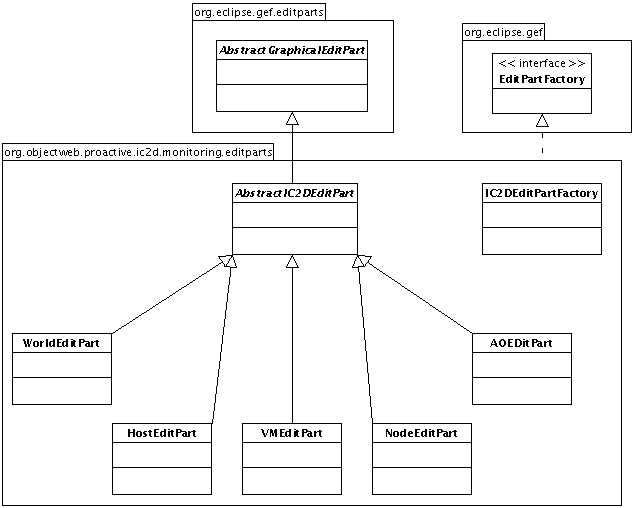
The Controllers = In GEF the controllers are subclasses of EditPart ( Figure 46.5, “The Controllers and the factory” )
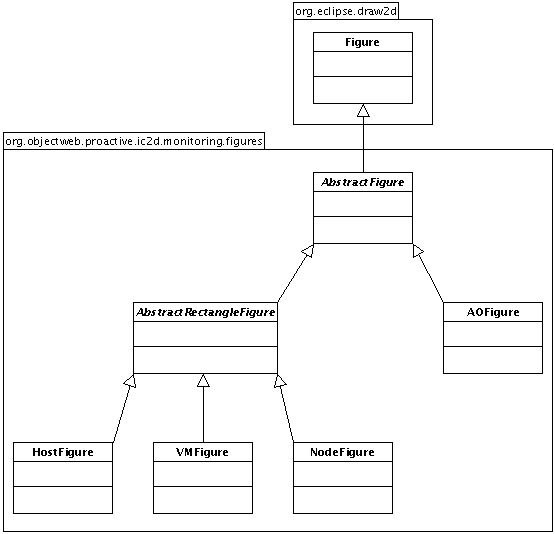
The Views = The Figure s ( Figure 46.6, “The Views” )
Three things to not forget
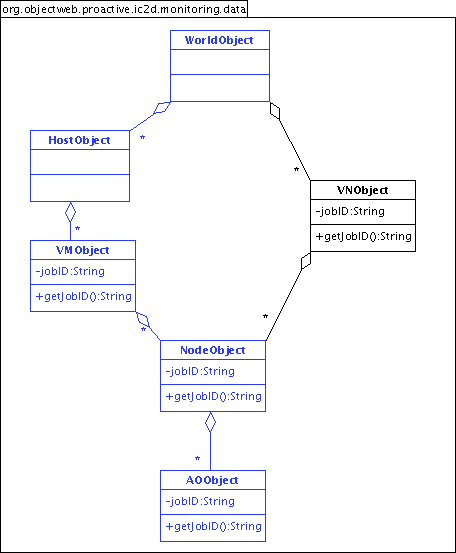
The data must be organized in a tree structure. . See Figure 46.7, “ The data strucure of the monitoring plugin ”
In GEF the controllers are subclasses of EditPart
A factory (implementing EditPartFactory ) allows GEF to create the controller corresponding to the model.
In blue, the data which we use with GEF. As you can see it, they are organized in a tree structure.
Description of the creation of the controllers and the figures step by step :
We indicate to GEF the root element of the tree, and the factory.
GEF queries the factory to create the controller corresponding to the root.
GEF queries the obtained controller to create the figure corresponding to the model.
GEF queries the root to provide it its sons.
On each one of these children, GEF do the same process.
GEF queries the factory to create the controller corresponding to the first child.
GEF queries the obtained controller to create the figure corresponding to the model.
GEF queries the model to provide it its sons.
etc...
The official site of GEF: http://www.eclipse.org/gef/
A web page referring a lot of very interesting links about GEF: http://eclipsewiki.editme.com/GEF
A detailed description of GEF : http://eclipse-wiki.info/GEFDescription
A tutorial : 'Building a GEF-based Eclipse editor' : Part 0 , Part 1 , Part 2 , Part 3 .
Somes GEF examples : http://eclipse-wiki.info/GEFExamples
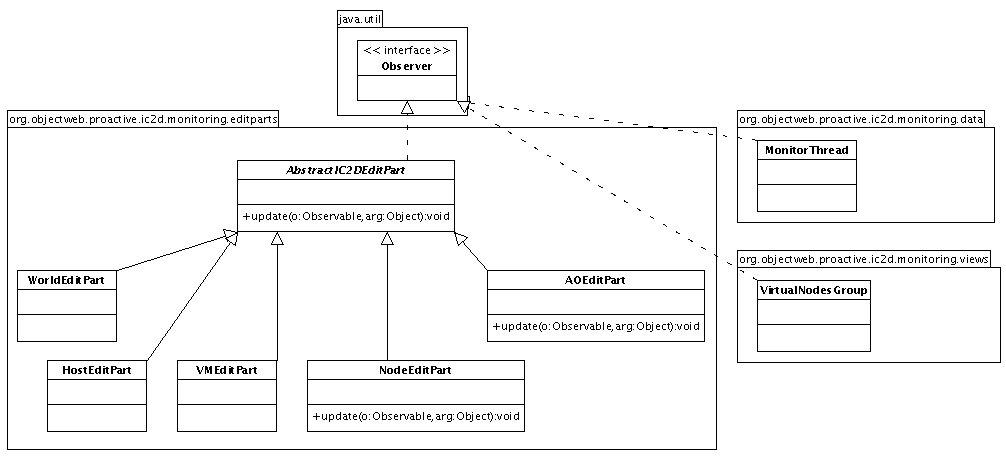
The pattern Observer/Observable is used to update the figures when the model changes.
In the Figure 46.8, “Observable objects” you can see all the observable objects with methods which can call notifyObservers .
In the Figure 46.9, “Observer objects” , you can see all the observer objects and where the method update is overriden.
In the Table 46.1, “Observable and Observer objects” , you can see each observable with their observers.
In the following diagram, you can see all classes necessary to the espionage of the active objects.
When a node is found for the first time, IC2D put a spy in the node.
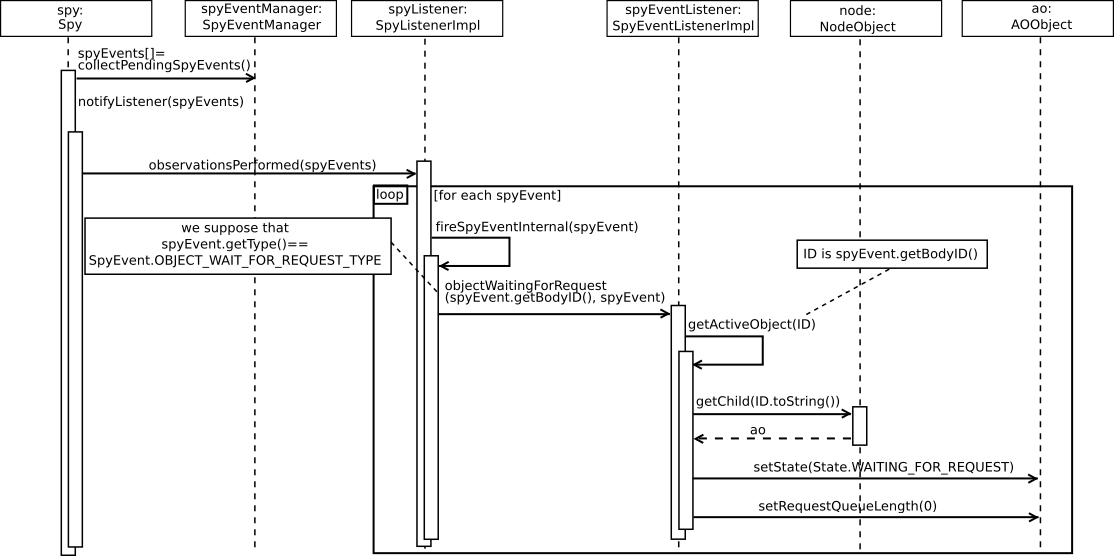
Once the spy is in the node, it regularly asks to the SpyEventManager to provide all the events. The next step is explained in the Figure 46.11, “Active Objects' events management”.
Then the Spy transmits all these events to the SpyListener .
For the each event, the SpyListener calls the corresponding method on SpyEventListener
The SpyEventListener searches the AOObject concerned with this event (thanks to the Node attribut of his class). And it modifies the state of this object.
The AOObject notify its observers.
The AOEditPart , which is an AOObject observer, update the view of this Active Object.
The NodeObject calls its "addSpy()" method :
This method creates a SpyEventListener with the NodeObject in parameter.
It creates also a SpyListener with the SpyEventListener in parameter.
Next,it turns active the previous SpyListener.
And creates a new Active Object (with the ProActive.newActive method) which is the spy with 2 parameters : the turned active object (SpyListener) , and the node . (This node is given in parameter at the constructor of the NodeObject)
When an active object is found for the first time, we ask to the NodeObject to provide us the spy.
We call the ' addMessageEventListener ' method on the Spy .
The Spy calls on its SpyEventManager the ' addMessageEventListener ' method.
The SpyEventManager adds a MessageEvent listener to the body of the active object.
In some cases, you may want to hide some objects to the users, i.e. don't monitor some internal objects. For example, spy objects used by IC2D for monitoring JVMs. That's why we introduce the concept of filtering in the monitoring plugin.
The package org.objectweb.proactive.monitoring.filters contains:
Filter : an abstract class, which has to be extended by all filter classes. This class provides the method filter (AbstractDataObject) that returns true if it matches the filter, otherwise false.
FilterProcess : provides the method filter (AbstractDataObject object).This is the first method called when a new object is discovered. It applies all filters on the object and if at least one filter returns true the object is not monitored.
This plugin provides several methods to log in the console :
log (String message)
warn (String message)
err (String message)
logException (Throwable e)
debug (String message)
debug (Throwable e)
You can have several different consoles. For example, the plugin monitoring logs in a console named "Monitoring", all the log4j messages are logged in the console "Log4j", ...
If you want to add your own console, you must choose a unique name. and call the method Console. getInstance (String yourUniqueName) to obtain the console (if it didn't exist it is created). Then you can call the methods above on your console.
This plugin contains all jar (which are not provided by Eclipse) necessary to the other plugins (like ProActive.jar, log4j.jar, ...). So if you modify the code and need a new jar, you have to add it to the plugin lib. And if you create a new plugin which needs a jar which is in the plugin lib, it must be dependent of this plugin.
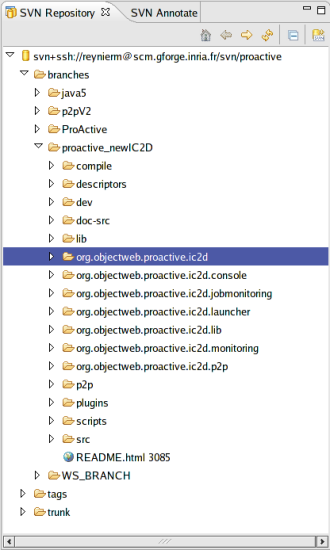
Here is the IC2D SVN repository : svn://scm.gforge.inria.fr/svn/proactive/branches/proactive_newIC2D
You have to checkout :
org.objectweb.proactive.ic2d
org.objectweb.proactive.ic2d.monitoring
org.objectweb.proactive.ic2d.lib
org.objectweb.proactive.ic2d.console
org.objectweb.proactive.ic2d.launcher
If you are using Eclipse and its plugin Subclipse , open the SVN Repository perspective and checkout all those folders as new Java projects .
You'll maybe have to replace the proactive.jar file in the plugin org.objectweb.proactive.ic2d.lib, it depends on your ProActive version.
Now, you can run IC2D clicking on the link Launch the product in ic2d.product in the org.objectweb.proactive.ic2d project.
IC2D is a Rich Client Platform (RCP) based on the familiar Eclipse plug-in architecture .
If you want to create a plug-in for IC2D, you have to use the Eclipse's Plug-in Development Environment (PDE) . This is a complete environment that Eclipse provides for plug-in development. The PDE adds a new perspective and several views and wizards that help you create, maintain, and publish plug-ins. The PDE creates boilerplate starter code that you can use to build your plug-in. This section explains how to use the plug-in project wizard to create your plug-in.
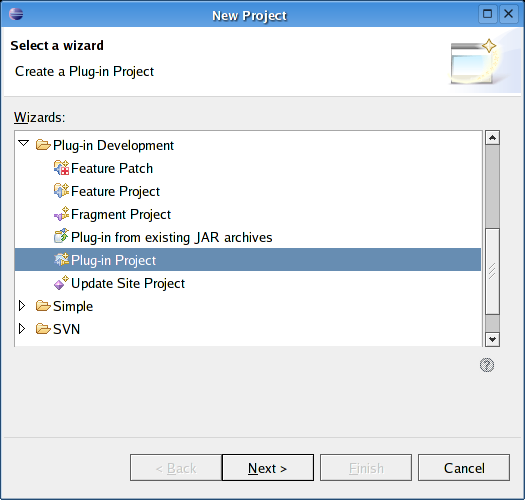
Select File > New > Project from the menu bar to open the new project wizard.
Select Plug-in Project in Plug-in Development .
Click Next .
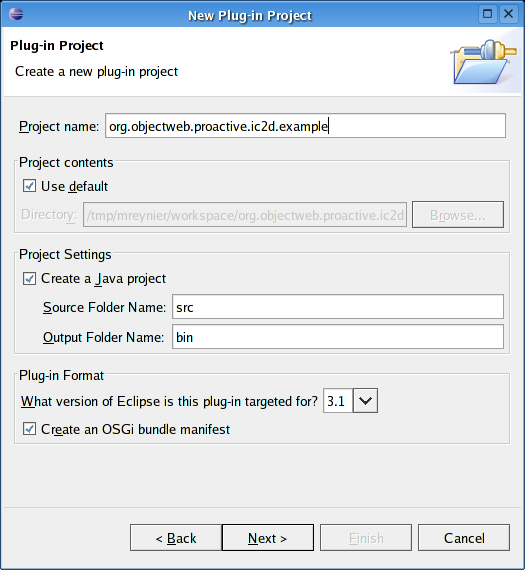
In the Project name field, enter a name for the plug-in. For example, we chose org.objectweb.proactive.ic2d.example. You must use the fully-qualified name to ensure its uniqueness.
In the Project contents pane, accept the default directory value.
Make sure the Create a Java project option is selected since we want our project to contain Java files. Accept the default values of the other options.
Beginning in Eclipse 3.1 you will get best results by using the OSGi bundle manifest . In contrast to previous versions, this is now the default.
Click Next .
Now enter the fully qualified ID of the plug-in . By default it is the same as its project name.
Accept the default values of the other options.
Click Finish .
The plug-in project has the file structure illustrated in the followed figure.
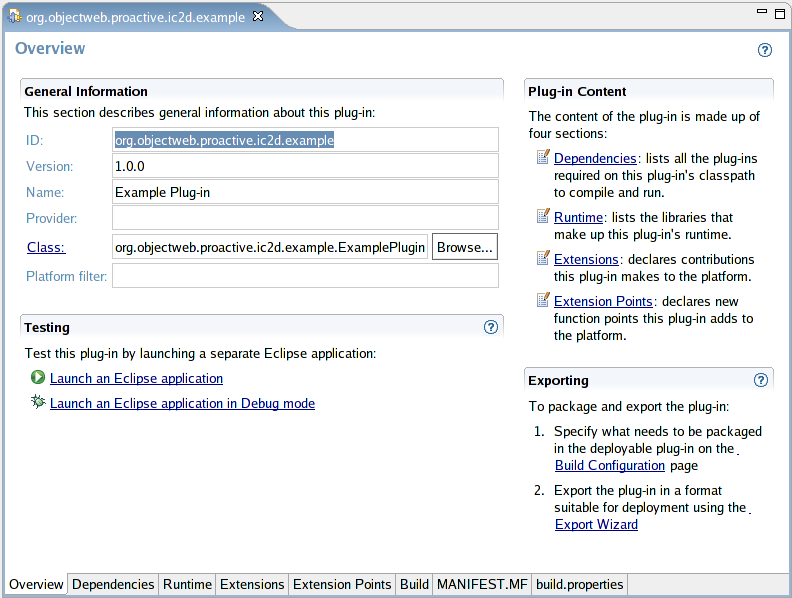
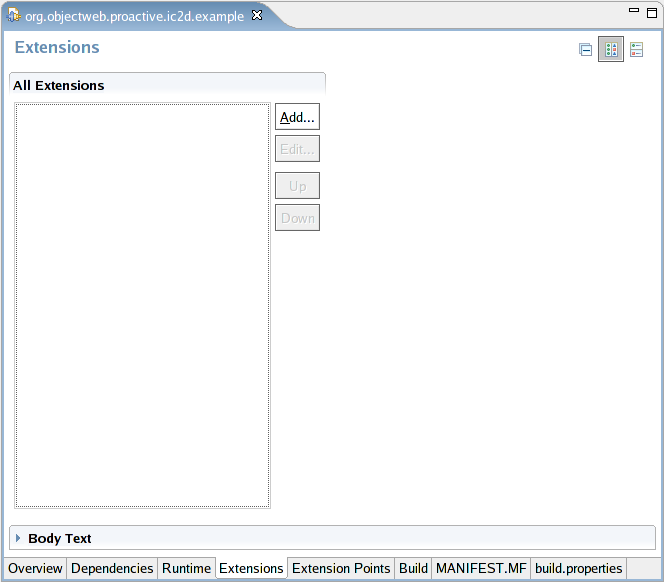
The plug-in manifest ties all the code and resources together. When you first create a plug-in, Eclipse will create and open the manifest for you automatically. The manifest is split into two files: MANIFEST.MF and plugin.xml . PDE provides a fancy editor to modify the options stored in these files (see Figure 46.18, “ Interface for editing the manifest and related files. ” ) but also allows you to edit the source directly.
MANIFEST.MF
The OSGi bundle manifest is stored in MANIFEST.MF. OSGi is the name of a standard that Eclipse uses for dynamically loading plug-ins. Example 46.1, “MANIFEST.MF” shows the OSGi bundle manifest generated by the plug-in wizard. Everything in this file can be edited by the Manifest editor, so there should be no need to edit it by hand . However if you need to, just double-click it in the Package Explorer to bring up the Manifest editor, then click on the MANIFEST.MF tab in the editor to see and modify the source.
Manifest-Version: 1.0
Bundle-ManifestVersion: 2 Bundle-Name:
Example Plug-in Bundle-SymbolicName:
org.objectweb.proactive.ic2d.example
Bundle-Version: 1.0.0 Bundle-Activator:
org.objectweb.proactive.ic2d.example.ExamplePlugin
Bundle-Localization: plugin Require-Bundle:
org.eclipse.ui, org.eclipse.core.runtime
Eclipse-AutoStart: true
Example 46.1. MANIFEST.MF
plugin.xml
The Eclipse extension manifest is called plugin.xml. It's used for defining and using Eclipse extension points , so if you're not using extension points then this file may be omitted. Extension points are the fundamental way that Eclipse plug-ins are tied together. This new plug-in is not yet using extension points so the plug-in wizard didn't generate the plugin.xml file.
The plug-in class is an optional singleton class that can be used to store global information for the plug-in. It's also a convenient place to put a few static utility functions used by other classes in the plug-in. See the listing Example 46.2, “ExamplePlugin.java” for the plug-in class that was created for us by the plug-in wizard.
package org.objectweb.proactive.ic2d.example;

import org.eclipse.ui.plugin.*;
import org.eclipse.jface.resource.ImageDescriptor;
import org.osgi.framework.BundleContext;

/**
 * The main plugin class to be used in the desktop.
 */
public class ExamplePlugin extends AbstractUIPlugin {

	//The shared instance.
	private static ExamplePlugin plugin;

	/**
	 * The constructor.
	 */
	public ExamplePlugin() {
		plugin = this;
	}

	/**
	 * This method is called upon plug-in activation
	 */
	public void start(BundleContext context) throws Exception {
		super.start(context);
	}

	/**
	 * This method is called when the plug-in is stopped
	 */
	public void stop(BundleContext context) throws Exception {
		super.stop(context);
		plugin = null;
	}

	/**
	 * Returns the shared instance.
	 */
	public static ExamplePlugin getDefault() {
		return plugin;
	}

	/**
	 * Returns an image descriptor for the image file at the given
	 * plug-in relative path.
	 *
	 * @param path the path
	 * @return the image descriptor
	 */
	public static ImageDescriptor getImageDescriptor(String path) {
		return AbstractUIPlugin.imageDescriptorFromPlugin("org.objectweb.proactive.ic2d.example", path);
	}
}
Example 46.2. ExamplePlugin.java
The build.properties file (see Example 46.3, “build.properties” ) will be needed when exporting the application for others to use . In particular if your application needs any resources like icons they should be listed here in the bin.includes section. The Plug-in Manifest editor provides a convenient interface to modify this file that is less error-prone than modifying it by hand.
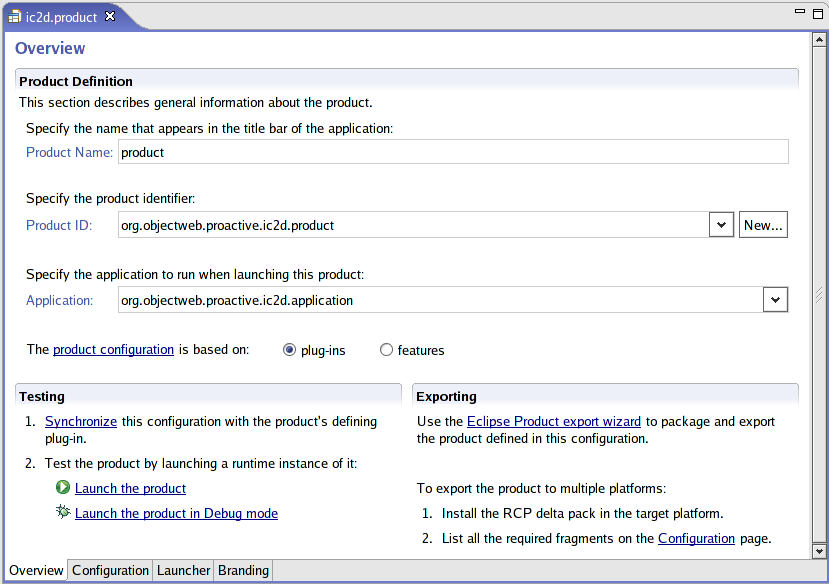
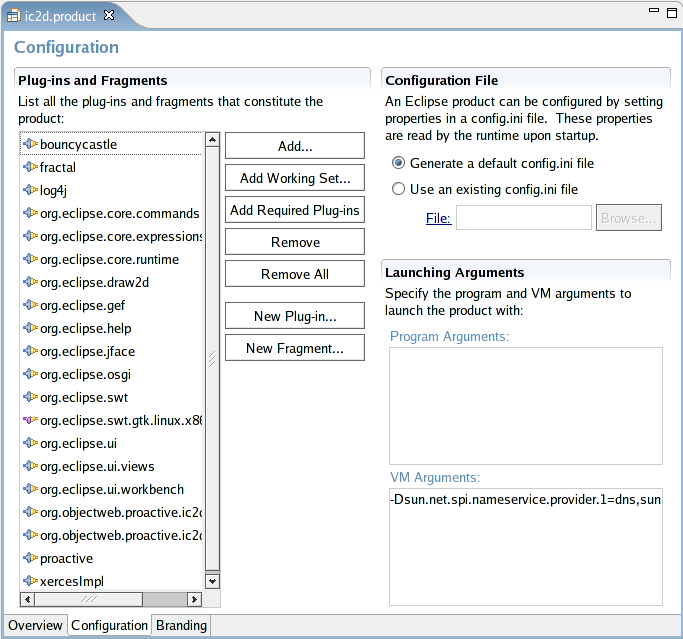
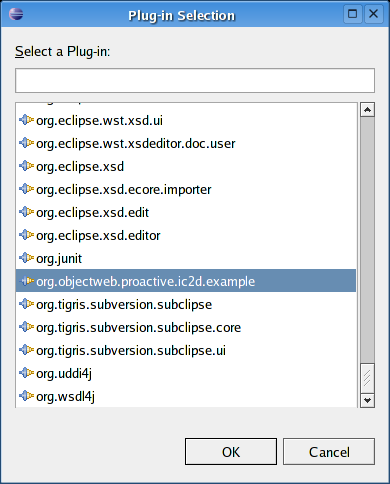
In the project org.objectweb.proactive.ic2d , open ic2d.product . In the Configuration tab, click Add .
Then select your plug-in.
Now, click Add Required Plug-ins .
Return to the Overview tab and click Synchronize . Now launch ic2d by clicking Launch the product .
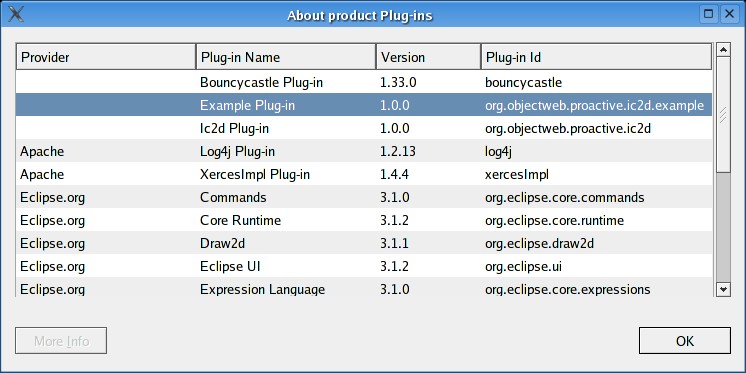
You can verify that your plug-in is integrated : in the IC2D frame, go to Help > About product > Plug-in Details .
Perspectives provide an additional layer of organization inside the workbench page. A perspective defines an appropriate collection of views , their layout, and applicable actions for a given user task. Users can switch between perspectives as they move across tasks. From an implementation point of view, the user's active perspective controls which views are shown on the workbench page and their positions and sizes. Editors are not affected by a change in perspective.
A new perspective is added to the workbench using a simple two step process :
Add a perspective extension to the plugin.xml file.
Define a perspective class for the extension within the plug-in.
Step 1 : Add a Perspective Extension to the plugin.xml file
Open MANIFEST.MF with the Plug-in Manifest Editor
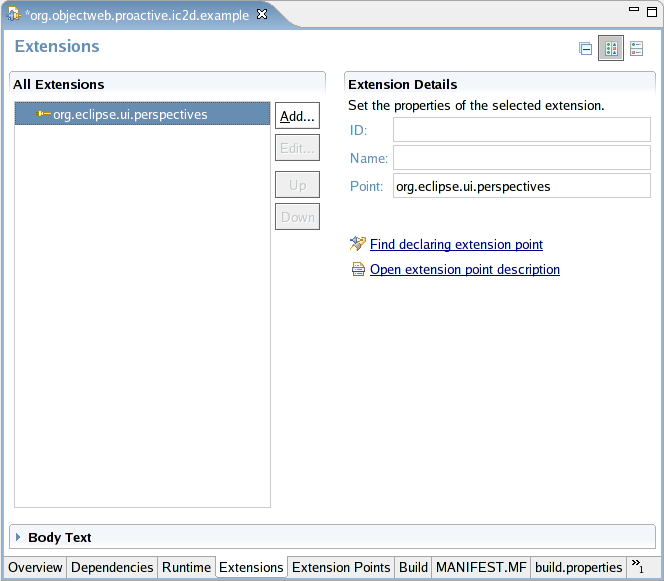
Open the Extensions tab
Click Add
In the Extensions Points tab, select org.eclipse.ui.perspectives
Ajouter un screenshot
Click Finish
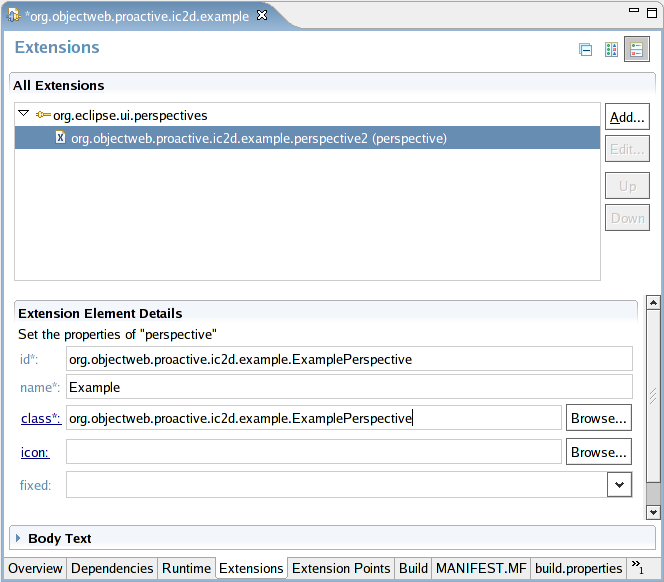
Right click the new extension : New > perspective
Now, enter the ID , the name and the class corresponding to the perspective.
If the plugin.xml file didn't exist, it is now created. Example 46.4, “plugin.xml” shows the plugin.xml file that was created.
<?xml version="1.0" encoding="UTF-8"?>
<?eclipse version="3.0"?>
<plugin>
   <extension
         point="org.eclipse.ui.perspectives">
      <perspective
            class="org.objectweb.proactive.ic2d.example.ExamplePerspective"
            id="org.objectweb.proactive.ic2d.example.ExamplePerspective"
            name="Example"/>
   </extension>
</plugin>
Example 46.4. plugin.xml
Step 2 : Define a Perspective Class for the Extension within the Plug-in
Now we need to define the perspective class which must implements the IPerspectiveFactory interface :
package org.objectweb.proactive.ic2d.example;

import org.eclipse.ui.IPageLayout;
import org.eclipse.ui.IPerspectiveFactory;

public class ExamplePerspective implements IPerspectiveFactory {

	public static final String ID="org.objectweb.proactive.ic2d.example.ExamplePerspective";

	public void createInitialLayout(IPageLayout layout) {
		// TODO Auto-generated method stub

	}

}
Example 46.5. ExamplePlugin.java
You have created your first perspective !
A view is typically used to navigate a hierarchy of information, open an editor, or display properties for the active editor.
Create a view looks like create a perspective. You have to add a perspective extension to the plugin.xml file and to define a view class for the extension within the plug-in .
Step 1 : Add a View Extension to the plugin.xml file
Add an extension : org.eclipse.ui.views, then add a view and configure it.
An editor is a visual component within a workbench page. It is used to interact with the primary focus of attention, which may be a document, data object, or person. The primary focus of attention is a reflection of the primary task.
© 2001-2007 INRIA Sophia Antipolis All Rights Reserved