| Prev | Part IV. Deploying Chapter 27. ProActive Grid Scheduler |  | Next |
| Prev | Part IV. Deploying Chapter 27. ProActive Grid Scheduler | | Next |
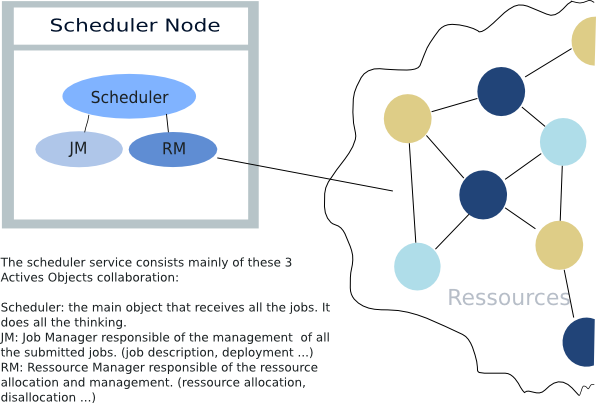
The Scheduler is a service used to enhance the user's experience to the proActive environment. A scheduler is created to administer the deployment and the maintenance of a list of jobs over various platforms and infrastructure (Grid or P2P infrastructure) following one of many set of rules regarding the job management. In addition to this, the scheduler offers a shell based command submitter and is integrated in IC2D to enable an ease of interactions. In this chapter, we will expose how the scheduler works, what policies govern the job manipulation, how to create a job and how to get the jobs and the nodes state using either a shell based command submitter or the IC2D GUI.
The scheduler service is the result of a collaboration between 3 active objects (Scheduler, Job Manager, and Ressource Manager) each of wich has its own functionality. The Scheduler object is the main object and is a non GUI daemon that is connected to a job and a ressource management objects. The job management class (class that extends from AbstractPolicy) contains a set of guidelines, a policy, upon which the jobs will be served. You can choose from one of the following policies: a time policy serving the fastest jobs first, a space policy serving the smallest jobs or the ones that need the least number of ressources, a FIFO policy and a composite policy of the previously mentioned policies. The job management object also maintains a description of all the jobs and monitors the deployment of all the jobs. It communicates with the ressource management object (RessourceManager) for the node allocation and disallocation and receives queing orders and job status notification requests from the main scheduler object.
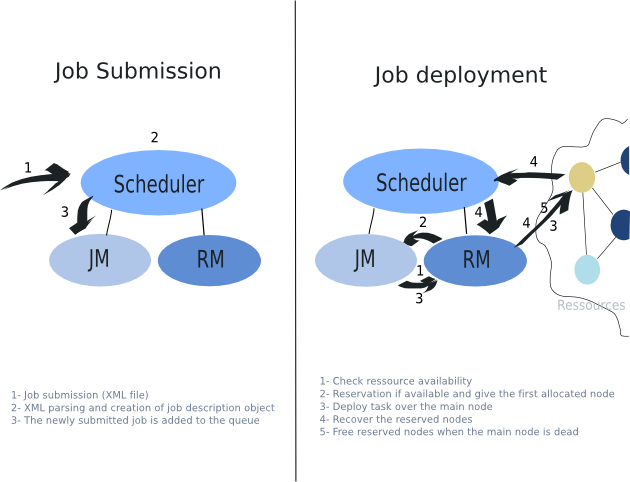
When a job is submitted (see below for the definition of a scheduler job Section 27.2.1, “Job creation”), it is first parsed to extract its information and then balanced to the job manager which adds it to the waiting queue. As precised before, the job manager refers to a policy and to the availability of the needed ressources (ressource manager) to choose the job to be served and to deploy the job on one of the reserved nodes. Once deployed, the job gets the nodes reserved from the scheduler by calling the ProActiveDescriptor activate() method and then the getVirtualNode("VNName") method. The job manager also deploys an agent on the main node to keep track of the deployed job and to set the system properties of the VM. It will also keep pinging this AO to ensure that the job is still alive.There are, for the moment, 4 policies that are used by the job manager of which we distinguish:
FIFO Policy: is the traditional policy that serves the submitted jobs in the same order of their submittal.
Time Policy: serves the fastest jobs first, the ones that are estimated to occupy the ressources with the less amount of possible time.
Space Policy: serves the smallest jobs, the ones that need the smallest number of ressources. If, by any chance, we find more than one job with the same amount of needed ressources, the oldest job in the queue is served first.
Mixed Policy: any combination of the precited policies.
The job creation doesn't differ much from the normal code written with ProActive. The main difference is that all the jobs must implement an interface containing the definition of the main constants. We'll see, shortly, a brief example of a job but first we need to know about the definition of a job in ProActive. A job is a combination of a main class (or a jar package) and a descriptor deployment file. The descriptor file contains all the needed information for the deployment. The most important part for the submission of a job is the main definition part that shouldn't be forgotten.
  <mainDefinition id="main" class="org.objectweb.proactive.scheduler.jobTemplate.Hello">
     <arg value="param1"/>
     <arg value="param2"/>
     <mapToVirtualNode value="schedulervn"/>
      <classpath>
          <absolutePath value="test/classes/" />
          <absolutePath value="test/src/" />
      </classpath>
  </mainDefinition>
Here is the main class definition: we mention the name of the class and enumerate all the main parameters as well as the mapping to the main Virtual Node and an optional new tag that can help you launch a job if its not resident in the actual class path of the scheduler. The definition of the Virtual node is done in the same manner as for any job description with the difference of an acquisition method instead of a creation one:
      <jvm name="Jvm1">
        <acquisition>
          <serviceReference refid="ProactiveScheduler"/>
        </acquisition>
      </jvm>
      ...
      <serviceDefinition id="ProactiveScheduler">
        <ProActiveScheduler numberOfNodes="2" minNumberOfNodes="1"
        schedulerUrl="rmi://localhost:1234" jvmParameters="-Dname=value"/>
      </serviceDefinition>
In the service definition part we see that we want to contact the ProActiveScheduler service with the following attribute tags:
numberOfNodes: the number of nodes gives an estimate of the maximum number of nodes needed
minNumberOfNodes: the minimum number of node is an optional attribut that is used to refer that the application may begin if the minimum amount of needed ressources is satisfied.
schedulerUrl: is the scheduler url to make sure that we can effectively contact the scheduler and get the reserved nodes in the activation part of the program
jvmParameters: are the system properties of the main JVM.
To follow: startDate, priority, estimatedTime ....
This is a complete example of the xml prototype of the job_template.xml:
<?xml version="1.0" encoding="UTF-8"?>
<ProActiveDescriptor xmlns:xsi="http://www.w3.org/2001/XMLSchema-instance"
 xsi:noNamespaceSchemaLocation=
 "http://www-sop.inria.fr/oasis/proactive/schema/3.2/DescriptorSchema.xsd">
  <mainDefinition id="main" class="org.objectweb.proactive.scheduler.jobTemplate.Hello">
     <arg value="param1"/>
     <arg value="param2"/>
     <mapToVirtualNode value="schedulervn"/>
     <classpath>
        <absolutePath value="test/classes/" />
        <absolutePath value="test/src/" />
     </classpath>
  </mainDefinition>
  <componentDefinition>
    <virtualNodesDefinition>
      <virtualNode name="schedulervn" property="multiple"  />
    </virtualNodesDefinition>
  </componentDefinition>
  <deployment>
    <mapping>
      <map virtualNode="schedulervn">
        <jvmSet>
          <vmName value="Jvm1"/>
        </jvmSet>
      </map>
    </mapping>
    <jvms>
      <jvm name="Jvm1">
        <acquisition>
          <serviceReference refid="ProactiveScheduler"/>
        </acquisition>
      </jvm>
    </jvms>
  </deployment>
  <infrastructure>
    <services>
      <serviceDefinition id="ProactiveScheduler">
        <ProActiveScheduler numberOfNodes="2" minNumberOfNodes="1"
        schedulerUrl="rmi://localhost:1234" jvmParameters="-Dname=value"/>
      </serviceDefinition>
    </services>
  </infrastructure>
</ProActiveDescriptor>
Attention: It's banned the use of currentJVM tag.
Next we need to create the program that we need to execute on the remote nodes:
public class Hello implements java.io.Serializable,
    org.objectweb.proactive.scheduler.JobConstants {
    public static void main(String[] args) throws Exception {
      // get the complete path of the xml descriptor file on the remote node
      String xmlFile = System.getProperty(XML_DESC);

      // Access the nodes of the descriptor file
      ProActiveDescriptor descriptorPad = ProActive.getProactiveDescriptor(xmlFile);
      descriptorPad.activateMappings();

      // get the reserved nodes
      VirtualNode vnode = descriptorPad.getVirtualNode("schedulervn");
      Node[] nodes = vnode.getNodes();

      ...
      ...

      // wait for the job to finish and do the cleaning of the active objects if not
      // the scheduler ensures the cleaning implicitly ...

      ...

      // exit the program
      System.exit();
    }
}
This is a short sample of the job that shall run on the scheduler. As you may have noticed, there is nothing new except for the first line. The thing is that we do not need to set the complete XML path. The scheduler takes care of the file transfert of the XML Deployment descriptor to the remote node and sets automatically the system property of the complete XML path on the remote node prior to the activation.
As you may have noticed, there is no difference with the current example except for the System.getProperty() call.
There are lots of scripts in the schduler directory in the unix directory of the scripts directory of the ProActive library.
ProActive/scripts/unix/scheduler/
If you want you can call from the terminal after launching the scheduler one of the following scripts that shall launch either the:
Simple hello world program that creates one Virtual Node containing 2 nodes:
$ ./LaunchHello.sh
Simple hello world program that creates 2 VIrtual Nodes containing 1 node:
$ ./LaunchHello2.sh
The C3D application by submitting the renderer to the scheduler and then by adding a new user by the use of the old script in the scripts directory.
 $ ./LaunchC3DRenderer.sh
 $ ../c3d_add_user.sh
There is a shell based program that helps you interact with the scheduler by first connecting to the scheduler daemon. This program offers the basic commands mainly the job submission and deletion, and a view of the status of the jobs (waiting, deployed) and that of the nodes (free, reserved, busy).
You can launch this program using a shell script:
$ProActive/scripts/unix/communicator.sh [schedulerURL]
Or a BAT script under windows:
$ProActive/scripts/windows/communicator.bat [schedulerURL]
You can use this program to start the connection and the interation with the scheduler. You can submit the scheduler URL or else the program connects by default to the following url: "rmi://localhost:1234/SchedulerNode/"
bash-3.00$ ./communicator.sh

--- Communicator ----------------------------------------------
[Scheduler] Starting Scheduler command listener
 --> This ClassFileServer is reading resources from classpath
Generating class : pa.stub.org.objectweb.proactive.scheduler.Stub_Scheduler
 > ?

The commands available are: sub, stat, del, nodes, kill, exit

 >
Once connected you will see a console where you can choose one of the following commands:
stat: this command will give a complete report of all the jobs queued, deployed and finished. We can mention the jobId of the specified job we need to fetch it's proper description ..
> stat [jobId]
nodes: this command will give a complete report of all the nodes freed, reserved and busy. We can mention the nodeURL of the specified node we need to fetch it's proper description and state ..
> nodes [nodeURL]
sub: this command will enable you to post a job by posting the xml description of the job
> sub file_name.xml
del: this command will enable you to delete a job posted by the same user with the given jobId
> del jobId
exit: this command is used to exit the communicator program
> exit
If you are unsure of the command you are using or about how to use it you can always consult the help menu in our program by using the "?" command as follows:
> ? [command name]
This will give you all the available commands that can be used if no command is specified or else it will give you a full descriptor of the command submitted.
All daemon logs are written in a file. All logs are available in:
SchedulerDIR/logs
It is nevertheless possible to use the scheduler API for the allocation and disallocation of the ressources in real time programming. The Scheduler class offers you the possibility to connect to the scheduler daemon using the connectTo(SchedulerURL) method and then allocate the needed ressources using the getNodes(ressourceNb, estimatedTime) which adds the job to the waiting queue like any job that contacts the Scheduler for ressources and then returns a Vector of the reserved nodes. In the end we need to free the reserved nodes by calling the method del(jobId) that frees and cleans all the reserved nodes. We should note here that when the job submits its demand to get some nodes from the scheduler, it is automatically associated with a jobId that we can get by consulting the jobId of one of the reserved nodes like follow: node.getNodeInformation().getJobID(). Below is a complete example of how we can use the API.
public class HelloNoDescriptor implements java.io.Serializable {
    public static void main(String[] args) throws Exception {
        // Get the scheduler URL from the main argument and connect to the scheduler
        String schedulerURL = args[0];
        Scheduler scheduler = Scheduler.connectTo(schedulerURL);

        // demand from the scheduler 1 node and tell it that the estimated time
        // for the task to finish is about 3 seconds
        Vector nodes = scheduler.getNodes(1, 3);

        Node node = (Node) nodes.get(0);

        ...
        ...

        // we should think of freeing the nodes here
        scheduler.del(mainNode.getNodeInformation().getJobID());
    }
}
There's a script in the scheduler directory of the scripts directory that shall run this prog:
$ ./HelloNoDescriptor.sh
These are the main methods used to ask for nodes from the scheduler. Next, you will find here a detailed description of all the classes and all their methods and how you could enhance or add certain features to the scheduler.
Here you shall find a detailed explanation about the classes that form the scheduler API. You'll also find out an explanation of the role and methods of each one.
This is the most important part that you should learn first. You can find out here how the jobs are represented in the queue and where the descriptions are saved while queing or deploying the application. In general there are 2 ways of submitting a job to the scheduler service: it's either by submitting a descriptor or by using the API while programming. So there are 2 objects for each kind of submission, the first (GenericJob) offers a mean to store the job's description before adding it to the waiting queue and the second (JobNoDescriptor) will contain a reference to the first object but will also contain a method that will detect the nodes reservation and will return the reserved nodes to the job that's using the API rather than the deployment descriptor. Either way, after the job deployment, the job's description will be part of a new object (DeployedTask) along with an agent object responsible of keeping track, in the case of a deployment, and changing the system properties of the main node. And we created an interface called JobConstants in which we keep the constants to help the programmer and to ensure the simplicity of the creation of the programs that shall be submitted to the scheduler.
This class includes the definition and description of the tasks and mainly contains some setters and getters. You'll find these attributes
"classname" of the class to be run
"priority" of the job
"userId" is the id of the user who posted the job.
"submitDate" gives the date when the task was submitted.
"mainParameters" contains the parameters that should be submitted to the job when starting it.
"ressourceNb" indicates the number of processors needed to execute this job.
"estimatedTime" gives an estimate of the time to finish the task.
"xmlName" gives a mean to store the path to the deployment descriptor if present.
"startDate" is the date when the job should start execution
"jobId" is the id of the job
"jvmParameters" is the JVM system properties of the main node
"jobStatus" is the status of the job. It can take one of the following values: queued, deployed, finished
"classPath" offers the class paths of the main node
"minRessourceNb" is an optional field that, if set, indicates the minimum required ressource to enable the job to run
This is the class that supports the jobs that have no XML descriptor API. They use directly the Scheduler API to get nodes. In short when a job with no decriptor submits its demand to reserve a certain amount of ressources, this causes the generation of a GenericJob object that will be added to the queue like any normal job and of an active object of this class that shall throw the allocated nodes as soon as he detects their reservation before we dispose of his services.
getNodes(): This method is used to detect the node reservation event and to help fetch those reserved nodes. Returns a vector of all the reserved nodes.
public Vector getNodes();
runActivity(): The runActivity is reimplemented to stop the service and to destroy the active object after the getNodes method is called.
public void runActivity(Body body);
Class that contains the description of the task and the reference to an agent that keeps track of the job evolution. This agent helps setting the main JVM system properties as well a simple method to make sure that this node stays alive (the ping() method, an empty method to ensure that the main node is still alive).
getTaskDescription(): returns the GenericJob associated to this deployed job.
public GenericJob getTaskDescription();
isAlive(): this method is a sort of pinging method. It gives the status of the main node (alive or dead). Returns true if the main node is alive, false otherwise.
public BooleanWrapper isAlive();
The queue class offers a mean of queueing the jobs. It contains a HashMap in which every GenericJob object created will be stored after associating it with a jobId. In short this class keeps the main methods used for the HashMap namely:
size(): Returns the number of the waiting jobs.
public int size();
containsId(jobId): tests the existence of the job with the specified jobId.
public boolean containsId(String jobIds);
put(job): Inserts the job to the queue and gives it an Id. If the queue is full then this method throws a QueueFullException.
public void put(GenericJob task) throws QueueFullException;
keySet(): Gives a list of the IDs of the waiting jobs.
public Set keySet();
get(jobId): Returns the job associated with the job Id.
public GenericJob get(String jobId);
remove(jobId): Removes and returns the job associated with the job Id from the queue.If there is no job associated to this jobId then this method returns null.
public GenericJob remove(String jobId);
isEmpty(): true if the queue is empty, false otherwise.
public boolean isEmpty();
values(): returns a collection of the genericJob description
public Collection values();
The job manager is an object that acts upon a policy to serve the waiting jobs. In general we dispose of an abstract class (AbstractPolicy) that contains all the essential tools for the job managers to run. Mainly, the insertion and deployement of tasks, and an abstract comparer that should be redefined in the specific policies.
sub(job): Insert the job's description object in the queue.
public BooleanWrapper sub(GenericJob task);
del(jobId): Deletes the job from the queue and stops it if it has already been launched.
public BooleanWrapper del(String jobId);
stat(jobId): Gives description of all the jobs that are curently running in forms of a Vector if no specific id is specified, else, it gives the description of the specified job if it exists.
public Vector stat(String jobId);
isToBeServed(job1, job2): This is an abstract comparer method to be redefined by the specifique policy... Returns true if task1 is to be served before task2 according to the policy.
abstract public boolean isToBeServed(GenericJob job1, GenericJob job2);
nextTask():Returns the job that should run next (according to the implemented policy).
public String nextTask();
execute(): This method is used to execute a task if the required ressources are available.
public void execute();
checkRunningTasks(): Check the list of the running tasks to find out if there is one that's finished so that we can free the allocated ressources.
public void checkRunningTasks();
The ressource manager is an object that has the main purpose of managing the ressources. It is, in fact, responsible for the allocation, disallocation and creation or retrieval of the "ressources" (processing power). This class contains 3 main hashmaps one for each kind of node (unused, reserved, busy) and implements the node event listener to enable the detection of the newly created and/or acquired ressources.
getAvailableNodesNb(): This method returns the number of ressources available.
public int getAvailableNodesNb();
freeNodes(jobId, mainIsDead): frees the allocated nodes of the job associated to the specified jobId. The parameter mainIsDead is there to specify if the main node is dead to know if it is useless or not so we can know if we have to dispose of it.
public void freeNodes(String jobId, boolean mainIsDead);
nodeFreer(nodes, jobId, mainIsDead): frees the nodes and does the cleaning. This method is used because we are unsure of the place of the nodes wether they are in the usedNodes queue or in the reservedNodes queue. This method is never used externally, the freeNodes method usually tests the stat of the job before submitting the command to this method.
private void nodeFreer(Vector nodes, String jobId, boolean mainIsDead);
reserveNodes(jobId, ressourceNumber): Reserve "ressourceNumber" of ressources and returns the first reserved node. This method usually puts those reserved nodes in the reservedNodes queue for later retrieval while activating.
public Node reserveNodes(String jobId, int ressourceNumber);
getNodes(jobId, askedNodes): Returns all the nodes that were reserved to the job and moves them from the waiting queue to the used queue.
public Node[] getNodes(String jobId, int askedNodes);
sec(ressourceNumber): Tests the availlability of "ressourceNumber" of ressources.
public BooleanWrapper isAvailable(int ressourceNumber);
nodes(nodeURL): Provides the information about the nodes (state, job running, properties ...) Returns a vector of the nodes description.
public Vector nodes(String nodeURL);
checkReservation(jobId): checks to find out wether the job with the specified jobId has had its needed ressources reserved.
public BooleanWrapper checkReservation(String jobId);
This is the class of the scheduler daemon. This class offers many methods to ensure flexibility and to offer methods for all kind of services. For instance, it is possible to interact with the scheduler via 4 basic methods sub for job submission, del for job deletion, stat for job statistics and nodes for nodes information. It is also possible to create a new Scheduler daemon via the call of the start(policy) method and to connect to a previously created scheduler via connectTo(schedulerURL). Once a job is submitted via a descriptor it will need to be parsed to extract its information and when it comes to deployment time it will need to get its nodes this is why we will need the following methods fetchJobDescription for xml parsing that will create a temporary GenericJob object that can only be accessed during parsing time via getTmpJob so that we can set its atributes and finally to commit the object to the queue we will need the commit object method, then, when deploying the task, we will need to connect to the scheduler to fetch the reserved nodes by the use of the getNodes method.
Scheduler(policyName): Scheduler constructor that instanciate an active object used to manage jobs knowing the policy class name and creates an active object ressource manager.
public Scheduler (String policyName);
sub(job): Insert a job in the queue of the scheduler.
public BooleanWrapper sub(GenericJob job);
del(jobId): Deletes the job from the queue and stops it if it has already been launched.
public BooleanWraper del(String jobId);
stat(jobId): Gives description of all the jobs that are curently running in forms of a Vector if no specific id is specified, else, it gives the description of the specified job if it exists.
public Vector stat(String jobId);
nodes(jobId, askedNodesnodeURL): Provides the information about the nodes (state, job running, ...)
public Vector nodes(String nodeURL);
createScheduler(policyName): This method is used to create a unique scheduler object on the machine. If the scheduler isn't already created, it creates a new instance a new scheduler with a job manager following the specified policyName.
static public void createScheduler(String policyName);
start(policyName): Starts the scheduler. Calls the createScheduler method and creates a new scheduler.
public static void start(String policyName);
fetchJobDescription(xmlDescriptorURL): This method launches the parsing of the XML file to extract the description of the job submitted prior to its submission to the queue. Returns the jobId of the newly created object
public StringMutableWrapper fetchJobDescription(String xmlDescriptorURL);
connectTo(schedulerURL): connects to the scheduler node and fetchs the scheduler daemon using the submitted url. Returns a reference to the Scheduler object else it doesn't try to create a scheduler service and returns null.
public static Scheduler connectTo(String schedulerURL);
getNodes(ressourceNb, estimatedTime): This method is used while programming .. You can use it to reserve submit your demand for ressources... This method will create an active object containing the job's description in a genericJob object and submit it to the queue like any usual job but the trick is that to make sure that the reserved nodes can get to the demanding job this active object will stay waiting for the ressource allocation and when finished it will submit those reserved nodes to the job.
public Vector getNodes (int ressourceNb, int estimatedTime);
getReservedNodes(jobID, askedNodes): Returns an array of the reserved nodes of the object with the specified jobId. This method is used while parsing the XML deployment descriptor when activating the deployment descriptor.
public Node [] getReservedNodes(String jobID, int askedNodes);
commit(jobID): commits the job's description after parsing and submits it to the waiting queue.
public void commit(String jobID);
getTmpJob(jobID): Gets the temporary created generic job object to change it's attribute's content. It is important to note that this method is only used while parsing..
public GenericJob getTmpJob(String jobID);
This class represents a service to acquire the nodes of a given Job from the scheduler service. This service can be defined and used transparently when using XML Deployment descriptor. This object is a service that will automatically connect to the scheduler object when instanciated via the procured url. Here also we have an interface, called SchedulerConstants, containing the necessary constants needed by the scheduler and the scheduler lookup service.
getNodes(): This is the method to get nodes form the scheduler ressource manager.
public Node [] getNodes();
getServiceName(): Gives the service name or the scheduler node name of the scheduler daemon.
public String getServiceName();
getSchedulerService(): Returns the scheduler service object.
public Scheduler getSchedulerService();
getNodeNumber(): Returns the askedNodes.
public int getNodeNumber();
setNodeNumber(nodeNumber): Sets the number of nodes to be acquired with this Scheduler service.
public void setNodeNumber(int nodeNumber);
getMinNodeNumber(): Returns the min askedNodes number.
public int getMinNodeNumber();
setMinNodeNumber(nodeNumber): Sets the min number of nodes to be acquired with this Scheduler service. By minimum we mark that if the right policy is selected this number would be judged as suffisant to start the application.
public void setMinNodeNumber(int nodeNumber);
This is the main class used for parsing the jobs submitted with the xml deployment descriptor file. This class will launch the parsing of the file and the extraction of the descriptions of the job.
notifyEndActiveHandler(): we redefine this method so that we can collect in the end the total amount of information from the created Virtual nodes. Like for instance the total amount of needed ressources.
protected void notifyEndActiveHandler(String name,
        UnmarshallerHandler activeHandler) throws org.xml.sax.SAXException;
This is the main class used to communicate with the scheduler daemon to submit the commands to the scheduler like the submission, deletion and statistics of any job and the nodes status command. The communicator offer a console interaction program with the scheduler daemon. For more information about the communicator please refer to Section 27.2.2, “Interaction with the scheduler”. Here you will only find the technical explanation and the method names.
communicator(schedulerURKL): This is the constructor that's used to create a communicator. It tries to establish a connection with the scheduler daemon and to get the scheduler object before we begin with the submission of commands.
public Communicator (String schedulerURL);
pad(string, pad_len): This function is used to make the String right-justified. If the String is bigger then pad_len then this function will add blanks in the beginning to make sure that the String is right-justified over the pad_len space else it will return the String unchanged.
private String pad(String s, int pad_len);
center(string, pad_len): This function is u sed to make the String center-justified. If the String is smaller then pad_len then this function will add blanks in the beginning and in the end to make sure that the String is right-justified over the pad_len space else it will return the String unchanged.
private String center(String s, int pad_len);
log(message, isError): Logs the message either as a normal message or as an error depending on the isError type. If the isError is true then the submitted message is an error else it's a normal one.
private static void log(String msg, boolean isError);
flush(message): sets an immediate flush of the normal message.
private static void flush(String message);
helpScreen(command): Is the help console. Here we can either set specific help for a specific command or we can add the command name of the newly created command
public void helpScreen(String command);
handleCommand(command): Here we shall handle the submitted command, check the validity of the command then call the related method or subroutine to launch the command. Returns true if the execution occured normaly, false otherwise.
private boolean handleCommand(String command);
startCommandListener(): Starts the command listener object and begins with to take the commands.
private void startCommandListener();
viewNodes(nodes, specific): This method is used to display the descriptions of all the nodes or of a specific node on the shell prompt. Nodes contains the nodes to be displayed and specific is set to true if the command demands the view of a specific node.
public void viewNodes(Vector nodes, boolean specific);
viewJobs(jobs, specific): This method is used to display the descriptions of all the jobs or of a specific job on the shell prompt. Jobs contains the job status of either all the jobs or of a specific one and specific indicates wether the command needs the description of a specific job or that of all the jobs.
public void viewJobs(Vector jobs, boolean specific);
We can always change the ressource acquisition method, the job description or create a new policy to serve the jobs and even create a new command that can be used for the scheduler. In this section you'll find out what are the steps that should be taken in this regard.
To ensure the independance between the acquisition of the nodes and the ressource reservation and manipulation, we created an object named RessourceListener which main purpose is to wait for the creation of the nodes and add it to the unusedNodes list. So in order to change the ressource acquisition mode you'd have to change only the RessourceListener class. One important thing that you don't have to forget is that the ressourceListener object has to take the reference to the unusedNodes queue of the ressourceManager, while instanciating, to be able to submit the nodes to the ressourceManager. So we can either think of changing directly the code of the RessourceListener class or think of only changing the xmlURL and the Virtual Node names in the RessourceManager constructor when instanciating the ressourceListener:
 public RessourceManager(BooleanWrapper b) {
     unusedNodes = new Vector();
     reservedNodes = new Vector();
     usedNodes = new Vector();

     // launches the specific ressourceListener that shall listen for the nodes
     // created and add the newly created node to the queue.
     String xmlURL = "/user/cjarjouh/home/ProActive/src/org/objectweb/proactive/scheduler/test.xml"
;
     Vector vnNames = new Vector();
     vnNames.add("SchedulerVN");
     new RessourceListener(this.unusedNodes, xmlURL, vnNames);
}
To add a new description for the job we shall have to modify the schema, the GenericJob class and add a code to fetch the content of this new attribute in the parsers. And we shall have to add those stuff in no particular order:
Modify the schema:
So in order for the parser to be able to detect this new addition we must modify the schema and put the definition of the new attribute in the ProActiveSchedulerType description tag.
<xs:complexType name="ProActiveSchedulerType">
    <xs:attribute name="numberOfNodes" type="xs:positiveInteger" use="required" />
    <xs:attribute name="minNumberOfNodes" type="xs:positiveInteger" use="optional" />
    <xs:attribute name="schedulerUrl" type="xs:string" use="optional" />
    <xs:attribute name="jvmParameters" type="xs:string" use="optional" />
</xs:complexType>
Modify the genericJob:
This code contain the description of the job as pre-cited before in the Section 27.3.1.1.1, “GenericJob” paragraphe. In this object we shall add this new attribute and add also some setters and some getters to manipulate this new addition.
Modify the parser:
When trying to modify the parser we shall see wether the newly created description is specific or if the attribut must be collected in general from all the Virtual Nodes. For instance, the numberOfNodes attribute is a non local attribute because in general for the scheduler to know wether to deploy or not the job it needs to have the total number of ressources needed. On the other hand, the schedulerURL attribute is local and is only used within the service for the acquisition of the nodes. Now that we know the difference, how can we tell the parser to extract the information following the 2 methods.
If the attribute is local we must add the attribute in the ProActiveSchedulerHandler of the ServiceDefinitionHandler class. We can add it to the startContextElement() method like this:
  if (scheduler != null) {
        // fetch an attribute
        String jvmParam = attributes.getValue("jvmParameters");
        // get the job's object description
        GenericJob job = scheduler.getTmpJob(jobId);
        // set the description because it's local
        if (checkNonEmpty(nbOfNodes)) {
             job.setJVMParameters(jvmParam);
        }

        // fetch another attribute but this one is non local
        String minNumberOfNodes = attributes.getValue("minNumberOfNodes");
        // set the attribute of the service associated to the node for later retrieval
        if (checkNonEmpty(minNumberOfNodes)) {
             schedulerLookupService.setMinNodeNumber(Integer.parseInt(minNumberOfNodes));
        }
  }
On the other hand if the thing is global, we shall think of setting the value inside the schedulerService like in the example above and then head back to the ProActiveJobHandler in the notifyEndActiveHandler() method and add it to the loop which can help fetch all the values associated to every virtual node and regroup them in one single attribute. Like for example, for the numberOfNodes demanded we add a counter to count the needed ressources and set the value to the job description like follow:
 for (int i=0; i<vns.length; ++i) {
       VirtualNode vn = vns[i];
       ArrayList vms = ((VirtualNodeImpl)vn).getVirtualMachines();
       for (int j=0; j<vms.size(); ++j) {
           VirtualMachine vm = (VirtualMachine) vms.get(j);

           UniversalService service = vm.getService();
           if (service.getServiceName().equals(SchedulerConstants.SCHEDULER_NODE_NAME)) {
                SchedulerLookupService schedulerLookupService = ((SchedulerLookupService) service);
                // here we shall calculate the sum of the non local attribute
                nodeNb += schedulerLookupService.getNodeNumber();
                minNodeNb += schedulerLookupService.getMinNodeNumber();
           }
       }
 }
 // and here we shall set the job description ...
 GenericJob job = scheduler.getTmpJob(jobId);
 job.setRessourceNb(nodeNb);
 job.setMinNbOfNodes(minNodeNb);
 scheduler.commit(jobId);
A job manager is, like mentioned before, an object for managing the ressources based on a specific policy. If you like to add a policy then you have to follow the following steps based on what kind of policy you want to add. In general, there is 2 kinds of policies that can be created: a simple policy and a mixed policy.
The first and the most basic kind of policy is the simple policy. It must be based on an existing quality of the job. If the attribute of the job doesn't exist you shoulld think of adding it first like directed in the previous paragraphe Section 27.3.2.2, “How to change or add a new description for the job”. For instance, if you want to create a new policy that serves the jobs with the highest priority first you have to create your own class, for example PriorityPolicy, and extend it from the AbstractPolicy class and implement the isToBeServed comparor method that compars 2 tasks in order to find the job with the highest priority. This is the complete example that can really explain how to create this simple code:
public class PriorityPolicy extends AbstractPolicy {
    public PriorityPolicy() {
        // TODO Auto-generated constructor stub
    }

    public PriorityPolicy(RessourceManager ressourceManager) {
        super(ressourceManager);
    }

    /**
     * Returns true if job1 is to be served before job2 according to the policy.
     * @param job1
     * @param job2
     * @return true if job1 is to be served before job2.
     */
    public boolean isToBeServed(GenericJob job1, GenericJob job2) {
        return (job1.getPriority() >= job2.getPriority());
    }
}
The second is a more advanced kind of policy but, nevertheless, is simple to add. There's the MixedPolicy class that's already created to take an undetermined number of policies, given their policyNames, to serve jobs according to more than one policy. So we can use this policy to form a specific policy according to the user's demands. But first the constituting pollicies must be created like directed in the previous paragraphe Section 27.3.2.3.1, “Adding a simple policy”. For instance, if you want to create a new policy that serves the shortest jobs with the highest priority first we need to combine the PriorityPolicy with the TimePolicy class and extend the newly created class, for example TimePriorityPolicy, from the MixedPolicy class instead of the basic AbstractPolicy class. This is the complete example that can really explain how to create this simple code:
public class TimePriorityPolicy extends MixedPolicy {
    private static Vector classes;
    static {
        classes = new Vector();
        classes.add("org.objectweb.proactive.scheduler.policy.PriorityPolicy");
        classes.add("org.objectweb.proactive.scheduler.policy.TimePolicy");
    }

    public TimePriorityPolicy() {
        // TODO Auto-generated constructor stub
    }

    public TimePriorityPolicy(RessourceManager ressourceManager) {
        super(ressourceManager, classes);
    }
}
To be able to add a new command we must first create the command in the specific object, for example if the command is relative to nodes we must think of creating it in the RessourceManager class and if it is relative to jobs we must think of creating it in the AbstractPolicy class. Either way all the demands must go through the scheduler daemon then we also need to put the method in the scheduler class and call the specific command from there.
Once the command is created we can add it to the communicator program in the HandleCommand method after creating its relative constant for the command name and for the command prototype. Then after adding a link to the method we should think of adding the help to the helpScreen method. For example if we need to create a command like the submission of a job we must create the method in the jobManager then make a method that calls this method from within the scheduler object. After this we must jump to the command class and create the constants, the help and the command like follows.
As we said before we must begin by creating the constants and insert the name of the newly created command in the constants area. The newly created command will have the name "sub" and stored in the constant with the tag SUB_CMD. On the other hand the prototype of the SUB_CMD is is "sub xmlFile" and is also stored in another constant with the SUB_PROTO tag. These constants will be used shortly after.
    /* These are the constants namely the commands that are used */
    private static final String SUB_CMD = "sub";
    private static final String SUB_PROTO = SUB_CMD + " XMLDescriptorOfTheJob";
Then we shall need to add certain functionalities for the command to work properly. We must head to the handleCommand method and add it to first to the list of known commands and then we will be more technical and make sure of the validity of the command before executing it.
       // we add the command here along with old commands to make sure that the
       // command is a valid one or is part of the commands that figure in the
       // communicator glossary of recognized terms.
       if (!command.startsWith(SUB_CMD) && ... ) {
            System.out.println("UNKNOWN COMMAND!!...");
            log("unknown command submitted: " + command, true);

            return false;
        }

        String error = null;

        // then we add what the command should do in here ...
        // if the command is a sub command then ...
        if (command.startsWith(SUB_CMD)) {
            flush(command);

            // Here we make sure that the command is being used correctly before we
            // continue withe execution of the sub command ...
            if (command.equals(SUB_CMD)) {
                error = SUB_PROTO + "\n";
            } else {
                String XMLDescriptorFile = command.substring(command.indexOf(' ')+1);
                this.scheduler.fetchJobDescription(XMLDescriptorFile);
            }
        }
Last but not least we'll add the documentation to the command in the helpMenu method:
     // Here we test the validity of the command and check if the comman dis known
     // in the communicator database ...
     if (!command.endsWith(SUB_CMD) && !command.endsWith(STAT_CMD) &&
                .... ) {
            System.out.println("No such command: " + command.substring(1));
            log("No help available for " + command, true);

            return;
        }

     result = "\n";

     if (!command.equals("?")){
        String keyword = command.substring(2);

        result += "This command's prototype is: ";

        // Here we shall add the specific help of the newly created command
        // along with the previously created commands ...
        if (keyword.equals(SUB_CMD)) {
            result += SUB_PROTO;
            result += "\n\n";
            result += "This command is used to submit a job to the scheduler.\n\n";
            result += "XMLDescriptorOfTheJob is the absolute path to the " +
               "XML Deployment Descriptor of the job to be submitted\n";
        } else if (keyword.equals(STAT_CMD)) {
            ....
        }

        result += "\n";
     } else {
        // and in the end we must add it to the list of known commands that will appear
        // when executing the "?" command
        result += "The commands available are: " + SUB_CMD + ", " + STAT_CMD + ", " +
           DEL_CMD + ", " + NODES_CMD + ", " + KILL_CMD + ", " + EXIT_CMD;
     }

     result += "\n";
     System.out.println(result);
© 2001-2007 INRIA Sophia Antipolis All Rights Reserved