| Prev | Part I. Introduction Chapter 2. ProActive Installation |  | Next |
| Prev | Part I. Introduction Chapter 2. ProActive Installation | | Next |
ProActive is made available for download under a LGPL license. ProActive requires the JDK 1.5 or later to be installed on your computer. Please note that ProActive will NOT run with any version prior to 1.5 since some features introduced in JDK 1.5 are essential.
Download and unzip the ProActive archive
Include in your CLASSPATH the ProActive jar
file (ProActive/ProActive.jar) along with
ProActive/lib/javassist.jar, ProActive/lib/log4j.jar,
          ProActive/lib/xercesImpl.jar, ProActive/lib/components/fractal.jar,
          ProActive/lib/bouncycastle.jar
Depending on your project needs, you might need to include other libraries located in the ProActive/lib directory.
Don't forget to launch the JVM with a security
policy file using the option
-Djava.security.policy=pathToFile. A basic policy file can be found
at ProActive/scripts/proactive.java.policy. You can also specify a
log4j
configuration file with the property
-Dlog4j.configuration=file:pathToFile. If not
specified a default logger that logs on the console will be
created.
Below are described the different steps in more details.
You can download the archive file (a standard zip file) containing ProActive from the download section of the ProActive home page. You will be asked to accept the licence agreement and provide a few personal details including your email address. You will then within a few minutes receive an email.
Unzip the archive using your favorite ZIP program, such as Winzip under Windows or the unzip command-line utility on most Unix systems. Unzipping the archive creates a ProActive directory and all the files contained in the archive go into this directory and its subdirectories.
Here is a quick overview of the directory structure of the archive:
Directory or File | Description |
| ProActive bytecode that you need to include in the CLASSPATH in order to use ProActive |
| The bytecode and resources of all examples included
with ProActive. This jar file needs to be included in the
CLASSPATH only when trying to run the examples. All examples rely
on ProActive and therefore the |
| The bytecode and resources of IC2D. This jar file
needs to be included in the CLASSPATH only when trying to run the
application IC2D. IC2D relies on ProActive and therefore the
|
| The external libraries used by ProActive |
| ProActive documentation including the full api doc |
| Unix sh scripts for running the examples |
| Windows .bat batch files for running the examples |
| For source version only, the full source code of ProActive |
| For source version only, the scripts to compile ProActive using Ant. |
Table 2.1. ProActive.zip contents
You can try to run the test applications provided with ProActive.
Each example comes with a script to launch the application. Depending on
you operating system, the script you need to launch is located either in
ProActive/scripts/unix or
ProActive/scripts/windows. The source code of all
examples can be found in the directory
ProActive/src/org/objectweb/proactive/examples.
A simple example
script : hello.sh or
hello.bat
source : examples/hello
This example is the ProActive version of the Readers/Writers canonical problem. To illustrate the ease-of-use of the ProActive model, different synchronization policies can be applied without even stopping the application. This example is based on a easy to use Swing GUI.
script : readers.sh or
readers.bat
source : examples/readers
This example is one possible implementation of the well-known Dining Philosophers synchronization problem. This example is based on a easy to use Swing GUI.
script : philosophers.sh or
philosophers.bat
source : examples/philosophers
Note that if you use the scripts provided with the distribution to run the examples you do not need to update your classpath.
In order to use ProActive in your
application you need to place in your CLASSPATH the
following jars files :
lib/ProActive.jar The
library itself.
lib/javassist.jar in lib directory. It is used to handle bytecode manipulation.
lib/log4j.jar Log4j
is the logging mechanism used in ProActive.
lib/xercesImpl.jar
Xerces is the library used to parse and validate xml
files, like Deployment Descriptors, Configuration files and Component
files (see Chapter 21, XML Deployment Descriptors, Chapter 20, ProActive Basic Configuration, and Chapter 28, Components introduction).
lib/components/fractal.jar Fractal is the component model used for ProActive Components (see Chapter 28, Components introduction).
lib/bouncycastle.jar This
library is used by the ProActive security framework (see Chapter 37, ProActive Security Mechanism).
You do not need to modify your CLASSPATH permanently as long as you include the two entries above using a Java IDE or a shell script.
In addition to the jar files above you may want to add the following jar files. None of them are used directly by the core functionnalities of ProActive but only in part of the library. Their are needed to compile all the code but they are not needed at runtime if those specific functionnalities are not used.
lib/jsch.jar Used when tunneling with rmissh.
lib/jini/*.jar Used to interface with Jini.
lib/globus/*.jar Used to interface with Globus.
lib/components/*.jar Used by the the Fractal components.
lib/ws/*.jar Used by the Web Services features in ProActive.
lib/ibis.jar Used by Ibis if configured as communication protocol.
lib/unicore/*.jar Used when deploying to a unicore site.
lib/glite/*.jar Used to deploy on gLite sites.
If you use the scripts provided with the distribution to run the examples an existing policy file named proactive.java.policy will be used by default.
See Permissions in the JavaTM 2 SDK to learn more about Java permissions. The option -Djava.security.policy=pathToFile will specify which policy file to use within proactive. As a first approximation, you can create a simple policy file granting all for everything :
grant {
    permission java.security.AllPermission;
}; ![[Note]](images/note.png) | Note |
|---|---|
If you use the scripts provided with the distribution to run the
examples an existing log4j file named |
          # the default logging level is INFO

log4j.rootLogger=INFO, A1

#A1 uses PatternLayout
#and displays the associated message (%m)
#using the platform dependant separator (%n)
#Use %M for method names
#see log4j documentation for details

log4j.appender.A1=org.apache.log4j.ConsoleAppender
log4j.appender.A1.layout=org.apache.log4j.PatternLayout
log4j.appender.A1.layout.ConversionPattern=%m %n

#this appender displays :
# %c : name of logger,
# %C : name of the class,
# %M : method name,
# %L : line number, and the message with the following pattern
#log4j.appender.A1.layout.ConversionPattern=%c - %C{1}@%M,line %L :%n %m%n

########### Change here default logging level on a
########### per-logger basis
########### usage is log4j.logger.className=Level, Appender
Example 2.1. A simple proactive-log4j file
We recommend you use the Eclispe IDE to develop your ProActive applications. You can get this tool on the Eclipse website Just unzip and launch the eclipse executable. In order to develop your own ProActive application, you will need to create an eclipse project :
File -> New ... -> Project
Then choose Java Project . A wizard should appear and ask you to enter the project name :
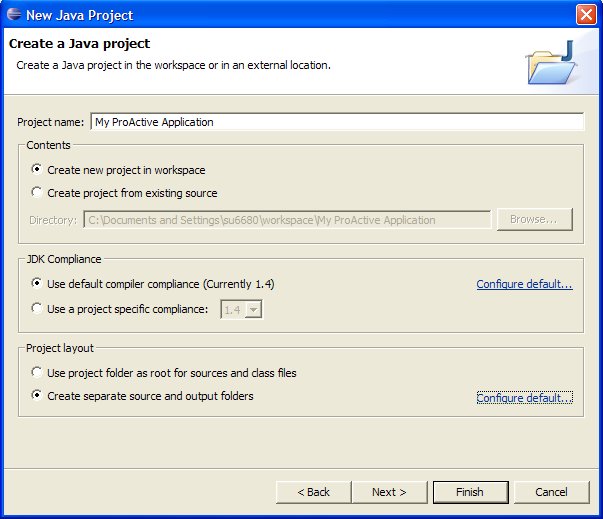
In order to separate class files from source files (it can be useful if you write scripts which refer to these classes), you can check the Create separate source and ouput folders in the Project Layout Frame, and click on configure default ... to choose the folders names. Once you have choosen all informations about Project Name , Project location , you can click on Next .
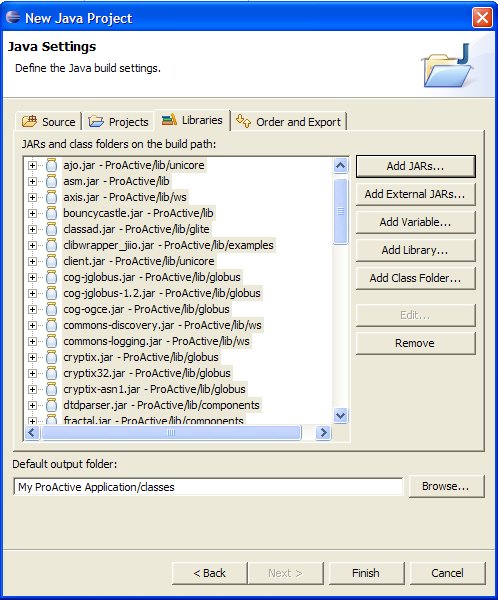
You have to specify some java settings in order to set the application classpath. Select the Librairies tab and click on the Add External Jar... button. Add the ProActive.jar and the librairies contained in the lib/ directory of the ProActive distribution.
The Librairies tab should look like this :
You can see now on the navigator tab on the left side, that there is a new Project with the source and output folders you've just created :
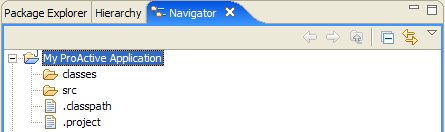
You are now able to create classes and packages that use the ProActive library.
| Note |
|---|---|
There is one file which is problematic with Eclipse:
compile$
      build compile
), there are no problems. The script checks the
java3d installation before compiling the 3d class. When java3d is not
installed, the nbody example only works only in 2d. |
All is now configured to create your ProActive application. Click on the Finish button.
We are currently developing an Eclipse plugin that will help developers to easily create ProActive applications. Have a look at the plugin documentation page, Chapter 42, IC2D: Interactive Control and Debugging of Distribution and Eclipse plugin .
If you encounter any problem with installing ProActive and running the examples, please make sure you correctly followed all the steps described above. If it doesn't help, here is a list of the most common mistakes:
Permission denied when trying to launch scripts under Linux Permissions do not allow to execute files. Just change the permissions with chmod 755 *.sh
Java complains about not being able to
find ProActive's classes. Your CLASSPATH
environment variable does not contain the entry for the ProActive's or
ASM's or Log4j's or Xerces' or Fractal's or BouncyCastle's classes.
ProActive.jar,asmXX.jar, log4j.jar,
xercesImpl.jar, fractal.jar, bouncycastle.jar must be in
your CLASSPATH.
Java complains about denial of access. If you get the following exceptions, you probably didn't change the file java.policy as described in Section 2.5, “Create a java.policy file to set permissions”.
org.objectweb.proactive.NodeException:
java.security.AccessControlException: access denied
(java.net.SocketPermission 127.0.0.1:1099 connect,resolve)
                at org.objectweb.proactive.core.node.rmi.RemoteNodeImpl.<init>(RmiNode.java:17)
                at org.objectweb.proactive.core.node.rmi.RemoteNodeFactory._createDefaultNode
                        (RmiNodeFactory.java, Compiled Code)
                at org.objectweb.proactive.core.node.NodeFactory.createDefaultNode(NodeFactory.java:127)
                at org.objectweb.proactive.core.node.NodeFactory.getDefaultNode(NodeFactory.java:57)
                at org.objectweb.proactive.ProActive.newActive(ProActive.java:315)
                ...
Exception in thread "main" java.lang.ExceptionInInitializerError:
java.security.AccessControlException: access denied
(java.util.PropertyPermission user.home re ad)
                at java.security.AccessControlContext.checkPermission (AccessControlContext.java, Compiled Code)
                at java.security.AccessController.checkPermission(AccessController.java:403)
                at java.lang.SecurityManager.checkPermission(SecurityManager.java:549)
                at java.lang.SecurityManager.checkPropertyAccess(SecurityManager.java:1243)
                at java.lang.System.getProperty(System.java:539)
                at org.objectweb.proactive.mop.MOPProperties.createDefaultProperties (MOPProperties.java:190)
                ...
Java complains log4j
initialization If you get the following message, you
probably made a mistake when giving the
-Dlog4j.configuration property to the java command.
Be sure that the given path is right, try also to add file: before the
path.
    log4j:WARN No appender could be found for logger .....
    log4j:WARN Please initialize the log4j system properly
Examples and compilation do not work at all under Windows system: Check if your java installation is not in a path containing spaces like C:\Program Files\java or C:\Documents and Settings\java. Batch scripts, indeed, do not run properly when JAVA_HOME is set to such a directory. To get rid of those problems, the best thing to do is to install the jdk under a space-free directory and path (e.g. C:\java\j2sdk.... or D:\java\j2sdk... ) and then set the JAVA_HOME environment variable accordingly.
If you cannot solve the problem, feel free to email us for support
at <proactive@objectweb.org>. Make sure that you include a
precise description of your problem along with a full copy of the error
message you get.
© 2001-2007 INRIA Sophia Antipolis All Rights Reserved