Programming in REJO
REJO is an extension of Java that creates Reactive Objects,
that's to say, objects that have data and a mix of java instructions and
reactive instructions. The execution model is that of Reactive Synchronous
Approach which executes the java instructions in an atomic way. These objects
may be considered as Mobile Agents because they can migrate
using a platform, called ROS, that provides the functionalities that they
need.
Since Java doesn't have primitives to make a reactive programming, REJO
and ROS use Junior. REJO/ROS is the evolution of RAMA platform which was
created with the propose of testing the reactive paradigm in order to build
mobile agents.
This tutorial presents the basis for building a reactive system using REJO
language. The first section introduce reactive systems and agents systems. The
section 2 presents REJO: program's structure and instructions. Section
3 describes the steps for compiling and running a REJO program. Finally, section
4 gives some examples and section 5 resumes the characteristcs of REJO.
1 Introduction
The reactive systems were introduced by Harel and Pnueli [1]
and developed in several laboratories that lead to the synchronous model and
a set of programming language, called synchronous, that implement it. Among
these languages one finds ESTEREL[12],
Lustre[13] et Signal[14].
However, the synchronous model presents some restrictions that avoid, for exemple,
its utilisation in the construction of dynamique systems. Such restrictions
led to the creation of the synchronous reactive model that was, firstly, implemented
in C (Reactive-C[6]) and then in Java (SugarCubes[9]
and Junior[4]) and Scheme (Senior [15]).
Nevertheless, it miss a programming language that rejoints the advantages of
previous languages and adds anothers. In particular it miss:
- A high level object oriented language and its reactve
object model. The language offert by SugarCubes and Junior is low level and
without modular mechanism.
- A language that integrates, in a transparent way,
the reactive code and the imperatif code. There were some tries like the Reactive
Scripts [10] but in this one the integration
is restraint and only the interpret case is considered.
- A language adapted to the new programming paradigms,
for exemple, the dynamique migration of code (par exemple of reactive behaviors).
This is imposible in pure synchronous languages like ESTEREL and in the reactive
synchronous languages there are neither primitives to migrate nor the execution
environment needed.
This paper presents REJO language which is the proposition of a new reactive
language, it is rather an extension of Java in order to create REactive Java
Objects (REJO). The reactive objects can migrate in a natural way using the
reactive framework, and the necessary functions typical of Mobile Agent (like
the assignation of names) are provided by the platform named ROS. This platform
executes the objects and provides the typical operations of a MAS. From now
on we'll use reactive object, REJO and agent as synonyms.
The REJO programs are translated in code 100% JAVA. The reactive instructions
are translated by the REJO Compiler (REJOC) in Junior instructions. The
result is a language with the following characteristics:
- Concurrency: REJO Objects are executed concurrently (in a cooperative system).
- Interactivity: REJO objects communicate locally using
instantaneous broadcast.
- Reactivity: Agent's behavior is built using primitives
that react to the presence or absence of broadcast events.
- Mobility: Agents can migrate in the network autonomously
(strong migration).
- Dynamic: The agents can be added, modified and removed
of the system whenever.
- Multi-platform: The portability is assured because of Java code (byte code).
2 REJO language
REJO is high level language that allows programmers to build reactive systems
easily. As a high level language, REJO translate its instructions in a low-level
language (Junior) hiding its complexity. In the case of REJO, it hides the complexity
of using logic conditions (called Configurations in Junior), using atomic instructions,
and using reactive variables (called i.e. IntegerWrappers). It also introduces
some notions that don't exist in the low-level language, for instance the notion
of method, local reactive variables, and the inheritance of reactive behaviors.
All these concepts will be described in the following sections.
2.1 REJO execution model
High level description
REJO language is a language that merge to 3 models, the model of: imperative
languages, OO languages (Object Oriented languages) and reactive languages.
The mix is implemented in the following fashion:
- OO code vs Imperative code. The OO model used is that of Java,
i.e. Java defines the relation between data and code, and the code is programmed
in an imperative style. In particular Java defines 3 concepts1) the relation
between imperative code and data; they are encapsulated and see like one unit,
a class, 2)the creation of objects from a class definition, the instantiation
of a class, 3) the contructions of one class from another one, i.e. the
inheritance and its rules.
- Imperative code vs Reactive code. Imperative code coexist
with reactive code thanks to the definition of a reactive instruction, the
atom instruction. This coexistence is unidirectional, i.e. imperative code
is not executed if the reactive code does not execute it (executing an atom
instruction).
- OO code vs Reactive code. The relation between the reactive
code and the OO model follows almost the same rules that the relation between
imperative code and the OO model. In other words reactive code behaves as
imperative code in the OO model: 1) reactive code is encapsulated with data
(a REJO class), 2) the instantiation of a REJO class creates a Reactive Object
and, 3) REJO class may be built inheriting from another REJO class. The particularites
in the relation between reactive code and the OOmodel
are due to the execution reactive model, for exemple variables are
evaluated according to the notion of intant defined in the reactive model.
The figure 1 shows the relation among the 3 models.
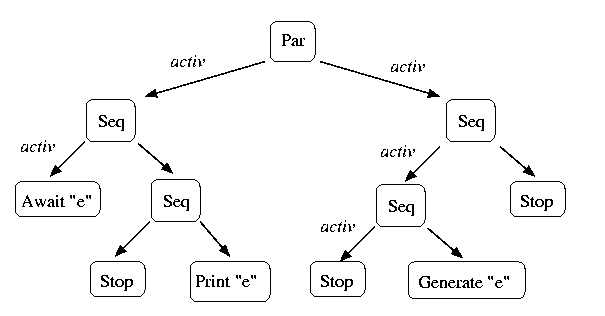
Figure1: REJO execution model.
Low level description
The REJO language was built with the objective of obtaining a high level language
based on the Junior language. In other words the REJO language was born from
the evolution of the Junior language and that is why REJO keeps many concepts
from Junior (those that we think are the main advantages of Junior) and hides
and adds others (those that make the reactive programming difficult or miss
in Junior). One of the main advantages of Junior, that REJO keeps, is the specification
of its execution model using rewriting rules. Rewriting rules are used to define
the semantics of each reactive instruction as well as the notion of executing
a Junior program (look Reactive Synchronous Model
description).
The graphical representation of a Junior program is a tree formed by nodes
that represent the reactive instructions. For exemple if we consider the following
Junior program:
Jr.Par(Jr.Seq( Jr.Await( Jr.Presence( Jr.StringWrapper("e"))
),Jr.Seq(
Jr.Stop(),
Jr.Atom( new Print("E") ) ))
,Jr.Seq( Jr.Seq(Jr.Stop(),
Jr.Generate(
Jr.StringWrapper("e") )),
Jr.Stop())
)
its execution tree is show in the figure 1.
Figure 2: Junior execution tree.
As you can see in the figure 1, the Junior semantics does not define the relation
among reactive instructions and variables. Of course that no language can be
used without the concept of variables and that is why Junior defines Wrappers.
Wrappers allows programers to define variables that will be evaluated , at run
time, by reactive instructions. The problem with Wrappers is that they are difficult
to use because it is a low level concept that does not allow programers to implemented
scopes of variables. In addition the notion of method, that may have parameters
and local variables, does not exist and so there is no way to make a program
in a modula way.
The REJO execution model takes the Junior execution model and adds the following
concepts:
- Reactive method: A reactive method is the asotiation of an
identifier, the method name, and a set of reactive instructions. The set of
reactive instructions must define a well-formed reactive program according
to the Junior semantics defined in (). A reactive method returns always a
Junior program and so its not necesary to have a keyword like return.
An empty reactive method returns a Junior Nothing reactive instruction.
- Invocation of a reactive method: The invocation of a reactive
method makes a copy of the reactive instructions of the method and puts the
copy where the invocation was done. The invocation of a reactive method can
be done statically or dinamically. If the invocation is done statically
- Local variable: A local variable is the asotiation of a name
and a zone of storage. The scope where the local variable can be used by its
name is that of the reactive method that declarates it. Local variables can
be used outside of its scope if they are objects and a references to the object
is stored in a global variable. In conclusion a local variable is defined
in the same way of Java.
- Parameter: A parameter of a reactive method is a local variable.
If the type of the local variable is a basic type (int, float, double, etc)
its value is a copy of the formal parameter value. If the type of the local
variable is an objetc, the local variable contains a reference to the formal
parameter object, in others words it is the same object. In conclusion the
parameters are implemented in the same way of Java: basic types are passed
by values and objects by reference.
To illustrate these 4 concepts the figure 2 shows the graphical representation
of the REJO program presented in the section 4.2.
Like Junior, the graphical representation of a REJO program is a tree formed
by nodes that represent reactive instruction. The reactive methods are represented
by a set of nodes (enclose in a dotted box ) that form a conex graph. Each reactive
methode may have a space of variables asociated.
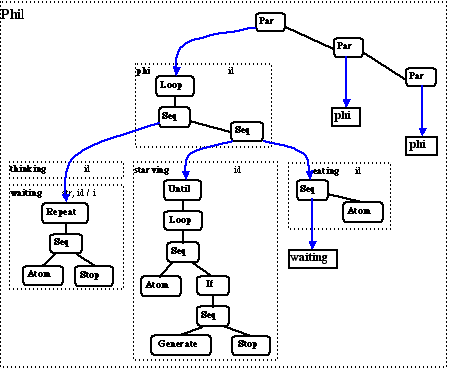
Figure 3: REJO execution tree
In order to execute a Junior program one use a reactive machine that makes
react the reactive instructions. Like Junior, REJO uses also a reactive machine
to make react reactive methods, this means that it is possible to execute many
reactive methods of differents REJO objects and to execute Junior programs at
the same time.
REJO language is implementes on top of Junior but the REJO execution model
defined in this section is sufficently abstract to be implemented in another
way (a field of research to explore).
2.2 REJO program structure
The structure of a REJO class is the same as a Java class to which it can be added
special methods named reactive methods. These reactive methods have
their own syntax which is very similar to the Java syntax and is given in the
next section, and their own semantic, the Junior semantic. A REJO program may
have several reactive methods and they can be put anywher inside of the class.
In summary, the only difference with a standard Java class is the presence of
reactive methods.
package package_name
import package_name
public class class_name
{
Variables;
Java Methods
Inner classes
...
Reactive
methods
}
Once created a REJO object, the programmer has two options to execute it:
- To follow the steps done in Junior :
- Create a main method with an instance of the class,
- Add the reactive instructions to the machine, and
- Activate the machine in order to execute the program.
- To load the REJO class in a ROS either by loading manually one instance
of the class or using the loader provided by the ROS system, the reactive
shell (Rsh). Rsh will create an instance of the class and it will automatically
add it in the system.
When a REJO program is executed on the ROS system it has to follow some rules:
- There must exist a reactive method called rmain.
The rmain method plays the
same role as the main method in a Java program: it is the method to which
the system gives the control.
- The REJO program must implement the interface Agent.
These rules add to the REJO two things that will allow it to be executed in ROS
platform: the notion of local name and some methods for performing the migration.
For more information about the execution of REJO programs, see the section 3.
2.3 Reactive methods and basic
reactive instructions
A reactive method has a syntax and a semantics very similar to the Java methods;
basically it is a sequence of instructions that has a name and that may have local
variables and parameters.
modifiers reactive
Method_Name( parameters )
{
local variables;
reactive instructions
}
The sequence of reactive instructions is a reactive instruction
which is hidden to the programmer. Besides of sequence of reactive instructions
there is another compound instruction, the par
instruction which is explained in the section 2.6.
The syntax of reactive methods is the same of Java methods with two differences:
they return a value of type reactive,
and the set of reactive instructions that can be used in a reactive method are
of three types:
- The reactive instructions defined in the following sections, for instance
par, loop,
repeat, etc.
- The subset of Java instructions named expressions, for example the
invocation of methods and the expressions that use the assignation operator.
-
The declaration of Java variables. These variables are local to the reactive
method as in Java methods.
The semantics of the expressions and the variables is the same of Java and the
semantics of reactive instructions is given in the following sections.
In order to make the Java instructions and reactive instructions coexist, the
Java instructions are executed like atomic instructions. An atomic
instruction is an instruction that finishes instantaneously, i.e. it starts
and finishes its execution in the same instant. The notion of instantaneously
termination is a concept to keep in mind because some reactive instructions
may take one or more instants for being executed, i.e. they can finish instantaneously
or not. There is another instruction, like the atomic one, that also finishes
instantaneously: the nothing instruction. The nothing instruction
is used for implementing the execution model and programmers rarely will used
it.
The instructions of the reactive methods are executed in sequence without interruption
until the stop instruction stops the execution for the actual
instant. The end of an instant is defined in the same way as Junior, when all
the instructions finish or are stopped. In general, programmers do not care
about instruction's state, TERM, STOP or SUSP, because these values are handled
by the reactive machine for implementing the behavior of each instruction. However,
in order to understand how the program is executed they have to take them in
account.
This section finishes with the presentation of one of the simplest programs
that can be programmed in REJO, the program that prints ''Hello World''. This
program uses the instruction System.out.print
that prints a string on the screen atomically.
import ros.kernel.*;
public class HelloWorld
implements Agent
{
public
reactive rmain(String[] args)
{
System.out.println(" Hello World");
}
}
2.4 Atom instruction
In the previous section we say that in a reactive method you can only use a subset
of Java instructions. The reason of this constraint is to avoid writing some instructions
that do not make sense (they would not have semantics) in the reactive model or
they could not be executed by the reactive machine. For instance in the programme
-
for(int i=0; i<10; i++)
-
stop;
there would be a problem executing the for instruction by the reactive machine.
The for instruction is not a
reactive instruction and thus the reactive machine would not know how to interpret
the stop code returned by the stop
instruction.
The problem with this restriction is that it forces you to write a Java method
each time that you want to use any flow control structure and to make an atomic
invocation to it (remember that invocations are valid expressions).
The atom instruction allows
programmers to write almost any kind of Java instruction as an atomic instruction
without defining a Java method.
Syntax
-
atom { Java instructions
}
Example
-
int j=10;
-
atom{
-
int i=5;
-
if(i < j)
-
for(int k=0; k<i; k++)
-
System.out.println("k= "+i);
-
}
We end this section with two atomic instruction used for printing: print
and println. These instructions are similar to the System.out.println
Java instruction. These instructions are provided for defining the standard output
in ROS platform. In order to use them out of ROS platform you have to implement
the Agent and Output interfaces (for more information about them look at ROS documentation).
2.5 Invocation of reactive methods
The previous section presented the use of Java instructions by reactive instructions.
These Java instructions are executed atomically and if you do not use the keyword
atom it is only possible to use
a subset of Java instructions. This subset includes invocations of methods and
thus to invoke a Java method you just type its name and its parameters, if needed,
for example:
-
public reactive rmain(String[]
args)
-
{
-
java_method();
-
}
Of course, when a Java method is invoked it is possible to catch the returned
value (if it was defined) and process it.
However, when a reactive method is invoked you have to use the keyword call,
for instance:
- public reactive rmain(String[]
args)
- {
- call reactive_method(3);
- }
- reactive reactive_method(int
i)
- {
- System.out.println("i=
"+i);
- }
The distinction between Java methods and reactive methods is done because the
last ones are reactive instructions that are built and and introduced at the point
where the call keyword was used,
i.e. the call instruction is basically a macro. The consequence of this is that
it is not possible to use recursion in reactive methods.
Since the call instruction allows
you to insert reactive instructions, it is possible to use not only reactive
methods but also any Java instructions that returns Junior instructions, for
example:
-
1.
-
call java_method();
-
...
-
Program java_method()
-
{
-
return Jr.Loop(Jr.Stop());
-
}
-
2.
-
Program p = Jr.Stop();
-
call p;
-
3.
-
call Jr.Repeat(5,
Jr.Stop());
Examples is in section 4 illustrates this.
2.6 Par instruction
The par instruction implements
a primitive parallelism. It is a primitive parallelism because its branches are
not executed at the same time as in a multiprocessors system and the parallelism
is controlled by the programmer using the stop
instruction. This parallelism can be seen as a variant of threads programming
in which you give explicitly the control. In REJO you do it using the stop
instruction and in threads programming you usually use a method called yield.
In other words, the par-stop instructions
allow programmers to build cooperative systems and not preemptive systems 1.
The par instruction implements
a primitive parallelism in which the branches are activated at each instant
and the par instruction finishes
when all the components have finished. The semantics of par
instructions does not specify the order in which the branches are executed and
thus you should not assume an specific order 2
when you build your program.
Finally, the par instruction finishes when all the components have finished
and it must have at least two components.
Syntax
-
par { reactive_instructions
|| ... || reactive_instructions }
Example
This example shows how the par-stop
works together for implementing the parallelism and how the structure of the
program defines the instants.
-
Instants
-
#1 #2 #3
- par
| | |
- {
-
System.out.print("i11");
|
-
stop;
|
-
System.out.print("i12");
|
-
stop;
|
- ||
-
System.out.print("i21");
|
-
stop;
|
-
System.out.print("i22");
|
-
stop;
|
-
System.out.print("i23");
|
-
stop;
|
- ||
-
System.out.print("i31");
|
-
stop;
|
- }
2.7 Loop instruction
A loop is an instruction that allows to execute several times a set of instructions
named loop's body or body. If the number of times is infinite, we say that it
is an infinite loop, otherwise it is a finite loop. In REJO, like in Junior, two
instructions allow creating infinite loops and finite loops; they are named loop
and repeat respectively. In this
section we present the loop instructions
and the next section presents the repeat
instruction.
As it was said, the loop instruction
implements an infinite loop, however when you use this kind of loop you have
to pay attention in the way of using this instruction. If you build a loop that,
after having completely executed its body during an instant, restarts immediately
to execute it in the same instant, we say that you have an instantaneous
loop. Instantaneous loop are potentially dangerous because they can stop
the execution of whole program, remember that you are programming a cooperative
system and that this means that soon or late you must give the control to the
other components if you want that the system evolves.
Syntax
-
loop
-
body
The loop instruction syntax is, in essence, the same that the Java control structures
syntax, for example there can be spaces and enters between the different components.
Like Java, the parenthesis "{" and "}" are necessary if the body has
more than one reactive instruction; this is also true for the other REJO instructions
described in the following sections. Of course we recommend, like in any programming
language, to indent your programs in order to make them understandable.
Examples
- This example shows the typical construction to execute an instruction at
every instant:
-
loop
-
{
-
System.out.print("Hello
World");
-
stop;
-
}
This program prints Hello World at each instant.
- The next example shows the construction of an instantaneous loop. In fact
this program will block the machine because it never gives the control to
the others components (you should never make a program like this, you should
use loop with at least one
stop).
-
loop
-
{
-
System.out.print("Hello");
-
System.out.println("World");
-
}
This instruction prints:
"Hello World" forever during the first instant.
2.8 Repeat instruction
This instruction implements finite loops, in other words it executes its
body a fixed number of times: the value read the first time that the instruction
is executed. Unlike infinite loops, the fact that the body finishes instantaneously
is not a problem because it will finish so it is not dangerous to omit
the stop instructions.
Syntax
- repeat( expression )
-
body
Example
repeat(5){
System.out.print("Hello
");
stop;
}
This program will print 5 times Hello, one by instance.
2.9 Reactive Variables
In REJO, as in Junior, you can use variables in reactive instructions. A problem
with these variables is that they have to be read when the reactive instruction
is executed and not when the instruction is built. In order to resolve this problem,
Junior defines Wrappers of Variables, for example IntegerWrappers
and BooleanWrappers. One of advantages
of using REJO is that Wrappers are used when they are necessary, i.e., the compiler
builds them whenever a variable is used in a reactive instruction. The only precaution
that you have to take in account, as usual, it is that types match.
For example, when you use a repeat
instruction you can use a variable for defining the number of times that the
loop will be performed. The repeat
instruction specifies that this number is read the first time we execute the
instruction, thus if you put a variable, like in the following example, the
repeat instruction will be executed
with the value read when the instruction is executed the first time (3 times
for the given example below) and this value does not change if you change the
variable's value.
int i=2;
i++;
repeat(i){
System.out.print(i+", ");
i++;
stop;
}
This program prints: 3, 4, 5.
2.10 If instruction
This instruction allows picking and following the execution between two branches
according to the evaluation of a boolean condition. If the condition is true then
the first branch (if branch) is
executed, else the second one (else
branch) is executed. Boolean conditions are java boolean conditions with one restriction:
they cannot test the presence or the absence of events, for doing that you have
to use the when instruction (section
2.14).
Syntax
-
if( boolean condition )
if( boolean condition )
-
body
body_1
else
body_2
Example
int i=5, j=10;
if( 2*i
== j ){
repeat(
i ){
System.out.print("i= "+i);
stop;
}
}
2.11 Events and Event conditions
Events are a key concept in the Reactive Synchronous Model, most of the reactive
instructions define a behavior depending on an event, for example events are used
for controlling or preempting reactive instructions. Events can be implemented
using strings but programmers can also use a more general definition, Identifiers
(for more information look at the documentation of Junior
[4]). Events are defined in the following
way:
- The events are undefined at the beginning of each instant. They are not
persistent data because they lost their values at the end of each instant.
- An event is generated when the generate
reactive instruction is executed, so the event becomes present for the actual
instant. Generating an event that is already present does not have any effect.
- The events are broadcast instantaneously by the execution machine.
-
You only can decide that an event is absent during an instant at the end
of it. Therefore, the reaction to an absent event is always done in the
following instant.
In this way, we find in REJO the reactive paradigm's events with the delayed
reaction to the absence that eliminates the causality problems
3.
In REJO you can also use Event Conditions, i.e. you can build expressions
for testing if two or more events are present in the same instant (AND operator)
or testing if at least one of them is present (OR operator). You can also test
if an event is not present in the instant (NOT operator). These are the only
3 operators that you can use for testing conditions formed with events.
Each of these operators are implemented in REJO, like in Java, using the characters
&&, || and !. As in Java the AND and the OR operator have the same precedence
(and therefore evaluated from right to left), and the NOT operator has more
precedence than AND and OR operators. To change the precedence of the operators
or the order, between AND and OR operators, you can use "(" and ")" characters
as in Java.
Some examples of event conditions are:
cond1 = !("a"&&
"b") || "c"
cond2 = ! "a" && var1
|| var2 + "b"
The following sections show how you can generate events and how you can
react if an event condition is satisfied.
2.12 Generate instruction
This instruction generates an event in the execution environment and finishes
immediately, i.e., in an atomic way. The type of events is defined in a general
way using the notion of Identifier.
An Identifier allows defining events
using any kind of object that has at least an equals method. Thanks to this abstraction
programmers can use any basic data type or a combination of them, for instance,
integers as events. However, the use of Identifiers
implies that programmers must define their own notion of event. For avoiding this
job, REJO defines the StringIdentifier
type that allows generating Strings as events. Of course String events are handled
transparently by REJO and thus you do not have to define anything. For more information
about Identifiers look the Junior
spec.
Syntax
- Event !;
- (gen|generate)
Event_Expression [, objs];
Examples
-
"Event" !;
// Example 1
-
gen "Event";
// Example 2
-
gen "Event" + variable +
method(); // Example 3
-
gen variable;
// Example 4
-
gen method();
// Example 5
Note that the syntax used in the example 1 accepts neither objects nor expressions
whereas the gen syntax accepts
string expressions (like in example 3), Objects
and Identifiers. In the examples
5 and 6 the variable and the method can be strings or Identifiers, the gen instructions
test the type.
When an event is generated, no matter its type, you can attach an object to
it, in other words you can generate events with values. In this way, it is possible
to not only synchronize behaviors using events but also communicate data at
the same time.
-
gen "Event", "Obj String";
// Example 6
2.13 Wait instruction
This instruction implements a reactive behavior which consists in waiting that
a event conditions is true. If the event condition is true the control pass to
the next instruction in the same branch, otherwise the instruction waits untill
the event condition is true. The wait is implemented by testing if the event condition
is false or the end of instant is achieved. If the end of instant is achieved
the instruction returns stop, i.e., it behaves as a stop instruction for that
instant.
Syntax
-
Event ?;
-
wait Event_Condition [,
objs];
Examples
- "Event" ?;
// Example 1
- wait "Event";
// Example 2
- wait "Event" + variable
+ method(); // Example 3
- wait ("a" && variable
) || !method(); // Example 4
As in gen instruction, the use
of the character ? allows waiting
for simple events and not for event conditions or events formed by string expressions.
In the case of examples 4 the wait
instruction tests the event's type for knowing which type of Identifier
will be used.
When a valued event has been generated, you have to use a special Junior instruction
for retrieving the values. In REJO you have two constructions for doing that:
-
currentValues Event,
objs;
-
previousValues Event, objs;
These instructions returns an array of Objects in objs thus it is the
programmer responsibility to make a correct cast to recover the type emitted.
There is another syntax that allows doing both the wait
and the previousValues instructions
in one step:
- wait "Event", objs;
The programmer should be careful with this syntax because the semantic of the
instruction hides a stop instruction;
in fact this instruction is equivalent to:
-
wait "Event";
-
stop;
-
previousValues "Event",
objs;
2.14 When instruction
This instruction allows picking and following the execution between two branches
according to the evaluation of an event condition. If the condition is true then
the first branch (when branch)
is executed, else the second one (else
branch) is executed.
The particularity of this instruction is that it can finish instantaneously
and when it does not finishes instantaneously its behavior hides a stop
instruction. The instruction finishes instantaneously when the event condition
is satisfied before the end of instant and the chosen branch (the first branch
if the condition is satisfied and the else
branch in the other case) finishes in the same instant. We say that it hides
a stop instruction because if
the value of event condition in known at the end of instant, for example when
the absence of an event is tested, then the chosen branch is executed at the
next instant.
Syntax
-
when( event condition )
when( event condition )
-
body
body_1
-
else
-
body_2
Example
The following example shows the effect of the stop
instruction hidden in the when
instruction. The program is compound by two branches: the first one generates
the event "E" in the fourth instant and the second one tests its presence. The
fact is that even though the second branch tests the presence of the event it
does not detect it because the branch is unsynchronized with the first one because
of the introduced stop instruction.
The right side of the program gives two traces of the program's execution: the
first one when you run the program with N=3 and the second one with N=2.
-
Trace 1
Trace 2
-
#1 #2 #3 #4 #5
#6 #1 #2 #3
#4 #5
-
par
| | | |
| | *
* * * *
-
{
- repeat(N)
| | |
* *
-
stop;
| | |
* *
-
"E" !;
|
*
-
||
-
repeat(3){
| | | |
| *
* * * *
-
when("E")
| |
| *
* *
-
System.out.print("e ");
*
-
else
-
System.out.print("!e "); |
| |
*
*
-
stop;
| |
| *
* *
-
}
-
}
The output of the program using the value 3 is: ``!e !e !e'' and ``!e e !e ''
in the other case.
2.15 Until instruction
This instruction implements the preemption, in other words it forces the termination
of a set of reactive instructions (the body of the until
instruction) according to an event condition. The preemption is weak, i.e., it
occurs after body reacts, if the event condition becomes true and the body has
stopped. Junior, and therefore REJO, uses weak preemption for avoiding causality
problems.
The instruction may have two parts: a body and a handler. The handler's code
is optional and it is executed when the preemption is done.
The until preemption can be instantaneous or not. We say that it occurs an
instantaneous preemption if the event condition is true during the instant;
in this case the handler is executed instantaneously, i.e. in the same instant.
If the preemption is not instantaneous the handler is executed at the next instant.
Syntax
-
until( event condition )
until( event condition )
-
body
body_1
-
handler
-
body_2
Example
-
par
-
{
-
loop{
-
until("Preempted_event")
-
System.out.println("Preempted Action");
-
handler
-
System.out.print("Handler execution");
-
stop;
-
}
-
||
-
repeat(10)
-
stop;
-
"Preempted_event"
!;
-
}
2.16 Control instruction
This instruction executes its body when an event is present. The control
instruction finishes when its body finishes.
Syntax
-
control( event condition
)
-
body
Example
- par
- {
- repeat(10){
-
control("Waited_event")
-
System.out.print("The event is generated");
-
stop;
- }
- ||
- repeat(5)
- stop;
- "Waited_event" !;
- }
2.17 Local Instruction
This instruction defines events that have local scope to the body section. The
local instruction avoids the input
and output of the event identified by the variable or constant event.
Syntax
- local( string_event )
-
body
Example
This example shows how you can use another event for regenerating the event
hidden by the local instruction.
-
par
-
{
-
loop
-
{
-
local("Ext_Event")
-
par
-
{
-
"Local_Event" ?;
-
"Ext_Event" !;
-
||
-
loop{
-
control("Ext_Event")
-
System.out.print("The event was generated");
-
stop;}
-
}
-
stop;
-
}
-
||
-
repeat(20)
-
stop;
-
"Local_Event" !;
-
}
We end this section suggesting that you take a look at REJO's
structure. REJO structure is a good example that shows the use of event conditions
with local, control,
until and par
instructions for building a set of instructions that allow users to resume, suspend
and kill a reactive program using events. This is the control mechanism used in
the ROS platform.
2.18 Freezable instruction
This instruction allows freezing a program that is been executed in the machine;
in other words, the program is removed from the machine and is stored in a machine's
internal variable. The program is frozen when an event, given as a parameter,
is generated. Actually the program is frozen when the instant finishes for avoiding
causality problems. If at the next instant somebody freeze an instruction using
the same event, the old frozen instruction will be lost, therefore you have one
instant for taking them from the machine.
This instruction is semantically similar to the until instruction, the difference
is that this instruction does not accept event conditions and that the body is
frozen always at the end of instant.
This instruction is the basis for doing the migration that is why it is used
in the implementation of agents in ROS. For more information read the ROS's
tutorial.
Syntax
-
freezable( Event )
-
body
Example
This example shows how you can freeze a program and reload it after.
-
Program prog;
-
par
-
{
-
repeat(20)
-
stop;
-
"cold"
!
-
stop;
-
prog=GetProgram("cold");
-
repeat(5)
-
stop
-
Ros.LoadInst(prog);
// This instruction is dependent plateforme
-
// in general you'd use machine.add(prog);
-
||
-
freezable("cold"){
-
int i=1;
-
repeat(10){
-
System.out.println("i= "+i);
-
i++;
-
stop;
-
}
-
}
-
}
2.19 Agents and Migration
When you build a REJO, you have the possibility of choosing if the REJO will be
an agent or not. If the REJO is an agent it can be executed in the ROS
platform and uses the ROS services, for exemple the migration between ROS systems,
the ROS name service and the REJO control service. In order to build an agent
you have to program it and compile it in a particular way; these particularities
are explained in this section and the following. For avoiding confusion we will
only call agent a REJO that can be executed in the ROS system.
In order to built an agent, the REJO class must 1) implement the Agent interface
(and thus you have to import ros.kernel.*;) and, 2) be compiled with the option
-ros (for more information about compilation options see the next
section). An agent class may use the ROS services in three ways: 1) using the
ROS API, 2) generating evens and 3) Programming some methods. The explication
of these three utilisations follows:
Using the ROS API
ROS offers a set of Java methods (defined in the ROS
API) that can be invoked using the ros variable available
in all agents. The ros variable (and other agent variables explained also in
the ROS API section) is updated automatically by the ROS system when the agent
is loaded. The next subsection shows an example of ros variable.
In a Operating System users may use the system at two levels: programming level
and man-machine level. The ROS system may be seen in the same way; Java methods
defined in the ROS API can be seen as the system calls and two REJO applications,
the Rsh and the ROS GUI explained in the ROS tutorial, offer the man-machine
interface.
Generating events
Some ROS services are launched by the generation of events, for instance the
migration service is started by the generation of an event. In fact, the migration
service is started by the generation of two valued events which have as identifier
the name of the Agent plus the string "!migra" and as data
the machine address and a ROS identifier.
The following example illustrates the migration service. It defines a REJO that
does nothing for 100 instants and then try to migrate, at the end it uses the
migGet primitive defined in the
Agent interface for verifying if the migration was successful.
- public class MyAgent implements
Agent
- {
- public reactive rmain(String[]
args)
- {
- repeat(100){
-
System.out.print(".");
-
stop;
- }
- System.out.println("");
- gen locName()+"!migra",
"machine address";
- ros.generate(locName()+"!migra",
"ROS identifier");
- stop;
- if(migGet())
-
System.out.println("Successful migration");
- else
-
System.out.println("Failed migration");
- }
- }
The ROS identifier is used when there is more than two ROS systems in the
same machine. By default ROS systems uses Ros1 identifier but you can
change it (see ros options). Machine address has the typical Internet adreess,
e.g. polka.inria.fr.
Programming methods
If you build an agent and you define a termin, freez or warmUp
methods, then they will have the following semantic:
-
termin(); This
method is executed when the execution of the REJO is finished.
-
freez();
This method is executed before that the Agent is migrated.
-
warmUp(); This
method is executed when the REJO is loaded using the migration
-
service of ROS.
These methods are used for freezing and reinitializing resources, for example
termin method can be used for freezing resources when the agent finishes
its execution and warmUp can be used for setting up variables when the
agent restart in a remote site.
3 Compilation and Execution
The steps to compile and execute a REJO program are similar to those of a Java
program. First you compile the REJO class using the REJO compiler and then you
run the programm using a reactive machine. The second step is simpler when using
the ROS system because it creates the Java main method, a reactive machine and
loads agents.
Since the used development tools are based on Java language, the class path
passage (and some Java properties) was simplified by the cration of some shell
script. The REJO compiler, named REJOC, is a script shell that executes the
REJO parser with a REJO file name as parameter. The script makes two compiling
phases, one to verify the syntax and translate the reactive instructions to
Junior reactive instructions, and another to compile the produced Java code.
The figure 4 shows these steps considering the execution of an agent in a ROS
system.
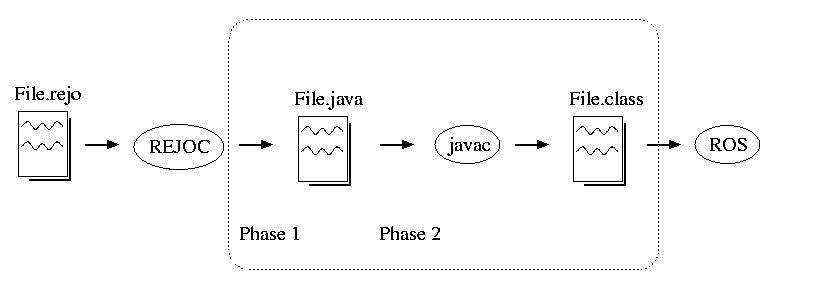
Figure 4: Compilation steps.
During the first phase, the compiler may adds some Java instructions in order
to implement the Agent structure. These instructions are added by the compiler,
instead of inheriting from a Java class, for giving to programmer the possibility
of making one heritage. Programmers can control the behavior of the compilation
sequence using the following compiler options:
-
-pars Make the translation to Junior reactive instructions
and do not compile the Java file generated, that's to say, the phase two
is not done.
- -ros Build an agent for running it
in the ROS system. This option adds variables and Java instructions that constitute
the agent structure, i.e. it adds the defintion of the Java methods defined
in the Agent interface.
For instance, in order to compile the HelloWorld program, you can type:
- $ rejoc HelloWorld -ros
- Compiling HelloWorld.rejo
- Compiling HelloWorld.java
Now you can run the REJO program using ROS platform
- $ run HelloWorld
-
- Hello World
- $
The ROS system is much more complex that one can see in this exemple; ROS system
may be executed with a Reactive Shell and with an experimental GUI so we recommend
you to read the ROS tutorial.
4 Three complete examples
4.1 Counter
This example shows how you can build a REJO that uses graphics objects,
for example objects that uses AWT or Swing. This REJO implements a counter
that prints its value in a window which is destroyed when the body is preempted
using the event fin.
-
import
ros.kernel.*;
-
import
java.awt.*;
-
public
class Counter implements Agent
-
{
-
Frame frame;
-
TextArea txt;
-
int i;
-
public void start()
-
{
-
frame = new Frame();
-
frame.setTitle(" - REJO - ");
-
txt = new TextArea();
-
frame.add("Center", txt );
-
frame.setSize(185, 200);
-
frame.show();
-
}
-
public void update()
-
{
-
txt.append( i + "\n");
-
i++;
-
}
-
public reactive rmain(String[] args)
-
{
-
i=0;
-
start();
-
until("fin")
-
{
-
loop{
-
update();
-
stop;}
-
}
-
}
-
}
The compilation and execution of this agent is the following:
- $ rejoc Counter -ros
- Compiling Counter.rejo
- Compiling Counter.java
- $ run
-
Reactive Operating System Ver 1.0
- Reactive
Machine
- Starting
EngineDaemon
- Migration
Service
- Starting
Migration Daemon
- <petita.inria.fr| ~ >
Counter
-
...
- <petita.inria.fr| ~ >
gen "Counter!kill" # This command kill the REJO
- <petita.inria.fr| ~ >
# and therfore the window will disapear.
4.2 Philosopher's problem
This program shows how you can resolve the typical problem of accessing
a shared resource. The propose is not to resolve completely the problem
of philosophers but to shows how you can use Java methods, Reactive Methods
and other reactive instructions. Of course the other point that we want
to show with this examples is how simple is to resolve shared access when
you use cooperative systems, you don't have to use semaphores or another
synchronization mechanism because you are sure that nobody preempt you.
This example implements 3 philosophers using one REJO. The behavior
of each philosopher is modeled by a reactive method called Phil. The Phil
method executes a infinite loop executing in sequence 3 reactive methods
that model the behaviors: Thinking, Hungry and Eating.
- import ros.kernel.*;
- public class Phil implements
Agent
- {
- int NF=4;
// Forks number
- boolean f[]={true,
true, true, true}; // state of forks
- public reactive rmain(String[]
args)
- {
- par
- {
-
call phi(1);
- ||
-
call phi(2);
- ||
-
call phi(3);
- ||
-
call phi(4);
- }
- }
- public reactive phi(int
id)
- {
- loop{
-
call thinking(id);
-
call starving(id);
-
call eating(id);
- }
- }
- public reactive thinking(int
id)
- {
- call
waiting(id, "T"); //
Simulating Thinking with Waiting
- }
- public reactive starving(int
id)
- {
- until("forksTaken"+id)
-
loop{
-
prn(id*2, "H("+id+")");
-
if( takeForks(id) )
// At each instant we try to take forks. Another way of
-
gen "forksTaken"+id; // doing this
it could be of waiting for an event.
-
stop;
-
}
- }
- public reactive eating(int
id)
- {
- call
waiting(id, "E"); //
Simulating Eating with Waiting
- freeFork(id);
- }
- public reactive waiting(int
id, String str)
- {
- int i=5;
-
repeat(i){
-
prn(id*2, str+"("+id+") ");
-
stop;
-
}
- }
- boolean takeForks(int
left)
- {
- int righ;
-
if(left==0)
-
righ = NF-1;
-
else
-
righ = left-1;
-
if( f[left] && f[righ] ){
-
f[righ] = false;
-
f[left] = false;
-
return true;}
-
else
-
return false;
- }
- void freeFork(int
left)
- {
- int righ;
-
if(left==0)
-
righ = NF-1;
-
else
-
righ = left-1;
-
f[righ] = f[left] = true;
- }
- void prn(int nTabs,
String str)
- {
- for(int
i=1; i<=nTabs; i++)
-
System.out.print("\t");
- System.out.println(str);
- }
- }
4.3 Inheritance
This program show how you can use inheritance in REJO and how you can continue
using low-level Junior primitives for building reactive behaviors. This REJO extends
the previous one and redefines the Waiting and Eating methods. The redefinitions
of Waiting method is done using Junior instructions; the new behavior is the same
of previous one (this is done for showing how REJO works and to glance at Junior
Programming) but instead of waiting five instants the wait is random. The redefinition
of Eating method use the old definition of Waiting method and puts in sequence
two times the original behavior, in other words the Eating method defines 10 instants
for eating.
- public class Phil2 extends
Phil
- {
- public reactive eating(int
id)
- {
- call
super.waiting(id, "E");
- call
super.waiting(id, "E");
- freeFork(id);
- }
- public Program waiting(int
id, String str)
- {
- class Aux
- {
- VarIntegerWrapper
i = new VarIntegerWrapper(0);
- String
str;
- int id;
- }
- Aux a = new Aux();
- a.str=str;
- a.id=id;
- return Jr.Link(a,
-
Jr.Seq(Jr.Atom(new Action(){ public void execute(Environment env)
-
{
-
((Aux)env.linkedObject()).i.value = (int)(Math.random()*1000)%20;
-
}}),
-
Jr.Repeat( a.i,
-
Jr.Seq(Jr.Atom(new Action(){ public void execute(Environment env)
-
{
-
prn( ((Aux)env.linkedObject()).id*2,
-
((Aux)env.linkedObject()).str+"("+
-
((Aux)env.linkedObject()).id+") ");
-
}}),
-
Jr.Stop()
-
)
-
)
-
)
-
);
- }
- }
5 Conclusion
REJO language has the following characeristics:
- It is a high level language that offers: a clear semantics, concurrency,
dinamicty, high-level description of behaviors depending on events.
- It defines Reactive Objects, i.e. a Reactive Object Model.
- If it is used in conjuntion with ROS it defines agents.
- It is an alternative to the use of Java cooperative threads. Java programmers
can also use FairThreads [8], a Java package
that implements cooperative threads, programmed with Java style, with Junior.
Footnotes
- ... preemptive systems
- Cooperative system presents some advantages over a preemptive system, and
in the case of Java the reactive model provides other advantages over the
threads programming [7]. The three main drawbacks
of java threads programming are: 1) the lack of a semantic in the execution
model of threads, 2) a reduced number of threads by user, and 3) the lost
of time doing unnecessary context switches.
- ... specific order
- Since REJO can use any Junior implementation (REWRITE, REPLACE, STORM and
SIMPLE) in some cases it is possible to consider the order specified in a
particular implementation. For instance in REWRITE and REPLACE the execution
order is given by the position of the instruction whereas in Simple you cannot
assume any order.
- ... causality problems
- The causality problem is generated in the synchronous approach due to you
can detect the absence of an event and generate it in the same instant.