design is a software intended for computing the geometry of all the parallel manipulators whose workspace include a specified workspace.
The binary of this software is freely available via anonymous fpt (download here).
This software is provided "as is" without warranty of any kind. In no event shall INRIA be liable for any loss of profits, loss of business, loss of use or data, interruption of business, or for indirect, special, incidental, or consequential damages of any kind, arising from any error in this software.
Window system: X
Type: binary for Sun workstation
Size of binary: 3.65 Mo
Output: display, files, graphic output in xjpdraw format
User's manual of design
Version 0.2
7/21/1996
design is a software enabling, under certain restrictions, to determine every parallel manipulators whose workspace include a given workspace. This is an implementation of the algorithm described in [2].
It is intended to be used for the Gough-type robot. The following parameters should be known:

Figure 1: The known parameters
The design parameters are therefore
the distance ![]() from the center of the
base frame to each joint center
from the center of the
base frame to each joint center ![]() and the distance
and the distance ![]() from the center of
the platform frame to the joint center
from the center of
the platform frame to the joint center ![]() .
Consequently a robot is completely defined by these two parameters.
.
Consequently a robot is completely defined by these two parameters.
The purpose of design is to determine the planar region which enclose all
the values of ![]() defining a robot whose workspace will include a
desired workspace.
defining a robot whose workspace will include a
desired workspace.
The following factors may be taken into account as restricting the workspace:
For the circular robot there will be only one region (obtained as the intersection of the regions determined for each link), a point in this region defining the radii of the circles, and therefore a unique robot geometry.
Note that you can compute independently the allowed regions for the legs only if you don't consider links interference.
In the current version the specified workspace is described by a set of segments on which the orientation of the platform is kept constant.
The program is invoked with three arguments
35
145
155
265
275
25

85
95
205
215
325
335
Here is an example of length file, ro.d:
30 30 30 30 30 30
40 40 40 40 40 40
and here is an example of trajectory file, traj.d:
0 0 20 0 0 0
10 10 20 0 0 0
where the start and end points of the segment are given. Then you can run the program with the following argument:
design base.d ro.d traj.d
We consider here the constraint of the leg length limits. For one link and for one trajectory the allowed zone is the intersection of two ellipses (usually drawn in black) minus a region which is the union of a set of ellipses (usually only two elements of the set are shown and drawn in red). A point in the allowed region define all the possible location of the attachment point of this leg, for this particular trajectory. If you have more than one trajectory the program will compute the intersection of the allowed regions for all the trajectories.
Furthermore if the attachment points are on the same circles the allowed region (a point in this region define the radii of the base and the mobile platform) is obtained as the intersection of the allowed regions for all the legs and for the trajectories.
The design window may be split in three components:
To compute a region you need first to define for which leg and for which trajectory you want to compute the region. This is done in the Trajectory number text window. In this window you can give either:
If you want to visualize the limits of the region click in the button Ellipsis. Black ellipses will appear on the screen: the intersection of these ellipses define the external boundary of the allowed region. Then you have red ellipses (usually 2) which define the extremal ellipses of a set of forbidden ellipses whose union is forbidden: the center of all the ellipses in the set is on the line joining the center of the 2 ellipses shown on the screen. Figure 2 show an example.
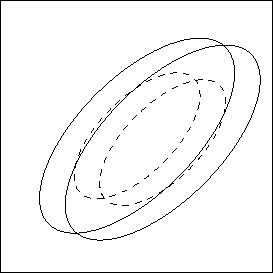
Figure 2: The limit ellipses. The allowed region is the
intersection of the two ellipses in thin line, minus the union of a
set of ellipses whose extremal elements are represented in dashed
lines
You can also compute directly the allowed region by clicking in the Polygons button. If you have first click in the Ellipsis button you will see the allowed region with an external border in blue, and, if it exists, an internal border in red. Figure 3 shows an example, corresponding to the previous example, for which no internal border is present.
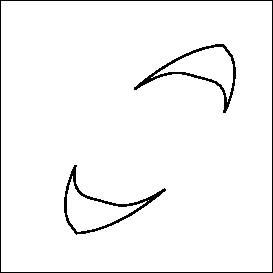
Figure 3: The allowed region of the previous example
If you want to visualize the region for all the legs it is better to do it leg by leg as if you do it directly for all legs it will be difficult to distinguish the regions.
For a circular robot you can compute the allowed region by clicking in the Same radii button. The program will display the allowed region: any point inside the region define the radii of the base plate and of the mobile platform.
Leg length limits are not the only constraint for the workspace. The mechanical limits of the passive points play also an important role. For modeling the constraint on the joint at A we assume that the operator is able to define a pyramid with planar faces, whose apex is A. If the constraints on the joint are satisfied then the link will lie inside the pyramid (figure 4).
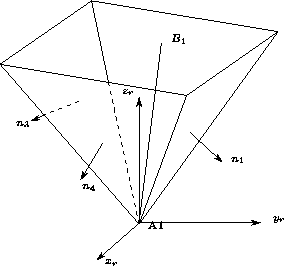
Figure 4: An example of model of a constraint on a passive
joint located at ![]() .
If the mechanical limits of the joints are satisfied then
link
.
If the mechanical limits of the joints are satisfied then
link ![]() is inside the volume delimited by the
pyramid.
is inside the volume delimited by the
pyramid.
In the current implementation only the constraint on the joint located near the base can be taken into account. The joints pyramids are described successively in a file. This file starts with the word all. Then if there is no constraint on the joint the word none should be present. Otherwise the file should contain:
![]()
number of facets (n)
plan ![]()
plan ![]()
![]()
plan ![]()
where ![]() are the Euler's angle defining a new frame
(to get this new frame we start from the reference frame, then we have a
rotation around the z axis of angle
are the Euler's angle defining a new frame
(to get this new frame we start from the reference frame, then we have a
rotation around the z axis of angle ![]() , then a rotation around
the new x axis of angle
, then a rotation around
the new x axis of angle ![]() , then a rotation around the new z
axis of angle
, then a rotation around the new z
axis of angle ![]() . These angle should be given in radian. Then we
have the number of facets of the pyramid, then on the same line a key
word plan followed by the Euler's angles defining the direction
of the normal to the facet. You must give as many such line as there
are facets.
In the following example we define a pyramid only for the first joint.
. These angle should be given in radian. Then we
have the number of facets of the pyramid, then on the same line a key
word plan followed by the Euler's angles defining the direction
of the normal to the facet. You must give as many such line as there
are facets.
In the following example we define a pyramid only for the first joint.
all
3.946457 0 0
4
plan  0 -60
plan 90 -60
plan 180 -60
plan -90 -60
none
none
none
none
none
Now you can indicate to design that there are also constraints on the joints by adding as fourth argument of the command line the name of the pyramid file, as in:
design base.d ro.d traj.d A.pyrIf when running the program you have not defined a pyramid file you can still introduce this constraint by given the name of the pyramid file in the Pyramid file button. Now you can check the allowed region with respect to this new constraint by first defining a trajectory, as in the previous section, then by clicking in the Pyramids button. The allowed zone for the link defined in the Trajectory number button will be displayed, with the border displayed in thick colored line, a different color for each link (figure 5).
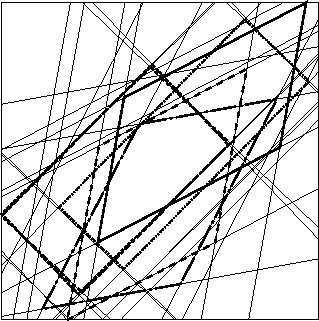
Figure 5: The allowed region for each link.
If you want to compute the intersection of this region (meaning that you will consider a circular robot) click in the All pyramids button. This will display the allowed region for the constraints on all the joints (figure 6), i.e. the definition of the radii.
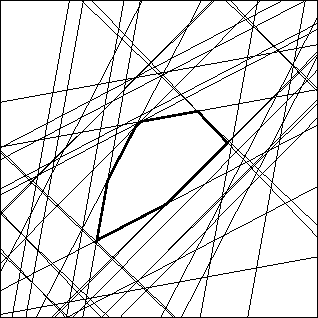
Figure 6: The allowed region for a circular robot
Note that for a circular robot you can compute the allowed region taking into account both the constraint on the leg length and the pyramids by clicking in the Constrains:pyr+ro button, as shown in figure 7.
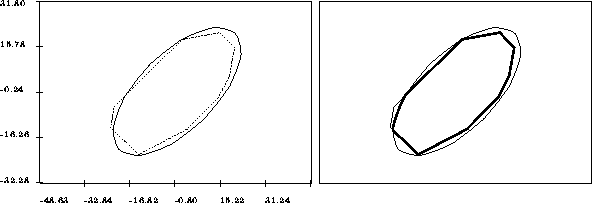
Figure 7: An example of computation of allowable region
combining the leg lengths constraints and the mechanical limits. On
the left the allowable region for the leg lengths constraints and
mechanical limits constraints (in dashed lines) are shown. On the
right the allowable region for all these constraints is shown in thick
lines
You can also determine the forbidden region where links interference
will occur (links interference mean that the segments will have an
intersection), under the assumption that each pairs of legs i, j for which
you are checking the interference have the attachments points at the
same distance (i.e. ![]() ).
To determine the forbidden region for a pair of legs give in the
Trajectory number button the trajectory number and the numbers
of the two legs. Then click in the Interference button.
If you give only one leg number the region will describe the forbidden
region for which this leg interfere with one of the remaining legs. If
you don't give leg number then interference between every pair of legs
will be considered.
).
To determine the forbidden region for a pair of legs give in the
Trajectory number button the trajectory number and the numbers
of the two legs. Then click in the Interference button.
If you give only one leg number the region will describe the forbidden
region for which this leg interfere with one of the remaining legs. If
you don't give leg number then interference between every pair of legs
will be considered.
For a circular robot if you click in the All constraints button after having define a trajectory the program will display the allowed region, taking into account all the constraints: leg length, joints limit (if you have given a pyramid file) and legs interference.
The Time button will display the computation time for determining the region. According to the number of trajectories, the type of constraints taken into account, the discrete step for the ellipses this time may range from a few millisecond to many seconds.
When using the Same radii, Constraints:pyr+ro, All constraints buttons the button Aire will display the area of the region.
The button Clear may be used to clear the screen (note that the Ellipsis button clear the screen before drawing the ellipses).
The Discret button is used to define the number of points of the polygonal approximation of an ellipses. Indeed in the current implementation the computation of the intersection and union of ellipses is done by approximating them by polygons. If you decrease the number of points the computation time will decrease but the result may be very approximate. For a very fine computation you can increase the number of points (the computation time vary approximately as the square of the number of points).
The Verify button may be used to verify the result. The allowed region will be sampled and for every points of this sampling (remember that each point define a unique robot) the trajectories will be tested using the algorithm described in [1] (this algorithm enables to test quickly if a segment lie inside the workspace of a robot). If the robot is able to perform all the trajectories a green cross will appear, otherwise the cross will be red. Due to the discretization of the ellipses some points close to the border may be wrong.
The Redraw button enables to redraw the last result.
As soon as a drawing appear on the screen the button x=.., y=..
will display the value of ![]() for the current location of the
mouse. If you want to test a particular robot you may define its
geometry by clicking with the left mouse button at the desired
location (a small cross will appear). Then you save your robot by
giving a name in the Robot file button followed by a
Return. Another mean is to indicate in the Robot point button
the value of
for the current location of the
mouse. If you want to test a particular robot you may define its
geometry by clicking with the left mouse button at the desired
location (a small cross will appear). Then you save your robot by
giving a name in the Robot file button followed by a
Return. Another mean is to indicate in the Robot point button
the value of ![]() . In the generated file you will find first the
three coordinates of the 6 attachments points of the legs on the
base, then the three coordinates of the attachment points on the
mobile platform, then the 6 maximal lengths and then the 6 minimal
lengths.
. In the generated file you will find first the
three coordinates of the 6 attachments points of the legs on the
base, then the three coordinates of the attachment points on the
mobile platform, then the 6 maximal lengths and then the 6 minimal
lengths.
When an allowed region has been computed you can save it. The first method is to give a name in the Result file button. In the generated file you will find a description of the region. The external borders will start with zone_permise followed by a number n which indicate the number of points of the following polygon which describe the border. Then you will find the coordinates of the n vertices of the polygon. A forbidden region will use the same syntax except that zone_permise will be substituted by zone_interdite.
Another method is to save the result in a format which can be read by the graphic editor xjpdraw. This is done by giving a name in the Jpdraw file button. This enable to output directly a file which can be incorporated in a LaTeX document. Note that xjpdraw is also available by ftp.
This program is rather computer intensive and some memory problems have appeared when computing to much region in a same session. It is usually preferable to check a few things then quit the program and start again.
One part of this program is sensitive to the scale, especially when dealing with large dimension. If incorrect result appear you may try to create a file called configurateur in the current directory and writing a line like:
UPPER_SMALL 25which enable to change the value of a parameter inside the program (when started design will look for this file and update the parameter). The default value of this parameter is 5 and the larger it is the better the program will work for robot with large dimension. You can also scale down your own file.
The part of this program dealing with the leg length limit has been extensively tested and is pretty robust. On the contrary less efforts have been spent on the part related to joint limits and leg interference.
Version 0.1: 28/9/1995
Version 0.2: 21/7/1996 (minor bugs corrected)