
The RegistrationTool : the fast and simple image registration module of MedINRIA.
Introduction
Processing and visualisation of medical data is nowadays a common yet challenging problem. The diversification and complexification of the available sources of medical information raised the need for new methods to have a better and simpler insight of these data. While clinicians need new solutions to fully exploit their data, they often cannot access state-of-the-art methods as they are mostly available in complex software targeting researchers. The MedINRIA software consists of a collection of tools that optimally exploit various types of data (e.g., 3D images, diffusion tensor fields, neural fibres as obtained in DT-MRI), providing state-of-the-art algorithms while keeping a user-friendly graphical interface. In this report we will focus on one of the applications provided by MedINRIA : the Registration Tool. This application provides a simple interface for several kinds of registration. The goal of this toolkit is to provide the clinicians with an easy way of comparing two images, either taken at different time points or from different modalities. As images are often not taken exactly in the same geometric positions and more importantly different orientations, they need to be registered in order to allow a faithful comparison. In a clinical context, registration problems that are targeted here include rigid registration for compensating the motion between acquisitions at different time points (longitudinal studies) or between different modalities, affine and deformable spatial normalisation for atlas based segmentations, and deformable registration for motion tracking in time sequences. The tool is thus divided into : first a collection of algorithms that address different registration problems, such as manual rigid registration, automatic affine registration, and deformable registration; second a collection of visualisation tools adapted to the comparison of two images, and the visualisation of deformation fields.
Different Registration Solutions Up
RegistrationTool takes two images as input, the ``fixed image'' and the ``moving image'', and offers up to now three ways of registering them:
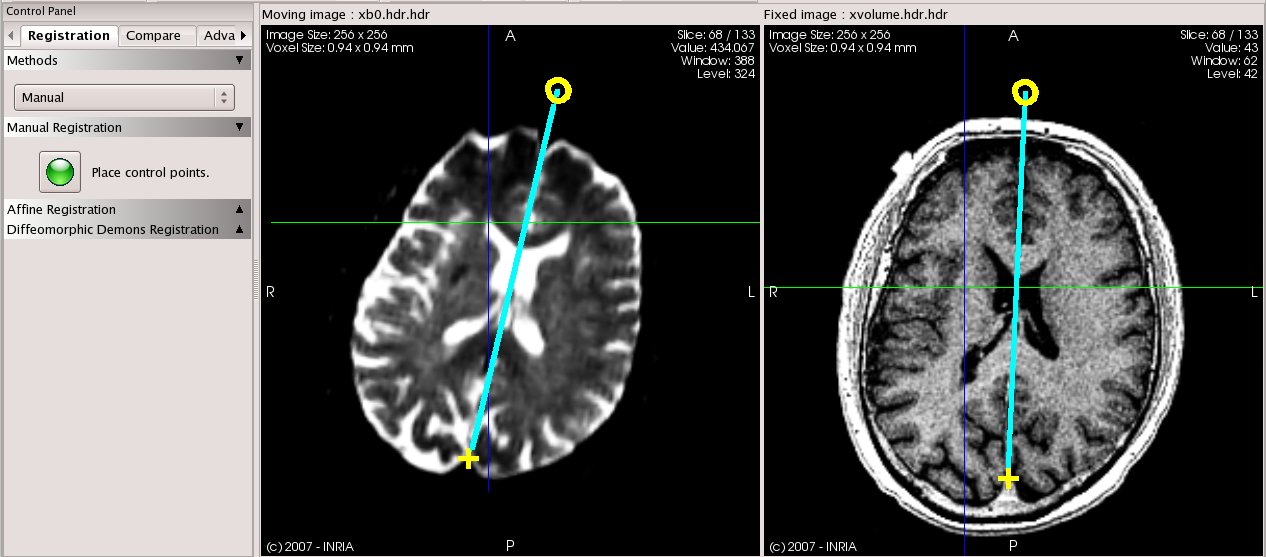
- Manual Rigid Registration: In a few clicks, one can perform a manual rigid registration of two images. Rigid registration consists in a translation and a rotation. This is done very simply by asking the user to place in both fixed and moving images a point plus a direction. The two points are used to compute the translation, and the directions are used to calculate the angle of rotation. See this section for more details.
- Automatic Rigid or Affine Registration: We use the affine registration framework from the Insight Tool Kit http://www.itk.org to achieve this automatic matching of images. It consists in maximising the mutual information of the two images, and is embedded in a multi-resolution framework.
No user input is required. This method is adapted to longitudinal studies for instance. See this section for more details.
- Automatic Diffeomorphic Demons Registration: This method provides a very up-to-date method for non-linear registration. This procedure is based on variants of the Thirion's demons algorithm for non-linear mono-modal image registration. It is fast, and ensures the invertibility of the transform, which is a very desirable feature in registration. See this section for more details.
An important note is that registration can be done iteratively: one can start with a manual rigid matching to roughly align the images, continue with an automatic affine that will feed the non-linear algorithm with a good initialisation.
For convenience, one can reset all registration steps. As software outputs, not only can the registered image be saved, but an output affine matrix file - concerning the affine and/or rigid registration - can also be saved and is compatible with the other MedINRIA modules. This matrix file can be loaded as input for the registration process in future use. On the other hand as soon as the user performs non-linear registration the output becomes a deformation field that can be saved in ITK metafile format and can also be loaded as input for future use.
Rigid Registration Up
|
This module provides easy-to-use manual rigid registration. The method is intuitive: the user navigates through the slices until two corresponding slices in the volume are found, the user can then choose a single point and a direction in the given slices. The RegistrationTool turns this information into a rigid matrix. The calculated rigid matrix is first applied to the moving image. Then the moving image is re-sampled to meet the fixed image size and spacing information. The process can be iterated on other slice orientations to achieve a truly 3D rigid registration.
Note that the moving image is also automatically re-sampled into the fixed image size and spacing information. The re-sampling process uses a linear interpolation (default) between pixel values but B-spine and Sinus Cardinal interpolation can be chosen.

Automatic Affine Registration Up
The user can switch between the available registration modes. By default the automatic affine mode is chosen. It consists in maximising the mutual information of the two images, and is embedded in a multi-resolution framework, based on ITK (see www.itk.org for details on the method). Three levels appear to be sufficient for a common use. No user interaction is necessary to perform this process. This operation can be executed iteratively for best results. You can also initially choose a rigid transformation as a first step (see this section) to avoid failure on large transformation, and then use the affine automatic mode to get optimal results.
Note that the output of both rigid and affine registration methods is an affine transformation matrix that can be saved for later use.
Automatic Deformable Registration Up
In this registration toolkit we also propose a solution for non-linear mono-modal image registration problems. This method provides a very up-to-date method [#!Vercauteren:ISBI:2006!#] based on variants of the Thirion's demons algorithm [#!Thirion:MIA:1998!#] to retrieve deformations between images. Although this procedure takes longer than the affine automatic mode, it allows the registration of images from different subjects, or to align an atlas image with a patient specific one. The output is a deformation vector field. We want to thank Tom Vercauteren and Mauna Kea Technologies (http://www.maunakeatech.com) for their participation on this registration algorithm.
You can save the resulting deformation field in ITK metafile format (.mha). The deformation field maps the moving image onto the fixed image. A deformation field is represented as an image whose pixel type is the 2D or 3D displacement vector. This output field can also be reload.
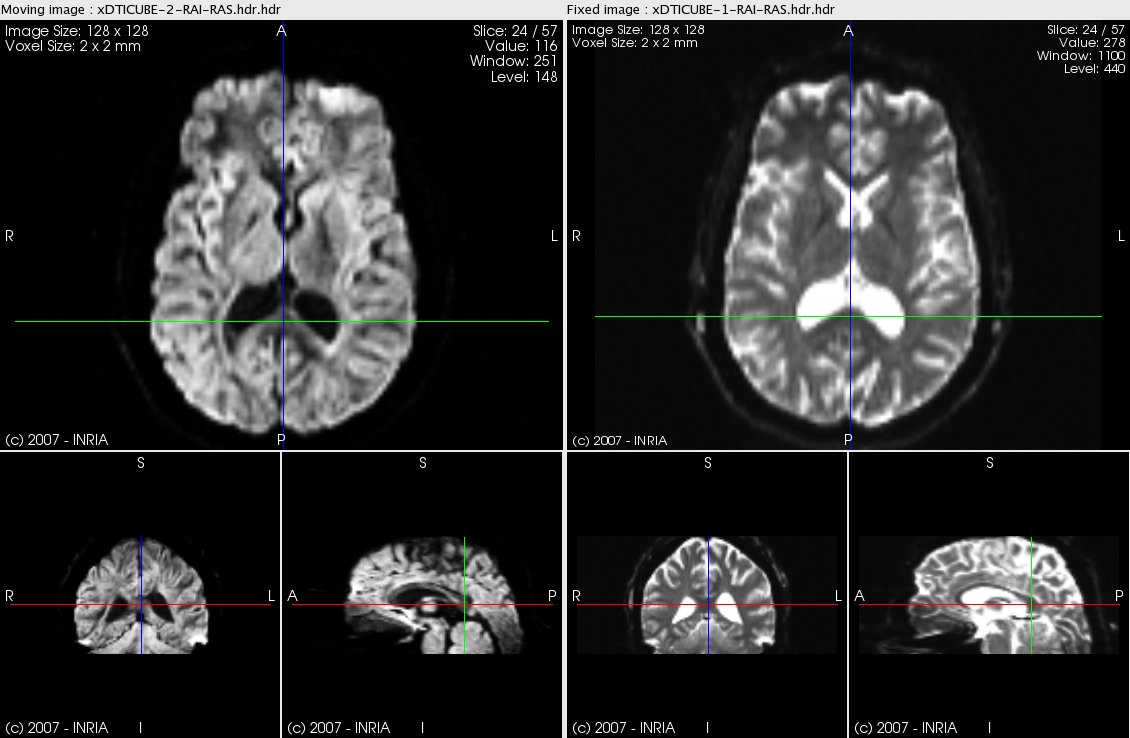
Image Comparison Up
|
Comparing images remains an important goal in medical imaging. In the RegistrationTool, an effort has been made in providing intuitive and easy ways of doing so. Hence the user can simply load two images and compare them in the module. As shown in Fig. 2, spatial positioning of both images are linked together to synchronise the navigation. One can also choose a specific slice orientation and display in full screen this slice of both images.
|
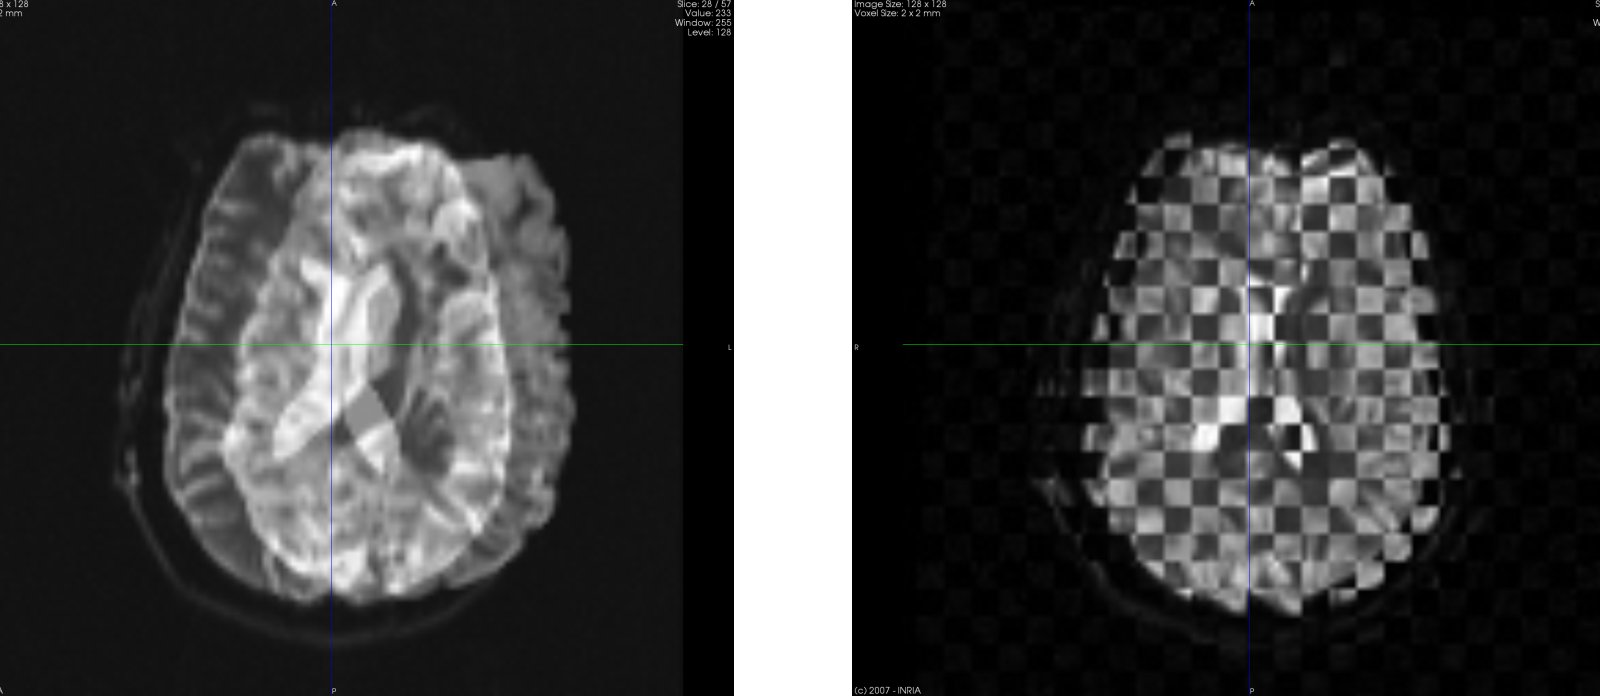
As shown in figure 3, we propose two different modes. The first one, shown in Fig. 3 left, fuses the first image with the second one by blending them with an alpha value that the user can change.
The second mode shown in Fig. 3 right, uses a checker-board technique: the view is divided in squares (the number of squares can be changed), and every second square contains alternatively the first and the second image.
The navigation between slices and the change of parameters are real-time processes. Hence this is an easy method for the user to quickly compare two images, whether they are well registered to each other or not, or qualitatively evaluate their geometry differences.
|
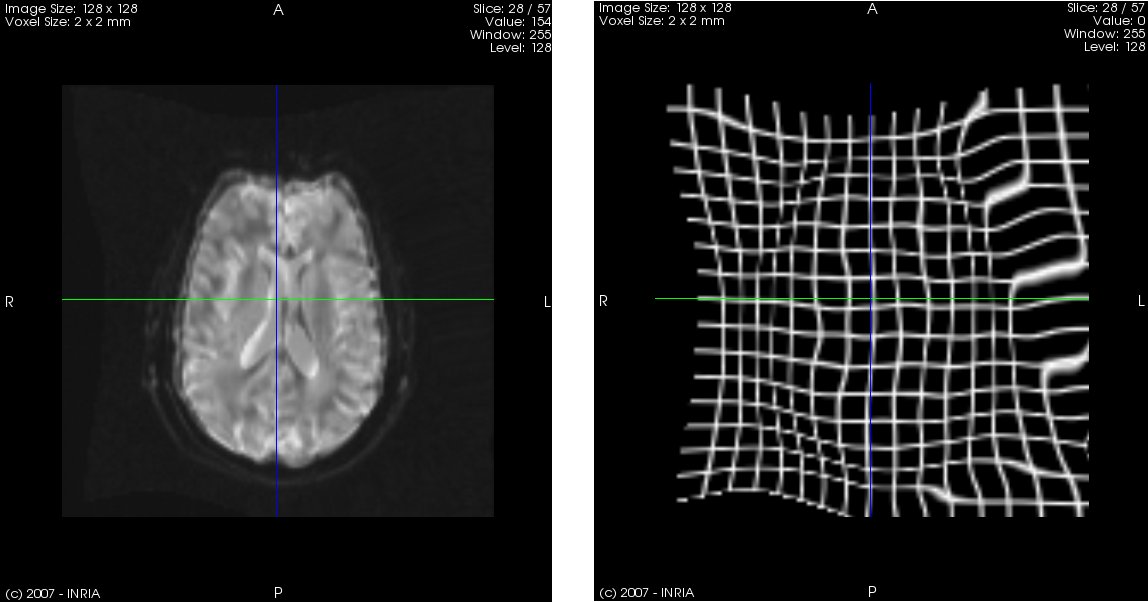
As soon as one performs a deformable registration process (or loaded a deformation field as input), the RegistrationTool tries to visualise this field in the compare mode. The deformation field is used to wrap a regular grid. The output grid is then shown in parallel of the comparison view. Again the positions are linked to synchronise the navigation (see Fig. 4).
Conclusions and Perspectives Up
The RegistrationTool module of the MedINRIA software provides a user-friendly interface to perform simple to complex registrations, and an intuitive system for comparing two images. In Health-e-Child, the RegistrationTool is included as a service available on the HeC USB stick.