TD4 Racing cars
In these TDs we will implement a racing game in Unity 3D step by step.
You’ll be able to control a car with reasonable physics to compete against simple AI players, count the laps of the cars to determine the winner and start the race with a countdown. Finally we will see some techniques you can use (particles, sound effects & music, animations…) to juice up your game in order to make it more lively and fun !
These TDs are split into 3 parts : the first part covers the basics of a racing game (TD4), the second part will add opponents (TD5) and the final part is focused on shiny and fun effects to make your game stand out (TD6). It will cover all the essential things you need to know before starting your own project.
Minimum Viable Product 🚙 Drive a car around a race track + count laps |
Buckle your belt, because you’re about to make a racing game !
Create a drivable car 🚙
Model
First of all, our car needs at least some visuals in order to be recognizable as a car.
We could create and import a model from blender or take one from the internet, but for now let’s keep it simple.
We will just use some primary shapes (cubes and cylinders) in unity and use the scale and position transforms to make it appear like it.
- I recommend creating an empty gameobject first (right click in the hierarchy window > Create empty), and name this object something like “Player” or “Car”.
- Then inside this empty gameObject you will add some unity 3D objects primitives (in the hierarchy window, right click on your root gameObject > 3D object > Cube or Cylinder)
- Play with the position and scale parameters of your shapes to shape a sort of car
Tip: You can use empty game objects as parents to have a clean hierarchy
This is what I got :
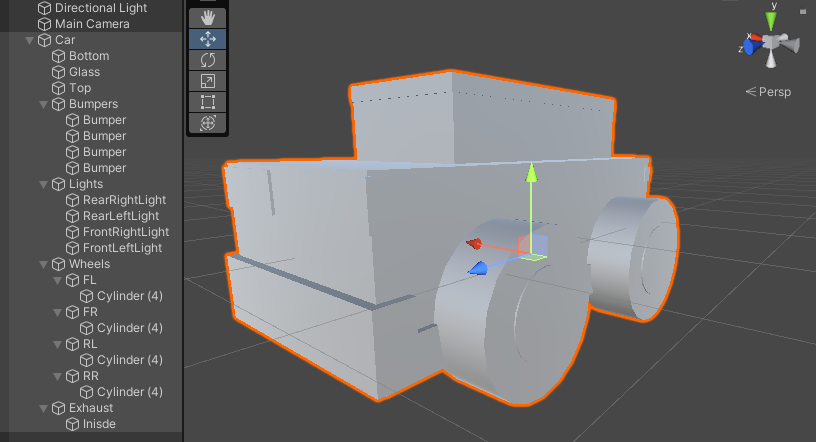
All white ? This is a bit sad..
Let’s add some colors to your primitive shapes to make it pop !
In unity, models can have one and + materials. A material is an asset that dictates to your model how it will render (color, reaction to the light, transparency, texture, etc.). In this simple case, we will create some simple materials to apply to our shapes (1 for the car paint, 1 for the metal parts, 1 for the glass, 1 for the tires, and 2 for the front and rear lights).
- To apply a material to a mesh you need to create a material asset in your project folder : Right click into the project window > Create > Material. An asset should appear in your window, name it something like “Car paint”
- Select the material, you should see the material properties on the right.
- Change the albedo color to your licking
- Then drag and drop your material from your project window onto a part of your car in your scene view. You should see that the shape has now changed its color !
- Repeat the operation with each material you’ll need.
- Play with Metallic and Smoothness properties of your materials to make it appear more metallic and more smooth.
- For the glass, you can change the rendering mode from “Opaque” to “Transparent” and change the alpha color (Channel A) on the albedo color to make it really transparent.
- For the lights, you can check “Emission” and select an emission color like the albedo color. Then increase the intensity of the material to something like 2 or 3.
Physics
Now that we have a cool car to drive around, let’s make it drivable, shall we ?
The cool thing about using a game engine like unity is that you don’t need to code all the physics, unity does already a lot for you.
To make our car react to some physics, we need 3 things :
This component will tell unity that our car needs to react to physics like detect collisions, apply gravity and also drag forces (the forces that resists motion of an object, to simulate air friction for example. To illustrate, a feather has huge drag forces applied to it compared to a bowling bowl).
It represents the bounds / sizes of the object that should react to physics.
Collisions in game engines are heavy to calculate, so we often simplify the collisions of the object by using primitive colliders in order to simplify the physics and avoid weird behaviors.
This custom script will listen to keyboard inputs and add forces to the rigidbody in order to move and steer the car.
Let’s get started ! 🚀
- Select the root object of your car model and click on the button “Add Component”
- Add a rigidbody component and change the constraints to freeze the Y position and X,Z rotations. We don’t want our car to jump or roll on the track. Also set Interpolate from “None” to “Interpolate” in order to smooth the physics. Make sure “Use gravity” is checked on your rigidbody
- Now, we will add a collider to our car in order to tell unity where our car is considered in collision or not, what are the physical bounds of the car. First of all, we need to delete all the colliders that are not necessary. In the previous step, we created simple 3D objects to make the graphics of our car; but Unity adds one collider by default for each new primitive object. Select object by object in your car model and right click > Remove component on each collider (they have a green icon) you may find on these shapes.
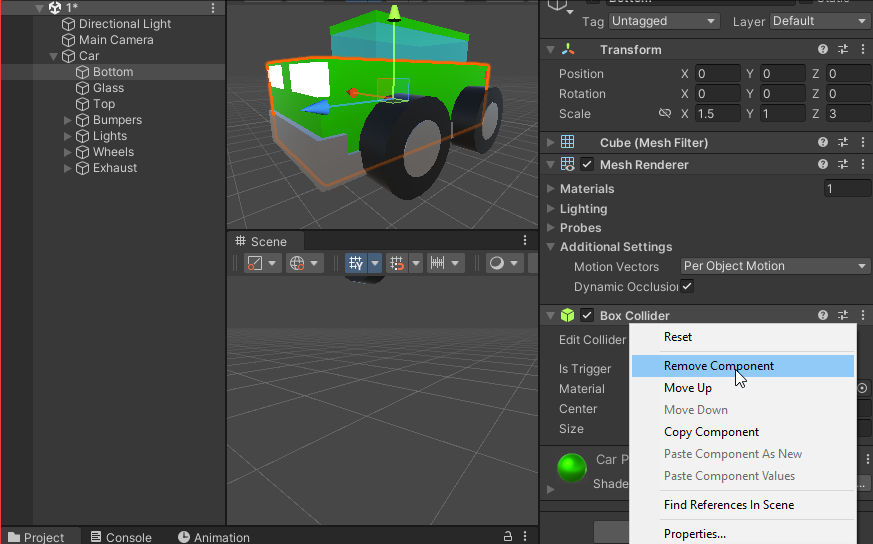
- Our car is now “clean” and has now zero colliders. We will now add a big one that will do for the entire car. Add a box collider, then click on the button next to “Edit Collider”, a green word box with points should appear : This is the collider.
- Look at your car from profile (click on one axis of the orientation wheel at the top right of the scene view a click on the text under to go into orthogonal mode). Now drag the green points to match perfectly the height and length of your car. Do the same by looking at your car from the front.
- We now have a car that reacts to physics ! Add a plane under the car at position (0,0,0) and scale it to cover a larger surface, move your car at (0,5,0) for example and click play
You should see the car fall and rest on the plane !
Great ! So now, let’s add a motor to this physical car ! 🚗
- We add a new component to our car gameObject that we name “CarController” for example. This script will be responsible for listening to keyboard inputs and applying forces to move and steer the car. This will create a new C# Script that we open in Visual Studio.
- We should have a piece of code with a class that contains 2 empty methods : Start and Update. If you read the generated comment above, Update is run each frame and Start only once when the game starts.
- First, we need to capture the keyboard inputs of the arrows. We need to do that each frame, so that code needs to be in the Update method. This is done like so :
public class CarController : MonoBehaviour
{
private float inputX;
private float inputY;
void Update() // Get keyboard inputs
{
inputY = Input.GetAxis("Vertical");
inputX = Input.GetAxis("Horizontal");
Debug.Log(inputX + "," + inputY);
}
} |
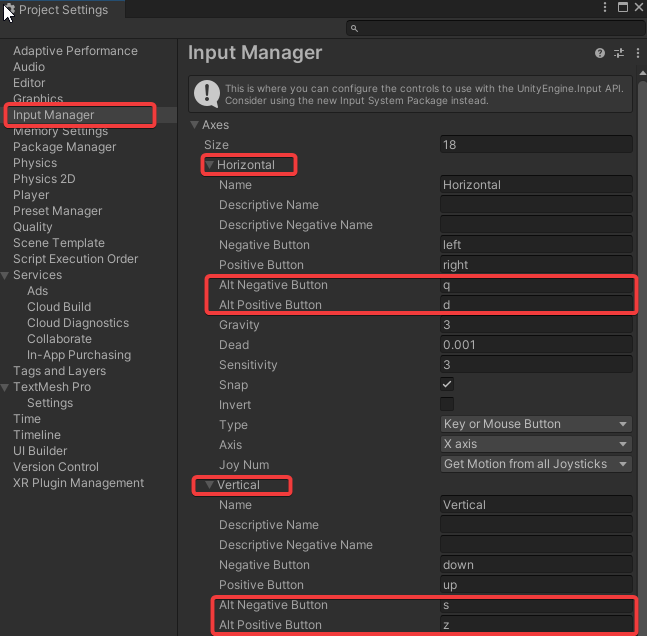
If you don’t have arrows on your keyboard or want also to control your car with the keys QZSD, you will have to go into Edit > Project Settings > Input manager and change the “Alt negative/positive Button” for the “Vertical” and “Horizontal” inputs like so :
- Play the scene and check the console, you should see the values evolving between -1 and 1 when pushing left/right/top/down arrows (or QZSD) on your keyboard.
Great, we can catch keyboard inputs ! So now let’s use the inputY (up/down keys) to move the car :
- To apply forces to our car, we will use the component that makes it physical (Rigidbody). So we need a reference to this rigidbody in our script by setting a public variable.
All variables that are public are displayed as a property in the inspector in the unity editor. That makes connection between components and tweaking of values on your component much easier !
- We also need a public variable for the car speed. Why ? because we don’t know exactly which speed to use, so it will be convenient to have the capacity to edit this property from the editor and even in playtime !
So just by adding this variables in our script :
public Rigidbody rg;
public float forwardMoveSpeed; |
If you save and go back to the editor you should see the properties display like so :
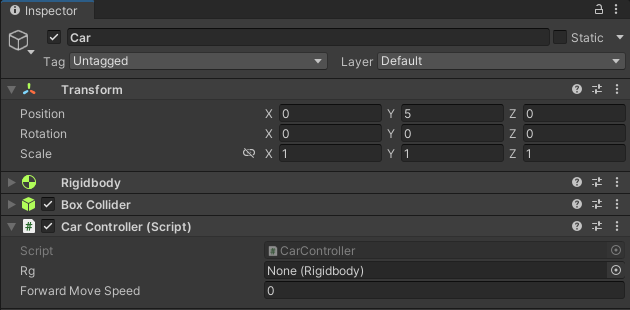
- Go back into the unity editor and assign the rigidbody property with the one of your car by dragging and dropping the rigidbody to the empty slot. Set a forward move speed to something like 10.
Go back to the script and let’s move the car !
- When inputY > 0 we want the car to go forward, so we need a positive speed and when input < 0, we want the car to go backward so we need a negative speed.
- We then apply a force to the rigidbody on the forward axis of the car proportional to the speed by using the Rigidbody.AddForce method that takes in first argument a force vector and in second a force mode.
- All the physics code we described needs to be done in a FixedUpdate method because physics should always be applied in this method (or else be prepared to have weird physics behaviors : Unity has one loop for rendering the frames of your game and another to calculate the physics).
Here is the new code :
public class CarController : MonoBehaviour
{
public Rigidbody rg;
public float forwardMoveSpeed;
private float inputX;
private float inputY;
void Update() // Get keyboard inputs
{
inputY = Input.GetAxis("Vertical");
inputX = Input.GetAxis("Horizontal");
Debug.Log(inputX + "," + inputY);
}
void FixedUpdate() // Apply physics here
{
float speed = inputY > 0 ? forwardMoveSpeed : -forwardMoveSpeed;
if (inputY == 0) speed = 0;
rg.AddForce(this.transform.forward * speed, ForceMode.Acceleration);
}
} |
Your car can now go forward or backward ! 👏
Now let’s steer the vehicle ! ⬅️ ➡️
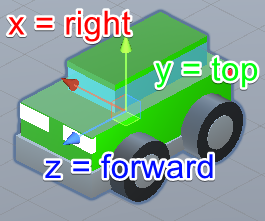
- To steer, no need to apply forces, just a simple rotation of the car transform will do. The rotation needs to happen on the y axis of the car using the left/right input.
- This is the final code with the steer part (a backward force has also been added to reverse less quickly)
public class CarController : MonoBehaviour
{
public Rigidbody rg;
public float forwardMoveSpeed;
public float backwardMoveSpeed;
public float steerSpeed;
private float inputX;
private float inputY;
void Update() // Get keyboard inputs
{
inputY = Input.GetAxis("Vertical");
inputX = Input.GetAxis("Horizontal");
}
void FixedUpdate() // Apply physics here
{
// Accelerate
float speed = inputY > 0 ? forwardMoveSpeed : backwardMoveSpeed;
if (inputY == 0) speed = 0;
rg.AddForce(this.transform.forward * speed, ForceMode.Acceleration);
// Steer
float rotation = inputX * steerSpeed * Time.fixedDeltaTime;
transform.Rotate(0, rotation, 0, Space.World);
}
} |
- “transform” refers to the transform the script has been attached to (here it's the car).
- Play around with your car controller properties and the drag and angular drag properties of your car rigidbody. I got correct results with a Drag of 4, Angular drag of 400, forward speed of 120, backward speed -30 and steer speed 250.
Camera 🎥
Okay, that’s cool but we quickly lose the car from our camera field of view.
- Like we have done for the CarController script, add a new component to the camera that you will call “FollowPlayer”
- We update the new script to make the camera move according to the car. This is easily done like so :
public class FollowPlayer : MonoBehaviour
{
public Transform player;
public Vector3 marginFromPlayer;
void Update()
{
transform.position = player.transform.position + marginFromPlayer;
}
} |
Each frame, this script sets the position of the camera to the position of the player with a vector3 (a vector with 3 axis) to add some space between the camera and the player.
- Save the script, go back in unity and drag your car into the “Player” property and set the margin from the player that you like
Tip: You can run play and change public properties on your script at runtime, it makes it easy to test which good values you need to put in your scripts ! Be careful, during play changes in script properties are NOT saved ! So remember or copy them before stopping the game !
- Make sure your camera has a rotation of something like (45,0,0) in order to look at the ground
- You should also put some random objects on the track to feel how the cars reacts to your controls
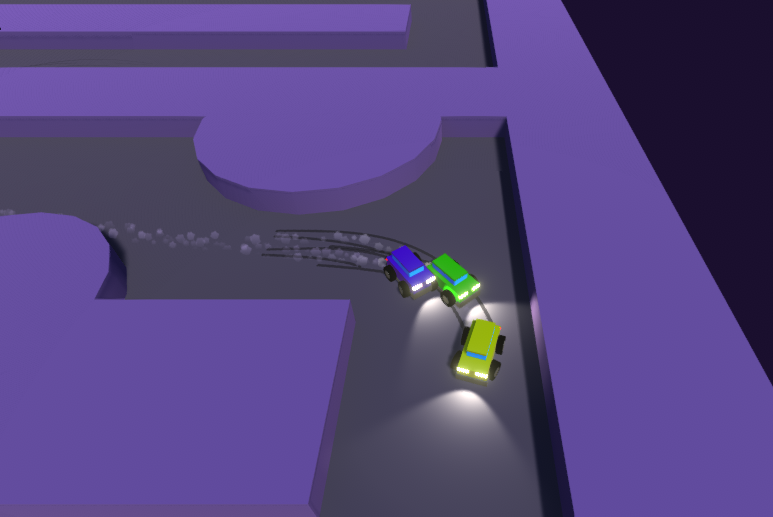
Yay ! Here is our drivable car with the following camera ! 🚗 🎥
Build a track 🛣️
Driving in a blank scene is quite boring and a real race game should have at least one race track ! So let’s place one !
Basic structure
A race track has already been made, you can grab it in Assets/Prefabs/TD1/TrackTD1Todo and drop it in your scene. Then on the track gameObject Right click Prefab > Unpack to make sure you can add gameObjects in your track.
As you can see, it is only a composition of a plane with 3D blocks to make the walls and some cylinders to do some obstacles, nothing fancy.
Textured finish line
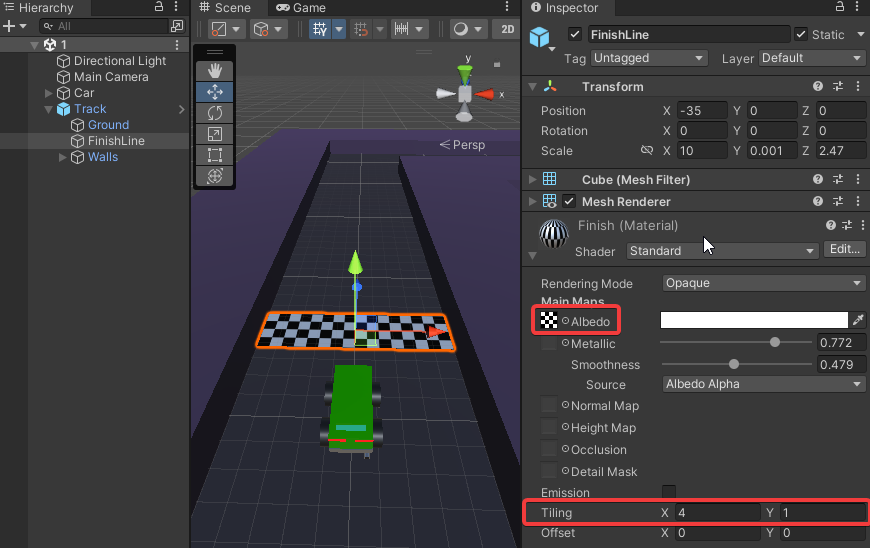
Let’s just add a finish line onto the track.
- Create a plane in the scene, rename it “Finish line”
- Scale it to make a line of it and place it where you want the finish line to be.
- Create a new material and apply it to this plane
- To make it look like a finish line in black and white we drag a checker texture taken from Assets > Images onto the square slot next to the property “Albedo” of your finish line material.
- You can then play with the tiling X Y to change how the texture stretch on your model
Count laps 🔢
Now that we have a drivable car and a racetrack with a finish line, let’s count the laps that we make on it !
Count laps for one car
In a race game we can’t say the player has completed a lap when he reaches the finish line.
In fact, with such a technique, a player would just have to cross the line by going forward and backward multiple times, and that’s not what we want !
A simple technique we can use is to drop some intermediate checkpoint doors on the track that the player will have to cross in order to make sure the player has completed the lap before crossing the finish line again.
- First let’s create an empty gameObject that we name something like “LapManager”
- In this Lap manager, let’s add some 3D cubes that we scale enough to make sure the car will have to cross them
- We keep the box collider on it, but we just change the property “isTrigger” to true. A collider marked as trigger will not act as a wall but let physical objects enter in them. It is very useful to detect the presence of objects in a zone for example, and this is what we are going to do.
- If you press play and drive your car through the checkpoint, you will see that the car goes through it !
- To make it invisible visually, just deactivate the MeshRenderer component on it
- Now, let’s detect our car. Add a new component on your Checkpoint 3D cube that we call “Checkpoint”
- A script attached to a gameObject with a Collider can use methods to detect collisions and triggers like : OnCollisionEnter/Stay/Exit, OnTriggerEnter/Stay/Exit
- In our car we made the collider a trigger and we want to detect when our car enters the checkpoint. So we use the method OnTriggerEnter. https://docs.unity3d.com/ScriptReference/Collider.OnTriggerEnter.html
- When an object with a rigidbody and a collider enters in a collider marked as trigger, the method will fire and have into argument the collider that entered the zone.
- We write the code as follow :
using UnityEngine.Events; // needed to use UnityEvent
using UnityEngine; // as usual
public class SimpleCheckpoint : MonoBehaviour
{
public UnityEvent<GameObject, SimpleCheckpoint> onCheckpointEnter;
void OnTriggerEnter(Collider collider)
{
// if entering object is tagged as the Player
if (collider.gameObject.tag == "Player")
{
// fire an event giving the entering gameObject and this checkpoint
onCheckpointEnter.Invoke(collider.gameObject, this);
}
}
} |
- To make sure this is the player, we look at the tag of the gameObject that entered the checkpoint. A tag is a special attribute you can give to some gameObjects in order to help you recognise them in cases like that.
- Go into unity, select the player’s car and in the inspector, change “Tag : Untagged” to “Tag : Player”. As you can see there are also other default tags and you can also create new ones if you want.
- Then, we use an event that we fire for whoever might want to listen to the checkpoint. Events are useful to decouple our components/scripts. In fact each checkpoint could have a reference to our LapManager and trigger a public function on it, but as the project grows, this technique can result in spaghetti code where every component needs to have a reference to others. In a moment you will see how to listen to this event.
- Duplicate your checkpoint and place/rotate them around the lap to make sure the player has done the lap.
- Go into unity and add a new component “LapManager” to the lap manager gameobject. This script will be responsible for counting the laps that the car has done by listening to the checkpoints.
- This script needs a list of checkpoints, a total number of laps to do and keep track of the current lap number + last checkpoint the car has reached.
- Here is a possible code for keeping track of the laps (no pun intended) :
using System.Collections.Generic;
using UnityEngine;
public class LapManager : MonoBehaviour
{
public List<Checkpoint> checkpoints;
public int totalLaps = 3;
private int lastPlayerCheckpoint = -1;
private int currentPlayerLap = 0;
void Start()
{
ListenCheckpoints(true);
}
private void ListenCheckpoints(bool subscribe)
{
foreach (Checkpoint checkpoint in checkpoints)
{
if (subscribe) checkpoint.onCheckpointEnter.AddListener(CheckpointActivated);
else checkpoint.onCheckpointEnter.RemoveListener(CheckpointActivated);
}
}
public void CheckpointActivated(GameObject car, Checkpoint checkpoint)
{
// Do we know this checkpoint ?
if (checkpoints.Contains(checkpoint))
{
int checkpointNumber = checkpoints.IndexOf(checkpoint);
// first time ever the car reach the first checkpoint
bool startingFirstLap = checkpointNumber == 0 && lastPlayerCheckpoint == -1;
// finish line checkpoint is triggered & last checkpoint was reached
bool lapIsFinished = checkpointNumber == 0 && lastPlayerCheckpoint >= checkpoints.Count - 1;
if (startingFirstLap || lapIsFinished)
{
currentPlayerLap += 1;
lastPlayerCheckpoint = 0;
// if this was the final lap
if (currentPlayerLap > totalLaps) Debug.Log("You won");
else Debug.Log("Lap " + currentPlayerLap);
}
// next checkpoint reached
else if (checkpointNumber == lastPlayerCheckpoint + 1) lastPlayerCheckpoint += 1;
}
}
} |
- On start, we listen to all the checkpoints that the lap manager knows by giving them the method CheckpointActivated
- This method is responsible for updating the lap number and checkpoint progression of the player
- Go into unity, click into the lap manager and drag and drop each checkpoints placed on the track into your list
- Great ! Ready to play, you should see the Lap number appear in the console !
Display current lap on UI
Instead of a boring console, let’s display the lap number in a UI in our game !
- To make a UI, we need a Canvas. In the hierarchy, right click > UI > Canvas. You can rename the created gameObject “UI”
- By default the Canvas component is set to Screen Space - Overlay, this is great for our purpose
- Set the “UI Scale Mode” of the canvas scaler to “Scale With Screen Size” with a reference resolution to (X:1920, Y:1080). This will make sure you UI scale depending on the size of the window
- Let’s add a Text to display our lap number. Right click on your UI gameObject > UI > Text - TextMeshPro. It will add a text in our UI.
- When you edit a UI, select it in the hierarchy, and activate 2D mode in the top bar. Enabling gizmos is also recommended to see the canvas bounds

You should see your UI correctly in the scene now
- Let’s place our text correctly. We want it to the top left side, so we can use the top left anchor presets by clicking with Ctrl + Alt. Here is a gif to show you some presets :
- In the text input remove the text because we are going to update it via a script
- Apply to your UI gameObject (the one containing the canvas) a new component that we call “UIManager”
- This script will take in public reference a TextMeshProUGUI with import using TMPro;, this is the text we are going to update.
- Now, the UIManager needs to know the current lap of the player in order to display it. Let’s see another simpler way to communicate between components : by reference. All we need is to add a public reference to UIManager in LapManager. We are going to let the LapManager update the UIManager.
- Add a public method UpdateLapText(string message) on the UIManager that sets the text of the TextMeshProUGUI to message.
- Then call the method on start and whenever we are updating the currentPlayerLap
- Go back to the unity editor and don’t forget to drag and drop the references needed by your scripts !
- TextMeshPro reference on UIManager
- UIManager reference on LapManager
👏🚗🎉 Congratulations ! 🎉🚗👏
You have your first racing game MVP done in unity3D !