| Prev | Part V. Composing Chapter 30. Configuration |  | Next |
| Prev | Part V. Composing Chapter 30. Configuration | | Next |
This section explains how to customize the membranes of component through the configuration, composition and creation of controllers and interceptors.
It is possible to customize controllers, by specifying a control interface and an implementation.
Controllers are configured in a simple XML configuration file, which has the following structure:
<componentConfiguration>
 <controllers>
   <controller>
 <interface>ControllerInterface</interface>
      <implementation>ControllerImplementation</implementation>
   </controller>
...
Unless they some controllers are also interceptors (see later on), the controllers do not have to be ordered.
A default configuration file is provided, it defines the default controllers available for every ProActive component (super, binding, content, naming, lifecycle and component parameters controllers).
A custom configuration file can be specified (in this example with "thePathToMyConfigFile") for any component in the controller description parameter of the newFcInstance method from the Fractal API:
 componentInstance = componentFactory.newFcInstance(
   myComponentType,
   new ControllerDescription(
     "name",
     myHierarchicalType,
     thePathToMyControllerConfigFile),
myContentDescription); The controller interface is a standard interface which defines which methods are available.
When a new implementation is defined for a given controller interface, it has to conform to the following rules:
The controller implementation must extend the AbstractProActiveController class, which is the base class for component controllers in ProActive, and which defines the constructor AbstractProActiveController(Component owner).
The controller implementation must override this constructor:
public ControllerImplementation(Component owner) {
    super(owner);
}
The controller implementation must also override the abstract method setControllerItfType(), which sets the type of the controller interface:
protected void setControllerItfType() {
 try {
   setItfType(ProActiveTypeFactory.instance().createFcItfType(
     "Name of the controller",
     TypeFactory.SINGLE));
   } catch (InstantiationException e) {
     throw new ProActiveRuntimeException("cannot create controller type: " +
       this.getClass().getName());
   }
 }
The controller interface and its implementation have to be declared in the component configuration file.
Controllers can also act as interceptors: they can intercept incoming invocations and outgoing invocations. For each invocation, pre and post processings are defined in the methods beforeInputMethodInvocation, afterInputMethodInvocation, beforeOutputMethodInvocation, and afterOutputMethodInvocation. These methods are defined in the interfaces InputInterceptor and OutputInterceptor, and take a MethodCall object as an argument. MethodCall objects are reified representations of method invocations, and they contain Method objects, along with the parameters of the invocation.
Interceptors are configured in the controllers XML configuration file, by simply adding input-interceptor="true" or/and output-interceptor="true" as attributes of the controller element in the definition of a controller (provided of course the specified interceptor is an input or/and output interceptor). For example a controller that would be an input interceptor and an output interceptor would be defined as follows:
<componentConfiguration>
 <controllers>
 ....
   <controller
input-interceptor="true" output-interceptor="true"
>
     <interface>InterceptorControllerInterface</interface>
     <implementation>ControllerImplementation</implementation>
   </controller>
...
Interceptors can be composed in a basic manner: sequentially.
For input interceptors, the beforeInputMethodInvocation method is called sequentially for each controller in the order they are defined in the controllers configuration file. The afterInputMethodInvocation method is called sequentially for each controller in the reverse order they are defined in the controllers configuration file.
If in the controller config file, the list of input interceptors is in this order (the order in the controller config file is from top to bottom):
InputInterceptor1
InputInterceptor2
This means that an invocation on a server interface will follow this path:
--> caller
--> InputInterceptor1.beforeInputMethodInvocation
--> InputInterceptor2.beforeInputMethodInvocation
--> callee.invocation
--> InputInterceptor2.afterInputMethodInvocation
--> InputInterceptor1.afterInputMethodInvocation
For output interceptors, the beforeOutputMethodInvocation method is called sequentially for each controller in the order they are defined in the controllers configuration file. The afterOutputMethodInvocationmethod is called sequentially for each controller in the reverse order they are defined in the
controllers configuration file.
If in the controller config file, the list of input interceptors is in this order (the order in the controller config file is from top to bottom):
OutputInterceptor1
OutputInterceptor2
This means that an invocation on a server interface will follow this path
--> currentComponent
--> OutputInterceptor1.beforeOutputMethodInvocation
--> OutputInterceptor2.beforeOutputMethodInvocation
--> callee.invocation
--> OutputInterceptor2.afterOutputMethodInvocation
--> OutputInterceptor1.afterOutputMethodInvocation
An interceptor being a controller, it must follow the rules explained above for the creation of a custom controller.
Input interceptors and output interceptors must implement respectively the interfaces InputInterceptor and OutputInterceptor, which declare interception methods (pre/post interception) that have to be implemented.
Here is a simple example of an input interceptor:
public class MyInputInterceptor extends AbstractProActiveController
 implements InputInterceptor, MyController {
  public MyInputInterceptor(Component owner) {
    super(owner);
  }

  protected void setControllerItfType() {
    try {
      setItfType(ProActiveTypeFactory.instance().createFcItfType("my control\
ler",
        MyController.class.getName(), TypeFactory.SERVER,
        TypeFactory.MANDATORY, TypeFactory.SINGLE));
    } catch (InstantiationException e) {
      throw new ProActiveRuntimeException("cannot create controller " +
        this.getClass().getName());
    }
  }
  // foo is defined in the MyController interface
  public void foo() {
    // foo implementation
  }
  public void afterInputMethodInvocation(MethodCall methodCall) {
    System.out.println("post processing an intercepted an incoming functiona\
l invocation");
    // interception code
  }
  public void beforeInputMethodInvocation(MethodCall methodCall) {
    System.out.println("pre processing an intercepted an incoming functional\
 invocation");
    // interception code
 }
}
The configuration file would state:
<componentConfiguration>
 <controllers>
 ....
   <controller
     input-interceptor="true">
     <interface>
        MyController
     </interface>
     <implementation>
        MyInputInterceptor
     </implementation>
   </controller>
 ...
In this implementation of the Fractal component model, Fractal components are active objects. Therefore it is possible to redefine their activity. In this context of component based programming, we call an activity redefined by a user a functional activity.
When a component is instantiated, its lifecycle is in the STOPPED state, and the functional activity that a user may have redefined is not started yet. Internally, there is a default activity which handles controller requests in a FIFO order.
When the component is started, its lifecycle goes to the STARTED state, and then the functional activity is started: this activity is initialized (as defined in InitActive), and run (as defined in RunActive).
2 conditions are required for a smooth integration between custom management of functional activities and lifecycle of the component:
the control of the request queue must use the org.objectweb.proactive.Service class
the functional activity must loop on the body.isActive() condition (this is not compulsory, but it allows to automatically end the functional activity when the lifecycle of the component is stopped. It may also be managed with a custom filter).
Control invocations to stop the component will automatically set the isActive() return value to false, which implies that when the functional activity loops on the body.isActive() condition, it will end when the lifecycle of the component is set to STOPPED.
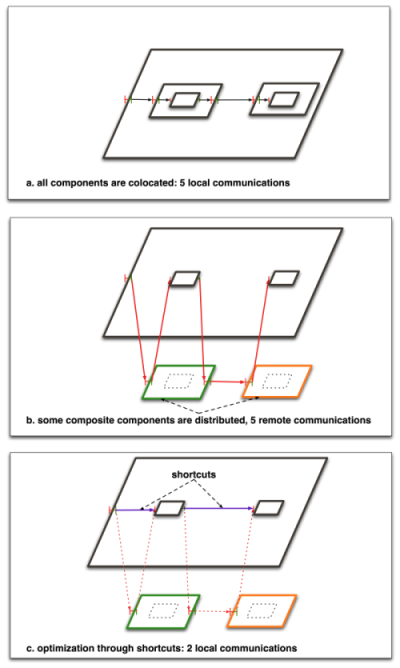
Communications between components in a hierarchical model may involve the crossing of several membranes, and therefore paying the cost of several indirections. If the invocations are not intercepted in the membranes, then it is possible to optimize the communication path by shortcutting: communicating directly from a caller component to a callee component by avoiding indirections in the membranes.
In the Julia implementation, a shortcut mechanism is provided for components in the same JVM, and the implementation of this mechanism relies on code generation techniques.
We provide a shortcut mechanism for distributed components, and the implementation of this mechanism relies on a "tensioning" technique: the first invocation determines the shortcut path, then the following invocations will use this shortcut path.
For example, in the following figure, a simple component system, which consists of a composite containing two wrapped primitive components, is represented with different distributions of the components. In a, all components are located in the same JVM, therefore all communications are local communications. If the wrapping composites are distributed on different remote jvms, all communications are remote because they have to cross composite enclosing components. The short cut optimization is a simple bypassing of the wrapper components, which results in 2 local communications for the sole functional interface.
Shortcuts are available when composite components are synchronous components (this does not break the ProActive model, as composite components are structural components). Components can be specified as synchronous in the ControllerDescription object that is passed to the component factory:
ControllerDescription controllerDescription =
            new ControllerDescription("name", Constants.COMPOSITE, Constants.SYNCHRONOUS);
When the system property proactive.components.use_shortcuts is set to true, the component system will automatically establish short cuts between components whenever possible.
© 2001-2007 INRIA Sophia Antipolis All Rights Reserved