| Prev | Part VII. Graphical User Interface (GUI) and tools Chapter 44. TimIt API |  | Next |
| Prev | Part VII. Graphical User Interface (GUI) and tools Chapter 44. TimIt API | | Next |
TimIt offer a complete solution to benchmark an application. It is an API which provide some advanced timing and event observing services. Benchmarking your ProActive application will permit you to enhance performance of it. Thanks to generated statistics charts, you will be able to determine critical points of your application.
Different kind of statistics can be done. You can setup different timers with hierarchical capabilities and see them in charts. Event observers can be placed to study, for example, communication pattern between your application's workers.
TimIt generate charts and results XML file, with exact timing and event observers values. Here are some examples of charts and XML files generated by TimIt :
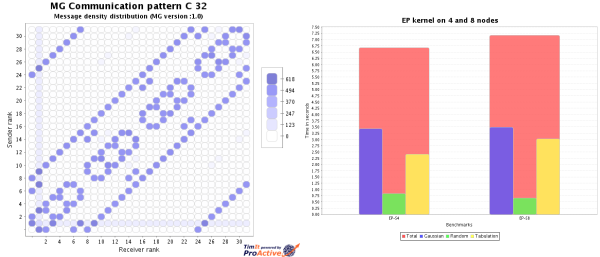
<timit>

  <FinalStatistics name="Example2 4" runs="10" timeoutErrors="0"
                   date="2006-11-05 10:46:56.742">


    <timers>
      <timer name="total"
             min="2095.0" avg="2191.250" max="2357.0" dev="1.603" sum="2187.750">
        <timer name="work"
               min="1453.0" avg="1466.000" max="1473.0" dev="0.951" sum="0.000" />
        <timer name="init"
               min="147.0" avg="175.250" max="205.0" dev="2.932" sum="0.000" />
        <timer name="end"
               min="467.0" avg="546.500" max="679.0" dev="1.439" sum="0.000" />
      </timer>
    </timers>


    <events>
      <event name="nbComms" min="92.000" avg="92.000" max="92.000" dev="0.000" />
      <event name="commPattern" value="Too complex value, first run shown">.
10  0 13  0
 0 13  0 10
13  0 10  0
 0 10  0 13
      </event>
      <event name="densityPattern" value="Too complex value, first run shown">.
  20    0 2080    0
   0 2080    0   20
2080    0   20    0
   0   20    0 2080
      </event>
    </events>


    <informations>
      <deployer jvm="Java HotSpot(TM) Client VM 1.5.0_06-64 - Version 1.5.0_06"
                os="ppc Mac OS X 10.4.8" processors="1" />
    </informations>


  </FinalStatistics>

</timit>
Configuring TimIt is done through an XML configuration file which is axed around four major tags :
This part set variables which can be used both inside this file as you can see in next parts, but also in ProActive descriptor file.
TimIt offer a nice tool to deal with variables and redundancy : the sequences variables
These variables are very useful to reduce your configuration file size and its management.
A sequence is a list of values for a variable. In our example, NP is a sequence variable which have values 4 and 8 and the benchmark tag will be expanded into two benchmark tags : one with NP value set to 4 and the other with NP value set to 8.
If sequence variables are used in a Serie's attribute, you will expand this Serie into as tags as you have values in your sequence.
For example, these two examples are equivalents :
<timit>

  <globalVariables>
    <descriptorVariable name="ALGO" value="Algo1,Algo2"/>
    <descriptorVariable name="NP"   value="4,8"/>
    <descriptorVariable name="TEST" value="#1"/>
  </globalVariables>

  <serie (...) result="${ALGO}">
    <benchmarks>
      <benchmark name="Test ${TEST} : algo ${ALGO} on ${NP} nodes" (...)/>
    </benchmarks>
  </serie>

</timit>
<timit>

  <globalVariables>
    <descriptorVariable name="TEST" value="#1"/>
  </globalVariables>

  <serie (...) result="Algo1">
    <benchmarks>
      <benchmark name="Test #1 : algo Algo1 on 4 nodes" (...)/>
      <benchmark name="Test #1 : algo Algo1 on 8 nodes" (...)/>
    </benchmarks>
  </serie>

  <serie (...) result="Algo2">
    <benchmarks>
      <benchmark name="Test #1 : algo Algo2 on 4 nodes" (...)/>
      <benchmark name="Test #1 : algo Algo2 on 8 nodes" (...)/>
    </benchmarks>
  </serie>

</timit>
Important :
Sequences variables are not handled by ProActive descriptor files, so do not use same names for ProActive descriptor and sequence variable names to avoid bad overwriting. To do it, you should prefer overwriting in benchmark tag like this :
<benchmark name="Test ${TEST} : algo ${ALGO} on ${NP} nodes" (...) >
  <descriptorVariable name="NBNODES" value="${NP} />
</benchmark>
Note :
You can use sequences without using
variables with #{...} pattern :
<benchmark name="Test ${TEST} : algo #{Algo1,Algo2} on ${NP} nodes" (...) >
  <descriptorVariable name="NBNODES" value="${NP} />
</benchmark>
A Serie represent a suite of benchmarks. For example, if you want to benchmark two algorithms with different parameters each, you can specify two Series (one for each algorithm) and then specify different benchmarks for all parameters.
Description of the attributes :
[CAN] descriptorBase : the file containing the base ProActive deployment descriptor
[MUST] class : the class of your application which is Startable (see section 2.2)
[MUST] result : the output file for writing final results
[CAN] errorFile : if an error occur (recoverable), logs will be outputed into this file
Here you specify parameters for the charts. Those charts will be generated thanks to benchmark results.
Description of the attributes :
Other attributes are chart's type specific :
[MUST] type : the type of chart you want to create
[MUST] title : your chart title
[MUST] subtitle : your chart subtitle
[MUST] xaxislabel : the X axis label
[MUST] yaxislabel : the Y axis label
[CAN] width : the width of the output chart
[CAN] height : the height of the output chart
[MUST] filename : the chart output filename (will produce both a .PNG and .SVG files)
Other attributes are chart's type specific :
[CAN] filter : the name of the counter
(event) you want to involve in this chart. All activated counters
(events) are involved if not specified (available only for
HierarchicalBarChart and
Line2dChart)
[MUST] tag : the tag to deal with
(timers or events) must be
associated with attribute (available only for
Line2dChart)
[MUST] attribute : the attribute value
(min, average,
max or deviation) to use for
the chart (available only for
Line2dchart)
[CAN] legendFormatMode : the format of
the legend (Default, None,
K1000, K1024) to show value
in legent as standard, power of 2 or power of 10 numbers
(available only for MatrixChart)
[CAN] scaleMode : the scale mode
(Default, Linear,
Logarithmic) for che chart (available only for
MatrixChart)
Define the suite of tests with different parameters. Each test will generate a result file and an entry in chart.
Description of the attributes :
[MUST] name : the name of this benchmark. Will be set in result file.
[MUST] run : the number of runs you want to perform. Final result will give the min/average/max/deviation between these runs.
[CAN] warmup : the number of "untimed" runs you want to perform before starting the real runs.
[CAN] timeout : the time in seconds before restarting a run (with a maximum of 3 restarts per benchmark).
[CAN] descriptorGenerated : the ouput file where TimIt but the ProActive deployment descriptor.
[CAN] removeExtremums : if
true, max and min values between all runs will
be removed.
[CAN] note : the text entered here will be copied into result file. Useful for specifying launch environnement.
[MUST] parameters : the parameters to launch your application.
[MUST] output : result of all runs will be outputted into this output file.
In addition to these attributes, you can specify descriptorVariable tags which will be copied into generated ProActive deployment descriptor file.
Here is a complete example of a configuration file :
<?xml version="1.0" encoding="UTF-8"?>
<timit>

  <!-- GLOBAL VARIABLES DEFINITION
       Will replace those in ProActive deployment descriptor -->
  <globalVariables>
    <descriptorVariable name="VMARGS" value="-Xmx32M -Xms32M" />
    <descriptorVariable name="CLASS_PREFIX"
                        value="org.objectweb.proactive.examples.timit" />
    <descriptorVariable name="NP" value="4,8" />
    <descriptorVariable name="RUN" value="1" />
    <descriptorVariable name="WARMUP" value="0" />
  </globalVariables>


  <!-- Running example2 suite and generate different charts -->
  <serie descriptorBase="${PROJECT_PATH}/descriptors/TimIt.xml"
         result="${PROJECT_PATH}/results/example2.4-8.xml"
         class="${CLASS_PREFIX}.example2.Launcher">

    <charts>
      <chart type="HierarchicalBarChart"
             filter="total,init,foo"
             title="Example2 on 4 and 8 nodes"
             subtitle="Timing values" width="800" height="600"
             xaxislabel="Benchmarks" yaxislabel="Time in seconds"
             filename="${PROJECT_PATH}/results/example2.Timing" />
      <chart type="MatrixChart"
             eventName="commPattern"
             title="Example2"
             subtitle="Communications pattern"
             xaxislabel="Receiver rank" yaxislabel="Sender rank"
             scalemode="logarithmic" legendFormatMode="pow2"
             filename="${PROJECT_PATH}/results/example2.Pattern" />
      <chart type="Line2dChart"
             tag="events" filter="nbComms" attribute="avg"
             title="Example2"
             subtitle="Total number of communications"
             xaxislabel="Benchmarks" yaxislabel="Nb communications"
             filename="${PROJECT_PATH}/results/example2.nbComms" />
    </charts>

    <benchmarks>
      <benchmark name="Example2 ${NP}"
                 run="${RUN}" warmup="${WARMUP}" timeout="100"
                 descriptorGenerated="${PROJECT_PATH}/descriptors/generated.xml"
                 removeExtremums="true"
                 note="My first test"
                 parameters="${PROJECT_PATH}/descriptors/generated.xml ${NP}"
                 output="${PROJECT_PATH}/results/example2-${NP}.xml">
        <descriptorVariable name="NODES" value="${NP}" />
        <descriptorVariable name="TIMIT_ACTIVATE"
                 value="total,init,work,end,foo,densityPattern,commPattern,nbComms"/>
      </benchmark>
    </benchmarks>
  </serie>

</timit>
Main class have to implement Startable interface
public class Example implements Startable {

  /** TimIt needs a noarg constructor (can be implicit) **/
  public Example() {}

  /** The main method is not used by TimIt **/
  public static void main( String[] args ) {
    new Example().start(args);
  }

  /** Invoked by TimIt to start your application **/
  public void start( String[] args ) {
    // Creation of the Timed object(s)
    // It can be by example :
    //   - a classic java object
    //   - an active object
    //   - a group of objects
    Worker workers = ProSPMD.newSPMDGroup(...);

    // You have to create an instance of TimItManager and
    // give to it the Timed objects
    TimItManager tManager = TimItManager.getInstance();

    // Timed objects start their job
    workers.start();

    // At the and of you application, you must invoke
    // the getBenchmarkStatistics to retrieve the results
    // from the Timed objects
    BenchmarkStatistics bStats = tManager.getBenchmarkStatistics();

    // Then, you can modify or print out the results
    System.out.println(bStats);
  }
}
Analyzed class have to extend Timed
public class Worker extends Timed {

  /** Declaration of all TimerCounters and EventObservers **/
  private TimerCounter T_TOTAL, T_INIT, T_WORK, T_COMM;
  private EventObserver E_COMM, E_MFLOPS;

  public void start() {
    // Register the TimerCounters and EventObservers
    T_TOTAL = TimIt.add(new HierarchicalTimerCounter("total"));
    T_INIT = TimIt.add(new HierarchicalTimerCounter("init"));
    T_WORK = TimIt.add(new HierarchicalTimerCounter("work"));
    T_COMM = TimIt.add(new HierarchicalTimerCounter("comms"));
    E_MFLOPS = TimIt.add(new DefaultEventObserver("mdlops"));
    E_COMM = TimIt.add(new CommEventObserver(
               "communicationPattern", groupSize, timedID));

    // You must activate TimIt before using your counters and observers
    // According to the 'proactive.timit.activation' property value, it
    // will activate or not concerned TimerCounters (EventObservers)
    TimIt.activation();

    // The you can use your counters and observers
    // (better examples of usage in next section)
    T_TOTAL.start();
      for( int destID=0; destID<nbTimeds; destID++ ) {
        TimIt.notifyObservers(new CommEvent(E_COMM,destID,1));
      }
    T_TOTAL.stop();
    TimIt.notifyObservers(new Event(E_MFLOPS,mflops));

    // At the end, you have invoke finalization method to return results
    // to the startable object
    TimIt.finalization(timedID,"Worker "+timedID+" OK");
  }
}
TimIt provide different kind of services. By combinig them, you will be able to measure many parameters of your application. TimIt package contains few examples for using these services in your application.
It will help you to time some piece of code in your application. For example you can get total, initialization, working and communication time. These counters are hierarchicals. It means that time values will be defined by counter dependances.
Example of hierarchy :
Total time = 60 seconds
Initialization time = 10 seconds
Communication time = 4 seconds
Working time = 50 seconds
Communication time = 17 seconds
Here you can see communication part both in initialization and working time.
The code associated to this example is :
T_TOTAL.start();

  T_INIT.start();
    // Initialization part...
    T_COMM.start();
      // Communications...
    T_COMM.stop();
  T_INIT.stop();

  T_WORK.start();
    // Working part...
    T_COMM.start();
      // Communications...
    T_COMM.stop();
  T_WORK.stop();

T_TOTAL.stop();
It will help you to keep an eye on different events that occur in your application.
There is two types of events :
Default event
This event manage a single value (a double). It can be useful to compute mflops or total number of performed communications.
Example of usage :
// Initialization
int collapseOperation = DefaultEventData.SUM;
int notifyOperation = DefaultEventData.SUM;
EventObserver E_NBCOMMS = TimIt.add(
         new DefaultEventObserver("nbComms", collapseOperation, notifyOperation));
Value of notifyOperation determine what operation to perform between notifications.
Value of collapseOperation determine what operation to perform between Timed objects.
// Utilization
for( int i=0; i<10; i++ ) {
  TimIt.notifyObservers( new Event(E_NBCOMMS, 1) );
}
For each Timed object, nbComms value will be 10, and final value would be 30 if we had 3 Timed objects.
Communication event
This event were designed for communications. It manage a square matrix which can be used by example to determine topology of communications between Timed objects.
Example of usage :
// Initialization
EventObserver E_COMM = TimIt.add(
         new CommEventObserver("mflops", groupSize, timedID);
Value of groupSize represent the number of Timed objects which are involved in these communications.
Value of timedID represent an identification number which represent the current Timed object (like the rank).
// Utilization
int destID = (timedID + 1) % groupSize;
TimIt.notifyObservers( new CommEvent(E_COMM, destID, 1) );
Between each notification an addition with the old value will be performed. Then the collapsing operation between the Timed objects will be an sum. In this case, we will obtain a matrix showing the toplogy of our application.
In line we have the sender, and in column with have the receiver. Here we obtain a ring topology :
1 0 0 0
0 0 0 1
0 0 1 0
0 1 0 0
TimIt package can be found in org.objectweb.proactive.benchmarks.timit. We try to make easy as possible the way to add a new feature to this application. To do so, TimIt is organized in 5 major points which can be extended :
The subpackage timit.config contains all classes related to the configuration file management.
ConfigReader
This class read the configuration file. It deal with globalVariable and serie tags.
Tag
All created tags (except globalVariable) have to extend this class. It makes easier the way to read tag's attributes. If you want to create a new tag, extend this class and take example on a new tag, like Benchmark, which is a good example.
Example :
Suppose you want to add attribute myOption to the Benchmark tag where the default value is 1.
// Add these lines in the get method of Benchmark class
if (name.equals("myOption")) {
  return "1";
}
Then, you will be able to use it like this it TimIt class:
String result = bench.get("myOption");
// ... and do whatever you want with it...
The subpackage timit.util.timing contains all classes related to the timing management.
HierarchicalTimer
This class will contain values of all timer counters. Here is
all the "intelligency" of the timer. For example, if you want to use
nanoseconds instead of milliseconds, you should extend this class
and overwrite getCurrentTime() method.
The subpackage timit.util.observing contains all classes related to the event observers management. Existant event observers are default and communication specific. Default (DefaultEventObserver) is base on a single value, while the communication specific (CommEventObserver) is based on 2D square matrix.
Event observers are based on observer/observaSuble design pattern.
EventObserver
This interface must be implemented by all kind of event observers. These implementations will have to deal with an EventData.
Event
Each kind of event should have its own Event implementation. An instance of this event will be passed at each notification.
EventData
Like HierarchicalTimer for the timing
service, EventData is the "intelligence" of
event observing. It will contain all data values for a particular
Timed object. It also contain a
collapseWith() method which will be used to merge
data values from all Timed objects.
EventObservable
For performance purpose, there is to implementations of this interface. A FakeEventObservable and a RealEventObservable.
EventDataBag
This class contains data values from all Timed objects. You are able to get it through an EventStatistics.
EventStatistics
When a benchmark run is done, you can get a BenchmarkStatistics which contains both timer and event statistics.
Example :
Suppose you want to create a new kind of Event which work with a 3D matrix instead of 2D matrix like CommEventObserver.
You will have to implement 2 or 3 classes :
MyEventObserver which implements EventObserver
It will receive notifications and transmit them to your EventData.
MyEventData which implements EventData
It will contain your 3D matrix computed from your notifications.
MyEvent which implements Event
It will be passed at each notification of your observer and will contain necessary data to update your 3D matrix.
Notice that you can reuse an other Event implementation if existing ones are sufficient.
The subpackage timit.util.charts contains all classes related to charts generation. This service is based on JFreeChart API (http://www.jfree.org/jfreechart/). Three major type of charts are proposed with TimIt :
HierarchicalBarChart, used to represent a serie of hierarchical timing statistics.
Line2dChart, used to represent a serie of single values.
MatrixChart, used to represent communications specific event observer.
Remember that in configuration file, choosing your chart type is
done through the type attribute of
chart tag. Actually, it represent the classname used
to handle your chart creation.
By the way, to create an new kind of chart, you just have to implement the Chart interface. So, you will have access to XML results file, full BenchmarkStatistics and all chart parameters given in configuration file (see section 4.1 to add new attributes).
If you need a very complex rendering chart method, you can implement your own renderer like we did for HierarchicalBarChart. Take example on this class, and see JFreeChart documentation.
© 2001-2007 INRIA Sophia Antipolis All Rights Reserved