bic &A dialog box pops up to query the interface name.
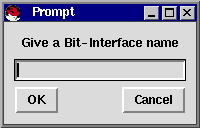
Type foo in the entry. Then, click on OK.
bic [ -- options ]
options:
-appl application-name
-n integer number of bytes in a Binary
-dir dir-name name of the directory
defaults:
n = 2 (i.e., 16 bits)
dir = .Configuration files:
extension = cfg
Assume that foo.cfg doesn't exist in the current directory.
If not given, bic will query for the interface name.
Here, both a name and the size are given.bic -- -appl foo -n 4
bic -- -appl kbd_7s
bic &A dialog box pops up to query the interface name.
Type foo in the entry. Then, click on OK.
The main panel is drawn:
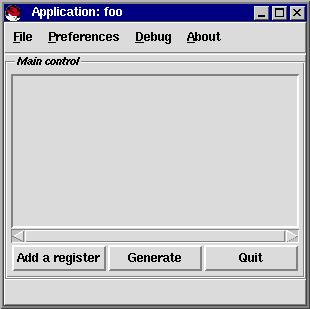
You can now, define and configure registers.
Let A be a first 8-bit register:
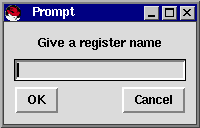
Click on "Add a register". A dialog box pops up.
Type A in the entry, then OK.
Another dialog box queries for the size if register A in bytes. Type 1 and then press OK.

The configuration window for register A is drawn. It is composed of read-only bits.
Read-only is the default option. The mode (Read, Write, Read/Write) expresses the possible actions of the
Controller on the register.
The check button "Export" is set by default: this means that this register is an interface register.
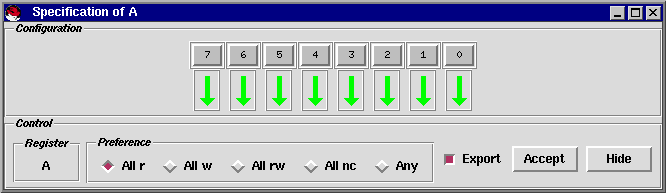
Another window entitled "Associations" is opened. It is void.

The mode associated with each bit can be easily changed by a simple click. It is a spinning selection:
By default, bits are set to 0 (grey raisen button). By clicking on a button widget, it turns to a light yellow sunken button, meaning that its initial value is 1.
- read-only (downward green arrow)
- write-only (upward blue arrow)
- read and write (up and down magenta arrow)
- not connected (broken black line)
If the register is local to the controller, de-activate Export by a simple click.
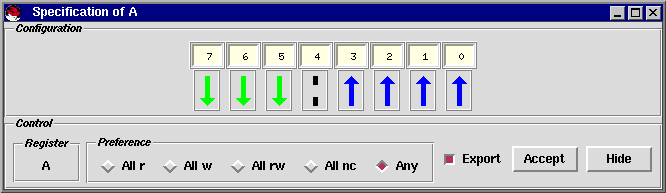
The window above represents the settings for register A. Accept this setting by clicking on the Accept button in the Specification window. When validated, the new configuration of A is displayed in a coded form in the main window:
regDecl A 1 0xe0 0xf 0xff 1Names may be associated with bits or groups of bits. Just click on a button with B3 (right button of the mouse): a dialog box is opened. Type an identifier in the entry. For instance, select bit 0 and enter "Row". Validate with a "carriage return". A new click with B3 on the dialog box withdraws the dialog box itself.
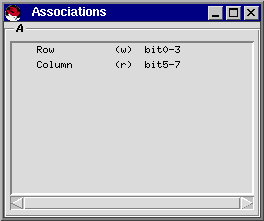
In the same manner, give the name "Column" to bit 5. Click on Accept: the Association window now displays the new associations.

The same identifier may be given to several bits. This is a somewhat tedious method to assign a name to a group of bits. An easier way is to click, in the Association window, on the line of the association you want to change. For instance, click on "Row ...". A new dialog box allows you to extend your selection: in this case bit 0 up to 4 can be given the same name. Choose 3 in the spinbox and click on Accept: your selection is registered. You can now hides this dialog box. To be effective, your change must be validated by a click on the Accept button in the specification window. The association window is then updated.

The figure below, shows the Association window for register A, after assigning the identifiers Row and Column to respectively, groups bit0-bit3 and bit5-bit7.
Configuration of register B
Use the same procedure. B is a 8-bit write-only register.

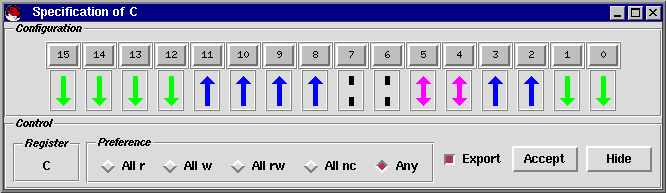
Configuration of register C
It is a 16-bit register with several groups.
The specification of the foo interface is summed up in the main window:
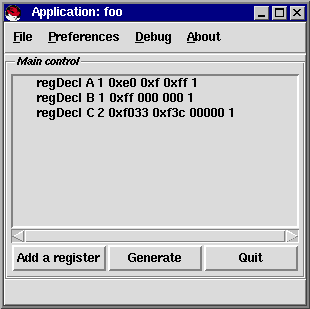
Clicking on a register description in the main window causes the associated specification window to pop up.
Just click on the Generate button. Three files are generated:
- foo.cfg coded representation of the configuration
- fooCfg.c auxiliary C file that contains interface functions
- fooCfg.tcl auxiliary tcl file for the animation
bic (Binary Interface Configuration)
April 12, 2000
v2.6
Charles André
I3S Laboratory
BP 121
06903 Sophia Antipolis cédex
France