
Gli oggetti sono definiti nel package java.awt. Dunque per utilizzarli bisogna fare un import (tipicamente import java.awt.*;).
Tale toolkit è astratto perché è portatile. Ogni implementazione della JVM deve avere un'implementazione della AWT. Ma questo non vuole dire che l'aspetto degli oggetti sotto Linux sia lo stesso che sotto Windows. Ma il comportamento sarà lo stesso.
Storicamente la parte grafica di Java è stata la parte più visibile di Java (le famose Applet) ma anche la più debole. Ci sono stati molti errori di implementazione e di incompatibilità fra Windows e Linux.
Awt è la base degli oggetti grafici. Ci sono adesso altri toolkit più sviluppati che permettono di fare la grafica, per esempio: Swing, Java3D etc... Ma Awt in ogni caso è la base fondamentale e l'architettura è la stessa.
import java.awt.Color;

Color myColor = Color.red;
Color myColor = new Color(255,0,0);
Font smallFont = new Font("Serif", Font.PLAIN, 10);
Font bigFont = new Font("SansSerif", Font.BOLD, 18);
package java.awt;

abstract class Component  {
  ...
  void setSize(int width, int height);
  void setForeground(Color c);
  void setBackground(Color c);
  void setFont(Font f);
  ...
  int getWidth();
  int getHeight();
  Color getForeground();
  Color getBackground();
  Font getFont();
  ...
}
import java.awt.Button;

Button b = new Button("Yes");
Dopo si possono modificare le sue caratteristiche:
import java.awt.Button;

Button b = new Button("Yes");
b.setFont(new Font("Serif",Font.BOLD, 24));
b.setForeground(Color.blue);
b.setBackground(Color.red);
Quando questo oggetto sarà messo nella interfaccia grafica, risulterà
come:
import java.awt.Label;

Label b = new Label("Yes");
Dopo si possono modificare le sue caratteristiche:
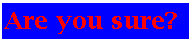
import java.awt.Label;

Label b = new Label("Are you sure?");
b.setFont(new Font("Serif",Font.BOLD, 24));
b.setForeground(Color.red);
b.setBackground(Color.blue);
Quando questo oggetto sarà messo nella interfaccia grafica, risulterà
come:
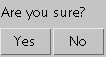
import java.awt.*;

Panel p1 = new Panel();
Panel p2 = new Panel();
Label l = new Label("Are you sure?");
p1.add(l);
Button b1 = new Button("Yes");
p2.add(b1);
Button b2 = new Button("No");
p2.add(b2);
p1.add(p2)
Il panel p1 contiene una label l e un altro panel p2.
Il panel p2 contiene due buttons b1, b2.
import java.awt.*;

class Test  {
  public static void main(String [] args) {
    Frame f = new Frame();
    Button b = new Button("Yes");
    b.setFont(new Font("Serif",Font.BOLD, 24));
    b.setForeground(Color.blue);
    b.setBackground(Color.red);
    f.add(b);
    f.pack();
    f.setVisible(true);
  }
}
L'esecuzione di questo codice crea una finestra con il button.
L'esecuzione non termina perchè l'oggetto frame è ancora attivo.
Per terminare, bisogna fare dispose sul frame f.
import java.awt.*;

class Test  {
  public static void main(String [] args) {
    Frame f = new Frame();
    f.setLayout(new FlowLayout());
    f.add(new Label("Are you sure?"));
    Panel p = new Panel();
    p.setLayout(new FlowLayout());
    p.add(new Button("Yes"));
    p.add(new Button("No"));
    f.add(p);
    f.pack();
    f.setVisible(true);
  }
}

Con tale manager, gli oggetti hanno la loro taglia naturale. Questo manager è il default per il panel. Dunque nell'esempio precedente, si potrebbe anche non fare l'associazione del manager.
import java.awt.*;

class Test  {
  public static void main(String [] args) {
    Frame f = new Frame("Test");
    f.setLayout(new FlowLayout());
    f.add(new Label("Are you sure?"));
    Panel p = new Panel();
    p.add(new Button("Yes"));
    p.add(new Button("No"));
    f.add(p);
    f.pack();
    f.setVisible(true);
  }
}
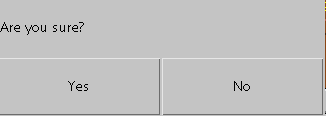
// 3 righe e 2 colonne
GridLayout gl = new GridLayout(3,2)
// Vertical
GridLayout gl = new GridLayout(0,1)
// Horizontal
GridLayout gl = new GridLayout(1,0)
Con tale manager possiamo avere un Test un po' più ragionevole:
class Test  {
  public static void main(String [] args) {
    Frame f = new Frame("Test");
    f.setLayout(new GridLayout(0,1));
    f.add(new Label("Are you sure?"));
    Panel p = new Panel();
    p.setLayout(new GridLayout(1,0));
    p.add(new Button("Yes"));
    p.add(new Button("No"));
    f.add(p);
    f.pack();
    f.setVisible(true);
  }
}
Poiché usiamo un GridLayout, i button sono ritagliati per occupare la taglia necessaria e la label rimane sulla sinistra. Questo si vede quando si ritaglia la finestra:
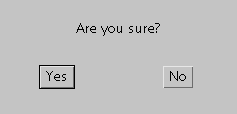
Per risolvere questo problema, si può usare un panel intermedio:
class Test  {
  private static Component newButton (String s) {
    Panel p = new Panel();
    p.add(new Button(s));
    return p;
  }
  public static void main(String [] args) {
    Frame f = new Frame("Test");
    f.setLayout(new GridLayout(0,1));
    f.add(new Label("Are you sure?",Label.CENTER));
    Panel p = new Panel();
    p.setLayout(new GridLayout(1,0));
    p.add(newButton("Yes"));
    p.add(newButton("No"));
    f.add(p);
    f.pack();
    f.setVisible(true);
  }
}

questo dopo il cambio di taglia va meglio:
class Test  {
  public static void main(String [] args) {
    Frame f = new Frame("Test");
    f.setLayout(new BorderLayout());
    f.add(new Label("Go",Label.CENTER));
    f.add(new Button("North"),"North");
    f.add(new Button("South"),"South");
    f.add(new Button("East"),"East");
    f.add(new Button("West"),"West");
    f.pack();
    f.setVisible(true);
  }
}
L'esecuzione dà:
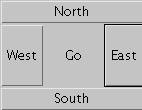
Il BorderLayout manager è il manager di default per il Frame dunque si può semplicemente scrivere:
class Test  {
  public static void main(String [] args) {
    Frame f = new Frame("Test");
    f.add(new Label("Go",Label.CENTER));
    f.add(new Button("North"),"North");
    f.add(new Button("South"),"South");
    f.add(new Button("East"),"East");
    f.add(new Button("West"),"West");
    f.pack();
    f.setVisible(true);
  }
}
Il metodo getSource permette d'avere l'oggetto che è all'origine dell'event.
Il metodo getX permette d'avere l'ascissa dell'event nel component origine dell'event.
Il metodo getY permette d'avere l'ordinata dell'event nel component origine dell'event.
Il metodo getActionCommand permette d'avere la stringa che rappresenta l'azione.
interface ActionListener {
  void actionPerformed(ActionEvent e);
}
Per associare il comportamento definito in un listener alla selezione
di un button è sufficiente registrare il listener con il metodo
addActionListener.
Per esempio si può definire un listener che termina
un'applicazione e associarlo con un button Quit:
import java.awt.*;
import java.awt.event.*;

class ButtonListener implements ActionListener {
  Frame f;
  ButtonListener(Frame f) {
    this.f = f;
  }
  public void actionPerformed (ActionEvent e) {
    f.dispose();
  }
}

class Test  {
  private static Component newButton (String s) {
    Panel p = new Panel();
    p.add(new Button(s));
    return p;
  }
  public static void main(String [] args) {
    Frame f = new Frame("Test");
    Button b = new Button("Quit?");
    b.addActionListener(new ButtonListener(f));
    f.add(b);
    f.pack();
    f.setVisible(true);
  }
}
class MouseListener {
 public void mouseClicked(MouseEvent e);
 public void mouseEntered(MouseEvent e);
 public void mouseExited(MouseEvent e);
 public void mousePressed(MouseEvent e);
 public void mouseReleased(MouseEvent e);
}
Quando siamo interessati ad avere una reazione corrispondente
a un solo metodo,
piuttosto che implementare MouseListener è più
semplice estendere MouseAdapter che implementa
MouseListener con metodi vuoti.
import java.awt.*;
import java.awt.event.*;

class LabelListener implements ActionListener {
  Frame f;
  Label l;
  LabelListener(Frame f, Label l) {
    this.f = f;
    this.l = l;

  }
  public void actionPerformed (ActionEvent e) {
    if ("+".equals(e.getActionCommand())) {
      l.setText(""+(Integer.parseInt(l.getText())+1));
    } else if ("-".equals(e.getActionCommand())) {
      l.setText(""+(Integer.parseInt(l.getText())-1));
    }
  }
}

class Test  {
  private static Component newButton (String s, ActionListener al) {
    Panel p = new Panel();
    Button b = new Button(s);
    b.addActionListener(al);
    p.add(b);
    return p;
  }
  public static void main(String [] args) {
    Frame f = new Frame("Test");
    f.setLayout(new GridLayout(0,1));
    Label l = new Label("0",Label.CENTER);
    f.add(l);
    Panel p = new Panel();
    p.setLayout(new GridLayout(1,0));
    LabelListener ll = new LabelListener(f,l);
    p.add(newButton("+",ll));
    p.add(newButton("-",ll));
    f.add(p);
    f.pack();
    f.setVisible(true);
  }
}

void setColor(Color c);
void setFont(Font font);

void drawLine(int x1, int y1, int x2, int y2);
void drawOval(int x, int y, int width, int height);
void drawRect(int x, int y, int width, int height);
void drawString(String str, int x, int y)

void fillOval(int x, int y, int width, int height);
void fillRect(int x, int y, int width, int height);
Per esempio per avere un component che si comporta come una scacchiera, si scrive:
import java.awt.*;

class Chessboard extends Canvas {
  int n;
  Chessboard(int n) {
    this.n = n;
  }
  int minSize() {
    return Math.min(getSize().width,getSize().height);
  }
  public void paint(Graphics g) {
    // The dimension of a chessboard
    int size=minSize();
    for(int i=0; i < n; i++) {
      for(int j = 0; j < n; j++) {
        //Determine the colour of the square
        if ((i+j)%2==0) {
          g.setColor(Color.white);
	}else{
          g.setColor(Color.black);
	}
        g.fillRect((i*size)/n,(j*size)/n,size/n,size/n);
      }
    }
  }
}
class Test {
  public static void main(String[] args) {
    Frame fm = new Frame("test");
    Chessboard cb = new Chessboard(8);
    cb.setSize(200,200);
    fm.add(cb);
    fm.pack();
    fm.setVisible(true);
  }
}
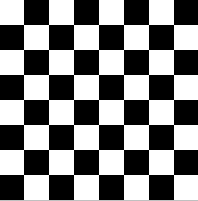
Il risultato è:
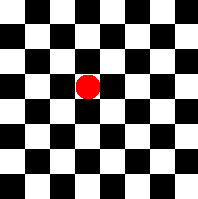
Si può anche mostrare un casella particolare della scacchiera. Quando questo punto è cambiato, bisogna dire a l'oggetto di ridisegnarsi, si fa con il metodo repaint:
import java.awt.*;

class Point {
  int x, y;
  Point (int x, int y) {
    this.x=x;
    this.y=y;
  }
}

class Chessboard extends Canvas {
  int n;
  Point pt;
  Chessboard(int n) {
    this.n = n;
  }
  int minSize() {
    return Math.min(getSize().width,getSize().height);
  }
  public void paint(Graphics g) {
    // The dimension of a square
    int size = minSize();
    for(int i=0; i < n; i++) {
      for(int j = 0; j < n; j++) {
        //Determine the colour of the square
        if ((i+j)%2==0) {
          g.setColor(Color.white);
	}else{
          g.setColor(Color.black);
	}
        g.fillRect((i*size)/n,(j*size)/n,size/n,size/n);
        if (pt != null) {
         g.setColor(Color.red);
         g.fillOval((pt.x*size)/n,(pt.y*size)/n,size/n,size/n);
        }
      }
    }
  }
  void setPoint(int x, int y) {
    if (x<1 || n < x || y < 1 || n < y)
      return;
    if (pt == null) {
      pt=new Point(x-1,y-1);
    } else {
      pt.x=x-1;
      pt.y=y-1;
    }
    repaint();
  }
}
class Test {
  public static void main(String[] args) {
    Frame fm = new Frame("test");
    Chessboard cb = new Chessboard(8);
    cb.setSize(200,200);
    fm.add(cb);
    fm.pack();
    fm.setVisible(true);
    cb.setPoint(4,4);
  }
}
Cosí abbiamo:
Adesso siamo pronti a reagire agli eventi prodotti dal mouse. Per questo bisogna semplicemente registrarsi a Chessboard per ascoltare i MouseEvent:
import java.awt.*;
import java.awt.event.*;

class MouseCb extends MouseAdapter {
  Chessboard cb;
  MouseCb (Chessboard cb) {
    this.cb = cb;
  }
  public void mouseClicked (MouseEvent e) {
    int size = cb.minSize()
    int x = (cb.n*e.getX())/size +1;
    int y = (cb.n*e.getY())/size +1;
    cb.setPoint(x,y);
  }
}

class Point {
  int x, y;
  Point (int x, int y) {
    this.x=x;
    this.y=y;
  }
}

class Chessboard extends Canvas {
  int n;
  Point pt;
  Chessboard(int n) {
    this.n = n;
  }
  int minSize() {
    return Math.min(getSize().width,getSize().height);
  }
  public void paint(Graphics g) {
    int size = minSize();
    for(int i=0; i < n; i++) {
      for(int j = 0; j < n; j++) {
        //Determine the colour of the square
        if ((i+j)%2==0) {
          g.setColor(Color.white);
	}else{
          g.setColor(Color.black);
	}
        g.fillRect((i*size)/n,(j*size)/n,size/n,size/n);
        if (pt != null) {
         g.setColor(Color.red);
         g.fillOval((pt.x*size)/n,(pt.y*size)/n,size/n,size/n);
        }
      }
    }
  }
  void setPoint(int x, int y) {
    if (x<1 || n < x || y < 1 || n < y)
      return;
    if (pt == null) {
      pt=new Point(x-1,y-1);
    } else {
      pt.x=x-1;
      pt.y=y-1;
    }
    repaint();
  }
}
class Test {
  public static void main(String[] args) {
    Frame fm = new Frame("test");
    Chessboard cb = new Chessboard(8);
    cb.addMouseListener(new MouseCb(cb));
    cb.setSize(200,200);
    fm.add(cb);
    fm.pack();
    fm.setVisible(true);
  }
}
Adesso si può cambiare il punto usando il click del mouse.
Si può migliorare anche un po' questo esempio perché
si vede un flash ogni volta che si clicka. Il risponsabile di tale
flash è la chiamata repaint. Tale metodo utilizza un
altro metodo update la cui implementazione di default è:
public void update (Graphics g) {
  setColor(backgroungColor);
  fillRect(0,0,getSize().width,getSize().height);
  paint(g);
}
Il flash che vediamo è il disegno del rettangolo.
Questo rettangolo permette di assicursarci che tutto il disegno
precedente è stato cancellato. Nel nostro caso, il nostro
nuovo disegno coprirà completemente il vecchio disegno.
Dunque non c'è bisogno di disegnare il rettangolo:
si può fare un overwrite
di update:
class Chessboard extends Canvas {
  ....
  public void update(Graphics g) {
    paint(g);
  }
  ...
}