Purpose
visu_robot is a tool enabling to visualize various types of parallel robots, in various positions. It enables also to see trajectories and to create a drawing of the robot using the drawing system xjpdraw.Availability
The sources of this software is freely available via anonymous fpt (download for Sun, download for Linux).
This software is provided "as is" without warranty of any kind. In no event shall INRIA be liable for any loss of profits, loss of business, loss of use or data, interruption of business, or for indirect, special, incidental, or consequential damages of any kind, arising from any error in this software.
Implementation features
Window system: X
Type: sources
Language: C
OS:Solaris,linux
Number of lines: 10000
Size of binary: 2.58 Mo (Solaris), 1.3 Mo (linux)
Output: display, graphic output in xjpdraw format
History
- version 0: 3/9/1993
- version 1: 9/28/1995
- version 2: 5/29/1997
- version 3: 4/10/1999
User's manual
Introduction
visu_robot is a tool enabling to visualize various types of parallel robots, in various positions. It enables also to see trajectories and to create a drawing of the robot using the drawing system xjpdraw which is available via anonymous ftp.
Known type of robot
The type of the robot is indicated when running the program or in the window Robot file. The type of robot and the robot file is written as:-S [robot type] -R [robot file]robot type is one of the following keyword:
- 2d: planar robot with variable length links
- 2dgoss: planar robot of Gosselin type (the platform is connected to the ground by three links with two segments in each link).
- left_hand : 6 d.o.f robot of Gough type
- proto : INRIA parallel robot type (similar to Gough robot but with fixed length links. The position of the platform is controlled by vertical motion of the joints close to the base).
- stewart: Stewart platform
- poignet :3 d.o.f parallel robot similar to a wrist. The triangular platform lie on a fixed ball and socket joint. Each vertex of the platform is connected to a link and one extremity of the link moves along a vertical direction.
- poignet_mg: similar to the previous one but the robot is actuated by changing the links lengths.
- lee_special: a special form of Lee robot. Three rotoid joints on the base, one oriented along the x-axis, the two other one along the y axis. Three variable lengths legs with ball-and socket joint connecting the legs to the platform.
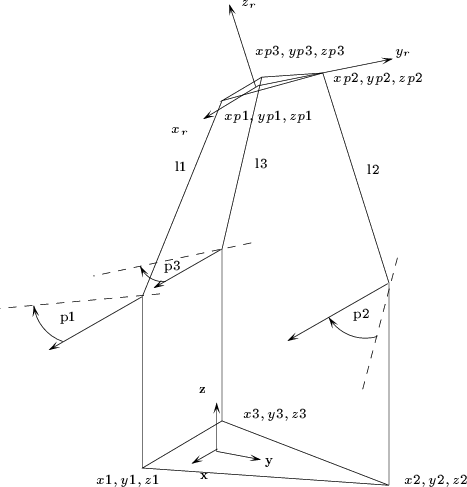
- poignetz: a variant of Lee robot, the legs have a fixed length but their extremity close to the base are moving along the z axis
Visualization
After having loaded a robot the display of the robot will be obtained by given a position/orientation in the window Position and hitting the Return key.A xjpdraw file of the current robot will be obtained by giving a file name in the window Jpdraw file. To get a drawing from a file toto use the command
xjpdraw -X 6 -Y 6 -F totoThe numbers 6 indicates that you will put your drawing in a 6x6 rectangle.
Modifying the view
If you have a robot on the screen you can modify the view point by hitting key with the mouse in the canvas.- 'l': left motion
- 'r': right motion
- 'u': up motion
- 'd': down motion
- 'Z','z': positive or negative zoom
- 'V','v': positive or negative rotation around the z axis
- 'A','a':positive or negative rotation around the x axis
- 'p': display of the articular coordinates
Command file
Using Command file is a simple way to create automatically drawing of a robot. You use a command file by running the commandvisu_robot -C [command file]or
visu_robot -CI [command file]In the latter case the command file will be executed without any creation of a window. In the first case you run the command file by clicking on the button Execute.
A command file always begin by the definition of the robot. For example :
robot "-S left_hand -R inria.car"In the command file you can use variable (always beginning by a % followed by a number) and you can perform on this variable any classical arithmetic operations. See the xjpdraw command file manual. The position of the robot is defined by the order pos_data followed by values or variables.
Saving a robot in a drawing is done by using the order save followed by a file name between ". The file name can be indexed with a variable (e.g. "toto".
The command save_art enables to draw also the values of the articular coordinates. The commands face_view, side_view, top_view, perspective_view enable to modify the view point. The xjpdraw file is closed using the command close.
The order interrupt enables to interrupt the execution of the command file. visu_robot will ask if it can continue the execution.
Every lines between /* and */ is considered as a comment. Section Example presents an example of command file.
Trajectory
A trajectory can be also seen. A trajectory file describes the position/orientation of the robot by indicating the successive positions of the robot. To see the trajectory give the name of the trajectory file in the Trajectory File window.
visu_robot
visu_robot est un outil permettant la visualisation de différents types de robots parallèles, en différentes positions. Il permet aussi la visualisation de trajectoire ainsi que l'écriture de fichiers xjpdraw, un logiciel de dessin que l'on peut obtenir par ftp anonyme.Type de robots reconnus
Le type de robot traité ainsi que les caractéristiques géométriques sont indiqués soit au lancement du programme soit dans la fenêtre Robot File. En premier lieu on indique le type de robot par la chaîne -S suivie d'un mot-clé pris dans la liste suivante :- 2d: robot plan avec segments de longueur variable
- 2dgoss: robot plan de type Gosselin.
- left_hand : robot de type Gough general
- proto : type poignet actif
- stewart: plate-forme de Stewart
- poignet : robot parallèle à 3 d.d.l en rotation. Le plateau repose sur une rotule. Les points d'articulations bougent selon une direction verticale et les segments ont une longueur fixe
- poignet_mg: idem que précédemment mais la commande se fait en changeant les longueurs des segments
- lee_special: un cas particulier du robot de Lee avec 3 articulation rotoïde sur la base orienté selon l'axe x puis les deux autres selon l'axe y.
- poignetz: même chose que le robot de Lee mais les segments sont de longueur fixe et les centres des articulations proches de la base se déplace selon l'axe z.
visu_robot -S main_gauche -R inria.car
Description des robots/ Robot description
Ce que doit contenir le fichier en fonction de l'architecture est indiqué dans la partie qui suit.


Fichier de description/ Description files
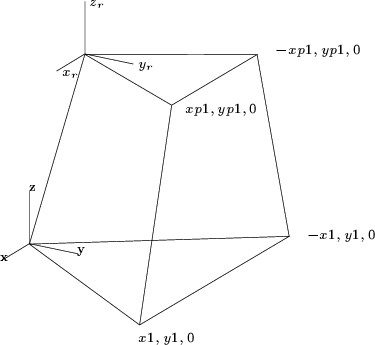
2d
x1 y1
x2 y2
x3 y3
xp1 yp1
xp2 yp2
xp3 yp3
2dgoss
x1 y1 x2 y2 x3 y3 xp1 yp1 xp2 yp2 xp3 yp3l11 l12 l21 l31 l32
left_hand
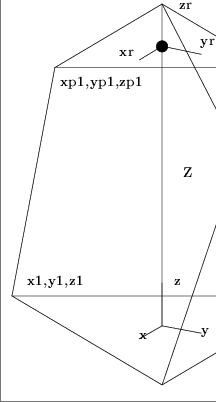
x1 y1 z1
x2 y2 z2
x3 y3 z3
x4 y4 z4
x5 y5 z5
x6 y6 z6
xp1 yp1 zp1
xp2 yp2 zp2
xp3 yp3 zp3
xp4 yp4 zp4
xp5 yp5 zp5
xp6 yp6 zp6
[L1 L2 L3 L4 L5 L6]
[l1 l2 l3 l4 l5 l6]
Les valeurs L, l sont les longueurs maximum et minimum des segments et sont optionnelles.
The values of L,l are the maximum and minimum leg lengths and are optional.
proto
x1 y1 z1
x2 y2 z2
x3 y3 z3
x4 y4 z4
x5 y5 z5
x6 y6 z6
xp1 yp1 zp1
xp2 yp2 zp2
xp3 yp3 zp3
xp4 yp4 zp4
xp5 yp5 zp5
xp6 yp6 zp6
l1 l2 l3 l4 l5 l6
stewart
x1 y1 z11 z21 l1
x2 y2 z12 z22 l2
x3 y3 z13 z23 l3
xp1 yp1 zp1
xp2 yp2 zp2
xp3 yp3 zp3
poignet
x1 y1 z1 xp1 yp1 zp1
x2 y2 z2 xp2 yp2 zp2
x3 y3 z3 xp3 yp3 zp3
Z
l1 l2 l3
poignet_mg
x1 y1 z1 xp1 yp1 zp1
x2 y2 z2 xp2 yp2 zp2
x3 y3 z3 xp3 yp3 zp3
Z
lee_special
x1 y1
xp1 yp1
poignetz
x1 y1 z1 xp1 yp1 zp1
x2 y2 z2 xp2 yp2 zp2
x3 y3 z3 xp3 yp3 zp3
p1 p2 p3 (in degree)
l1 l2 l3
Visualisation
Après avoir chargé un robot l'affichage du robot se fera une fois que l'on aura donné sa position cartésienne dans la fenêtre Position et que l'on aura tapé sur la touche Return.L'écriture du robot dans sa position courante dans un fichier xjpdraw se fait dès que l'on donne le nom d'un fichier dans la fenêtre File et que l'on aura tapé sur la touche Return. Pour obtenir un dessin à partir du fichier obtenu (mettons toto) tapez:
xjpdraw -X 6 -Y 6 -F totoLe chiffre 6 indique ici les dimensions en centimètres de votre dessin. La dimension en X et Y doivent être identique.
Les commandes de modifications de vue
Après le lancement du programme on peut modifier la visualisation du robot en tapant certaine lettre dans le canevas où s'effectue le dessin.- 'l': déplacement du robot à gauche
- 'r':déplacement du robot à droite
- 'u': le centre de la scène bouge vers le haut
- 'd':le centre de la scène bouge vers le bas
- 'Z','z': zoom positif on négatif
- 'V','v': rotation positive ou négative autour de l'axe z
- 'A','a':rotation positive ou négative en azimuth
- 'p': affichage des positions articulaires
Les fichiers de commande
Les fichiers de commande sont un moyen simple de créer automatiquement des dessins de robot. On définit un fichier de commande pour le programme en lancant le robot de la façon suivante :visu_robot -C essai.cmdou
visu_robot -CI essai.cmdCette dernière manière fait que le fichier de commande est exécuté sans qu'il y ait création de la fenêtre visu_robot. Dans la première syntaxe on fera exécuter le fichier de commande en appuyant sur le bouton Execute.
Un fichier de commande commence toujours par la définition d'un robot. Par exemple :
robot "-S main_gauche -R inria.car"Pour le reste la syntaxe des fichiers de commande est identique à celle utilisé pour les fichiers de commandes xjpdraw. On dispose ainsi de variables : elle commence par un % suivie d'un nombre. On peut faire sur ces variables tous les calculs utilisant les opérations mathématiques les plus courantes. On dispose aussi de test , de boucles etc..
La position du robot se fait avec l'ordre pos_data suivie de valeur qui peuvent être des nombres ou des variables. Le nombre de valeur est celui correspondant aux positions cartésiennes.
La sauvegarde dans un fichier xjpdraw se fait par l'instruction save suivi d'un nom de fichier entre ". Le nom peut être indexé par une variable comme dans "toto".%0. Si toto1. L'instruction save_art permet de sauver (après avoir écrit le fichier xjpdraw du robot) la valeur des variables articulaires.
Les instructions face_view, side_view, top_view, perspective_view permettent de modifier le point de vue du robot.
L'instruction close permet de refermer le fichier xjpdraw couramment ouvert alors que new effectue la même chose en invalidant le robot courant.
L'instruction interrupt permet d'interrompre le déroulement du fichier de commande. Le programme demande alors dans la fenêtre où l'on a lancé le programme si l'on continue. Il faut faire très attention que cette fenêtre soit visible.
D'autre part toute ligne entre /* et */ est considéré comme un commentaire.
Exemple/Example
/*-------------------------------
Visualisation d'un robot de type main gauche.
Le robot est visualise dans son deplacement selon l'axe z
en perspective. Apres cela on desine le robot dans sa position courante
en vue de cote et on sauve cette vue dans le fichier xjpdraw "toto"

View of a Gough type robot. The robot will move along the z axis. Then
we draw the side view of the robot and save it in the xjpdraw file
"toto"
-----------------------------*/
robot "-S main_gauche -R inria.car"
%0=40

/* the loop for displaying the robot in a z axis motion */

for %0 from 40; (%0 < 50); step 0.1 bloc
        pos_data 0,0,%0,0,0,0
end_bloc

/* end of the loop */

side_view
save "toto"
quit
Trajectoire
On peut visualiser le robot lors de son mouvement sur une trajectoire en créant un fichier qui contient les positions successives du robot. Il suffit alors de donner le nom du fichier trajectoire dans la fenêtre Trajectory File pour voir s'exécuter la trajectoire.